Advertisement
Package Contents
- DCM-301 Broadband Cable Modem
- Ethernet Cable
- Power Adapter
- Stand
- Quick Install Guide
If any of the above items are missing, please contact your reseller.
System Requirements
Verify that you have these items before beginning the installation:
- A cable-line splitter (not included), if you plan to have the cable modem and a television connected to the same wall cable outlet.
- An active two-way cable line
- Subscription to a cable Internet service provider (ISP)
Introduction
The cable modem enables your network cable operator to provide you with broadband applications such as: telecommunications, IP dedication for your small office/home office (SOHO), or high-speed residential Internet access. The DES data encryption helps ensure privacy for the transmitted information. Another distinctive feature of the cable modem is its easy installation, because DHCP and TFTP clients can obtain automatic access to the IP address and configuration from their network servers via the modem. SNMP agents permit remote configuration and monitoring from a management station equipped with an SNMP server.
 Note: For Internet Access, a subscription to a cable provider is required.
Features
- Full-featured compact, economical cable modem with Ethernet port.
- DOCSIS 3.0 compliant.
- RJ-45 10/100/1000BaseT Ethernet port provides traditional industry standard connection.
- Extensive SNMP management support: MIB-II.
- Ethernet-like MIB, Bridge MIB, Cable Device MIB, Baseline privacy Interface MIB, RF Interface MIB.
- Easy-to-read front panel LED's clearly display network status and activity.
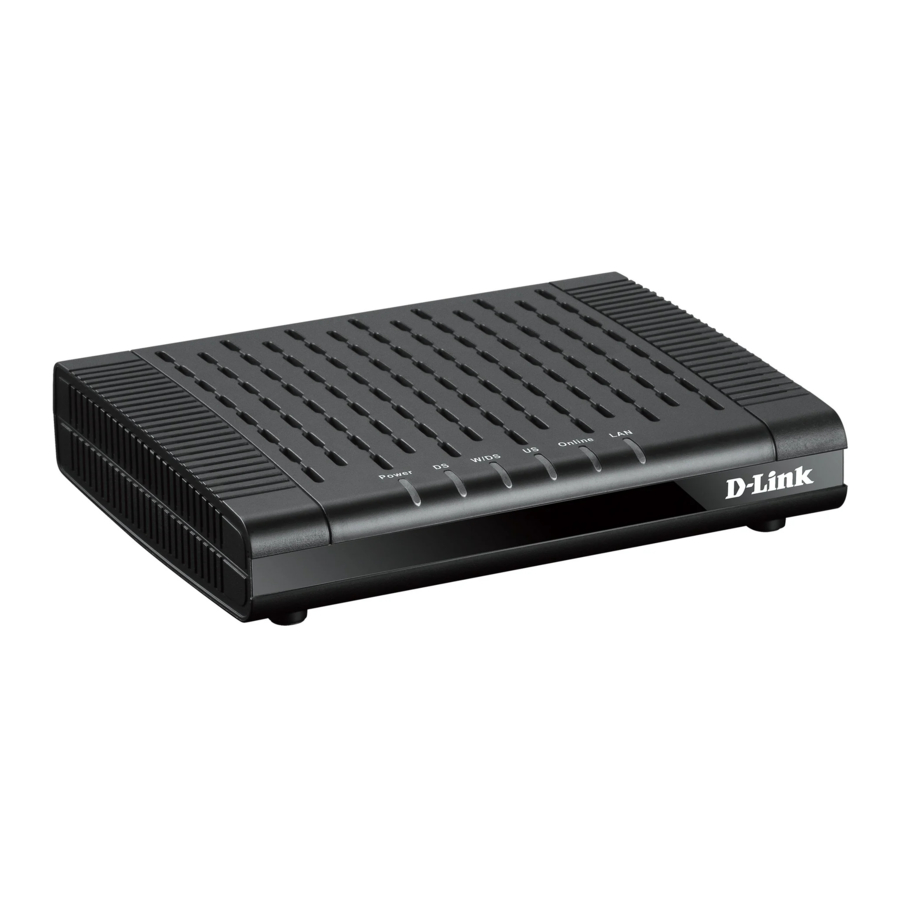
Hardware Overview
Front Panel LEDs
The LEDs on the cable modem indicate:
- The current performance of the cable modem.
- The condition of the network connection between the cable modem and your cable service provider.
- The condition of the connection between your cable modem and electrical power.


| 1 | Power LED | A solid green light indicates a proper connection to the power supply. The light will blink during boot-up. |
| 2 | Downstream (DS) LED | A solid green light indicates a non-bonded (single channel) connection is successfully made. The light will blink while searching for a downstream connection. |
| 3 | W/DS LED | A solid green light indicates a bonded (multi-channel) connection is successfully made. |
| 4 | Upstream (US) LED | A solid green light indicates a successful upstream connection. The light will blink while performing upstream ranging. |
| 5 | Online LED | A solid green light indicates a connectivity to the Internet. |
| 6 | LAN LED | A solid green light indicates connectivity to your router or computer |
Back Panel Connectors

| 7 | Ethernet Port | Connect to the WAN (Internet) port on your router or to an Ethernet port on your computer using an Ethernet cable. |
| 8 | Reset Button | Press and hold the reset button with a paper clip for 10 seconds to reset the router to the factory default settings. |
| 9 | Coaxial Connector | Connect the cable coaxial cable to this connector. If you are sharing this connection with a TV, you must use a coaxial splitter (not included). |
| 10 | Power Port | Connect the supplied power adapter. |
| 11 | Power Button | Press to turn the modem on or off. |
Before You Begin
Local Cable Network Service
Before installing the modem:
- Find the Serial Number, RF and Ethernet address located on a sticker on the cable modem and write them down.
- Contact your local cable service operator for Internet/cable network access. Your local cable operator will check for cable access availability in your area, install a cable line (if necessary), provide you with an access account, set up configuration and verify other technical details.
- Ask your local cable service provider about adding additional IP addresses to your account. Refer to "Which Installation to Use?" for more information.
Prepare Your Workspace
To prepare your workspace:
- Position the cable modem so that it is located near the computer and the wall cable outlet. There should be plenty of room to guide the cables away from the cable modem without crimping them.
Prepare the cable modem:
- For horizontal installation: Place the cable modem on a level surface.
- For vertical installation: Attach the stand to the cable modem and set on a level surface.
- Do not restrict the airflow around the cable modem.
Installation
The D-Link DCM-301 DOCSIS™ 3.0 Cable Modem provides high-speed Internet access to the Internet. You can use your cable modem to directly connect one computer in your network to the Internet or connect to a Broadband router to allow multiple devices to share the Internet.
After you install the cable modem, you must contact your cable provider (ISP) and register the MAC address. The MAC address is located on the label on the bottom of the modem.
Below are two common ways to connect your DCM-301 modem to your network. The diagram on the left shows the connection with a broadband router. The diagram on the right shows the connection directly to a computer. Note that the DCM-301 can be placed horizontal or vertical using the included stand (as seen in the diagrams below).

Connecting the Cable Modem (with Router)
Step 1:
Power off your router.
Step 2:
If you are replacing the modem, disconnect all cables and unplug the power to your old modem.
Step 3:
Connect the coaxial cable from your wall to the cable modem's CATV cable connector. If you plan to have the cable connected to a television as well as the cable modem, you must use a cable line splitter (not included).
Step 4:
Plug the cable modem's power adapter into a wall outlet or surge protector and into the cable modem's power port.
Step 5:
Plug one end of the Ethernet cable into the cable modem's Ethernet port and the other end of the cable into the WAN or Internet port on your router.
Step 6:
In most cases you will have to call your cable company (Internet Provider) and register the MAC address of the D-Link modem. The MAC address is on a label on the bottom of the modem.
Step 7:
When the modem is working properly, the Power, DS, US, Online, and LAN LEDs will all be lit.
Note: Remember to contact your Internet Service Provider (ISP) to register the MAC address of the DCM-301 or you will NOT be able to connect to the Internet.
Connecting the Cable Modem (without Router)
Step 1:
Power off your computer.
Step 2:
If you are replacing the modem, disconnect all cables and unplug the power to your old modem.
Step 3:
Connect the coaxial cable from your wall to the cable modem's CATV cable connector. If you plan to have the cable connected to a television as well as the cable modem, you must use a cable line splitter (not included).
Step 4:
Plug the cable modem's power adapter into a wall outlet or surge protector and into the cable modem's power port.
Step 5:
Plug one end of the Ethernet cable into the cable modem's Ethernet port and the other end of the cable into the Ethernet adapter of your computer.
Step 6:
In most cases you will have to call your cable company (Internet Provider) and register the MAC address of the D-Link modem. The MAC address is on a label on the bottom of the modem.
Step 7:
When the modem is working properly, the Power, DS, US, Online, and LAN LEDs will all be lit.
Note: Remember to contact your Internet Service Provider (ISP) to register the MAC address of the DCM-301 or you will NOT be able to connect to the Internet.
Troubleshooting
- Power LED is not on.
- Verify the power adapter is plugged into a working outlet or power strip and seated in the power port.
- Press the power button on the back of the modem.
- Cannot connect to the Internet.
- You must contact your Internet provider and register the MAC address of the modem (located on the bottom of the modem). If you skip this step you will not be able to connect.
- Verify all cables are connected properly.
- If the LEDs on the modem are indicating that you are connected to the Internet (verified by your Internet provider) and you are connected to a router, you may have to reset and reconfigure your router.
Technical Specifications
Compliant Standard
- DOCSIS 1.0
- DOCSIS 1.1
- DOCSIS 2.0
- DOCSIS 3.0
Interface
- 10/100/1000BASE-T (half/fullduplex, auto-sensing) 1 port
- F type female 75
Receiver:
- Demodulation: 64/256QAM
- Max Speed: 240 Mbps 64QAM/344Mbps(256QAM)
- Frequency Range: 50 to 1002 MHz ±30 kHz (Center)
- Bandwidth: 6MHz
- Signal Level: -15dBmV to +15dBmV
Transmitter:
- Modulation: 64/256QAM TDMA: QPSK, 8QAM, 16QAM, 32QAM, 64QAM S-CDMA: QPSK, 8QAM, 16QAM, 32QAM, 64QAM, 128QAM
- Max Speed: 30 Mbps (TDMA); 160 Mbps (S-CDMA, 64QAM, 4 U/S channel bonding)
- Frequency Range: 5 to 42MHz (edge to edge)
- Bandwidth: 0.2, 0.4, 0.8, 1.6, 3.2MHz TDMA: 200, 400, 800, 1600, 3200 and 6400 kHz S-CDMA: 1600, 3200 and 6400 kHz
- TDMA: +8 to +54 dBmV (32QAM, 64QAM) +8 to +55 dBmV (8QAM, 16QAM) +8 to +58 dBmV (QPSK) S-CDMA:+8 to +53 dBmV (all modulations)
(Output level of CM can be automatically controlled by CMTS through power ranging function), Step: 1dB - Output Return Loss: > 6 dB (5-42 MHz) and (91~857 MHz)
Max. Number of CPEs:
- 32 (32 MAC addresses)
Filtering:
- LLC: 16
- IP: 32
Frequency Search:
- Frequency Cache: 4 entries Frequency
- Channel Plan: 250kHz step
Number of SID: 16
Safety:
- EN60950, UL1950, UL1310 (AC-DC adapter)
EMC:
- EN55022 (Emission), EN55024 (Immunity) FCC Part 15 class B
Power Supply:
- AC-DC Adapter: 12V/1A, 50/60Hz
- Consumption: 12W
OSS:
- Protocol: ICMP/SNMP V1, V2c, V3
- MIB: MIB II / MCNS MIB
Environment:
- Operating temperature: 32°F (0°C) to 104°F (40°C)
- Operating humidity: 10% to 90% (Non condensing)
- Storage temperature: -4°F (-20°C) to 140°F (60°C)
LEDs:
- Power, DS, W/DS, US, Online, LAN
Dimensions (without AC Adapter):
- 159 mm x 133 mm x 32.5 mm (Approximately)
Weight:
- 220g +/- 10g (Approximately)
Contacting Technical Support
D-Link provides free technical support for customers within the United States and within Canada for the duration of the warranty period on this product. U.S. customers can contact D-Link technical support through our website or by phone.
Before you contact technical support, please have the following ready:
- Model number of the product (e.g. DCM-301)
- Hardware Revision (located on the label on the bottom of the modem (e.g. rev E1))
- Serial Number (s/n number located on the label on the bottom of the modem).
You can find software updates and user documentation on the D-Link website as well as frequently asked questions and answers to technical issues.
For customers within the United States:
Phone Support:
(877) 453-5465
Internet Support:
http://support.dlink.com
Registration
Register your product online at http://registration.dlink.com
Documents / Resources
References
Download manual
Here you can download full pdf version of manual, it may contain additional safety instructions, warranty information, FCC rules, etc.
Advertisement


Need help?
Do you have a question about the DCM-301 and is the answer not in the manual?
Questions and answers