Advertisement
SETUP
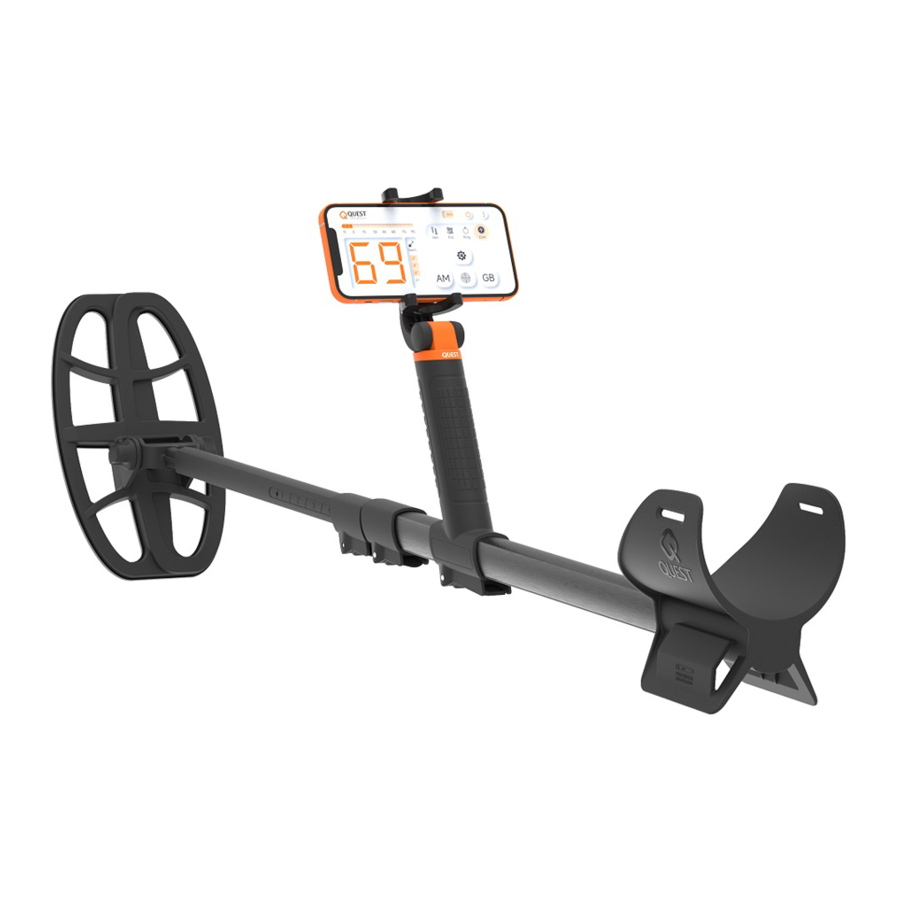
ASSEMBLY

Release the locking lever located at the bottom of the handle. Then, push the handle into the upper rod. Next, press down the locking lever to secure it in place. Insert the armrest to the button of upper rod, use a Phillips screwdriver to tighten it securely.
Insert the middle rod into the upper rod and the lower rod into the middle rod.
HOLDING A PHONE

Pull the clamp of the phone holder to unfold it. You can then twist it for horizontal (recommended) or vertical orientation.
Next, pull the clamp and place your phone securely into the holder.
When the phone is not placed in the holder, the clamp can be folded to seamlessly integrate with the handle. Alternatively, the holder can be easily removed from the handle, and you may install the provided handle cover into the handle hole if you do not want to use the holder.
STORAGE
The Quest Air can be easily flat-folded for more compact storage.
Simply pull out the lower rod, rotate it 90 degrees, and insert the middle rod.


APP & CONNECTION
MOBILE APP INSTALLATION

Search and download "QUEST AIR MD" application from Appstore or Google Play Store.


SMART PHONE CONNECTION
- POWER ON. To activate the coil, simply pull out the lower rod from the middle rod to the place where you can find the magnetic sensor. This action will trigger the magnet, sending a signal to the magnetic sensor to power on. (After the coil is connected with the app, you may adjust the length of the lower rod as needed.)

- Bluetooth & GPS setting. For Android, enable Bluetooth and GPS in settings; for iPhone, enable Bluetooth.
- Launch the Quest AIR MD app.
- Search Quest Air detector in the App. In the Bluetooth device searching list, locate and select "QuestMD-V2.4". If not found, ensure Bluetooth and GPS are enabled, and verify the correct placement of the lower rod. Press "Scan" in the middle of the screen to resume Bluetooth device scanning.

- Wait for the coil to establish a connection. If the coil fails to connect, close the application, turn off Bluetooth (or reboot the Android device), or adjust the lower rod placement, then retry from step #3&4.
To disconnect the coil from the app, simply press the power button located in the upper right corner of the app. Once disconnected, the coil will be deactivated.


INTERFACE & SETTINGS
INTERFACE

- Battery Indication
- Target Type
- Discrimination Mask
- VDI number
- Depth
- Chosen Setting –
- Setting Menu
- Chosen Setting +
- All Metal Mode
- Pinpointing
- Ground Balance
- Quit the App
- App Setting
SETTINGS
SENSITIVITY (1-50)
Sensitivity: The higher the more your detection depth increases.

High sensitivity may result in more false positives and unstable signal quality.
DISCRIMINATION (-90,-80,-70,..., 0,5,10,15,...,90)
Unwanted metals discrimination.
Below zero indicates iron, while above zero indicates non-ferrous metals.
RECOVERY SPEED (0-10)
Increasing the recovery speed improves metal detection in cluttered areas. However, it reduces detection depth and raises the minimum coil swing speed above targets.
TONES (1...4, FAST)
The number of tones corresponds to various metals. In FAST mode, there's the maximum number of tones and maximum speed.
THRESHOLD TONE (0-10)
A permanent background tone aids in discriminating between wanted and unwanted targets. This feature is only available in FAST mode for the "TONES" setting.
HOT ROCKS (0-10)
Suppresses signals from hot rocks. Highly mineralized soils with hot stones can cause false positives with signal strength above 85. Raise the setting until signal strength from hots rocks becomes comfortable to work with. Setting it too high may reduce detection ability for large silver coins.
CHARGING
Before first use, it is recommended that you fully charge the battery for 6 hours.

Use a high-quality mobile phone charger plug to charge the detector. The specific steps are as follows:
Detach the lower rod and unscrew the orange protective cap of the detector.
Insert the larger end of the charging cable into a socket or a computer with a standard plug, or a solar power bank, and insert the smaller end (Type-C) into the metal detector plug.
Charging typically takes between 5 to 6 hours.
Need to check the app for the charging status.
Once fully charged, the battery can operate for approximately 10 hours.
DETECTING
- Swing the coil: Maintain the coil about 4cm above the ground and ensure that swings overlap to cover the area thoroughly.
![]()
- Activate Pinpointer: Upon hearing a distinct tone, press the PINPOINTER button in the app and move the coil in a crisscross manner (XING) to pinpoint the target accurately.
![]()
- Utilize the Pinpointer: Employ a pinpointer to precisely locate the target's position.
![]()
- Digging Process: Use the digging tool to expose the target gradually. Ensure you excavate thin layers of soil to avoid missing any items, periodically checking with the pinpointer for accuracy.
![]()


SPECIFICATIONS
Working frequency: 7.5kHz
Audio Output: Via smartphone
WIRELESS AUDIO: Optional Bluetooth WIREFREE VIBE or PRO HE
Smartphone compatibility: Built-in 4.0 Bluetooth module
Coil: 9x5 inch double D waterproof coil
Battery: Built-in 750mAh Li-Po battery for 10 hours of operation
Charging port: USB-C
Protection: Entire unit IP68, waterproof to 1 meter
Detecting Mode: All Metal or Discrimination
ID range: -90 to 90
Ground Balance: Automatic (pump) or Manual (selecting)
Pinpoint: Yes
Telescopic Rod: Fast release cam-lock 2 sections straight rods extendable from 80CM to 130CM
Armrest: U-shape with kickstand
Weight: Lightweight at 2.5 lbs
Operation Temperature Range: -20 to 50°C
IN THE BOX
Lower Rod with Coil *1
Middle & Upper Rod *1
Arm Rest *1
Handle with Phone Holder *1
Handle Cover *1
Charging Cable *1
Arm Rest Band *1
Manual *1
TROUBLE SHOOTING
-
Cannot find the unit in App
Check Coil: Ensure that the low rod is properly extended. Try retracting and extending the lower rod to the right place again.
Check App: Make sure Bluetooth and GPS settings are enabled.
-
The Audio response is slow
Keep Close: Maintain the phone within 10 meters of the handle/coil for prompt audio feedback, the closer the better.
-
Too Much Noisy Sound
Move Away: Keep distance from electronic devices or power lines.
Balance It: Perform a Ground Balance automatically or manually.
Lower Sensitivity: Turn down the Sensitivity setting.
-
No Sound with Wireless Headphones
Check Headphones: Make sure they are powered on.
Activate Wireless: Ensure the detector's wireless function is enabled and paired with your phone.
Charge Headphones: Make sure they are fully charged.
Volume: Check both the headphone and your smartphone volume settings.
Try Wired: If all else fails, try wired headphones with your phone.
-
Disconnection with App
Check battery status: Check the coil battery status on your phone.
Check coil: Avoid submerging underwater beyond 50cm
Reconnect the coil with the App as per the instruction in "APP & CONNECTION" section.
WARNINGS
READ CAREFULLY BEFORE OPERATION OF THE DEVICE
Comply with applicable laws and regulations governing use of metal detectors while using this detector. Do not use the detector without a uthorization in protected or archeological sites. Do not use this detector around unexploded ordnance or in restricted military zones without authorization. Notify appropriate authorities with details of any historical or culturally significant artifacts you find.
- The Quest Air Metal Detector is a state-of-the-art electronic device.
- Do not assemble or operate the device before reading the user manual.
- To avoid affecting after-sales service, please refrain from disassembling the circuit of the lower rod arbitrarily.
- Do not store the device under extremely low or high temperatures for extended periods. (Storage Temperature: -20°C to 50°C)
- The device has been designed with IP68 rating as a waterproof unit up to 1 meter.
- Pay attention to the items below after using the device especially under salty water:
- Wash the rod and the coil with tap water and be sure no salt water is left in the connectors.
- Do not use any chemicals for cleaning and/or for any other purposes.
- Wipe the rod dry with a soft, non-scratch cloth.
- Protect the detector against impacts during normal use. For shipping, carefully place detector in original carton and secure with shock resistant packaging.
- The Quest Air Metal Detector may only be disassembled and repaired by Quest Authorized Service Centers. Unauthorized disassembly/intrusion into the metal detector control housing for any reason voids the warranty.

- Do not use the device indoors. The device may constantly give target signals indoors where there are many metals present. Use the device outdoors, in open fields.
- Do not let another detector or an electromagnetic device come in close proximity (10m (30ft.)) to the device.
Documents / Resources
References
Download manual
Here you can download full pdf version of manual, it may contain additional safety instructions, warranty information, FCC rules, etc.
Advertisement


Need help?
Do you have a question about the AIR and is the answer not in the manual?
Questions and answers