Advertisement
INTRODUCTION
The CD34 is a burglar alarm system which can detect an (attempted) break-in using connected detectors, magnetic contacts, etc., generating an alarm.
The manual uses symbols to show when you must enter information into the keypad, and when the system emits a beep. Examples of these symbols are shown below:
 | You need to enter information into the keypad. What you have to enter is on the right of the symbol. In this example you should enter your code and then press the Accept key (  ). ). |
 | The buzzer on a key switch or keypad emits a long beep. Short beeps can also be emitted - this is indicated with the text 'Beep Beep'. |
Your system has been programmed with one or two entrance times and one exit time. These are pre-set amounts of time that let you enter and leave the premises through specific routes without activating an alarm. Be sure you know which routes you can use to leave and enter the premises.
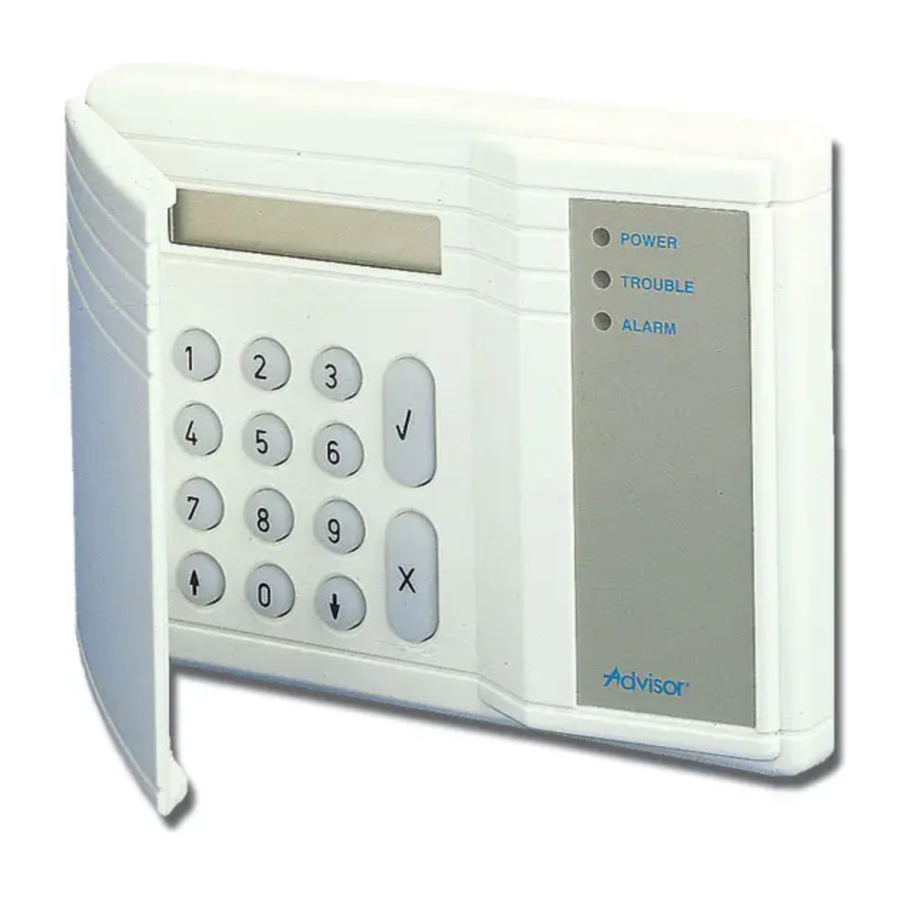
USING THE KEYPAD
This chapter describes the alarm system keypad.
THE KEYPAD

THE CD3008, CD3009, CD3048 & CD3049 KEYPAD
| The keys | |
| 0 - 9 | These keys are used to enter your code. Always begin with zero (0) and then enter your code. After entering the code, you can carry out the operations assigned to it. T he options assigned to a code can be adjusted by the installer or manager. |
 | When you are in an option list, this key can be used to go backwards in the list. During arming you can exclude zones. See Special keys. |
 | This key has several functions. When you are in an option list, you can use it to move forward through the list. The other options are listed under Special keys. |
 | This key is the Accept key. It is used to confirm that the option shown in the display should be implemented. |
| X | This is the Reject key. It is used to indicate that the option shown has not been changed or that you want to exit the option list. |
| Special keys The following key combinations can be programmed by the installer. They may not be active in your system. | |
 | Pressing these keys simultaneously will activate a personnel attack alarm. A report can then be sent over the phone lines to the central station, and the bells and flashing light may be activated. |
 | Press the ' ' key twice to see which zones are still open. All the open zones are displayed or the message 'All Closed' appears. |
 | Press the ' ' key twice to see which zones are inhibited. All the inhibited zones are displayed or the message 'No Inhibits' appears. |
THE DISPLAY
The display is the link between you and the security system. The text messages displayed show where and when faults or alarms have occurred. The display can also show a list of operations from which you can select.
Examples of the messages which can appear include:
 | The date and time are always displayed, regardless if the system is armed or not. You can ask the installer to replace it with another message, if you want. |
 | If you press Accept (  ), you enter an option list. This option list can be used to determine the method used arm the system. ), you enter an option list. This option list can be used to determine the method used arm the system. |
 | The system is being armed. Leave the secured area now. |
 | The system is armed. |
THE LEDS
There are three coloured LEDs (light emiting diodes) on the keypad that let you quickly see if there is a problem.
| Green LED | Power | The mains power is on. If it has not been illuminated for a hour and a power cut is not apparent, contact your installer. |
| Yellow LED | Trouble | If the yellow LED is on, there is a problem in the panel. The type of problem is shown in the display. Contact your installer. Problems that may occur include:
|
| Red LED | Alarm | The alarm is activated. The bells, keypad buzzers and flashing light may also be active. If a dialler is connected, the alarm is reported to the central station. When you enter your code, the system disarms, the bells and the flashing light are switched off, and the central station receives the report that the alarm has been deactivated. The red LED will also illuminate if you disturb an alarm zone during the exit period, and the internal sounder will be activated. |
USING THE SYSTEM
This chapter explains how to switch on and off an alarm system. Depending on how the system has been programmed, you may not need to do all the steps shown in the instructions.
If you enter the wrong code 10 times consecutively, the system is automatically locked for 90 seconds. During this time you cannot access the system.
ARMING A SYSTEM
Before you can arm, that is switch on, the alarm system, all intrusion zones must be secure. If a zone in the premises is 'open,' that is its doors, windows, etc. are not properly closed, you will not be able to set the alarm in that zone, and the message 'Open zones' will appear on the display. It will also show you which zone(s) are open. You must then check that the doors, windows, etc. protected by the zone(s) shown on the display are properly closed.
- Go to the keypad. The current date and time appear on the display. An example is shown.
![]()
- Press the key 0 and then enter your code. A '*' appears in the display for every key you press. Use the 0 key to cancel an incorrect entry and to start a new entry.
![]()
- Press the Accept key.
![]()
- Press the Accept key again.
![]()


If the system cannot be armed because there are zone(s) in the premises which are not properly secured, the message 'Open Zone(s)' will appear and a list of the zone(s) not closed. Press the 0 key to quit and check the doors, windows, etc. of the zone(s) identified.
For information about excluding open zones, refer to the section 'Arming a system which has open zones'
The alarm is being set.

The buzzer begins to beep. You must now exit the protected area by the designated route.

The alarm is now set.

The current date and time automatically appears.

ARMING A SYSTEM WITH OPEN ZONES
When arming (switching on) the system, you may get the message 'Open Zone(s)' along with a list of the zones in the premises that have not yet been closed. You should close these zones and then retry arming the system. However, occasionally you may not be able to close an open zone because, for example, a door lock or magnetic contact may be malfunctioning. You can exclude this open zone from the system (called inhibiting a zone).
Only use this exclusion option when absolutely necessary as any inhibiting of zones will reduce the security level of your system. When the system is disarmed, the message 'Events in Log...' is displayed and the the zones inhibited will be listed.
Although you can exclude an open zone when the tamper alarm has been triggered (identified by the letter 'T' in front of the open zone listed), you will not be able to arm the system until the tamper alarm has been rectified.
- Go to the keypad. The current date and time appear on the display. An example is shown.
![]()
- Press the key 0 and then enter your code. A '*' appears in the display for every key you press. Use the 0 key to cancel an incorrect entry and to restart a new entry.
![]()
- Press the Accept key.
![]()
- Press the Accept key again.
The system begins to arm. If it discovers any zones in the premises that are not properly closed, they will be listed.
In this example, zone 2 'Hall' is open
![]()
- Press
![]() to exclude a zone from the system. One of two messages will then appear. Either the system will tell you that there are no zones already inhibited, or it will show the message 'Zones Inhibited' and then list the inhibited zone(s).
to exclude a zone from the system. One of two messages will then appear. Either the system will tell you that there are no zones already inhibited, or it will show the message 'Zones Inhibited' and then list the inhibited zone(s).
You can then enter the zone numberv you want to inhibit.
![]()
- Press the number of the open zone, in this example '2.'
The system then confirms which zone you have excluded.
If the message 'Inhib. Not Poss' is displayed, you cannot inhibit the zone entered.
If another zone is open, it will be listed and you must again press![]() and the zone number to inhibit it.
and the zone number to inhibit it.
The system will then list all the inhibited zones.
If you want to uninhibit a zone, enter the number of the inhibited zone. The message 'Unihibiting...' appears, followed by the name of the zone. The list of inhibited zones then reappears. If the message 'No Inhibits' appears, there are no inhibited zones.
![]()
![]()


 to exclude a zone from the system. One of two messages will then appear. Either the system will tell you that there are no zones already inhibited, or it will show the message 'Zones Inhibited' and then list the inhibited zone(s).
 and the zone number to inhibit it.

- Press the Accept key to arm the system. The system will arm automatically even if you do not press the accept key.
The alarm is being set.
The buzzer begins to beep. You must now exit the protected area by the designated exit route.
The alarm is now set.
The current date and time will automatically appear.
![]()

DISARMING A SYSTEM
If you enter the premises when the system is armed, the buzzer will begin to beep (if programmed) with an intermittent tone to indicate that the entry period has begun. As long as this beeping continues, you can disarm (switch off) the system with your code without activating an alarm. You must not enter other areas of the system during the beeping. If you do, a siren will sound and a full alarm condition may occur. The entry period (length of time of the beeping) is programmed by the installer.
- Go to the keypad. The entry period starts as soon as you open the entrance door, or when you enter the entry zone. You can switch off the system without activating the alarm as long as the beeping continues.
The current day, date and time are displayed. An example is shown.
![]()
- Press the key 0 and then enter your code. A '*' appears in the display for every key you press. Use the 0 key to cancel an incorrect entry and to restart a new entry.
![]()
- Press the Accept key.
![]()
- Press the Accept key to confirm that you have finished. Steps 3 and 4 may be automated by the system. If so, you will not have to press the Accept key.
![]()


DISARMING A SYSTEM AFTER AN ALARM
The bell and the flashing light are activated when an alarm is triggered in the system. If your system has the option, a report of the event is automatically sent over the phone lines to a central station. If you inadvertently activate an alarm, immediately telephone the central station to prevent an unnecessary response.
When you enter the premises after an alarm, the bell may already be silent.. This allows there to be several alarms. Remember to record the fault or alarm in your logbook for future reference.
- Go to the keypad. The entry period starts as soon as you open the entrance door, or when you enter the entry zone. You can switch off the system without activating the alarm as long as the beeping continues.
The red ALARM LED is lit on the control panel.
![]()
The current day, date and time are displayed. An example is shown. - Press the key 0 and then enter your code. A '*' appears in the display for every key you press. Use the 0 key to cancel an incorrect entry and to restart a new entry.
![]()
- Press the Accept key.
A list of triggered zones will be displayed.
In this example, the alarm was triggered in zone 4 'Back Door' on 23 April at 5.20 am.
![]()
- Press the Accept key to confirm the alarm.
![]()
- Press the Accept key.
![]()


Steps 3 & 5 above may be automated by the system. If so, you will not have to press the Accept key.
RECORD THE FAULT OR ALARM IN YOUR LOGBOOK!
UPLOADING AND DOWNLOADING
The CD34 has the option of controlling, modifying and programming the alarm system remotely by the installer. With the use of a modem messages can be sent from the control panel to a personal computer (PC), called uploading, and from a PC to the control panel, called down loading. Uploading and downloading is therefore a quick and handy aid to easily discovering and solving problems.
A connection can be established in the following ways:
- The installer dials in to your alarm system. The dialler will then accept and check whether the connection can be established. The dialler hangs up and then calls the installer back. This ensures that nobody other that the installer can gain access. When the connection has been established 'OK' appears in the display.
- By entering a up/down (U/D) load code. This is a code which you can enter when the display is showing the time and date. If the code is correct, 'OK' appears in the display and the dialler then calls your installer and establishes a connection.
When the connection has been established 'U/D in Progress' appears in the display. You can no longer control your system from that moment until the time and date reappear in the display.
OVERVIEW OF THE OPTIONS AVAILABLE
The following flowchart provides an overview of all the options available from the CD34 alarm system. It also shows the keypad keys you need to press in order to arrive at the options. The symbols used to represent the keys are as follows:
| Accept | X | Reject | ↓ | Move forward | ↑ | Move backward |
OPTION LIST FOR THE UNIT
There are six main menu options in this system. Depending on how the system has been programmed, your code may not give you access to all of the options. If you want to access more options than you currently are able to, contact your installer.
The menu options let you carry out the following operations:
| Name of menu option | What it lets you do | |
| The sub-options allow you to carry out the following operations: | |
| Set the alarm Set the alarm with zones excluded by the installer Set the alarm with no exit time Set the alarm with all open zones inhibited, except exit/entry zone(s) and access zone(s) Return to previous menu | |
| Exclude zone area(s) | |
|
| |
|
| |
|
| |
| Change own or all other codes | |
| Change the user attributes | |
| Program the number of times code 8 (temporary code) can be used (maximum 99 times) | |
| Detailed list of activations and system operations. This log will be cleared each time the system is armed | |
| Exit the system. Time and date display appears. | |
FLOWCHART OF THE DEVICE USER OPTIONS


Documents / ResourcesDownload manual
Here you can download full pdf version of manual, it may contain additional safety instructions, warranty information, FCC rules, etc.
Advertisement


Need help?
Do you have a question about the Advisor CD 3403 and is the answer not in the manual?
Questions and answers