
Related Manuals for Aritech ADVISOR CD 7203


Summary of Contents for Aritech ADVISOR CD 7203
-
Page 1: User Manual
ADVISOR CD 7203 CD95/15003 User Manual Software from version: V6.0 142360999-2... - Page 2 COPYRIGHT SLC BV 1996. All rights reserved. No part of this publication may be reproduced, transmitted, stored in a retrieval system, or transmitted in any form, or by any means - electronic, photocopying, recording, or otherwise - without the prior written permission of SLC BV. DISCLAIMER SLC BV makes no representations or warranties with respect to the contents hereof and specifically disclaim any implied warranties of merchantability or fitness for any particular...
-
Page 3: Table Of Contents
ONTENTS INTRODUCTION ............................. 4 USING THE KEYPAD..........................5 The CD3008 keypad..........................5 The display ............................6 The LEDs ............................. 6 USING A SINGLE ALARM SYSTEM ...................... 7 Arming a system........................... 7 Arming a system with open zones......................8 Disarming a system ..........................9 Disarming a system after an alarm .................... -
Page 4: Introduction
This manual explains how to use the ARITECH CD72 and CD95 series for every day use. There is a more detailed manual available for managers which explains how to carry out a wider range of operations. -
Page 5: Using The Keypad
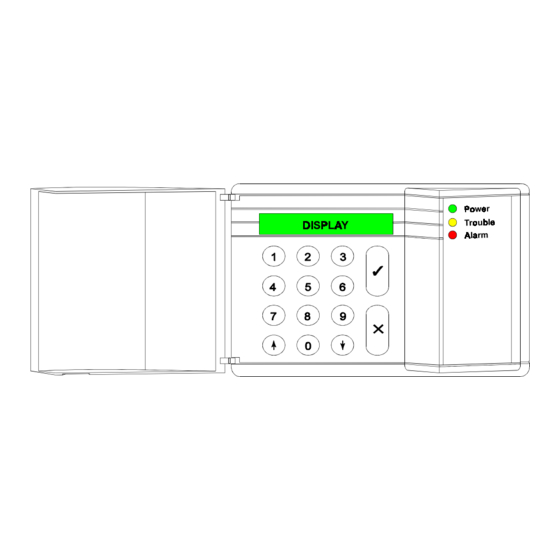
SING THE KEYPAD This chapter describes the alarm system keypad. CD3008 KEYPAD The keys 0 - 9 These keys are used to enter your code. Always begin with zero (0) and then enter your code. After entering the code, you can carry out the operations assigned to it. -
Page 6: The Display
HE DISPLAY The display is the link between you and the security system. The text messages displayed show where and when faults or alarms have occurred. The display can also show a list of operations from which you can select. Examples of the messages which can appear include: The date and time are always displayed, regardless if the system is TUE 23 APR 07.40... -
Page 7: Using A Single Alarm System
SING A SINGLE ALARM SYSTEM This chapter explains how to switch on and off an alarm system for premises with only one alarm system. These instructions also apply to users who only have access to a single alarm system in the premises, although several systems may actually be present. -
Page 8: Arming A System With Open Zones
Beeeep The alarm is now set. System Armed The current date and time automatically appears. TUE 23 APR 07.40 RMING A SYSTEM WITH OPEN ZONES When arming (switching on) the system, you may get the message ‘Open Zone(s)’ along with a list of the zones in the premises that have not yet been closed. -
Page 9: Disarming A System
Press the number of the open zone, in this example ‘2.’ Inhibit Zone 2 The system then confirms which zone you have excluded. 002 Hall If another zone is open, it will be listed and you must Is Inhibited again press " " " " and the zone number to inhibit it. The alarm is being set. -
Page 10: Disarming A System After An Alarm
ISARMING A SYSTEM AFTER AN ALARM The bell and the flashing light are activated when an alarm is triggered in the system. If your system has the option, a report of the event is automatically sent over the phone lines to a central station. If you inadvertently activate an alarm, immediately telephone the central station to prevent an unnecessary response. -
Page 11: Using A Split System
SING A SPLIT SYSTEM When the system was installed it was divided into different security areas. A system that has more than one security area it is called a split system. These different areas were programmed by the installer. Depending on how the system was programmed, your code may give you access to one or more of the security areas. -
Page 12: Arming A Split System
RMING A SPLIT SYSTEM As explained at the beginning of the chapter “Using a split system,” a split system can be programmed to show two different standby message displays, and two different ‘selection’ messages after entering your code. The instructions below use the displays “Time/Date” and “Area [number] armed.” If your code lets you access more than one security area, you can select one of them to arm. -
Page 13: Arming A Split System With Open Zones
Press the Accept key again. ! ! ! ! Normal Set ! ! ! ! Normal Set " Area 2 is arming. If programmed, the buzzer for the area Area 2 Arming will begin. Beeeep You must exit the protected area by the designated exit Leave Now route. - Page 14 0 + code Enter Code **** In this example, areas 1 and 2 are disarmed. Area 1 Disarmed Area 2 disarmed You have a few seconds to enter the number of the area Enter Area No. you want to arm. Enter the area number (in this example it is 1).
-
Page 15: Disarming A Split System
ISARMING A SPLIT SYSTEM If you enter the premises when the system is armed, the buzzer will begin to beep (if programmed) with an intermittent tone to indicate that the entry period has begun. As long as this beeping continues, you can disarm (switch off) the system with your code without activating an alarm. -
Page 16: Disarming A Split System After An Alarm
ISARMING A SPLIT SYSTEM AFTER AN ALARM The bells and the flashing light are activated when an alarm is triggered in the system. If your system has the option, a report of the event is automatically sent over the phone lines to a central station. If you inadvertently activate an alarm, immediately telephone the central station to prevent an unnecessary response. - Page 17 If there are other alarms, they are shown one after another. A summary of the status of the areas appears. If you wish to make more changes, enter the number of the area you want to change. Otherwise the standby message automatically appears. Area 2 Armed Enter Area No.
-
Page 18: Uploading And Downloading In The Cd72 And The Cd95
PLOADING AND DOWNLOADING IN THE CD THE CD The CD72 and CD95 series has the option of controlling, modifying and programming the alarm system remotely by the installer. With the use of a modem messages can be sent from the control panel to a personal computer (PC), called uploading, and from a PC to the control panel, called down loading. -
Page 19: Overview Of The Options Available
VERVIEW OF THE OPTIONS AVAILABLE The following flowchart provides an overview of all the options available from the CD72 and CD95/150 alarm systems. It also shows the keypad keys you need to press in order to arrive at the options. Options listed below in grey are only available for the CD95/150 alarm system. - Page 20 Flowchart of the CD72/95/150 User Options Page 20 User Manual for CD72/95/15003...
-
Page 21: User Manual For Cd72/95/15003 Page
User Manual for CD72/95/15003 Page 21... - Page 22 Page 22 User Manual for CD72/95/15003...
- Page 23 User Manual for CD72/95/15003 Page 23...
- Page 24 Page 24 User Manual for CD72/95/15003...
Need help?
Do you have a question about the ADVISOR CD 7203 and is the answer not in the manual?
Questions and answers