Table of Contents
Advertisement
Advertisement
Table of Contents

Related Manuals for Asus V6-P5G41E


Summary of Contents for Asus V6-P5G41E
- Page 1 V-series P5G41E ASUS PC (Desktop Barebone) User’s Manual...
- Page 2 Product warranty or service will not be extended if: (1) the product is repaired, modified or altered, unless such repair, modification of alteration is authorized in writing by ASUS; or (2) the serial number of the product is defaced or missing.
-
Page 3: Table Of Contents
About.this.guide..................viii System.package.contents................x Chapter.1:.System.introduction 1.1. Welcome!..................1-2 1.2. Front.panel..................1-2 1.2.1 V6-P5G41E front panel ..........1-2 1.2.3 V7-P5G41E front panel ........... 1-3 1.3. Rear.panel..................1-5 Voltage selector ................1-7 1.4. Internal.components..............1-8 1.5... - Page 4 Table of contents Chapter.4:.BIOS.setup 4.1. Managing.and.updating.your.BIOS..........4-2 4.1.1 ASUS Update utility ............4-2 4.1.2 ASUS EZ Flash 2 utility ........... 4-5 4.1.3 ASUS CrashFree BIOS ..........4-6 4.2. BIOS.setup.program..............4-7 4.2.1 BIOS menu screen ............4-8 4.2.2 Menu bar ................. 4-8 4.2.3...
- Page 5 Table of contents 4.6. Boot.menu................... 4-25 4.6.1 Boot Device Priority ............4-25 4.6.2 Boot Settings Configuration .......... 4-26 4.6.3 Security ................. 4-27 4.7. Tools.menu.................. 4-29 4.7.1 ASUS EZ Flash 2 ............4-29 4.7.2 Express Gate ..............4-30 4.8. Exit.menu..................4-31...
-
Page 6: Notices
Canadian Department of Communications. This class B digital apparatus complies with Canadian ICES-003. REACH Complying with the REACH (Registration, Evaluation, Authorisation, and Restriction of Chemicals) regulatory framework, we published the chemical substances in our products at ASUS REACH website at http://green.asus.com/english/REACH.htm. - Page 7 Safety information Electrical safety • To prevent electric shock hazard, disconnect the power cable from the electric outlet before relocating the system. • When adding or removing devices to or from the system, ensure that the power cables for the devices are unplugged before the signal cables are connected. If possible, disconnect all power cables from the existing system before you add a device.
-
Page 8: About.this.guide
About this guide Audience This guide provides general information and installation instructions about the ASUS Vintage V-series P5G41E barebone system. This guide is intended for experienced users and integrators with hardware knowledge of personal computers. How.this.guide.is.organized This guide contains the following parts: Chapter.1:.System.introduction... - Page 9 ASUS.Websites The ASUS websites worldwide provide updated information on ASUS hardware and software products. Refer to the ASUS contact information. Optional.Documentation Your product package may include optional documentation, such as warranty flyers, that may have been added by your dealer. These documents are not...
-
Page 10: System.package.contents
Check your V-series P5G41E system package for the following items. If any of the items is damaged or missing, contact your retailer immediately. Item.description ASUS V-series P5G41E barebone system with • ASUS motherboatd • Power supply unit • ASUS chassis Cable •... - Page 11 Chapter 1 This chapter gives a general description of the ASUS V-series P5G41E. The chapter lists the system features including introduction on the front and rear panel, and internal components.
-
Page 12: Chapter.1:.System.introduction
The ASUS V-series P5G41E is an all-in-one barebone system with a versatile home entertainment feature. The system comes in a stylish casing and powered by the ASUS motherboard that supports the Intel Core™2 Extreme / Core™2 Duo / Core™2 Quad / Pentium ®... -
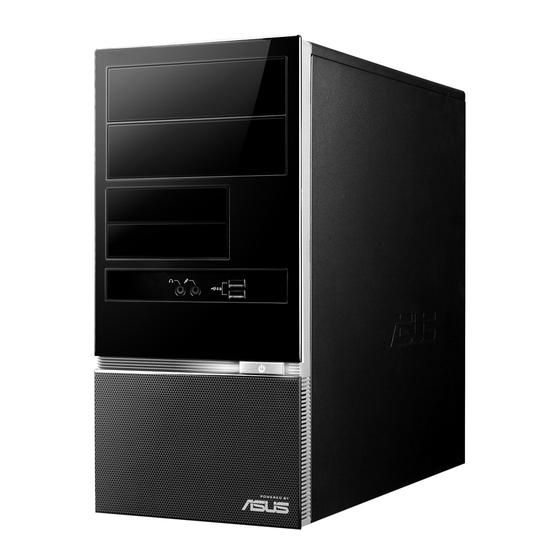
Page 13: V7-P5G41E Front Panel
PDA, and others. Microphone.port. This Mic (pink) port connects a microphone. Headphone.port. This Line Out (lime) port connects a headphone with a stereo mini-plug. Power button. Power.button. Press this button to turn the system on. 1.2.3 V7-P5G41E front panel ASUS V-series P5G41E... - Page 14 Two.empty.5.25-inch.drive.bays. These bays are for 5.25-inch IDE/SATA optical drives. IEEE1394 port. IEEE1394.port..This port provides high-speed connectivity for audio/video devices, storage peripherals, PCs, or portable devices Power.button. Press this button to turn the system on. USB.2.0.ports. These Universal Serial Bus 2.0 (USB 2.0) ports are available for connecting USB 2.0 devices such as a mouse, printer, scanner, camera, PDA, and others.
-
Page 15: Rear.panel
See the section “Voltage selector” on page 1-6 before adjusting this switch. Power.connector. This connector is for the power cable and plug. Power supply unit fan vent. This vent is for the PSU fan that provides ventilation inside the power supply unit. ASUS V-series P5G41E... - Page 16 Power.Switch..This switch is for switching on/off the power supply unit. Chassis fan vent. This vent is for the fan that provides ventilation inside the system chassis. PS/2.mouse.port..This green 6-pin connector is for a PS/2 mouse. PS/2.keyboard.port..This purple 6-pin connector is for a PS/2 keyboard. COM.port..This 9-pin COM1 port is for pointing devices or other serial devices..
-
Page 17: Voltage Selector
If the voltage supply in your area is 200-240 V, set this switch to 230 V. 115V/230V Voltage selector Setting the switch to 115V in a 230V environment or 230V in a 115V environment will seriously damage the system! ASUS V-series P5G41E... -
Page 18: Internal.components
The illustration below is the internal view of the system when you remove the side cover and the power supply unit. The installed components are labeled for your reference. P5G41T-M LX2/GB Front panel cover ASUS motherboard 5.25-inch optical drive bays PCI Express x16 slot 3.5-inch drive bay 10. PCI Express x1 slot Hard disk drive bay 11. -
Page 19: Qualified Vendors Lists (Qvl)
A*: Supports one module inserted in any slot as Single-channel memory configuration. • B*: Supports one pair of modules inserted into both the blue slots as one pair of dual-channel memory configuration. Visit the ASUS website at www.asus.com for the latest QVLs. ASUS V-series P5G41E... - Page 20 1-10 Chapter 1: System introduction...
- Page 21 Chapter 2 This chapter helps you power up the system and install drivers and utilities from the support DVD.
-
Page 22: Chapter.2:.Starting.up
Screen display and driver options may not be the same for different operating system versions. • The contents of the support DVD are subject to change at any time without notice. Visit the ASUS website at www.asus.com for updates. Chapter 2: Starting up... -
Page 23: Running The Support Dvd
If Autorun is NOT enabled in your computer, browse the contents of the support DVD to locate the file ASSETUP.EXE from the BIN folder. Double-click the ASSETUP.EXE to run the DVD. ASUS.InstAll Launches the ASUS InstAll driver installation wizard. PC-cillin.2010 Installs the PC-cillin 2010 to protect your system from the latest threats. Intel.Graphics.Driver Installs the Intel graphics driver. -
Page 24: Utilities Menu
Installs all of the utilities through the Installation Wizard. ASUS.Update. Allows you to download the latest version of the BIOS from the ASUS website. Before using the ASUS Update, make sure that you have an Internet connection so you can connect to the ASUS website. -
Page 25: Asus Contact Information
TV and movies, capturing videos, or playing games in your computer. Visit the Microsoft website (www.microsoft.com) for updates. 2.3.3 ASUS Contact information Click the Contact tab to display the ASUS contact information. You can also find this information on the inside front cover of this user guide. ASUS V-series P5G41E... -
Page 26: Other Information
2.3.5 Other information The icons on the top right corner of the screen give additional information on the motherboard and the contents of the support DVD. Click an icon to display the specified information. Motherboard Info Displays the general specifications of the motherboard. Browse this DVD Displays the support DVD contents in graphical format. - Page 27 Filelist Displays the contents of the support DVD and a brief description of each in text format. ASUS V-series P5G41E...
-
Page 28: Software Information
View the online help or readme file that came with the software for more information. 2.4.1. ASUS.AI.Manager ASUS AI Manager is a utility which gives you quick and easy access to frequently- used applications. Installing.AI.Manager To install AI Manager on your computer: Place the support CD in the optical drive. - Page 29 AI.Manager.quick.bar The AI Manager quick bar saves the desktop space and allows you to launch the ASUS utilities or display system information easily. Click any of the Main, My Favorites, Support or Information tab to display the menu’s contents. Close.button Maximize./.restore.button...
- Page 30 AI Security AI Security enables you to set a password to secure your devices, such as USB flash disks and CD/DVD disks, from unauthorized access. To.lock.a.device: 1. When using AI Security for the first time, you are asked to set a password.
- Page 31 CPU fan speed, and the voltage output. You can adjust the values as you need. Click the Temperature, Voltage, or Fan.Speed.tab, then select an item to enable and change the value by dragging the bar. ASUS V-series P5G41E 2-11...
- Page 32 My.Favorites My.Favorites allows you to add applications that you frequently use, saving you from searching for the applications throughout your computer. To.add.an.application: Click Add, then locate the application you want to add to My.Favorites. Click Open on the file location window. The application is added to My. Favorites.list.
- Page 33 Support Click any links on the Support.window to go to the ASUS website, technical support website, download support website, or contact information. Information Click the tab on the Information window to see the detailed information about your system, motherboard, CPU, BIOS, installed device(s), and memory.
-
Page 34: Asus Express Gate
2.4.2. ASUS.Express.Gate ASUS Express Gate is an instant-on environment that gives you quick access to the Internet. Eight seconds after powering on your computer, you can instantly surf the Internet, use Skype or other Express Gate applications without entering the Windows ®... - Page 35 To enter the motherboard BIOS Setup program, click Exit on the splash screen and then hold down <Del> during POST. • Click in the Express Gate environment for the detailed software instructions. Splash.screen.hot-keys Function <PAUSE/BREAK> Power off Continue to boot OS ASUS V-series P5G41E 2-15...
- Page 36 <Ctrl> + <Alt> + <Print Screen> Save screen snapshot as picture to file When you are using ASUS Express Gate for the first time, launch an application from the splash screen, a first-time wizard will appear and guide you through basic Express Gate configurations including language, date, and time.
- Page 37 Left-click this icon to launch the File.Manager window. Right- click it to eject the removable storage device / USB drive. Exits ASUS Express Gate. Click Yes to enter the operating system you installed on the hard disk drive. Powers off the computer.
- Page 38 • LAN settings If you connect your computer to a home router that is connected to your DSL/ cable modem, enable all the LAN ports. Express Gate automatically uses the connected port. If you plug the network cable into a different port while Express Gate is running (e.g.
- Page 39 JPEG, GIF, BMP, and PNG formats are supported. Refer to the online Help for details. ASUS Express Gate supports SATA devices connected to motherboard.. chipset-controlled.onboard.SATA.ports only. All onboard extended SATA ports and external SATA ports are NOT supported.
- Page 40 Express Gate. Refer to 4.7.2.Express.Gate for details. BIOS SETUP UTILITY Main Advanced Power Boot Tools Exit Press ENTER to run ASUS EZ Flash 2 the utility to select and update BIOS. Express Gate [Auto] This utility supports Enter OS Timer [10 Seconds] 1.FAT 12/16/32 (r/w)
- Page 41 Chapter 3 This chapter gives information about he motherboard that comes with the system. This chapter includes the motherboard layout, jumper settings, and connector locations.
-
Page 42: Chapter.3:.Motherboard Info
Introduction The Vintage V-series P5G41E barebone system comes with an ASUS motherboard. This chapter provides technical information about the motherboard for future upgrades or system reconfiguration. Motherboard layout 19.1cm(7.5in) KBMS KBPWR ATX12V PRI_IDE LGA775 CHA_FAN CPU_FAN USB34 USBPW1-4 LAN1_USB12 Intel ®... -
Page 43: Jumpers
You do not need to clear the RTC when the system hangs due to overclocking. For system failure due to overclocking, use the CPU Parameter Recall (C.P.R.) feature. Shut down and reboot the system, then the BIOS automatically resets parameter settings to default values. ASUS V-series P5G41E... - Page 44 USB device wake-up (3-pin USBPW1-4, USBPW5-8) Set these jumpers to +5V to wake up the computer from S1 sleep mode (CPU stopped, DRAM refreshed, system running in low power mode) using the connected USB devices. Set these jumpers to +5VSB to wake up the compurer from S3 and S4 sleep modes (no power to CPU, DRAM in slow refresh, power supply in reduced power mode).
-
Page 45: Connectors
480 Mbps connection speed. USB56 USB78 PIN 1 PIN 1 P5G41T-M LX2/GB P5G41T-M LX2/GB USB2.0 connectors Never connect a 1394 cable to the USB connectors. Doing so will damage the motherboard! The USB module is purchased separately. ASUS V-series P5G41E... - Page 46 IDE connector (40-1 pin PRI_IDE) The onboard IDE connector is for the Ultra DMA 100/66 signal cable. There are three connectors on each Ultra DMA 100/66 signal cable: blue, black, and gray. Connect the blue connector to the motherboard’s IDE connector, then select one of the following modes to configure your device. Drive.jumper.setting Mode of Cable.connector...
- Page 47 The ATX 12 V Specification 2.0-compliant (400W) PSU has been tested to support the motherboard power requirements. Optical drive audio connector (4-pin CD) These connectors allow you to receive stereo audio input from sound sources such as a CD-ROM, TV tuner, or MPEG card. P5G41T-M LX2/GB P5G41T-M LX2/GB Internal audio connector ASUS V-series P5G41E...
- Page 48 P5G41T-M LX2/GB CPU FAN PWR P5G41T-M LX2/GB fan connectors Only the 4-pin CPU fan connector supports the ASUS Q-Fan feature. Chassis intrusion connector (4-1 pin CHASSIS) This connector is for a chassis-mounted intrusion detection sensor or switch. Connect one end of the chassis intrusion sensor or switch cable to this connector.
- Page 49 By default, this connector is set to HD Audio. If you want to connect a High Definition front panel audio module to this connector, set the Front. Panel.Type item in the BIOS to [HD Audio]. See section “4.4.2 Chipset” for details. ASUS V-series P5G41E...
- Page 50 System panel connector (10-1 pin F_PANEL) This connector supports several chassis-mounted functions. F_PANEL PWR LED PWR BTN PIN 1 P5G41T-M LX2/GB HD LED RESET P5G41T-M LX2/GB System panel connector • System power LED (2-pin PLED) This 2-pin connector is for the system power LED. Connect the chassis power LED cable to this connector. The system power LED lights up when you turn on the system power, and blinks when the system is in sleep mode.
- Page 51 Chapter 4 This chapter tells how to change system settings through the BIOS Setup menus and describes the BIOS parameters.
-
Page 52: Chapter.4:.Bios.setup
Save a copy of the original motherboard BIOS file to a USB flash disk in case you need to restore the BIOS in the future. 4.1.1. ASUS.Update.utility The ASUS Update is a utility that allows you to manage, save, and update the motherboard BIOS in Windows environment. The ASUS Update utility allows you ®... - Page 53 Updating.the.BIOS.through.the.Internet To update the BIOS through the Internet: Launch the ASUS Update utility from the Windows desktop by clicking Start. ® >.Programs.>.ASUS.>.ASUSUpdate.>.ASUSUpdate. The ASUS Update main window appears. Select Update.BIOS from the Select the ASUS FTP site nearest Internet option from the drop-down you to avoid network traffic, or menu, then click Next.
- Page 54 Internet. Always update the utility to avail all its features. Updating the BIOS through a BIOS file To update the BIOS through a BIOS file: Launch the ASUS Update utility from the Windows desktop by clicking Start. ® >.Programs.>.ASUS.>.ASUSUpdate.>.ASUSUpdate. The ASUS Update main window appears.
-
Page 55: Asus Ez Flash 2 Utility
4.1.2. ASUS.EZ.Flash.2.utility The ASUS EZ Flash 2 feature allows you to update the BIOS without having to go through the long process of booting from a floppy disk and using a DOS-based utility. The EZ Flash 2 utility is built-in the BIOS chip so it is accessible by pressing <Alt>... -
Page 56: Asus Crashfree Bios
4.1.3 ASUS CrashFree BIOS The ASUS CrashFree BIOS is an auto recovery tool that allows you to restore the BIOS file when it fails or gets corrupted during the updating process. You can restore a corrupted BIOS file using the motherboard support DVD or a removable device that contains the updated BIOS file. -
Page 57: Bios.setup.program
The BIOS setup screens shown in this section are for reference purposes only, and may not exactly match what you see on your screen. • Visit the ASUS website (www.asus.com) to download the latest BIOS file for this motherboard. ASUS V-series P5G41E... -
Page 58: Bios Menu Screen
4.2.1. BIOS.menu.screen Menu.items Menu.bar Configuration fields General.help BIOS SETUP UTILITY Main Advanced Power Boot Tools Exit Use [ENTER], [TAB] System Time [12:56:38] or [SHIFT-TAB] to System Date [Mon 12/14/2009 select a field. Primary IDE Master :[Not Detected] Use [+] or [-] to Primary IDE Slave :[Not Detected] configure system time. -
Page 59: Menu Items
Press the Up/Down arrow keys or <Page Up> /<Page Down> keys to display the other items on the screen. 4.2.9. General.help At the top right corner of the menu screen is a brief description of the selected item. ASUS V-series P5G41E... -
Page 60: Main.menu
Main menu When you enter the BIOS Setup program, the Main menu screen appears, giving you an overview of the basic system information. Refer to section “4.2.1 BIOS menu screen” for information on the menu screen items and how to navigate through them. Use [ENTER], [TAB] System Time [12:56:38]... -
Page 61: Primary Ide Master/Slave, Sata1~4
When set to [Disabled], the data transfer from and to the device occurs one sector at a time. Configuration options: [Disabled] [Auto] ASUS V-series P5G41E 4-11... -
Page 62: Storage Configuration
PIO.Mode.[Auto] Selects the PIO mode. Configuration options: [Auto] [0] [1] [2] [3] [4] DMA.Mode.[Auto] Selects the DMA mode. Configuration options: [Auto] SMART.Monitoring.[Auto] Sets the Smart Monitoring, Analysis, and Reporting Technology. Configuration options: [Auto] [Disabled] [Enabled] 32Bit Data Transfer [Enabled] Enables or disables 32-bit data transfer. Configuration options: [Disabled] [Enabled] 4.3.4 Storage Configuration... -
Page 63: System Information
: Intel(R) Core(TM)2 Duo CPU @ 2.66GHz Speed : 2666MHz System Memory Installed Size: 1024MB Usable Size : 990MB BIOS Information Displays the auto-detected BIOS information. Processor Displays the auto-detected CPU specification. System.Memory Displays the auto-detected system memory. ASUS V-series P5G41E 4-13... -
Page 64: Advanced.menu
Advanced menu The Advanced menu items allow you to change the settings for the CPU and other system devices. Take caution when changing the settings of the Advanced menu items. Incorrect field values can cause the system to malfunction. BIOS SETUP UTILITY Main Advanced Power... - Page 65 Enables or disables Intel Execute Disable Bit function. This function enhance ® protection of your computer, reducing exposure to viruses and malicious buffer overflow attacks when working with its supporting software and system. Configuration options: [Disabled] [Enabled] ASUS V-series P5G41E 4-15...
-
Page 66: Chipset
The following item appears only when you installed an Intel Pentium 4 or later ® ® CPU that supports the Enhanced Intel SpeedStep Technology (EIST). ® Intel(R) SpeedStep(TM) Technology [Enabled] Allows you to use the Enhanced Intel SpeedStep Technology. When set to ® [Enabled], you can adjust the system power settings in the operating system to use the EIST feature. - Page 67 96MB for playing and storing the decrypted contents. The operation system and other programs cannot use this reserved memory, and Vista Aero (DWM) is disabled. Feature PAVP Lite PAVP Paranoid Compressed video buffer is encrypted HW 128-bit AES decryption Protected memory (96MB reserved during boot) ASUS V-series P5G41E 4-17...
- Page 68 South Bridge Configuration South Bridge chipset Configuration Options Enabled Audio Controller [Enabled] Disabled Front Panel Support Type [HD Audio] Onboard Gigabit LAN [Enabled] Onboard LAN Boot ROM [Disabled] Audio.Controller.[Enabled] Allows you to set the audio controller. Configuration options: [Enabled] [Disabled] The following item does not appear when the Audio.Controller item is set to [Disabled].
-
Page 69: Onboard Devices Configuration
Appears only when the Parallel.Port.Mode item is set to [ECP].or [EPP+ECP]. This item allows you to set the Parallel Port ECP DMA. Configuration options: [DMA0] [DMA1] [DMA3] Parallel Port IRQ [IRQ7] Allows you to select parallel port IRQ. Configuration options: [IRQ5] [IRQ7] ASUS V-series P5G41E 4-19... -
Page 70: Usb Configuration
4.4.4 USB Configuration The items in this menu allows you to change the USB-related features. Select an item then press <Enter> to display the configuration options. USB Configuration Options Options Disabled Module Version - 2.24.3-13.4 Enabled USB Devices Enabled: None USB Functions [Enabled] USB 2.0 Controller [Enabled]... -
Page 71: Pci Pnp
When set to [No], BIOS configures all the devices in the system. When set to [Yes] and if you install a Plug and Play operating system, the operating system configures the Plug and Play devices not required for boot. Configuration options: [No] [Yes] ASUS V-series P5G41E 4-21... -
Page 72: Power.menu
Power menu The Power menu items allow you to change the settings for the Advanced Power Management (APM). Select an item then press <Enter> to display the configuration options. BIOS SETUP UTILITY Main Advanced Power Boot Tools Exit Select the ACPI state used for System Suspend Mode [Auto]... -
Page 73: Apm Configuration
Configuration options: [Disabled] [Space Bar] [Power Key] [Ctrl-Esc] Power.On.By.PS/2.Mouse.[Disabled] Allows you to enable or disable the PS/2 mouse to generate a wake event. This feature requires an ATX power supply that provides at least 1A on the +5VSB lead. Configuration options: [Disabled] [Enabled] ASUS V-series P5G41E 4-23... -
Page 74: Hardware Monitor
4.5.5. Hardware.Monitor Hardware Monitor CPU Temperature CPU Temperature [55.5ºC/131.5ºF] MB Temperature [37ºC/98.5ºF] CPU Fan Speed [2884RPM] Chassis Fan Speed [N/A] VCORE Voltage [ 1.344V] 3.3V Voltage [ 3.280V] 5V Voltage [ 5.145V] 12V Voltage [11.932V] Select Screen Select Item CPU Q-Fan Function [Enabled] Enter Go to Sub-screen CPU Q-Fan Mode... -
Page 75: Boot.menu
Configuration options: [Removable Device] [Hard Exit Drive] [ATAPI CD-ROM] [Disabled] • To select the boot device suring system startup, press <F8> when ASUS Logo appears. • To access Windows OS in Safe Mode, do any of the following: ®... -
Page 76: Boot Settings Configuration
This allows you to enable or disable the full screen logo display feature. Configuration options: [Disabled] [Enabled] Set this item to [Enabled] to use the ASUS MyLogo2™ feature. Add.On.ROM.Display.Mode.[Force.BIOS] Sets the display mode for option ROM. Configuration options: [Force BIOS]... -
Page 77: Security
<Enter> twice. The message “Password Uninstalled” appears. If you forget your BIOS password, you can clear it by erasing the CMOS Real Time Clock (RTC) RAM. See section “4.3 Jumper” for information on how to erase the RTC RAM. ASUS V-series P5G41E 4-27... - Page 78 After you have set a supervisor password, the other items appear to allow you to change other security settings. Security Settings <Enter> to change password. <Enter> again to Supervisor Password : Installed disabled password. User Password : Not Installed Change Supervisor Password User Access Level [Full Access] Change User Password...
-
Page 79: Tools.menu
4.7.1. ASUS.EZ.Flash.2 Allows you to run ASUS EZ Flash 2. When you press <Enter>, a confirmation message appears. Use the left/right arrow key to select between [Yes] or [No], then press <Enter> to confirm your choice. Please see section 4.1.2 for details. -
Page 80: Express Gate
4.7.2. Express.Gate.[Auto] Allows you to enable or disable the ASUS Express Gate feature. The ASUS Express Gate feature is a unique instant-on environment that provides quick access to the Internet browser and Skype. Configuration options: [Disabled] [Enabled] Enter.OS.Timer.[10.Seconds] Allows you to set the countdown duration that the system waits at the Express Gate’s first screen before starting Windows or other installed OS. -
Page 81: Exit.menu
Setup menus. When you select this option or if you press <F5>, a confirmation window appears. Select OK to load default values. Select Exit.&.Save.Changes or make other changes before saving the values to the non-volatile RAM. ASUS V-series P5G41E 4-31... - Page 82 Manufacturer: ASUSTeK Computer Inc. Address: No. 150, LI-DE RD., PEITOU, TAIPEI 112, TAIWAN Authorised.representative.. ASUS Computer GmbH in.Europe: Address: HARKORT STR. 21-23, 40880 RATINGEN, GERMANY 4-32 Chapter 4: BIOS setup...
Need help?
Do you have a question about the V6-P5G41E and is the answer not in the manual?
Questions and answers