Table of Contents
Advertisement
Advertisement
Table of Contents

Related Manuals for Asus V6-P8H61E


Summary of Contents for Asus V6-P8H61E
- Page 1 V-Series P8H61E ASUS PC (Desktop Barebone) User’s Manual...
- Page 2 Product warranty or service will not be extended if: (1) the product is repaired, modified or altered, unless such repair, modification of alteration is authorized in writing by ASUS; or (2) the serial number of the product is defaced or missing.
-
Page 3: Table Of Contents
System package contents ................viii Chapter 1: System introduction Welcome! ..................1-2 Front panel ..................1-2 1.2.1 V6-P8H61E front panel ..........1-2 1.2.2 V7-P8H61E front panel ........... 1-3 Rear panel ..................1-5 Internal components ............... 1-9 Qualified Vendors Lists (QVL) ............1-10... - Page 4 Setup Mode [EZ Mode] ..........4-23 4.6.5 Boot Option Priorities ............ 4-24 4.6.6 Boot Override ..............4-24 Tools menu ................... 4-24 4.7.1 ASUS EZ Flash 2 ............4-24 4.7.2 ASUS SPD Information ..........4-24 Exit menu ..................4-25 ASUS contact information ................. 4-26...
-
Page 5: Notices
Notices ASUS Recycling/Takeback Services ASUS recycling and takeback programs come from our commitment to the highest standards for protecting our environment. We believe in providing solutions for you to be able to responsibly recycle our products, batteries, other components, as well as the packaging materials. -
Page 6: Safety Information
Safety information Electrical safety • To prevent electric shock hazard, disconnect the power cable from the electric outlet before relocating the system. • When adding or removing devices to or from the system, ensure that the power cables for the devices are unplugged before the signal cables are connected. If possible, disconnect all power cables from the existing system before you add a device. -
Page 7: About This Guide
About this guide Audience This guide provides general information and installation instructions about the ASUS Vintage V-Series P8H61E barebone system. This guide is intended for experienced users and integrators with hardware knowledge of personal computers. How this guide is organized... -
Page 8: System Package Contents
Check your V-Series P8H61E system package for the following items. If any of the items is damaged or missing, contact your retailer immediately. Item Description ASUS V-Series P8H61E barebone system with • ASUS motherboatd • Power supply unit • ASUS chassis Cable •... - Page 9 Chapter 1 This chapter gives a general description of the ASUS V-Series P8H61E. The chapter lists the system features including introduction on the front and rear panel, and internal components.
-
Page 10: Chapter 1: System Introduction
The ASUS V-Series P8H61E is an all-in-one barebone system with a versatile home entertainment feature. The system comes in a stylish casing and powered by the ASUS motherboard that supports the Second Generation Intel Core™ i7 / Core™ i5 / Core™ i3 processors in the 1155-land ®... -
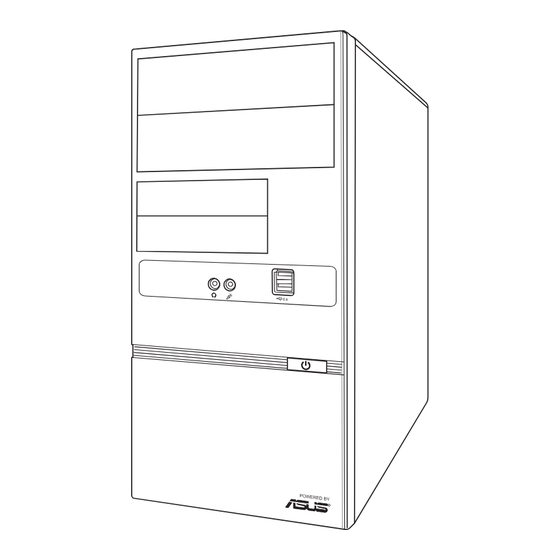
Page 11: V7-P8H61E Front Panel
Power button. Press this button to turn the system on. USB 2.0 ports. These Universal Serial Bus 2.0 (USB 2.0) ports are available for connecting USB 2.0 devices such as a mouse, printer, scanner, camera, PDA, and others. ASUS V-Series P8H61E... - Page 12 Microphone port. This Mic (pink) port connects a microphone. Headphone port. This Line In (lime) port connects a headphone with a stereo mini- plug. CompactFlash® / Microdrive™ card slot Secure Digital™/ Multimedia Card slot MemoryStick® / Memory Stick Pro™ card slot 1.2.3 V9-P8H61E front panel USB 2.0 ports.
-
Page 13: Rear Panel
The system rear panel includes the power connector and several I/O ports that allow convenient connection of devices. Do NOT cover the rear vent , and the ambient temperature is limited up to 35oC to prevent the system from overheating. ASUS V-Series P8H61E... - Page 14 Voltage selector. This switch allows you to adjust the system input voltage according to the voltage supply in your area. See the section Voltage selector on page 1-8 before adjusting this switch. Power connector. This connector is for the power cable and plug. PS/2 keyboard port.
- Page 15 Optical S/PDIF Out port. This port connects an external audio output device via an optical S/PDIF cable. Power Switch. This switch is for switching on/off the power supply unit. Power supply unit fan vent. This vent is for the PSU fan that provides ventilation inside the power supply unit. ASUS V-Series P8H61E...
-
Page 16: Voltage Selector
Voltage selector The PSU has a 115 V/230 V voltage selector switch located beside the power connector. Use this switch to select the appropriate system input voltage according to the voltage supply in your area. If the voltage supply in your area is 100-127 V, set this switch to 115 V. If the voltage supply in your area is 200-240 V, set this switch to 230 V. -
Page 17: Internal Components
Hard disk drive bay PCI slots Power supply unit Metal bracket lock CPU socket DIMM sockets Refer to the bundled Quick Installation Guide for installing additional system components and get assistance from professionals when you disassemble or assemble the system. ASUS V-Series P8H61E... -
Page 18: Qualified Vendors Lists (Qvl)
Qualified Vendors Lists �QVL� DDR3-1333 MHz capability DIMM socket support Chip Vendors Part No. Size Chip No. Timing Voltage �Optional� Brand A-Data AD31333002GOU A-Data AD30908C8D-151C • • E0903 Apacer 78.A1GC6.9L1 APACER • • Apacer 78.A1GC6.9L1 Apacer AM5D5808FEQSBG • • Crucial BL25664BN1337.16FF 7-7-7-24 1.65V... -
Page 19: Dimm Support
B*: two (2) modules inserted into either the blue slots or the black slots as one pair of dual-channel memory configuration. We suggest that you install the modules into slots A2 and B2 for better compatibility. Visit the ASUS website at www.asus.com for the latest QVLs. ASUS V-Series P8H61E 1-11... - Page 20 1-12 Chapter 1: System introduction...
- Page 21 Chapter 2 This chapter helps you power up the system and install drivers and utilities from the support DVD.
-
Page 22: Chapter 2: Starting Up
Screen display and driver options may not be the same for different operating system versions. • The contents of the support DVD are subject to change at any time without notice. Visit the ASUS website at www.asus.com for updates. Chapter 2: Starting up... -
Page 23: Running The Support Dvd
If Autorun is NOT enabled in your computer, browse the contents of the support DVD to locate the file ASSETUP.EXE from the BIN folder. Double-click the ASSETUP.EXE to run the DVD. ASUS InstAll Launches the ASUS InstAll driver installation wizard. Intel Chipset Driver Installs the Intel Chipset driver. Management Engine Interface Installs the Management Engine Interface. -
Page 24: Utilities Menu
Reader that allows you to open, view, and print documents in Portable ® Document Format (PDF). ASUS AI Manager Installs ASUS AI Manager. ASUS AI Suite II Installs the ASUS AI Suite II. Internet Radio Installs the Internet Radio. Chapter 2: Starting up... -
Page 25: Make Disk Menu
The Manual menu contains the list of supplementary user manuals. Click an item to open the folder of the user manual. Most user manuals are in Portable Document Format (PDF). Install the Adobe® Reader from the Utilities menu before opening a user manual. ASUS V-Series P8H61E... -
Page 26: Asus Contact Information
2.3.5 ASUS Contact information Click the Contact tab to display the ASUS contact information. You can also find this information on the inside front cover of this user guide. 2.3.6 Other information The icons on the top right corner of the screen give additional information on the motherboard and the contents of the support DVD. - Page 27 Browse this DVD Displays the support DVD contents in graphical format. Filelist Displays the contents of the support DVD and a brief description of each in text format. ASUS V-Series P8H61E...
-
Page 28: Software Information
View the online help or readme file that came with the software for more information. 2.4.1 AI Suite II ASUS AI Suite II is an all-in-one interface that integrates several ASUS utilities and allows users to launch and operate these utilities simultaneously. Installing AI Suite II To install AI Suite II: Place the support DVD in the optical drive. - Page 29 Select From EPU Installation to show the CO2 that has been reduced since you installed EPU. *• Select From the Last Reset to show the total CO2 that has been reduced since you click the Clear button ASUS V-Series P8H61E...
- Page 30 Probe II Probe II is a utility that monitors the computer’s vital components, and detects and alerts you of any problem with these components. Probe II senses fan rotations, CPU temperature, and system voltages, among others. With this utility, you are assured that your computer is always at a healthy operating condition.
-
Page 31: Sensor Recorder
Drag to view the status during a certain period of time Click to zoom in/out the Y axis Click to zoom in/out the X axis Click to return to the default mode ASUS V-Series P8H61E 2-11... -
Page 32: Cpu Frequency
Monitor The Monitor section includes the Sensor and CPU Frequency panels. Sensor The Sensor panel displays the current value of a system sensor such as fan rotation, CPU displays the current value of a system sensor such as fan rotation, CPU temperature, and voltages. - Page 33 The Update section allows you to update the motherboard BIOS and the BIOS boot logo with the ASUS designed update utilities. ASUS Update The ASUS Update is a utility that allows you to manage, save, and update the motherboard BIOS in Windows OS. The ASUS Update utility allows you to update the BIOS directly pdate the BIOS directly ®...
- Page 34 Updating the BIOS through a BIOS file To update the BIOS through a BIOS file: From the ASUS Update screen, select Update BIOS from file, and then click Next. Locate the BIOS file from the Open window, click Open, and click Next.
-
Page 35: System Information
Click the CPU tab to see the details on • the processor and the Cache. • Click the SPD tab and then select the memory slot to see the details on the memory module installed on the corresponding slot. ASUS V-Series P8H61E 2-15... - Page 36 Settings The Settings section allows you to customize the main menu bar settings and the interface’s skin. • Application allows you to select the application that you want to enable. • Bar allows you to modify the bar setting, • Skin allows you to customize the interface’s contrast, brightness, saturation, hue, and gamma.
-
Page 37: Asus Ai Manager
Place the support CD in the optical drive. If Autorun is enabled, the Drivers installation wizard appears. If Autorun is not enabled in your computer, locate the setup.exe file from the ASUS AI Manager folder in the support CD. Double-click the setup.exe file to start installation. -
Page 38: Ai Manager Quick Bar
AI Manager quick bar The AI Manager quick bar saves the desktop space and allows you to launch the ASUS utilities or display system information easily. Click the Main, My Favorites, Support or Information tab to display the menu’s contents. -
Page 39: Ai Security
Uncheck the checkbox of the selected device, then click Apply. Key in the password you have set previously, then click Ok. The selected device is unlocked. To change password: Click Change Password, then follow the on-screen instructions to change password. ASUS V-Series P8H61E 2-19... -
Page 40: Ai Booting
AI Booting AI Booting allows you to specify the boot device priority sequence. To specify the boot sequence: Select a device, then click on the left/right button to specify the boot sequence. When done, press Apply. My Favorites My Favorites allows you to add applications that you frequently use, saving you from searching for the applications throughout your computer. - Page 41 Support Click any links on the Support window to go to the ASUS website, technical support website, download support website, or contact information. Information Click the tab on the Information window to see the detailed information about your system, motherboard, CPU, BIOS, installed devices, and memory.
- Page 42 2-22 Chapter 2: Starting up...
- Page 43 Chapter 3 This chapter gives information about the motherboard that comes with the system. This chapter includes the motherboard layout, jumper settings, and connector locations.
-
Page 44: Chapter 3: Motherboard Info
Introduction The Vintage V-series P8H61E barebone system comes with an ASUS motherboard. This chapter provides technical information about the motherboard for future upgrades or system reconfiguration. Motherboard layout 22.9cm(9.0in) CPU_FAN KB_USB34 1442 ATX12V 1442 MemOK! DRAM_LED USB3_12 LAN1_USB12 CHA_FAN1 Lithium Cell... -
Page 45: Jumper
You do not need to clear the RTC when the system hangs due to overclocking. For system failure due to overclocking, use the CPU Parameter Recall (C.P.R.) feature. Shut down and reboot the system, then the BIOS automatically resets parameter settings to default values. ASUS V-Series P8H61E... -
Page 46: Connectors
Connectors Intel® H61 Serial ATA 3.0Gb/s connectors �7-pin SATA3G_1~4� These connectors are for the Serial ATA signal cables for Serial ATA 3Gb/s or 6Gb/s hard disk and optical disk drives. SATA3G_2 SATA3G_1 SATA3G_4 SATA3G_3 P8H61-M PRO_DP ® P8H61-M PRO_DP Intel SATA 3.0Gb/s connectors You must install Windows XP Service Pack 3 or later version before using Serial ATA hard... - Page 47 CPU_FAN CHA_FAN1 CHA_FAN2 CHA FAN PWR CHA FAN IN CHA FAN PWM P8H61-M PRO_DP CHA FAN PWM CHA FAN IN CHA FAN PWR P8H61-M PRO_DP fan connectors Only the 4-pin CPU fan supports the ASUS Q-Fan2 feature. ASUS V-Series P8H61E...
- Page 48 Front panel audio connector �10-1 pin AAFP� This connector is for a chassis-mounted front panel audio I/O module that supports either HD Audio or legacy AC’97 audio standard. AAFP PIN 1 PIN 1 P8H61-M PRO_DP HD-audio-compliant Legacy AC’97 pin definition compliant definition P8H61-M PRO_DP Front panel audio connector •...
- Page 49 The system may become unstable or may not boot up if the power is inadequate. • f you are uncertain about the minimum power supply requirement for your system, refer to the Recommended Power Supply Wattage Calculator at http://support.asus. com/PowerSupplyCalculator/PSCalculator.aspx?SLanguage=en-us for details. ASUS V-Series P8H61E...
- Page 50 System panel connector �20-8 pin PANEL� This connector supports several chassis-mounted functions. PLED SPEAKER PANEL PIN 1 P8H61-M PRO_DP IDE_LED PWRSW RESET * Requires an ATX power supply P8H61-M PRO_DP System panel connector • System power LED �2-pin PLED� This 2-pin connector is for the system power LED. Connect the chassis power LED cable to this connector.
- Page 51 LPT connector �26-1 pin LPT� The LPT (Line Printing Terminal) connector supports devices such as a printer. LPT standardizes as IEEE 1284, which is the parallel port interface on IBM PC-compatible computers. P8H61-M PRO_DP P8H61-M PRO_DP Parallel Port Connector ASUS V-Series P8H61E...
- Page 52 TPM connector �20-1 pin TPM� This connector supports a Trusted Platform Module (TPM) system, which can securely store keys, digital certificates, passwords, and data. A TPM system also helps enhance network security, protects digital identities, and ensures platform integrity. PIN 1 C_PCICLK_TPM S_SMBCLIK_MAIN F_FRAME#...
-
Page 53: Memok! Switch
BIOS default settings. A message will appear during POST reminding you that the BIOS has been restored to its default settings. • We recommend that you download and update to the latest BIOS version from the ASUS website at www.asus.com after using the MemOK! function. 3-11 ASUS V-Series P8H61E... -
Page 54: Dram Led
DRAM LED DRAM LED checks the DRAM in sequence during motherboard booting process. If an error is found , the LED next to the error device will continue lighting until the problem is solved. This user-friendly design provides an intuitional way to locate the root problem within a second. DRAM LED P8H61-M PRO_DP P8H61-M PRO_DP DRAM LED... - Page 55 Chapter 4 This chapter tells how to change system settings through the BIOS Setup menus and describes the BIOS parameters.
-
Page 56: Chapter 4: Bios Setup
Save a copy of the original motherboard BIOS file to a USB flash disk in case you need to restore the BIOS in the future. Copy the original motherboard BIOS using the ASUS Update utility. • Download the latest BIOS file from the ASUS website at www.asus.com Chapter 4: BIOS setup... -
Page 57: Asus Update Utility
Updating the BIOS To update the BIOS: From the Windows® desktop, click Start > Programs > ASUS > AI Suite II > AI Suite II X.XX.XX to launch the AI Suite II utility. The AI Suite II Quick Bar appears. -
Page 58: Asus Ez Flash 2
4.1.2 ASUS EZ Flash 2 The ASUS EZ Flash 2 feature allows you to update the BIOS without using an OS-based utility. Before you start using this utility, download the latest BIOS file from the ASUS website at www.asus.com To update the BIOS using EZ Flash 2: Insert the USB flash disk that contains the latest BIOS file to the USB port. -
Page 59: Asus Crashfree Bios 3
4.1.3 ASUS CrashFree BIOS 3 The ASUS CrashFree BIOS 3 is an auto recovery tool that allows you to restore the BIOS file when it fails or gets corrupted during the updating process. You can restore a corrupted BIOS file using the motherboard support DVD or a USB flash drive that contains the updated BIOS file. -
Page 60: Asus Bios Updater
4.1.4 ASUS BIOS Updater The ASUS BIOS Updater allows you to update BIOS in DOS environment. This utility also allows you to copy the current BIOS file that you can use as a backup when the BIOS fails or gets corrupted during the updating process. - Page 61 When BIOS backup is done, press any key to return to the DOS prompt. ASUSTek BIOS Updater for DOS V1.07 Current ROM Update ROM BOARD: BOARD: Unknown V-P8H61E VER: VER: Unknown 0208 Unknown DATE: 10/19/2010 DATE: PATH: BIOS backup is done! Press any key to continue. Note Saving BIOS: ASUS V-Series P8H61E...
- Page 62 Updating the BIOS file 1. At the FreeDOS prompt, type bupdater /pc /g and press <Enter>. D:\>bupdater /pc /g 2. The BIOS Updater screen appears as below. ASUSTek BIOS Updater for DOS V1.07 Current ROM Update ROM BOARD: BOARD: Unknown V-P8H61E VER: VER:...
-
Page 63: Bios Setup Program
BIOS menu screen The BIOS setup program can be used under two modes: EZ Mode and Advanced Mode. You can change modes from the Exit menu or from the Exit/Advanced Mode button in the EZ Mode/Advanced Mode screen. ASUS V-Series P8H61E... - Page 64 Default(F5) Loads optimized default Selects the boot device priority Power Saving mode Normal mode ASUS Optimal mode Displays the system properties of the selected mode on the right hand side Selects the boot device priority • The boot device options vary depending on the devices you installed to the system.
-
Page 65: Advanced Mode
The Advanced Mode provides advanced options for experienced end-users to configure the BIOS settings. The figure below shows an example of the Advanced Mode. Refer to the following sections for the detailed configurations. To access the EZ Mode, click Exit, then select ASUS EZ Mode. Back button Menu bar... -
Page 66: Menu Items
Menu items The highlighted item on the menu bar displays the specific items for that menu. For example, selecting Main shows the Main menu items. The other items (Ai Tweaker, Advanced, Monitor, Boot, Tool, and Exit) on the menu bar have their respective menu items. -
Page 67: Main Menu
RAM to clear the BIOS password. See section 3.3 Jumper for information on how to erase the RTC RAM. • The Administrator or User Password items on top of the screen show the default Not Installed. After you set a password, these items show Installed. ASUS V-Series P8H61E 4-13... -
Page 68: Administrator Password
Administrator Password If you have set an administrator password, we recommend that you enter the administrator password for accessing the system. Otherwise, you might be able to see or change only selected fields in the BIOS setup program. To set an administrator password: Select the Administrator Password item and press <Enter>. -
Page 69: Advanced Menu
<-> keys or the numeric keypad to adjust the ratio. The valid value ranges vary according to your CPU model. Intel Adaptive Thermal Monitor [Enabled] [Enabled] Enables the overheated CPU to throttle its clock speed to cool down. [Disabled] Disables the CPU thermal monitor function. ASUS V-Series P8H61E 4-15... -
Page 70: System Agent Configuration
Active Processor Cores [All] Allows you to choose the number of CPU cores to activate in each processor package. Configuration options: [All] [1] [2] [3] Limit CPUID Maximum [Disabled] [Enabled] Allows legacy operating systems to boot even without support for CPUs with extended CPUID functions. -
Page 71: Pch Configuration
POST. Configuration options: [Enabled] [Disabled] Configuration options: [Enabled] [Disabled] SATA3G_1~ SATA3G_4 [Disabled] SATA ports hot plug support ASUS V-Series P8H61E 4-17... -
Page 72: Usb Configuration
4.4.5 USB Configuration The items in this menu allow you to change the USB-related features. The USB Devices item shows the auto-detected values. If no USB device is detected, the item shows None. Legacy USB Support [Enabled] [Enabled] Enables the support for USB devices. [Disabled] The USB devices can be used only for the BIOS setup program. - Page 73 The following item appears only when the Asmedia USB 3.0 Controller item is set to [Enabled]. Asmedia USB 3.0 Battery Charging Support [Disabled] [Enabled] Enables the Asmedia USB 3.0 battery charging function. [Disabled] Disables this function ASUS V-Series P8H61E 4-19...
-
Page 74: Apm
4.4.7 Restore AC Power Loss [Power Off] [Power On] The system goes into on state after an AC power loss. [Power Off] The system goes into off state after an AC power loss. [Last State] The system goes into either off or on state, whatever the system state was before the AC power loss. -
Page 75: Monitor Menu
(RPM). If the fan is not connected to the fan speeds in rotations per minute (RPM). If the fan is not connected to the motherboard, the field shows N/A. Select Ignore if you do not wish to display the detected speed. ASUS V-Series P8H61E 4-21... -
Page 76: Cpu Q-Fan Control [Enabled]
4.5.3 CPU Q-Fan Control [Enabled] [Disabled] Disables the CPU Q-Fan control feature. [Enabled] Enables the CPU Q-Fan control feature. 4.5.4 Chassis Q-Fan Control [Enabled] [Disabled] Disables the Chassis Q-Fan control feature. [Enabled] Enables the Chassis Q-Fan control feature. 4.5.5 CPU Voltage, 3.3V Voltage, 5V Voltage, 12V Voltage The onboard hardware monitor automatically detects the voltage output through the onboard voltage regulators. -
Page 77: Boot Menu
[Enabled] Enables the full screen logo display feature. [Disabled] Disables the full screen logo display feature. Set this item to [Enabled] to use the ASUS MyLogo 2™ feature. 4.6.3 Option ROM Messages [Force BIOS] [Force BIOS] The third-party ROM messages will be forced to display during the boot sequence. -
Page 78: Boot Option Priorities
> ASUS SPD Information 4.7.1 ASUS EZ Flash 2 Allows you to run ASUS EZ Flash 2. When you press <Enter>, a confirmation message appears. Use the left/right arrow key to select between [Yes] or [No], then press <Enter> to confirm your choice. -
Page 79: Exit Menu
Load Optimized Defaults Save Changes & Reset Discard Changes & Exit ASUS EZ Mode Launch EFI Shell from filesystem device Load Optimized Defaults This option allows you to load the default values for each of the parameters on the Setup menus. -
Page 80: Asus Contact Information
+1-510-739-3777 +1-510-608-4555 Web site usa.asus.com Technical Support Telephone +1-812-282-2787 Support fax +1-812-284-0883 Online support support.asus.com ASUS COMPUTER GmbH �Germany and Austria� Address Harkort Str. 21-23, D-40880 Ratingen, Germany +49-2102-959911 Web site www.asus.de Online contact www.asus.de/sales Technical Support Telephone (Component) +49-1805-010923*...
Need help?
Do you have a question about the V6-P8H61E and is the answer not in the manual?
Questions and answers