Asus V6 Series Installation Manual
Desktop barebone
Hide thumbs
Also See for V6 Series:
- Installation manual (56 pages) ,
- Installation manual (80 pages) ,
- Installation manual (130 pages)

Related Manuals for Asus V6 Series


Summary of Contents for Asus V6 Series
- Page 1 A6358 V6-Series V7-Series V9-Series ASUS PC (Desktop Barebone) Installation manual A6358_V_�eries_Q�G_V2.indb 1 1�26�11 1:36:41 P�...
-
Page 2: Front Panel Features
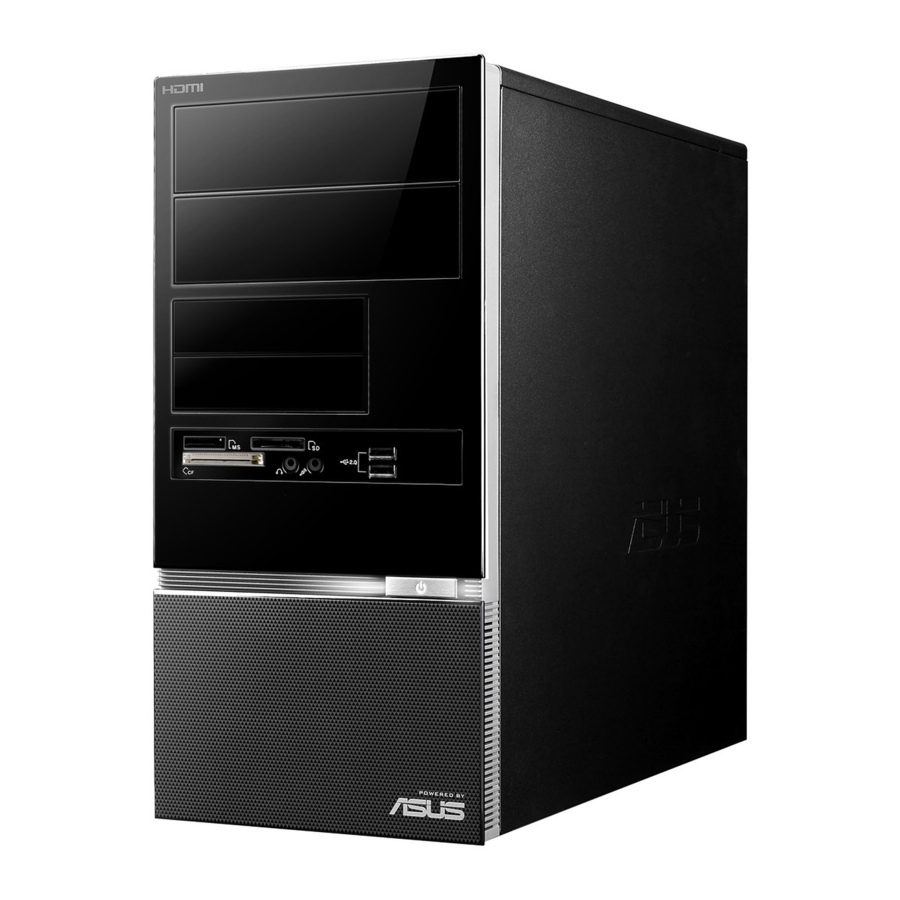
Front panel features 1� V6 Series Front Panel V7 Series Front Panel V9 Series Front Panel 5.25-inch drive bay cover 3.5-inch drive bay cover �ead�hone �ort �ead�hone �ort �icro�hone �ort �icro�hone �ort ���� 2.������ 3.� �orts �2 or 4 ���� �orts vary �ith models�... -
Page 3: Rear Panel Features
Rear panel features NOTE: The rear �anel �orts and their locations may vary, de�ending on the model of your system. For detailed descri�tions, refer to the system �ser Guide. P��2 keyboard �ort � � P��2 mouse �ort � � VGA �ort � �... -
Page 4: Internal Components
Internal components Front �anel cover Po�er su��ly unit 5.25-inch o�tical drive bays Chassis fan slot 2.5-inch �ortable hard disk drive bay A��� motherboard* �o�tional� Ex�ansion slot metal brackets �ard disk drive bay 3.5-inch hard disk drive holder �o�tional� NOTE: *Refer to the system �ser Guide for motherboard details. Installation manual A6358_V_�eries_Q�G_V2.indb 4 1�26�11 1:36:51 P�... -
Page 5: Selecting The Voltage
Selecting the voltage The system’s �o�er su��ly unit has a 115 V�23� V voltage selector s�itch located beside the �o�er connector. �se this s�itch to select the a��ro�riate system in�ut voltage according to the voltage su��ly in your area. If the voltage su��ly in your area is 1��-127 V, set the s�itch to 115 V. -
Page 6: Installing A Cpu
Installing a CPU Installing an Intel CPU in the LGA775 package ® Locate the CP� socket on the motherboard. Press the load lever �ith your thumb Retention tab �A�, then move it to the left ���� until it is released from the retention tab. CAUTION! To �revent damage to ��... - Page 7 Installing an Intel CPU in the LGA1156 package ® Locate the CP� socket on the motherboard. Press the load lever �ith your thumb �A�, Load lever and then move it to the right ���� until it is released from the retention tab. To �revent damage to the socket �ins, do not remove the PnP ca�...
- Page 8 A��ly some Thermal Interface �aterial to the ex�osed area of the CP� that the heatsink �ill be in contact �ith, ensuring that it is s�read in an even thin layer. �ome heatsinks come �ith �re-a��lied thermal �aste. If so, ski� this ste�. The Thermal Interface �aterial is toxic and inedible.
-
Page 9: Installing The Cpu Fan And Heatsink Assembly
Installing an AMD CPU Locate the CP� socket, then lift the socket lever to a 9�º angle. Install the CP� to the socket, making sure that the CP� corner �ith the gold triangle matches the socket corner �ith a small triangle. Push do�n the socket lever to secure the CP�. - Page 10 Installing an AMD CPU heatsink and fan Place the heatsink on to� of the installed CP�. IMPORTANT. Make sure that the fan and heatsink assembly perfectly fits the retention mechanism module base; other�ise you can not lock the retention bracket. Attach one end of the retention bracket to the retention module base. Attach the other end of the retention bracket �near the retention bracket lock�...
-
Page 11: Installing A Dimm
Installing a DIMM Locate the DI�� sockets in the motherboard. �nlock a DI�� socket by �ressing the retaining cli�s out�ard. Align a DI�� on the socket such that the notch on the DI�� matches the break on the socket. Push the DI�� to the socket until the retaining cli�s sna� in�ard. CAUTION: •... -
Page 12: Installing Storage Drives
Installing storage drives Optical drive Place the chassis u�right, then remove the u��er 5.25” drive bay metal �late cover. Insert the o�tical drive to the bay, then carefully �ush the drive until its scre� holes align �ith the holes on the bay. �ecure the o�tical drive �ith t�o scre�s on both sides of the bay. -
Page 13: Reinstalling The Front Panel Assembly And Side Cover
�ecure the hard disk drive �ith t�o scre�s on both sides of the bay. Re�lace the hard drive holder to the chassis and secure the scre�s. For �ATA �DD: Connect the �ATA signal and �o�er �lugs to the SATA connectors at the back of the drive. For IDE �DD: Connect the IDE and �o�er �lugs to the connectors at the back of the drive. - Page 14 J6358 V6-Series V7-Series V9-Series ASUS PC ( デス ク ト ッ プ ベアボー ン) セッ トアップガイ ド A6358_V_�eries_Q�G_V2.indb 14 1�26�11 1:37:23 P�...
- Page 15 フロントパネル 1� V6 Series フロントパネル V7 Series フロントパネル V9 Series フロントパネル 5.25インチドライブベイカバー 3.5インチドライブベイカバー ヘッドホンジャック マイクジャック ���� 2.������ 3.� �ート ����������������� ���� 2.������ 3.� �ート ����������������� 電源ボタン カードリーダーLED CompactFlash �Microdrive™ カードスロッ ト ® �ecure Digital™�Multimedia カードスロッ ト 1�. Memory�tick � Memory �tick Pro™ カードスロッ ト ™ カードスロッ ト カードスロッ ト...
- Page 16 バックパネル機能 注意 : バックパネ����の�ートと、 その位置� システムの������異な��す。 詳細�つき� して�ユーザーマニュア�をご参照ください。 P��2 キーボード�ート ( ) P��2 マウス�ート ( ) VGA �ート ( ���� 2.������ 3.� �ート ( ) � ������ �ート数�異な��す。 � 次の�ートのどれか : • 光学 ��PDIF 出力�ート ( • コアキシャ���PDIF 出力�ート ( IEEE 1394a �ート ( ) �特定���のみ� LAN (RJ-45) �ート ( 次の�ートのどれか : • e�ATA �ート ( • �erial (COM1) �ート ( • DVI �ート ( • HDMI �ート ( 次のオー�ィオ�ート設定のどれか : •...
- Page 17 内部コンポーネント フロントパネ�カバー 電源ユニッ ト 5.25 インチ 光学ドライブベイ ケースファンスロッ ト 2.5インチ�ータブ�ハード�ィスク A��� マザーボード* ドライブベイ �オプション� 拡張スロッ トメタ�ブラケッ ト ハード�ィスクドライブベイ 3.5インチハード�ィスクドライブ ホ�ダー �オプション� 注意 : *マザーボードの詳細�つき�して�、 ユーザーマニュア�をご参照ください。 セッ トアップガイド A6358_V_�eries_Q�G_V2.indb 17 1�26�11 1:37:32 P�...
- Page 18 電圧セレクター システム電源の電源コネクターの側��、 115 V�23� V 電圧セレクタースイッチが付 いてい�す。 お住�いのエリアの電圧�応じ て、 適切な電圧を選択してください。 供給電圧が 1��-127 V の場合、 スイッチを 115 V �し�す。 供給電圧が 2��-24� V の場合、 スイッチを 23� V �し�す。 注意 : 電圧セレクターの位置�ついて�、 ユーザーマニュア�をご参照ください。 サイドカバーとフロントパネルの取り外し バックパネ�のネジを外し�す。 サイドカバーをバックパネ�の方へ、 ケースの穴から留め具が外れる�でスライ ドし、 サイドカバーを取�外し�す。 フロントパネ�の留め具を、 ケースから外れる�で持ち上げ�す。 フロントパネ�を、 ヒンジの�うなタブが見える�で下の図を参照�動かし�す。 フロントパネ�を取�外し�す。 通気孔 ケースの穴 セッ トアップガイド A6358_V_�eries_Q�G_V2.indb 18 1�26�11 1:37:34 P�...
- Page 19 CPUを取り付ける Intel LGA775 に取り付ける ® CPUを マザーボードの CP� ソケッ トの位置を確認し�す。 親指でロードレバーを押し �A� 、 タブか タブ ら外れる�で外側�動かし�す ���� 。 注意 : ソケッ トピンの損傷防止の� め、 ソケッ トキャップ�CP�を �� 取�付ける�で外さないでく ださい。 ロードレバー ロードレバーを矢印の方向 �135º の角度� へ持ち ソケッ ト キャップ 上げ�す。 ロードプレート ロードプレートを、 親指と人差し指で1��ºの方向 4�� へ持ち上げ、 ロードプレートウィンドウ�あるソケ ッ...
- Page 20 Intel CPUを LGA1156 に取り付ける ® マザーボー ドの CP� ソケッ トの位置を確認し�す 。 ロードレバー 親指でロードレバーを押し �A� 、 タブから 外れる�で外側�動かし�す ���� 。 注意 : ソケッ トピンの損傷防止の�め、 ソケ ッ トキャップ�CP�を取�付ける�で タブ 外さないでください。 矢印の方向�ロードプレートを完全�持ち上 げ�す。 ロードプレート タブだけを上�上げ、 CP�ソケッ トか らソケッ トキャップを取�外し�す。 ソケッ ト キャップ キャップタブ CP��書かれている金色の三角形がソケッ トの左下隅�なる�う�CP�をソケッ トの上 ��せ�す。...
- Page 21 ヒートシンクを取�付ける�め、 サーマ�� ヒートシンクを取�付ける�め、 サーマ�� リス �放熱�リス� をCP�の表面�薄く均一 �塗布し�す。 ヒートシンク��って�既�サーマ��リ スが塗布されてい�す。 その場合�この 手順�行わず、 次の手順�進んでくださ い。 サーマ��リス�有毒物質を含んでい� す。 万一目�入っ�場合や、 肌�直接触れ �場合�洗浄後、 すぐ�医師の診断を受 けてください。 ロードプレート �A� を閉じ、 ロードレバー ���� を押し下げ、 ロードプレートがノブ �C� �収�る�う、 所定の位置�で戻し �す。 ロードレバーがタブ�収�る�で押し入 れ�す。 セッ トアップガイド A6358_V_�eries_Q�G_V2.indb 21 1�26�11 1:37:38 P�...
- Page 22 AMD CPUを取り付ける 1. CP� ソケッ トのレバーを 9�º �持ち上げ�す。 CP��書かれている金色の三角形がソケッ トの左下隅�なる�う�CP�をソケッ トの 上��せ�す。 このとき、 ソケッ トの位置合わせキー�、 CP�の溝�ぴっ��合わせる 必要があ��す。 3. CP�がしっか�と��る�う、 ソケッ トレバーを押し下げ�す。 注意 : CP� �一方向�のみぴっ��合う�う�なってい�す。 CP� をソケッ ト�無理�押し 込�ないでください。 ソケッ トのコネクターが曲がる、 あるい�CP� が破損する等の 原因とな��す。 CPUにヒートシンクとファンを取り付ける Intel CPUヒートシンクとファンを取り付ける ® �� 4つのファスナーがマザーボードの穴の位置 と合っていることを確認しながら、 ヒートシン クをCP�の上�置き�す。 �� 対角線上�ある2つのファ スナーを同時�押し 下げ、...
- Page 23 AMD CPU ヒートシンクとファンを取り付ける 1. ヒートシンクを設置され�CP�の上�置き�す。 重要 : ファンとヒートシンクがメカニカ��ジュー�ベース�完全���っていることを 確認してください。 完全���っていないと、 リテンションブラケッ トがロックでき� せん。 ブラケッ トの端を、 ベース�合わせ�す。 ブラケッ トのもう一方の端 �ブラケッ トロックの側�ある� を、 �ジュー�ベース� カチッと音がする�で合わせ�す。 注意 : �� OX版のCP�ヒートシンク��取�付け方法を記�し�説明書等が付属してい�す。 本書と内容が異なる場合�、 付属の説明書等の指示�従ってください。 ブラケッ トロックを押し下げ、 ヒートシンクとファンをベース�固定し�す。 CP� ファンケーブ�をマザーボードのコネクター�接続し�す。 注意 : CPUファンケーブルを必ず接続してください。 接続しないと、 ハードウェアのモニタリン グエラーが発生することがあります。 CP� ファン...
- Page 24 メモリーを取り付ける マザーボードでメ�リースロッ トの位置を確認し�す。 フックを外側�押して、 メ�リーソケッ トのロックを解除し�す。 メ�リーのノッチがスロッ トの切れ目�一致する�う�、 メ�リーをスロッ ト�合わせ� す。 フックが所定の場所�戻�メ�リーが正しく取�付けられる�で、 メ�リーを垂直 �スロッ ト�しっか�押し込み�す。 注意 • メ �リーや、 その他のシステムコン�ーネントを追加、 ���取�外す前�、 コンピュ ータの電源プラ�を抜いてください。 プラ�を差し込んだ��作業すると、 マザーボー ドとコン�ーネントが破損する原因とな��す。 • メ �リー�取�付ける向きがあ��す。 間違っ�向きでメ�リーを無理�スロッ ト�差 し込むと、 メ�リーが損傷する原因とな��す。 拡張カードを取り付ける 使用するスロッ トのメタ�カバー ネジを外し、 メタ�ブラケッ トロッ を取�外し�す。 クを取�外し�す。...
- Page 25 記憶装置ドライブを取り付ける 光学ドライブ ケースを縦�し、 上部�ある5.25インチ ドライブベイメタ�プレイトカバーを取 �外し�す。 光学ドライブをベイ�挿入し、 光学ドラ イブのネジ穴とベイのネジ穴の位置を 合わせ�す。 光学ドライブを�本のネジでベイ�固定し�す。 �ATA ODD : �ATAケーブ�と電源プ SATA ラ�をドライブの後部�あるコネク ター�接続し�す。 IDE ODD : IDE ケーブ�と電源プウ� をドライブの後部�あるコネクター �接続し�す。 フロッピーディスク ドライブ システム��ータブ�ハード�ィスク �オプション� が付属していない場合、 フロッピー �ィスクドライブを3.5インチドライブベイ�設置することができ�す。 ケースを縦�し、 上部�ある3.5インチド ライブベイメタ�プレイトカバーを取� 外し�す。 フロッピー�ィスクドライブをベイ�挿 入し、 ドライブのネジ穴とベイのネジ穴 の位置を合わせ�す。 �本のネジでベイ�フロッピー�ィスク ドライブを固定し�す。 ��...
- Page 26 ハード�ィスクドライブホ�ダー を回転 させ、 元の位置�戻し�す。 取�外し�� 本のネジで、 ケース�し っか� と固定し�す。 �ATA HDD : �ATAケーブ�と電源プ SATA ラ�をドライブの後�あるコネクター �接続し�す。 IDE HDD : IDEケーブ�と電源プラ�を ドライブの後�あるコネクター�接 続し�す。 サイドカバーとフロントパネルの装着 手順 フロントパネ�のヒンジの�うなタブをケースの左側�ある穴��め�す。 フロントパネ�を下の図を参照�動かし、 フロントパネ�がきっち���る�で 留め具をケース��め�す。 6個のサイドカバーの留め具を、 ケースの穴�入れ�す。 サイドカバーがきっち�と��る�で、 フロントパネ�方向�押し�す。 外し��個のネジで、 カバーを固定し�す。 通気孔 ケースの穴 セッ トアップガイド A6358_V_�eries_Q�G_V2.indb 26 1�26�11 1:37:5� P�...
Need help?
Do you have a question about the V6 Series and is the answer not in the manual?
Questions and answers