Eaton Tripp Lite Series Owner's Manual
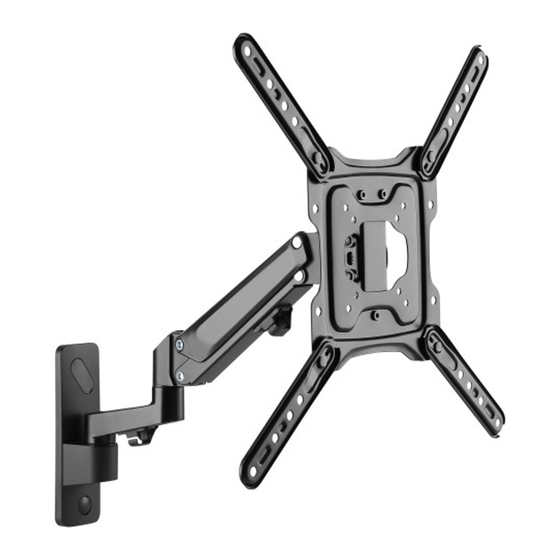
Full-motion flat-screen wall mount
Hide thumbs
Also See for Tripp Lite Series:
- User manual ,
- Advanced user's manual (221 pages) ,
- Owner's manual (84 pages)
Advertisement
Owner's Manual
Full-Motion Flat-Screen
Wall Mount
WARNING! ALWAYS USE AN ASSISTANT OR MECHANICAL LIFTING EQUIPMENT TO SAFELY LIFT
AND POSITION EQUIPMENT.
75x75/100x100
200x100/200x200
300x300/400x200
400x300/400x400
Este manual está disponible en español en la página de Eaton:
Tripplite.Eaton.com/support
Ce manuel est disponible en français sur le site Web de Eaton :
Tripplite.Eaton.com/support
Русскоязычная версия настоящего руководства представлена на веб-сайте компании
Eaton по адресу: Tripplite.Eaton.com/support
Dieses Handbuch ist in deutscher Sprache auf der Eaton-Website verfügbar:
Tripplite.Eaton.com/support
55"
MAX
PRODUCT REGISTRATION
Register your product today for a
chance to win an ISOBAR
surge
®
protector in our monthly drawing!
Tripplite.Eaton.com/warranty
Model:
DWM2355S
11-50.6 lbs
11-50.6 lbs
(5-23 kg)
(5-23 kg)
Rated
Rated
1
Advertisement
Table of Contents

Related Manuals for Eaton Tripp Lite Series


Summary of Contents for Eaton Tripp Lite Series
- Page 1 Rated Rated Este manual está disponible en español en la página de Eaton: Tripplite.Eaton.com/support Ce manuel est disponible en français sur le site Web de Eaton : Tripplite.Eaton.com/support Русскоязычная версия настоящего руководства представлена на веб-сайте компании Eaton по адресу: Tripplite.Eaton.com/support Dieses Handbuch ist in deutscher Sprache auf der Eaton-Website verfügbar:...
-
Page 2: Important Safety Instructions
• Check that the bracket is secure and safe to use at regular intervals (at least every three months) Parts List IMPORTANT: Before beginning installation, be sure you have received all the parts listed below. If any parts are missing or faulty, visit Tripplite.Eaton.com/support for service. Components Wall Plate Wall Plate... -
Page 3: Required For Installation
Parts List Package M M5x14 (x4) M6x14 (x4) M6x30 (x4) M8x30 (x4) M8x50 (x4) D5 Washer (x4) D8 Washer (x4) Smaller Spacer (x8) Large Spacer (x8) Package W Concrete Anchor (x3) Washer (x3) Anchor Bolt (x3) Required for Installation Level Drill with Stud finder Pencil... - Page 4 1a. Mount on Wood Stud Wall 60mm 55mm 2.4” (2.2") 4.5mm Ø 3/16") Ø Find and mark the exact location of mounting holes Drill pilot holes Ensure holes are level Screw mount into wall WARNING • Make sure the mounting screws are anchored into the center of the studs. Use of a stud finder is highly recommended.
- Page 5 1b. Mount on Solid Brick or Concrete Block 65mm 60mm 2.6" (2.4") 10mm Ø 3/8") Ø Find and mark the exact location of mounting holes Drill pilot holes Ensure holes are level Screw mount into wall WARNING • When installing wall mount onto a concrete masonry unit (also known as a CMU or cinder block), verify the actual concrete thickness is at least 1-3/8”...
- Page 6 2. Install Articulating Arm 3. Prepare VESA Plate...
- Page 7 4. Attach VESA Adapter Brackets...
- Page 8 5. Mount Brackets to Display Note: Choose appropriate screws, washers and spacers (if necessary) according to the type of screen. • Position the adapter brackets as close as possible to the center of the display. • Firmly secure the adapter brackets onto the display using the screws and any other necessary hardware components included with the unit.
- Page 9 6. Hang Flat Screen onto Articulating Arm 7. Level and Tighten Screen...
- Page 10 8. Adjust Articulating Arm...
- Page 11 9. Route Cables 10. Adjust Viewing Angle...
-
Page 12: Warranty And Product Registration
EXCEPT AS PROVIDED ABOVE, IN NO EVENT WILL EATON BE LIABLE FOR DIRECT, INDIRECT, SPECIAL, INCIDENTAL OR CONSEQUENTIAL DAMAGES ARISING OUT OF THE USE OF THIS PRODUCT, EVEN IF ADVISED OF THE POSSIBILITY OF SUCH DAMAGE.
Need help?
Do you have a question about the Tripp Lite Series and is the answer not in the manual?
Questions and answers