Apec Water ROTL-600, ROTL-600PH Manual
- Installation & operating manual (24 pages) ,
- Installation & operating manual (28 pages)
Advertisement
- 1 THINGS YOU MUST KNOW
- 2 PARTS LIST
- 3 PRODUCT SPECIFICATIONS
- 4 SYSTEM DESIGN
-
5
INSTALLATION INSTRUCTIONS
- 5.1 PREPARATION BEFORE INSTALLATION
- 5.2 INSTALLATION OF THE FEED WATER ADAPTER
- 5.3 INSTALLATION OF THE RO FAUCET
- 5.4 INSTALLATION OF THE RO SYSTEM
- 5.5 FILTER CARTRIDGE INSTALLATION
- 5.6 TUBING INSTALLATION
- 5.7 INSTALLATION OF THE POWER SUPPLY
- 5.8 ILLUSTRATION OF THE COMPLETED INSTALLATION
- 5.9 DRAIN SADDLE INSTALLATION
- 6 OPERATING INSTRUCTIONS
- 7 LIGHT INDICATIORS
- 8 MAINTENANCE
- 9 TROUBLESHOOTING AND SOLUTIONS
- 10 SYSTEM ISSUES AND SOLUTIONS
- 11 SAFETY PRECAUTIONS
- 12 Documents / Resources
THINGS YOU MUST KNOW
Your product must be installed accordance with the installation guidelines described in the Product Installation and Operating Manual (hereinafter referred to as the owner's manual). You should use the reverse osmosis system in accordance with the instructions in the owner's manual. Otherwise, the company does not assume any economic and legal liabilities for any property damage or even any personal injury arising from product damage or water leakage caused by failure to install and use the reverse osmosis system according to the requirements of the owner's manual.
- Before use, please confirm that the applicable voltage of the reverse osmosis system is consistent with the actual voltage used by users.
- The reverse osmosis system should be installed on a solid floor and the system should not be mount- ed or hung after it has been assembled.
- This reverse osmosis system is designed for home use. Please contact the manufacturer for use in other applications.
- If the power cord, plug or reverse osmosis system is damaged, do not continue to use the unit. You should immediately contact APEC customer support team for proper maintenance.
- To properly maintain your APEC drinking water system, please use only genuine APEC Water replacement filters and parts. Any system performance issues, problems, property damage or loss caused by the use of unauthorized filters, parts, or accessories are not covered by warranty.
- Do not use this system under the following situations:
- When you find the reverse osmosis system is damaged
- When you find the power cord or plug is damaged
- When you find the water in the reverse osmosis system keeps overflowing
- Regularly check and inspect whether the power supply and electrical wires are loose or damaged, avoid damages caused by faulty wires.
- Do not disassemble or modify the reverse osmosis system without manufacturer approval, which may result in water leaks or property damage.
- Any malfunction caused by improper use or system modifications will not be covered by the warranty.
- Do not pull the power cord with force when removing the plug.
PARTS LIST

PRODUCT SPECIFICATIONS
INSTALLATION REQUIREMENTS
- Installation location: Residential households (indoors)
- Tap water source: Only using city or well water. Do not use supply water that is microbiologically unsafe or of unknown quality without adequate disinfection before or after the system.
WATER TREATMENT PROCESS

FILTRATION PERFORMANCE
| FILTER CARTRIDGE | FILTRATION PERFORMANCE |
| CF sediment/carbon filter cartridge | Removes chlorine, silt, rust, odors, cloudiness, colors, other chemicals, etc. |
| RO reverse osmosis filter cartridge | 0.0001 micron rated - removes dust, particles, rust, heavy metals, fluoride, and more. |
| CB carbon block filter cartridge (For ROTL-600) | Enhances purified water taste. |
| PH+ mineral boost+ filter cartridge (For ROTL-600PH) | Improve taste and increase pH. |
SPECIFICATIONS
| System dimensions | 17¾" L x 5½" W x 16½" H |
| Power supply specifications | 100-240 V 50/60 Hz |
| Feed water pressure | 30-100 psi |
| Tap water temperature | 41°F-100°F |
| Purified water output flow1 | 0.42 gpm |
| Total purified water volume2 | Up to 1056 gallons (depending on actual tap water quality) |
| Tap water source | City/well water only |
| Tap water quality | <1000 ppm |
- The purified water output flow is based on 77°F water temperature.
- Depending on actual tap water quality and usage, the total purified water volume will vary.
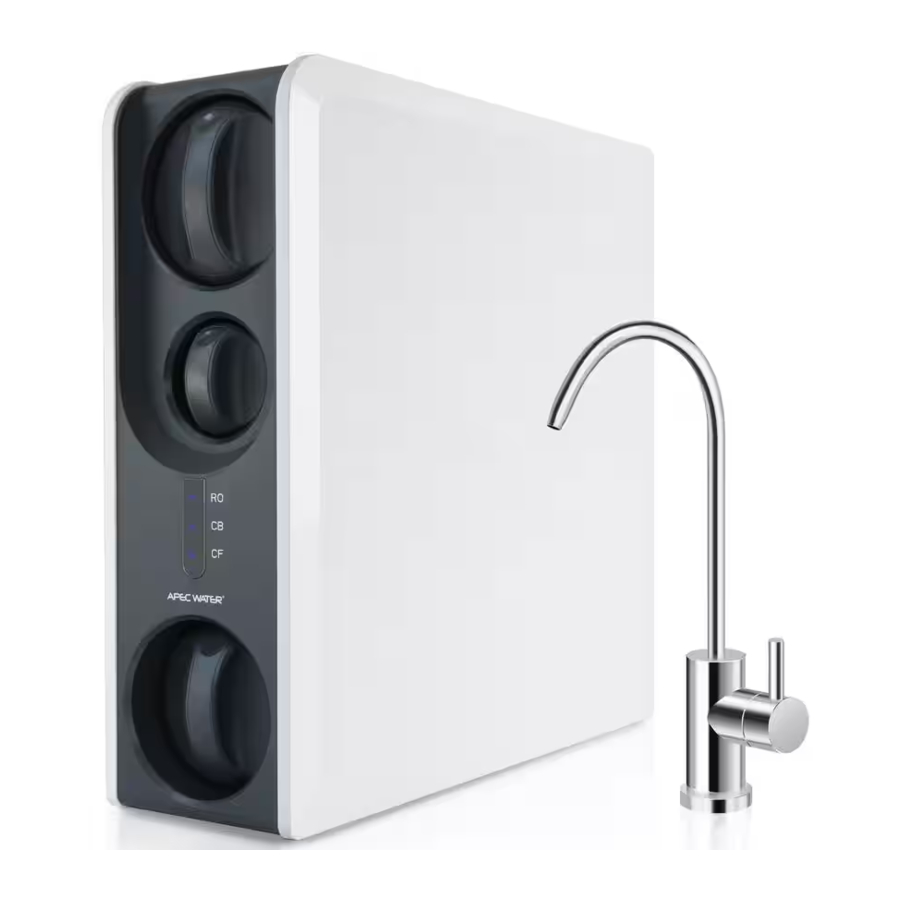
SYSTEM DESIGN

INSTALLATION INSTRUCTIONS
PREPARATION BEFORE INSTALLATION

- Electricity is needed for the system.
- Determine where system is to be installed.
- Check the parts list to make sure that all accessories are complete.
- Prepare the tools needed during installation.
INSTALLATION OF THE FEED WATER ADAPTER
- Locate the cold water supply valve under the kitchen sink (the round or oblong handle on the right side). Turn off the incoming cold water completely by turning the shut off handle clockwise.

- The RO system must be connected to the COLD water supply only!
- If the cold water shut off valve can not turn off the water, the main water supply to the house must be shut off for the installation. Another option for feed water adapter connection is to use a "self-piercing saddle valve" from a local hardware store.
Feed water adapter (1/2" to 3/8"):
- 1/2" x 9/16" Female-Male Water Supply Adapter with O-ring
![]()
- 3/8" x 9/16" Male-Female Converter with O-ring
![]()
- Feed Water Adapter
![]()


If your pipe has a 1/2" connection
By attaching the 3/8" x 9/16" converter (b) to the male end of the water supply adapter (a), you now have a 1/2" male and female water supply adapter.
If your pipe has a 3/8" connection
By attaching the 1/2" x 9/16" converter (b) to the female end of the water supply adapter (a), you now have a 3/8" male and female water supply adapter.

Install the white tubing on feed water adapter and tighten it with the adjustable wrench (do not remove the gasket on the cold water line during installation).

Recommend connection for flex line riser:
Loosen nut and separate cold water riser tube from shut off valve. Gently bend riser tube so that the feed water adapter fits onto the shut off valve. Connect the riser tube, feed water adapter, and shut off valve together and tighten.

For solid copper riser:
Follow the same procedure as for flex line. If the copper riser cannot bend, this it's best to replace it with a flex line riser. Fit the feed water adapter to the shut off valve the same way as described above.
Option connection point:
The feed water adapter can also be installed between the riser tube and faucet shank. Loosen nut and separate cold water riser tube from faucet shank. Gently bend riser tube so that the Feed Water Adapter fits onto the faucet shank. If your riser tube has no built-in washer, then fit the cone-sha ped washer provided onto the riser tube. Connect the riser tube, feed water adapter, and faucet shank together and tighten.

INSTALLATION OF THE RO FAUCET
Select an appropriate installation position in a sink or on a countertop and install it on a flat surface with proper hole size min 1/2" D to 1-1/4" D.

- Mount the faucet as shown in the diagram.
- Attach union connector to the faucet metal stem. No teflon tape is needed here.
- Connect the blue tubing to the faucet.
- The faucet has a solid metal handle that controls the flow of purified water exiting the faucet. Turn the handle to horizontal position to release the water and vertically to shut off.
INSTALLATION OF THE RO SYSTEM
Determine the location and product placement according to the installation environment.

A leak detector is built into the bottom of the unit. Please keep the unit in the upright position. DO NOT lay the product on one of its side as it can affect the leak detector alarm function.
FILTER CARTRIDGE INSTALLATION
- Remove the plastic protection cover at the upper end of the CF sediment/carbon filter cartridge, RO reverse osmosis filter cartridge, and CB carbon block/PH+ mineral boost+ filter cartridge.

- Screw the filter cartridges into the water purifier respectively in the directions shown in the figure according to their positions in the water purifier.


Insert the filter cartridge from the front side of the housing. Place the filter cartridge handle at an angle of 90° to the housing. After it is installed, turn the filter cartridge 90° clockwise until at the position of the filter cartridge handle. This completes filter cartridge installation.

Important installation notice!
The Quick Connect fittings come with end plugs that need to be removed before the tubing can be connected.

 TIP
TIP
Press in collet ring, while pressing and pull out the tubing with the other hand.
TUBING INSTALLATION
Illustration of PE water tube ports

Tube cutting
The plastic tubing outer tip should be a clear and smooth cut as shown below:

- The cuts on the plastic tubing must be a clear and smooth cut without any burrs affecting the quick connect connection port.
- Make sure that the tubing has a clear and smooth cut at the tubing tip and the tubing connection is securely pushed in when connected into the collet rings to prevent water leak.
Installation of the quick connect locking clips
Insert one end of the plastic tubing into the quick connect port on the main unit. After installing the tubing securely into the quick connect port, pull the tubing upwards and install the locking clip under the collet ring.

Installation of the inlet tap water tubing

- If needed, use a tubing cutter to cut an appropriate length of the white 3/8" tubing;
- Thread one end of the white 3/8" tubing through the metal nut and then connect feed water adapter. Tighten the metal nut with the adjustable wrench;
- Insert the other end of the white 3/8" tubing into the water inlet
![]() After the tubing is pushed in securely, insert 3/8" locking clip behind the collet ring.
After the tubing is pushed in securely, insert 3/8" locking clip behind the collet ring.
 After the tubing is pushed in securely, insert 3/8" locking clip behind the collet ring.
Installation of the pure water tubing

- If needed, use a tubing cutter to cut an appropriate length of the white 1/4" tubing;
- Insert the other end of the tubing on the RO faucet into the water outlet of the reverse osmosis system;
![]()
- After the tubing is pushed in securely, insert the 1/4" locking clip behind the collet ring.

Installation of the drain water tubing

- If needed, use a tubing cutter to cut an appropriate length of the white 1/4" tubing;
- Insert one end of the tubing into the drain water output of the reverse osmosis system
![]() . After the tubing is pushed in securely, insert the 1/4" locking clip behind the collet ring;
. After the tubing is pushed in securely, insert the 1/4" locking clip behind the collet ring; - Connect the other end of the tuning to the drain pipe.
 . After the tubing is pushed in securely, insert the 1/4" locking clip behind the collet ring;
INSTALLATION OF THE POWER SUPPLY

Connect the power cord to the power jack.
- To avoid the possibility of the appliance plug or receptacle getting wet, a "drip loop," should be arranged by the user. The "drip loop" is that part of the cord below the level of the receptacle, to prevent water traveling along the cord and coming in contact with the receptacle.
- If the plug or receptacle does get wet, DON'T unplug the cord. Disconnect the fuse or circuit breaker that supplies power to the appliance. Then, unplug and examine for presence of water in the receptacle.
ILLUSTRATION OF THE COMPLETED INSTALLATION

- After the drain connection is completed, open the tap water inlet ball valve and check for leaks.
- The drain water output tubing must be connected to the drain pipe. Do not use a water storage device to collect the drain water to prevent water spilling during the reverse osmosis system autonomous flushing.
DRAIN SADDLE INSTALLATION
- The drain saddle assembly should be installed above the trap and on the vertical or horizontal tailpiece. To reduce the drainage noise, mount the drain line as low as possible above the trap, or on the horizontal tailpiece.

- Next, align and install the drain saddle clip with the tubing connection port onto the black sponge. This will cushion any gap between the saddle and the pipe. Make sure the hole on the sponge is thoroughly punched out, and is aligned to the hole on the saddle to complete the installation.

- Make sure to align the drain saddle hole to the drilled hole perfectly. Mis-aligning these two holes will block the drain water and cause membrane damage. Attach the drain saddle to the drain pipe and tighten the two screws evenly.
- Once the drain saddle is secured, push 1/4" black drain tubing into the Quick Connect fitting on the saddle.DO NOT use an "Insert" on the drain tubing.


To avoid possible drainage noise, mount drain line as low as possible on the vertical tailpiece, or on horizontal tailpiece.
OPERATING INSTRUCTIONS
FLUSH BEFORE USE FOR THE FIRST TIME
Turn on the power and let the filters flush for 5 minutes. Then turn on the drinking faucet to let water flow for 30 minutes. The three filter cartridge life indicators will blink blue simultaneously during the flush, and stay illuminated after the flush (The flush time lasts more than 35 minutes, varying by the actual conditions).
- On system startup, please make sure all of the tube connections are secured and connected correctly. Use a paper towel to wipe all the connection points to make sure there are no water.
- After the filters flush has completed, please turn off the drinking faucet and make sure there are no leaks. This completes the start up process of the unit for usage.
ROUTINE MAINTENANCE
If you are not using the reverse osmosis system for a longer period of time, please turn on the drinking faucet and turn off the feed water, and disconnect the power supply to the RO system. Store the filter cartridges in a clean, air sealed bag and store them in a lower compartment of the refrigerator. When the system is used next time, install the filter cartridges and turn on the feed water for about 10 minutes before using water. In certain water situations, the filter cartridge should be replaced before the system is used again.
Please replace the filter cartridges regularly according to the filter cartridge life indicator or reminder information.
Filter cartridge replacement steps:
- Turn on the drinking faucet and turn off the supply water to the system. When pure water stops from the drinking faucet, unplug the power adapter.

- Unscrew the existing filter cartridge counterclockwise and relieve the pressure.

- Screw the replacement filter cartridge into the system in the clockwise direction

- Reconnect the power adapter and turn on the supply water to the system. After replacing the new filter, please flush the filter properly before using the drinking water.
- Reset the new filter cartridge.


- Replace the filter cartridge only with genuine APEC Water filter.
- The actual filter cartridge life will depend on the local tap water quality and your daily usage.
- The recommended filter cartridge replacement time is an average based on normal water quality and usage conditions. If the local water quality is more unique with high levels of impurities, actual filter life will differ from the recommended replacement time. If the filter is clogged, please replace the filter cartridge according to the actual usage life.
RESET THE FILTER CARTRIDGE
After the new filter cartridge is installed, the corresponding filter cartridge should be reset so that the reverse osmosis system can monitor the filter cartridge life again.

- Manual reset: Press and hold the filter cartridge reset button for 3 seconds. When the reset button indicator starts blinking and a beep sounds, the reset of the corresponding filter cartridge will start. Release the button and press and hold the filter cartridge reset button again for 3 seconds until a beep sounds. This completes the reset process. (Note: If the reset does not complete in 10 seconds, the filter cartridge reset mode will be cancelled)
- After any of the filter cartridges are reset successfully, the filter cartridge flush mode will start and the three indicators will blink simultaneously, while the reset of the other filter cartridges will not be affected.
- After the replaced filter cartridge is reset, the following filter cartridge flush will proceed:
- CF sediment/carbon filter cartridge: Autonomous flush for 5 minutes.
- RO membrane filter cartridge: Turn on the drinking faucet to flush the filter cartridge for 30 minutes.
- CB post carbon/PH+ mineral boost+ filter cartridge: Turn on the drinking faucet and flush the filter cartridge for 15 minutes.
- When the RO membrane filter cartridge and CF or CB/PH+ filter cartridges are reset simultaneously: First perform the autonomous flush for 5 minutes, then turn on the drinking faucet and flush the filter cartridges for 30 minutes.
- When the CF filter cartridge and the CB/PH+ filter cartridge are reset simultaneously: First perform the autonomous flush for 5 minutes, then turn on the drinking faucet and flush CB/PH+ filter cartridges for 15 minutes.
FLUSH SETTING
Press and hold the three filter cartridge reset buttons simultaneously for 3 seconds until the reset button indicators blink with a beep. Then, the manual flush mode starts. In the flush mode, press and hold the three filter cartridge reset buttons for 3 seconds, the flush mode will be terminated and the normal mode starts.
In addition to the manual flush mode, the reverse osmosis system will automatically activate the flush mode in any of the following situations:
- The RO system is powered up again after a power failure - flush for 20 seconds.
- The pump has run for 2 hours to produce purified water - flush for 20 seconds.
- No drinking water is used for 24 hours - flush for 20 seconds.
- After the filter cartridge reset is completed.
LIGHT INDICATIORS
INDICATORS ON THE MAIN UNIT
In normal operations, indicators on the reverse osmosis system show the life status of the corresponding filter cartridges.

Corresponding filter life indications
 | Blue light is lit constantly: Filter cartridge is working normal |
 | Yellow light is lit constantly: Filter cartridge needs to be replaced soon. |
 | Red light is lit constantly: Filter cartridge needs to be changed immediately. |
When the light indicator is lit red constantly, it indicates that there is an error. This is combined with the filter cartridge life indicators to show the error. For details, see light indicator description.
Light indicator description (For ROTL-600)
 |  |  |  |  |
| Constantly Iit indication Water production/idle state | Blinking indication Flush status | E1: Water leak protection | E2: Pump protection | E3: Pump frequent start and stop protection |
Light indicator description (For ROTL-600PH)
 |  |  |  |  |
| Constantly Iit indication Water production/idle state | Blinking indication Flush status | E1: Water leak protection | E2: Pump protection | E3: Pump frequent start and stop protection |
MAINTENANCE
All filter cartridges should be replaced within the recommended replacement time below. The recommended replacement time are as follows:
| CF sediment/carbon filter cartridge | 6 months |
| RO reverse osmosis filter cartridge | 24 months |
| CB carbon block filter cartridge (For ROTL-600) | 12 months |
| PH+ mineral boost+ filter cartridge (For ROTL-600PH) | 12 months |
- Recommended filter capacity and replacement time may vary according to actual water quality and usage.
- The estimated filter cartridge life is based on most normal tap water quality and residential drinking usage.
SERVICE AND SUPPORT
If the reverse osmosis system is not working normally, please review our troubleshooting and solutions guide below. If the issue cannot be resolved, please contact our customer service for support.
TROUBLESHOOTING AND SOLUTIONS
| ISSUES | CAUSES | SOLUTIONS |
Water leak | Tubing is not inserted securely, or the tubing outer tip needs to be made a clear cut so it is smooth. | Re-install tubing |
| Feed water adapter is leaking. | Re-install feed water adapter | |
No display | Power is not connected | Check if there is electricity at the outlet using another electrical item. |
| The power adapter is damaged | Contact APEC water | |
The system automatically shuts down | Booster pump stops working. | Refer to system issues and solutions below |
| The booster pump starts and stops frequently. | Refer to system issues and solutions below | |
| No tap water is entering the system. |
| |
| The water leak protector has detected leaking water. | Refer to system issues and solutions below | |
The booster pump runs loud | Low inlet pressure or low inlet water flow |
|
| The machine is being flushed (first time powering on, during operation, filter replacement, etc). | This is normal. The running sound will return to normal at the end of flushing | |
Low purified water flow | Low water flow at drinking faucet | Filter cartridge may need to be replaced. Contact APEC water for assistance. |
SYSTEM ISSUES AND SOLUTIONS
If the following status appears while performing troubleshooting and solutions, please follow the steps below to help take care of the issue. If the issue persists after following the steps below, please contact customer service for support.
| SYSTEM ISSUE TWO-COLOR (ERROR CODE) INDICATOR | BUZZER | SOLUTIONS | |
| E1: Water leak protection | Light indicator blinks red. The RO filter cartridge indicator blinks yellow. | Beeps constantly (Beeps 3 times and then pauses for 4 seconds) | Water leak is eliminated and the system automatically returns to normal operation. |
| E2: Pump continuously running timeout protection | Light indicator blinks red. The CB carbon block/PH+ mineral boost+ filter cartridge indicator blinks yellow. | Beeps for 3 minutes (Beeps for 1 second and then pauses for 4 seconds) | The system needs to be powered up again before returning to normal (The buzzer will beep once, and then indicators will illuminate in the order of blue, yellow and red for 1 second for a total of 3 seconds.). |
| E3: Pump frequently starts and stops | Light indicator blinks red. The CF and RO filter cartridge indicators blink yellow. | Beeps 5 times (Beeps for 1 second and then pauses for 2 seconds) | The system needs to be powered up again before returning to normal (The buzzer will beep once, and then indicators will illuminate in the order of blue, yellow and red for 1 second respectively, for a total of 3 seconds.). |
SAFETY PRECAUTIONS

- The feed water of the reverse osmosis system should be from your city tap water or microbiologically safe and adequately disinfected water.
- The required water pressure is 30-100 psi. If the inlet water pressure exceeds 100 psi, a pressure reducer (purchased separately) must be installed.
- The required tap water temperature is 41-100°F. If the water temperature exceeds 100°F, the seals may be damaged causing water leaks. When water temperature falls below 41°F, please turn off the water supply line and drain the water from the reverse osmosis system. If the water supply line or the reverse osmosis system freezes, failure and damage to the housing, internal tubing rupture, or water leaks may occur.
- Do not reverse the installation order of the filter cartridges of the reverse osmosis system, or the normal function of the system will be affected.
- Inlet and outlet water tubing connections must be correct, so it does not affect the normal operation of the reverse osmosis system.
- Do not plug or unplug the power plug with wet hands or wet surroundings to avoid the risk of electric shocks
- Do not disassemble, modify or place heavy objects on the reverse osmosis system to avoid damage to the system.
- Do not install the reverse osmosis system in a place exposed to direct sunlight or hazardous chemicals, or a place where it may fall, be bumped or damaged, etc.
- Do not install the reverse osmosis system in the vicinity of any heat source.
- Do not install the reverse osmosis system upside down.
- Clean the reverse osmosis system with water. Do not use steel wool, abrasive detergents or corrosive liquids (such a s gasoline or acetone) for system cleaning.
- When cleaning, do not introduce other liquids into the filter cartridges as the system of the filter cartridges may be damaged.
- Keep the drain tube unobstructed to avoid damage to the filter cartridges or internal components of the reverse osmosis system.
- When the sewer is clogged, do not use the reverse osmosis system. Please turn off the power to avoid the drain water from the system wetting the floor.
www.FreeDrinkingWater.com
301 Brea Canyon Road
City of Industry, CA 91789
1-800-880-4808
Documents / Resources
References
Download manual
Here you can download full pdf version of manual, it may contain additional safety instructions, warranty information, FCC rules, etc.
Advertisement


Need help?
Do you have a question about the ROTL-600 and is the answer not in the manual?
Questions and answers