Table of Contents
Advertisement
Quick Links
Advertisement
Table of Contents
Troubleshooting

Related Manuals for Apec Water ROTL-600-PH


Summary of Contents for Apec Water ROTL-600-PH
- Page 1 INSTALLATION & OPERATING MANUAL ROTL-600-PH 3 S T A G E / T A N K L E S S R E V E R S E O S M O S I S D R I N K I N G W A T E R S Y S T E M Read the Operating Manual carefully before use the product.
-
Page 3: Table Of Contents
TABLE OF CONTENTS Things You Must Know ..................page 1 Safety Precautions ....................page 1 Parts List ........................ page 2 Product Specifications ..................page 3 Installation requirements Water treatment process Filtration performance Specification parameters System Design ..................... page 4 System structure diagram Installation Instructions .................. -
Page 4: Things You Must Know
• If the power cord, plug or reverse osmosis system is damaged, do not continue to use the unit. You should immediately contact APEC customer support team for proper maintenance. • To properly maintain your APEC drinking water system, please use only genuine APEC Water replacement filters and parts. Any system performance issues, problems, property damage or loss caused by the use of unauthorized filters, parts, or accessories are not covered by warranty. -
Page 5: Parts List
osmosis system freezes, failure and damage to the housing, internal tubing rupture, or water leaks may occur. • Do not reverse the installation order of the filter cartridges of the reverse osmosis system, or the normal function of the system will be affected. •... -
Page 6: Product Specifications
PRODUCT SPECIFICATIONS INSTALLATION REQUIREMENTS • Installation location: Residential households (indoors) • Tap water source: Only using city or well water. Do not use supply water that is microbiologically unsafe or of unknown quality without adequate disinfection before or after the system. WATER TREATMENT PROCESS City/well CF sediment/carbon... -
Page 7: System Design
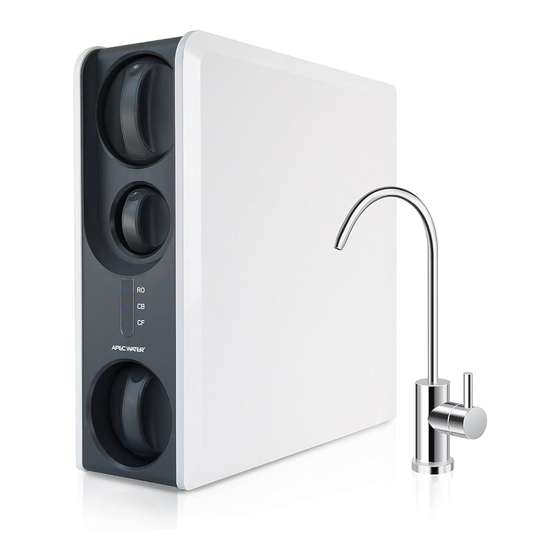
SYSTEM DESIGN Power cord Pipe connection Main Unit connection area area RO reverse osmosis filter cartridge 6½ inch PH+ mineral boost+ filter cartridge 10 inch faucet CF sediment/carbon filter cartridge INSTALLATION INSTRUCTIONS PREPARATION BEFORE INSTALLATION • Electricity is needed for the system. •... - Page 8 CAUTION 1. The RO system must be connected to the COLD water supply only! 2. If the cold water shut off valve can not turn off the water, the main water supply to the house must be shut off for the installation. Another option for feed water adapter connection is to use a “self-piercing saddle valve”...
- Page 9 Prepared by the user Cold water line Metal nut Gasket White tubing Feed water adapter Gasket Cold water valve Prepared by the user Recommend connection for flex line riser: Loosen nut and separate cold water riser tube from shut off valve. Gently bend riser tube so that the feed water adapter fits onto the shut off valve.
-
Page 10: Installation Of The Ro Faucet
Option connection point: The feed water adapter can also be installed between the riser tube and faucet shank. Loosen nut and separate cold water riser tube from faucet shank. Gently bend riser tube so that the Feed Water Adapter fits onto the faucet shank. If your riser tube has no built-in washer, then fit the cone-sha ped washer provided onto the riser tube. -
Page 11: Installation Of The Ro System
INSTALLATION OF THE RO SYSTEM Determine the location and product placement according to the installation environment. CAUTION A leak detector is built into the bottom of the unit. Please keep the unit in the upright position. DO NOT lay the product on one of its side as it can affect the leak detector alarm function. FILTER CARTRIDGE INSTALLATION 1. -
Page 12: Tubing Installation
of 90° to the housing. After it is installed, turn the filter cartridge 90° clockwise until at the position of the filter cartridge handle. This completes filter cartridge installation. Turn on Locking Important installation notice! The Quick Connect fittings come with end plugs that need to be removed before the tubing can be connected. - Page 13 Tube cutting The plastic tubing outer tip should be a clear and smooth cut as shown below: CAUTION 1. The cuts on the plastic tubing must be a clear and smooth cut without any burrs affecting the quick connect connection port. 2.
- Page 14 Installation of the pure water tubing 1. If needed, use a tubing cutter to cut an appropriate length of the white 1/4” tubing; 2. Insert the other end of the tubing on the RO faucet into the water outlet of the reverse osmosis system;...
-
Page 15: Installation Of The Power Supply
INSTALLATION OF THE POWER SUPPLY Connect the power cord to the power jack. Power adapter Water purifier power jack CAUTION 1. To avoid the possibility of the appliance plug or receptacle getting wet, a “drip loop, ” should be arranged by the user. The “drip loop” is that part of the cord below the level of the receptacle, to prevent water traveling along the cord and coming in contact with the receptacle. -
Page 16: Drain Saddle Installation
DRAIN SADDLE INSTALLATION 1. The drain saddle assembly should be installed above the trap and on the vertical or horizontal tailpiece. To reduce the drainage noise, mount the drain line as low as possible above the trap, or on the horizontal tailpiece. Mount drain saddle at either location... -
Page 17: Operating Instructions
CAUTION To avoid possible drainage noise, mount drain line as low as possible on the vertical tailpiece, or on horizontal tailpiece. OPERATING INSTRUCTIONS FLUSH BEFORE USE FOR THE FIRST TIME Turn on the power and let the filters flush for 5 minutes. Then turn on the drinking faucet to let water flow for 30 minutes until water is clean. - Page 18 2. Unscrew the existing filter cartridge counterclockwise and relieve the pressure. Remove horizontally Unscrew the filter cartridge 3. Screw the replacement filter cartridge into the system in the clockwise direction Place horfzontally Screw the filter cartridge 4. Reconnect the power adapter and turn on the supply water to the system. After replacing the new filter, please flush the filter properly before using the drinking water.
-
Page 19: Reset The Filter Cartridge
CAUTION 1. Replace the filter cartridge only with genuine APEC Water filter. 2. The actual filter cartridge life will depend on the local tap water quality and your daily usage. 3. The recommended filter cartridge replacement time is an average based on normal water quality and usage conditions. -
Page 20: Flush Setting
FLUSH SETTING Press and hold the three filter cartridge reset buttons simultaneously for 3 seconds until the reset button indicators blink with a beep. Then, the manual flush mode starts. In the flush mode, press and hold the three filter cartridge reset buttons for 3 seconds, the flush mode will be terminated and the normal mode starts. -
Page 21: Maintenance And Troubleshooting
Light indicator description Constantly Iit indication Blinking indication E1: Water leak E2: Pump E3: Pump frequent start Water production/idle state Flush status protection protection and stop protection MAINTENANCE AND TROUBLESHOOTING MAINTENANCE All filter cartridges should be replaced within the recommended replacement time below. The recommended replacement time are as follows: CF sediment/carbon filter cartridge 6 months... -
Page 22: Troubleshooting And Solutions
This is normal. The running sound will return to operation, filter replacement, normal at the end of flushing etc). Low purified Low water flow at drinking Filter cartridge may need to be replaced. water flow faucet Contact APEC water for assistance. -
Page 23: System Issues And Solutions
SYSTEM ISSUES AND SOLUTIONS If the following status appears while performing troubleshooting and solutions, please follow the steps below to help take care of the issue. If the issue persists after following the steps below, please contact customer service for support. SYSTEM ISSUE TWO-COLOR BUZZER... -
Page 25: Warranty
LIMITED PRODUCT WARRANTY Scope APEC takes pride in selling a superb line of products, including this reverse osmosis system (“Product”). As such, APEC expressly warrants to the original purchaser that, for a period of one (1) year from the date of purchase, the Product will be reasonably free of defects in materials and workmanship. - Page 26 4. Damage not resulting from manufacturing defects that occur while the Product is in the original purchaser’s possession. 5. Installation of the Product with known or visible manufacturing defects at the time of installation. 6. Damage caused by freezing, flood, fire or Act of God. CONDITIONS THAT RENDER THIS LIMITED PRODUCT WARRANTY VOID THIS LIMITED PRODUCT WARRANTY DOES NOT COVER DEFECTS CAUSED BY: 1.
- Page 28 www.FreeDrinkingWater.com 301 Brea Canyon Road City of Industry, CA 91789 1-800-880-4808 © This manual is copyrighted by APEC Inc. Under the copyright laws, this manual may not be reproduced in any form, in whole or part, without the prior written consent of APEC Inc. Manual print Ver.
Need help?
Do you have a question about the ROTL-600-PH and is the answer not in the manual?
Questions and answers