Table of Contents
Advertisement
Quick Links
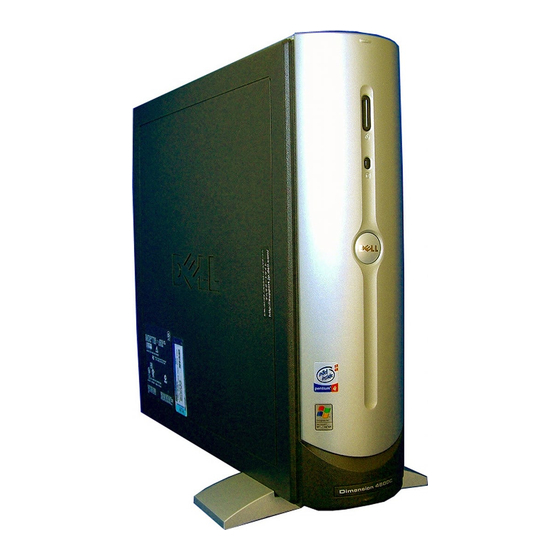
Dell™ Dimension™ 4600C
front door
power button
hard-drive light
*
On computers with integrated IEEE 1394 connectors.
**
On computers with integrated PC Card connectors.
SPDIF-out connector
integrated video
connector
diagnostic lights (4)
keyboard connector
center/LFE connector
microphone connector
USB 2.0 connectors (6)
IEEE 1394 connector
w w w . d e l l . c o m | s u p p o r t . d e l l . c o m
breakaway hinge
IEEE 1394 connector*
CD or DVD drive light
PC Card connectors (2)**
breakaway hinge
USB 2.0 connectors (2)
headphone connector
parallel connector
mouse connector
surround connector
line-out connector
line-in connector
network adapter connector
optional video card connector
(see the setup diagram)
modem connectors (2)
power connector
voltage selection switch
Advertisement
Table of Contents
Troubleshooting

Related Manuals for Dell Dimension H7228


Summary of Contents for Dell Dimension H7228
- Page 1 Dell™ Dimension™ 4600C front door power button hard-drive light On computers with integrated IEEE 1394 connectors. On computers with integrated PC Card connectors. SPDIF-out connector integrated video connector diagnostic lights (4) keyboard connector center/LFE connector microphone connector USB 2.0 connectors (6) IEEE 1394 connector w w w .
-
Page 2: Abbreviations And Acronyms
Trademarks used in this text: Dell, the DELL logo, Inspiron, Dell Precision, Dimension, OptiPlex, DellNet, PowerApp, PowerVault, PowerEdge, PowerConnect, Axim, and Latitude are trademarks of Dell Inc.; Intel, Pentium, and Celeron are registered trademarks of Intel Corporation; Microsoft and Windows are registered trademarks of Microsoft Corporation. -
Page 3: Table Of Contents
Contents Safety Instructions ......Finding Information for Your Computer Setting Up and Using Your Computer Connecting the AC Adapter (Japan only) Attaching and Removing the Computer Stand Setting Up a Printer... - Page 4 Battery Problems ......Drive Problems ......CD drive problems Problems writing to a CD-RW drive DVD drive problems...
- Page 5 ......Restoring Your Operating System Using Microsoft Windows XP System Restore Using Dell PC Restore by Symantec Resolving Software and Hardware Incompatibilities Adding Parts...
- Page 6 ......Viewing Settings System Setup Screens Clearing Forgotten Passwords Replacing the Battery Dell Technical Support Policy (U.S. Only) Definition of "Dell-Installed" Software and Peripherals Definition of "Third-Party" Software and Peripherals FCC Notices (U.S. Only) Class A .
-
Page 7: Safety Instructions
Safety Instructions See your Product Information Guide for safety instructions. Safety Instructions... - Page 8 Safety Instructions...
-
Page 9: Finding Information For Your Computer
Finding Information for Your Computer What are you looking for? • How to set up my computer • Tips on using Windows • How to clean my computer • How to use my mouse and keyboard • Express Service Code and Service Tag ®... - Page 10 • Solutions — Troubleshooting hints and tips, articles from technicians, and online courses • Community Forum — Online discussion with other Dell customers • Upgrades — Upgrade information for components, such as memory, the hard drive, and the operating system •...
-
Page 11: Setting Up And Using Your Computer
Setting Up and Using Your Computer Connecting the AC Adapter (Japan only) CAUTION: Before you begin any of the procedures in this section, follow the safety instructions in the Product Information Guide. Connect the AC adapter to the plug on the AC power cable. CAUTION: If you decide to connect the green ground wire to an electrical outlet, do not permit contact between the green ground wire and power leads because electrical shock, fire, or damage to your... -
Page 12: Attaching And Removing The Computer Stand
Attaching and Removing the Computer Stand CAUTION: Before you begin any of the procedures in this section, follow the safety instructions in the Product Information Guide. NOTE: Place your computer on a soft surface to prevent scratching the top cover. To attach the stand: Rotate the computer to an upside-down position. -
Page 13: Setting Up A Printer
Tighten the screw. Place the computer in the upright position. To remove the stand: Turn the computer over so that the stand is at the top. Loosen the screw and lift the stand away. Place the computer in a horizontal position until you reattach the stand. Setting Up a Printer NOTICE: Complete the operating system setup before you connect a printer to the computer. -
Page 14: Printer Cable
Printer Cable Your printer connects to your computer with either a USB cable or a parallel cable. Your printer may not come with a printer cable, so if you purchase a cable separately, ensure that it is compatible with your printer. If you purchased a printer cable at the same time you purchased your computer, the cable may arrive in the computer box. -
Page 15: Connecting A Usb Printer
Connecting a USB Printer NOTE: You can connect USB devices while the computer is turned on. Complete the operating system setup if you have not already done so. Install the printer driver if necessary. See the documentation that came with your printer. Attach the USB printer cable to the USB connectors on the computer and the printer. -
Page 16: Connecting An Ieee 1394 Device (Optional)
Connecting an IEEE 1394 Device (Optional) IEEE 1394 devices can move large amounts of data between computers and peripheral devices and are ideal for use with multimedia devices, such as digital video cameras. Your computer provides a IEEE 1394 connector on both the front and back panels (see "Front and Back View of the Computer"... -
Page 17: Network Setup Wizard
network adapter connector on computer Network Setup Wizard ® ® The Microsoft Windows XP operating system provides a Network Setup Wizard to guide you through the process of sharing files, printers, or an Internet connection between computers in a home or small office. Click the Start button, point to All Programs click Network Setup Wizard. -
Page 18: Connecting To The Internet
Connecting to the Internet NOTE: ISPs and ISP offerings vary by country. To connect to the Internet, you need a modem or network connection and an Internet service provider (ISP), such as AOL or MSN. Your ISP will offer one or more of the following Internet connection options: •... -
Page 19: Copying Cds And Dvds
Click the appropriate option under How do you want to connect to the Internet?, and then click Next. Use the setup information provided by your ISP to complete the setup. If you are having problems connecting to the Internet, see "E-Mail, Modem, and Internet Problems"... -
Page 20: Using Blank Cd-Rs And Cd-Rws
Using Blank CD-Rs and CD-RWs Your CD-RW drive can write to two different types of recording media—CD-Rs and CD-RWs. Use blank CD-Rs to record music or permanently store data files. After creating a CD-R, you cannot write to that CD-R again without changing your method of recording (see the Sonic documentation for more information). -
Page 21: Booting To A Usb Device
You can enable or disable Hyper-Threading through the system setup program. For more information on accessing the system setup program, see page 78. For more information on Hyper-Threading, search the Knowledge Base on the Dell Support website at support.dell.com. Booting to a USB Device NOTE: To boot to a USB device, the device must be bootable. - Page 22 Setting Up and Using Your Computer...
-
Page 23: Solving Problems
See page 36. Press a key or move the mouse. See the Tell Me How help file for information on standby mode. For more information, see page 25. Get technical assistance from Dell. See page 83. See page 29. Solving Problems... - Page 24 Solving Problems See page 40. See page 39 See page 37. See page 27 See page 34 See page 33. See page 26. See page 35. See page 38. See page 29. See page 30. See page 27. See page 27. See page 30.
-
Page 25: Finding Help Information
— If you have to repeatedly reset time and date information after turning on the computer, or if an incorrect time or date displays during start-up, replace the battery (see page 79). If the battery still does not work properly, contact Dell (see page 83). —... -
Page 26: Drive Problems
Drive Problems CD drive problems NOTE: High-speed CD drive vibration is normal and may cause noise, which does not indicate a defect in the drive or the CD. DJUST THE INDOWS VOLUME CONTROL your screen. • Ensure that the volume is turned up by clicking the slidebar and dragging it up. •... -
Page 27: Dvd Drive Problems
DVD drive problems NOTE: Because of different regions worldwide and different disc formats, not all DVD titles work in all DVD drives. DVD — Insert another DVD to eliminate the possibility that the original EST THE DRIVE WITH ANOTHER DVD is defective. NSURE THAT INDOWS RECOGNIZES THE DRIVE DVD drive is not listed, perform a full scan with your antivirus software to check for and remove... - Page 28 ONNECT THE MODEM DIRECTLY TO THE TELEPHONE WALL JACK sharing the line, such as an answering machine, fax machine, surge protector, or line splitter, then bypass them and use the telephone to connect the modem directly to the telephone wall jack. SE A DIFFERENT TELEPHONE LINE shorter one.
-
Page 29: Error Messages
If so, run the program that you want to use first. — Contact Dell (see page 83). PERATING SYSTEM NOT FOUND HE FILE BEING COPIED IS TOO LARGE FOR THE DESTINATION DRIVE too large to fit on the disk. -
Page 30: General Problems
General Problems The computer stops responding URN THE COMPUTER OFF a key on your keyboard or moving your mouse, press and hold the power button for at least 8 to 10 seconds until the computer turns off. Then press the power button again to turn on the computer. -
Page 31: A Solid Blue Screen Appears
A solid blue screen appears URN THE COMPUTER OFF — If the computer does not respond to a keystroke or a proper shutdown, press the power button for at least 8 to 10 seconds until the computer turns off. Press the power button again to restart the computer. -
Page 32: Other Technical Problems
See "Dell Support Website" on page 9 for more information about the website. See "Dell Technical Support Policy (U.S. Only)" on page 81 for a description of the hardware and software support provided by Dell. -
Page 33: Ieee 1394 Device Problems
— Connect a properly working keyboard to the computer, and try using the keyboard. If the new keyboard works, the original keyboard is faulty. HECK FOR INTERRUPT REQUEST CONFLICTS ® INDOWS — — Contact Dell (see page 83). IEEE 1394 DEVICE DEVICE NOT PROVIDED BY — Contact the — See page 52. -
Page 34: Mouse Problems
Mouse Problems ESTART THE COMPUTER Simultaneously press <Ctrl><Esc> to display the Start menu. Type u, press the keyboard arrow keys to highlight Shut down or Turn Off, and then press <Enter>. After the computer turns off, press the power button to restart the computer. F YOU CONNECTED THE MOUSE BEFORE TURNING ON THE COMPUTER Simultaneously press <Ctrl><Esc>... -
Page 35: Network Problems
EINSTALL THE MOUSE DRIVER — See page 49. HECK FOR INTERRUPT REQUEST CONFLICTS Network Problems HECK THE NETWORK CABLE CONNECTOR on page 16. HECK THE NETWORK LIGHTS ON THE BACK OF THE COMPUTER communication exists. Replace the network cable. link activity light E S T A R T T H E C O M P U T E R A N D T R Y T O L O G O N T O T H E N E T W O R K A G A I N HECK YOUR NETWORK SETTINGS —... -
Page 36: Power Problems
• Ensure that the main power cable is securely connected to the system board (see page 61). • Ensure that the front panel cable is securely connected to the system board (see page 61). • If the problem persists, contact Dell (see page 83). F THE POWER LIGHT IS STEADY AMBER power problem might exist. -
Page 37: Printer Problems
• Multiple power strips connected to the same electrical outlet Printer Problems NOTE: Dell does not cover the printer’s warranty. If you need technical assistance for your printer, call the printer’s manufacturer. See the printer documentation for the correct phone number. HECK THE PRINTER DOCUMENTATION troubleshooting information. -
Page 38: Scanner Problems
EINSTALL THE PRINTER DRIVER Scanner Problems NOTE: Dell does not cover the scanner’s warranty. If you need technical assistance for your scanner, call the scanner’s manufacturer. See the scanner documentation for the correct phone number. HECK THE SCANNER DOCUMENTATION troubleshooting information. -
Page 39: Sound And Speaker Problems
Sound and Speaker Problems No sound from speakers NOTE: The volume control in some MP3 players overrides the Windows been listening to MP3 songs, ensure that you did not turn the player volume down or off. HECK THE SPEAKER CABLE CONNECTIONS setup diagram supplied with the speakers. -
Page 40: No Sound From Headphones
EINSTALL THE AUDIO SOUND HECK FOR INTERRUPT REQUEST CONFLICTS No sound from headphones HECK THE HEADPHONE CABLE CONNECTION the headphone connector (see page 53). — Your headphones do not work if the CD drive is operating in digital mode. ISABLE DIGITAL MODE To disable digital mode: Click the Start button, click Control Panel, and then click Sounds, Speech, and Audio Devices. -
Page 41: If The Screen Is Difficult To Read
WAP THE POWER CABLES — Swap the computer and monitor power cables to determine if the power cable is defective. EST THE VIDEO EXTENSION CABLE IF USED cable solves the problem, the cable is defective. EST ANOTHER MONITOR — If another monitor is available, connect it to the computer. —... - Page 42 Solving Problems...
-
Page 43: Advanced Troubleshooting
Advanced Troubleshooting Diagnostic Lights To help you troubleshoot a problem, your computer is equipped with four lights on the back panel labeled "A," "B," "C," and "D" (see page 57). These lights can be yellow or green. When the computer starts normally, the lights flash. After the computer starts, the lights remain green. If the computer malfunctions, the color and sequence of the lights identify the problem. - Page 44 • If available, install properly working memory of the same type into your computer (see page 68). • If the problem persists, contact Dell (see page 83). Determine if a conflict exists by removing a card (not the video card) (see page 65) and then restarting the computer.
- Page 45 • If the problem persists or the computer has integrated video, contact Dell (see page 83). Reseat all power and data cables and restart the computer. Reinstall all USB devices, check cable connections, and then restart the computer.
-
Page 46: Dell Diagnostics
If you experience a problem with your computer, perform the checks in "Solving Problems" on page 23 and run the Dell Diagnostics before you contact Dell for technical assistance. Running the Dell Diagnostics may help you resolve the problem without contacting Dell. If you do contact Dell, the test results can provide important information for Dell's service and support personnel. -
Page 47: Starting The Dell Diagnostics
When the boot device list appears, highlight Boot to Utility Partition and press <Enter>. When the Dell Diagnostics Main Menu appears, select the test you want to run (see page 47). Dell Diagnostics Main Menu After the Dell Diagnostics loads and the Main Menu screen appears, click the button for the option you want. -
Page 48: Drivers
Parameters Allows you to customize the test by changing the test settings. Close the test screen to return to the Main Menu screen. To exit the Dell Diagnostics and restart the computer, close the Main Menu screen. Drivers What Is a Driver? A driver is a program that controls a device such as a printer, mouse, or keyboard. -
Page 49: Reinstalling Drivers
• Dell PC Restore by Symantec restores your hard drive to the operating state it was in when you purchased the computer. Dell PC Restore permanently deletes all data on the hard drive and removes any applications installed after you received the computer. -
Page 50: Using Microsoft Windows Xp System Restore
NOTE: The procedures in this document were written for the Windows default view, so they may not work if you set your Dell™ computer to the Windows Classic view. Creating a Restore Point Click the Start button and click Help and Support. -
Page 51: Using Dell Pc Restore By Symantec
Using Dell PC Restore by Symantec Use Dell PC Restore by Symantec only as the last method to restore your operating system. PC Restore restores your hard drive to the operating state it was in when you purchased the computer. -
Page 52: Resolving Software And Hardware Incompatibilities
Enabling System Restore If you reinstall Windows XP with less than 200 MB of free hard-disk space available, System Restore is automatically disabled. To see if System Restore is enabled: Click the Start button and click Control Panel. Click Performance and Maintenance. Click System. -
Page 53: Adding Parts
Adding Parts Front and Back View of the Computer Front View NOTE: The front-panel door does not close when you are using certain PC Cards or IEEE 1394, USB, or headphone connectors. Adding Parts... - Page 54 breakaway hinges (2) To prevent damage to your computer, the front door is designed to "break away" if it is opened too far. To reattach the front door, see page 57. IEEE 1394 connector Attach high-speed serial multimedia devices, such as digital video cameras. (This feature is only available on computers with an optional IEEE 1394 connector.) CD or DVD The drive activity light is on when the computer reads data from the CD or DVD drive.
-
Page 55: Back View
Back View NOTE: The front-panel door is removable; if you remove it or accidentally knock it off its hinges, it snaps back in place. For instructions on how to reattach the door, see page 57. Adding Parts... - Page 56 parallel connector Connect a parallel device, such as a printer, to the parallel connector. If you have a USB printer, plug it into a USB connector. mouse connector Plug a standard mouse into the green mouse connector. Turn off the computer and any attached devices before you connect a mouse to the computer.
-
Page 57: Reattaching The Front Door
It is recommended that you use the front USB connectors for devices that you connect occasionally, such as joysticks or cameras. microphone connector Use the pink microphone connector to attach a personal computer microphone for voice or musical input into a sound or telephony program. center/LFE connector Use the yellow center/LFE connector (available on computers with integrated sound) to attach your subwoofer. -
Page 58: Opening The Computer Cover
Align the two clips on the inside of the front door with the two hinge arms. Press inward on the front door until it clips to both hinge arms. hinge arms (2) in closed position Opening the Computer Cover CAUTION: Before you begin any of the procedures in this section, follow the safety instructions located in the Product Information Guide. - Page 59 Remove the computer stand, if it is attached (see page 12). CAUTION: To guard against electrical shock, always unplug your computer from the electrical outlet before opening the cover. NOTICE: Ensure that there is sufficient space to support the open cover—at least 30 cm (1 ft) of desk top space.
-
Page 60: Looking Inside Your Computer
Looking Inside Your Computer CAUTION: Before you begin any of the procedures in this section, follow the safety instructions located in the Product Information Guide. CAUTION: To guard against electrical shock, always unplug your computer from the electrical outlet before opening the cover. NOTICE: Be careful when opening the computer cover to ensure that you do not inadvertently disconnect cables from the system board. -
Page 61: System Board
System Board battery socket (BATTERY) page 79 CD drive connector (IDE2) password jumper (PWD1) page 78 main power connector (POWER) microprocessor fan connector (FAN) microprocessor connector (CPU) microprocessor power connector (12VPOWER) telephony voice modem connector (MODEM) back of computer front panel switch connector (FRONTPANEL) hard drive connector (IDE1) -
Page 62: Adding Pc Cards (Optional)
Adding PC Cards (Optional) CAUTION: Before you begin any of the procedures in this section, follow the safety instructions located in the Product Information Guide. You can add PC Cards to computers with integrated PC Card connectors. PC Card Types NOTE: "Type"... -
Page 63: Installing A Pc Card
Installing a PC Card NOTE: The length of some PC Cards may prevent the front-panel door from closing. PC Cards are generally marked with a symbol (such as a triangle or an arrow) to indicate which end to insert into the slot, and the cards are keyed to prevent incorrect insertion. If card orientation is not clear, see the documentation supplied with the card. -
Page 64: Removing A Pc Card
Removing a PC Card NOTICE: Use the PC Card configuration utility on the taskbar to select and stop a card from functioning before you remove it from the computer. If you do not remove the card in the configuration utility, you could lose data from open programs. -
Page 65: Adding Other Cards
Adding Other Cards CAUTION: Before you begin any of the procedures in this section, follow the safety instructions located in the Product Information Guide. NOTICE: You must use low-profile cards for your computer. A full-size card can cause damage to the computer or the card. -
Page 66: Adding Or Replacing A Video Card
You must use low-profile cards for your computer. A full-size card can cause damage to the computer or the card. Your Dell™ computer provides a connector for an AGP card. Shut down the computer through the Start menu (see page 21). -
Page 67: Removing A Video Card
Removing a Video Card Remove the filler bracket by raising the hinged lever and sliding the filler bracket up. hinged lever Press the card lever toward the PCI connector. Pull the card up and out of the card clip. notch lever card clip AGP connector... -
Page 68: Installing A Video Card
Installing a Video Card NOTE: If you purchased the optional video card, ensure that you connected your monitor cable to the correct video connector. NOTICE: You must use low-profile cards for your computer. A full-size card can damage the computer or the card. -
Page 69: Installing Memory
Dell. You should install your original memory modules in pairs in connectors DDR_A0 and DDR_B0. If possible, do not pair an original memory module with a new memory module. Otherwise, your computer may not function at optimal performance. - Page 70 Press out the securing clip at each end of the memory module connector. Align the notch on the bottom of the module with the crossbar in the connector. NOTICE: To avoid damage to the memory module, press the module straight down into the connector while you apply equal force to each end of the module.
-
Page 71: Removing Memory
Product Information Guide. NOTE: Memory purchased from Dell is covered under your computer warranty. Shut down the computer through the Start menu (see page 21). Ensure that your computer and attached devices are turned off. If your computer and attached devices did not automatically turn off when you shut down your computer, turn them off now. -
Page 72: Closing The Computer Cover
Closing the Computer Cover Ensure that all cables are connected, and fold cables out of the way. Gently pull the power cables toward you so that they do not get caught underneath the drives. Ensure that no tools or extra parts are left inside the computer. Close the cover: Pivot the cover down. -
Page 73: Appendix
Appendix Specifications Microprocessor Microprocessor type L1 cache L2 cache System Information System chip set DMA channels Interrupt levels System BIOS chip System clock Expansion Bus Bus types Bus speed AGP connector AGP connector size AGP connector data width (maximum) AGP video bus protocols PCI connectors PCI connector size PCI connector data width... - Page 74 Memory Architecture Memory connectors Memory capacities Minimum memory Maximum memory Memory type Drives Externally accessible Internally accessible Ports and Connectors Externally accessible: Parallel IEEE 1394 Video Keyboard Mouse Headphone Audio Network Internally accessible: Primary IDE channel Secondary IDE channel Serial ATA Video Video controller Appendix...
- Page 75 Audio Audio controller Network Network controller Controls and Lights Power control Power light Hard-drive access light Diagnostic code lights Power DC power supply: Wattage Heat dissipation Voltage (see the Product Information Guide for important voltage setting information) Backup battery Physical Height x Width x Depth (With stand) Weight...
- Page 76 Environmental Temperature: Operating Storage Relative humidity Maximum vibration: Operating Storage Maximum shock: Operating Storage Altitude: Operating Storage Appendix 10 to 35 C (50 to 95 F) NOTE: At 35°C (95°F), the maximum operating altitude is 914 m (3000 ft). –40 to 65 C (–40 to 149 F) 20% to 80% (noncondensing) 0.25 G at 3 to 200 Hz at 1/2 octave/min 0.5 G at 3 to 200 Hz at 1/2 octave/min...
-
Page 77: Standard Settings
Standard Settings The system setup program contains the standard settings for your computer. NOTICE: Unless you are an expert computer user, do not change the settings for this program. Certain changes might make your computer work incorrectly. See the following figure for an example of the main program screen. Appendix... -
Page 78: Viewing Settings
Viewing Settings Turn on (or restart) your computer. When the blue DELL™ logo appears, press <F2> immediately. If you wait too long and the operating system logo appears, continue to wait until you see the ® Microsoft Windows System Setup Screens The system setup program screens display the current configuration information for your computer. -
Page 79: Replacing The Battery
Locate jumper PSWD on the system board (see page 61) and remove the jumper plug. Close the computer cover (see page 72), plug your computer into an electrical outlet, and turn on the computer. The existing password(s) will be erased. Shut down the computer (see page 21). - Page 80 Ensure that your computer and attached devices are turned off. If your computer and attached devices did not automatically turn off when you shut down your computer, turn them off now. NOTICE: To disconnect a network cable, first unplug the cable from your computer and then unplug it from the network wall jack.
-
Page 81: Dell Technical Support Policy (U.s. Only)
Dell, as well as the verification of appropriate functionality of the computer and all Dell-installed hardware. In addition to this technician-assisted technical support, online technical support is available at support.dell.com. -
Page 82: Fcc Notices (U.s. Only)
Class B digital device. Once you have determined your system’s FCC classification, read the appropriate FCC notice. Note that FCC regulations provide that changes or modifications not expressly approved by Dell could void your authority to operate this equipment. -
Page 83: Fcc Identification Information
Toll-free numbers are for use within the country for which they are listed. When you need to contact Dell, use the electronic addresses, telephone numbers, and codes provided in the following table. If you need assistance in determining which codes to use, contact a local or an international operator. - Page 84 Tech Support Services Sales Aruba General Support Australia (Sydney) E-mail (Australia): au_tech_support@dell.com International Access Code: 0011 E-mail (New Zealand): nz_tech_support@dell.com Country Code: 61 Home and Small Business City Code: 2 Government and Business Preferred Accounts Division (PAD) For servers and storage...
- Page 85 Customer Technical Support (Penang, Malaysia) Country Code: 673 Customer Service (Penang, Malaysia) Transaction Sales (Penang, Malaysia) Canada (North York, Ontario) Online Order Status: www.dell.ca/ostatus International Access Code: 011 AutoTech (automated technical support) Customer Care (Home Sales/Small Business) Customer Care (med./large business, government) Technical Support (Home Sales/Small Business) Technical Support (med./large bus., government)
- Page 86 City Code Chile (Santiago) Sales, Customer Support, and Technical Support Country Code: 56 City Code: 2 China (Xiamen) Technical Support website: support.dell.com.cn Country Code: 86 Technical Support E-mail: cn_support@dell.com City Code: 592 Technical Support Fax Technical Support (Dimension™ and Inspiron™) Technical Support (OptiPlex™, Latitude™, and...
- Page 87 Country (City) International Access Code Country Code City Code Czech Republic (Prague) Website: support.euro.dell.com International Access Code: 00 E-mail: czech_dell@dell.com Country Code: 420 Technical Support City Code: 2 Technical Support Fax Customer Care Customer Care Fax Switchboard Denmark (Copenhagen) Website: support.euro.dell.com...
- Page 88 Country (City) International Access Code Country Code City Code Finland (Helsinki) Website: support.euro.dell.com International Access Code: 990 E-mail: fin_support@dell.com Country Code: 358 E-mail Support (servers): Nordic_support@dell.com City Code: 9 Technical Support Technical Support Fax Relational Customer Care Home/Small Business Customer Care...
- Page 89 Country (City) International Access Code Country Code City Code Germany (Langen) Website: support.euro.dell.com International Access Code: 00 E-mail: tech_support_central_europe@dell.com Country Code: 49 Technical Support City Code: 6103 Home/Small Business Customer Care Global Segment Customer Care Preferred Accounts Customer Care Large Accounts Customer Care...
- Page 90 Country (City) International Access Code Country Code City Code Hong Kong Website: support.ap.dell.com International Access Code: 001 E-mail: apsupport@dell.com Country Code: 852 Technical Support (Dimension™ and Inspiron™) Technical Support (OptiPlex™, Latitude™, and Dell Precision™) Technical Support (PowerApp™, PowerEdge™, PowerConnect™, and PowerVault™)
-
Page 91: Italy (Milan)
Country (City) International Access Code Country Code City Code Italy (Milan) Website: support.euro.dell.com International Access Code: 00 E-mail: support.euro.dell.com/it/it/emaildell/ Country Code: 39 Home and Small Business City Code: 02 Technical Support Customer Care Switchboard Corporate Technical Support Customer Care Switchboard... - Page 92 Technical Support (Dimension™ and Inspiron™) Technical Support outside of Japan (Dimension and Inspiron) Technical Support (Dell Precision™, OptiPlex™, and Latitude™) Technical Support outside of Japan (Dell Precision, OptiPlex, and Latitude) Technical Support (PDAs, projectors, printers, routers) Technical Support outside of Japan (PDAs,...
- Page 93 Macao Technical Support Country Code: 853 Customer Service (Penang, Malaysia) Transaction Sales Malaysia (Penang) Technical Support (Dell Precision, OptiPlex, and Latitude) International Access Code: 00 Technical Support (Dimension and Inspiron) Country Code: 60 Technical Support (PowerEdge and PowerVault) City Code: 4...
- Page 94 Relational Sales Home/Small Business Sales Fax Relational Sales Fax Switchboard Switchboard Fax New Zealand E-mail (New Zealand): nz_tech_support@dell.com International Access Code: 00 E-mail (Australia): au_tech_support@dell.com Country Code: 64 Technical Support (for desktop and portable computers) Technical Support (for servers and storage)
- Page 95 Country (City) International Access Code Country Code City Code Norway (Lysaker) Website: support.euro.dell.com International Access Code: 00 E-mail Support (portable computers): Country Code: 47 nor_nbk_support@dell.com E-mail Support (desktop computers): nor_support@dell.com E-mail Support (servers): nordic_server_support@dell.com Technical Support Relational Customer Care Home/Small Business Customer Care...
- Page 96 Technical Support (Optiplex, Latitude, and Precision) Country Code: 65 Technical Support (PowerEdge and PowerVault) Customer Service (Penang, Malaysia) Transaction Sales Corporate Sales South Africa (Johannesburg) Website: support.euro.dell.com International Access Code: E-mail: dell_za_support@dell.com 09/091 Gold Queue Country Code: 27 Technical Support City Code: 11...
- Page 97 International Access Code: 00 E-mail: swe_support@dell.com Country Code: 46 E-mail Support for Latitude and Inspiron: Swe-nbk_kats@dell.com City Code: 8 E-mail Support for OptiPlex: Swe_kats@dell.com E-mail Support for Servers: Nordic_server_support@dell.com Technical Support Relational Customer Care Home/Small Business Customer Care Employee Purchase Program (EPP) Support...
- Page 98 Trinidad/Tobago General Support Turks and Caicos Islands General Support U.K. (Bracknell) Website: support.euro.dell.com International Access Code: 00 Customer Care website: support.euro.dell.com/uk/en/ECare/Form/Home.asp Country Code: 44 City Code: 1344 E-mail: dell_direct_support@dell.com Technical Support (Corporate/Preferred Accounts/PAD [1000+ employees]) Technical Support (direct/PAD and general)
- Page 99 Employee Purchase Program (EPP) Customers Dell Sales Dell Outlet Store (Dell refurbished computers) Software and Peripherals Sales Spare Parts Sales Extended Service and Warranty Sales Dell Services for the Deaf, Hard-of-Hearing, or Speech-Impaired U.S. Virgin Islands General Support Venezuela General Support...
- Page 100 Appendix...
-
Page 101: Index
19 helpful tips, 20 how to, 19 cover closing, 72 Dell contacting, 83 Dell Diagnostics, 46 Dell Support website, 10, 32 Device Driver Rollback, 49 diagnostics, Dell, 46 display. See monitor documentation, 9 finding, 9 help file, 9 online, 10... - Page 102 Index hardware drivers, 48 problems, 32 Hardware Troubleshooter, 52 Help and Support Center, 10 help files accessing, 9-10, 25 Hyper-Threading, 20 IEEE 1394, 16 problems, 33 Internet problems, 27 Internet connection about, 18 options, 18 setting up, 18 IRQ conflicts, 52 keyboard problems, 33 lights...
-
Page 103: Troubleshooting
39 volume, 39 speaker problems, 39 volume, 39 specifications, 73 support contacting Dell, 83 system board, 61 System Restore, 49-50 system setup program, 77 Tell Me How help file accessing, 9, 25 Troubleshooting Help and Support Center, 25... - Page 104 Index Index...
Need help?
Do you have a question about the Dimension H7228 and is the answer not in the manual?
Questions and answers