Table of Contents
Advertisement
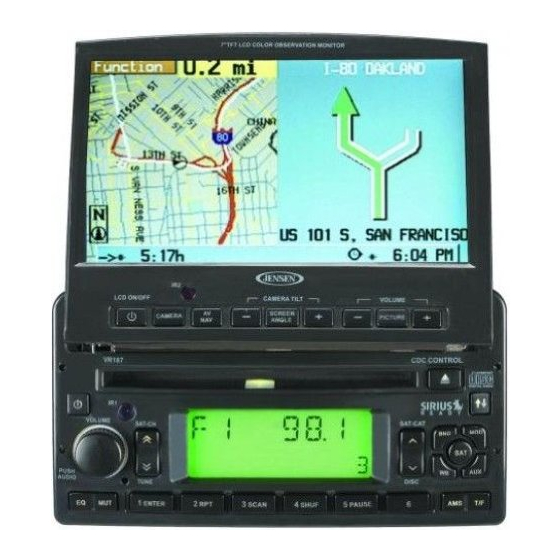
VR187
Owner's Manual
VR187
Ir1
VOLUME
SAT-CH
PUSH
AUDIO/MENU
TUNE
LOUD
3 SCAN
1 ENTER
2 RPT
EQ
MUT
ASA Electronics Corporation
www.asaelectronics.com
© 2005 ASA Electronics Corporation
featuring
JENSEN
7" TFT LCD COLOR OBSERVATION MONITOR
CDC CONTROL
SAT-CAT
BND
WB
DISC
4 SHUF
6
5 PAUSE
AMS
v.110905
Thank You!
Thank you for choosing a JENSEN product. We hope you will find the instructions in this owner's
manual clear and easy to follow. If you take a few minutes to look through it, you'll learn how to
use all the features of your new JENSEN receiver for maximum enjoyment.
System Features . . . . . . . . . . . . . . . . . . . . . . . . . . . . . . . . . . . . . . . . . . . . . . . . . . . . . . . . . . 1
Preparation . . . . . . . . . . . . . . . . . . . . . . . . . . . . . . . . . . . . . . . . . . . . . . . . . . . . . . . . . . . . . . 3
Installation . . . . . . . . . . . . . . . . . . . . . . . . . . . . . . . . . . . . . . . . . . . . . . . . . . . . . . . . . . . . . . . 5
Wiring . . . . . . . . . . . . . . . . . . . . . . . . . . . . . . . . . . . . . . . . . . . . . . . . . . . . . . . . . . . . . . . . . . . 6
Basic Operation. . . . . . . . . . . . . . . . . . . . . . . . . . . . . . . . . . . . . . . . . . . . . . . . . . . . . . . . . . . 7
Radio Operation . . . . . . . . . . . . . . . . . . . . . . . . . . . . . . . . . . . . . . . . . . . . . . . . . . . . . . . . . . 10
CD Player Operation . . . . . . . . . . . . . . . . . . . . . . . . . . . . . . . . . . . . . . . . . . . . . . . . . . . . . . . 12
CD Changer Operation . . . . . . . . . . . . . . . . . . . . . . . . . . . . . . . . . . . . . . . . . . . . . . . . . . . . . 13
Sirius Operation . . . . . . . . . . . . . . . . . . . . . . . . . . . . . . . . . . . . . . . . . . . . . . . . . . . . . . . . . . 14
LCD Monitor Operation. . . . . . . . . . . . . . . . . . . . . . . . . . . . . . . . . . . . . . . . . . . . . . . . . . . . . 16
Remote Control . . . . . . . . . . . . . . . . . . . . . . . . . . . . . . . . . . . . . . . . . . . . . . . . . . . . . . . . . . . 17
Troubleshooting . . . . . . . . . . . . . . . . . . . . . . . . . . . . . . . . . . . . . . . . . . . . . . . . . . . . . . . . . . 18
Ignition and Interference Noise . . . . . . . . . . . . . . . . . . . . . . . . . . . . . . . . . . . . . . . . . . . . . . 18
Maintenance. . . . . . . . . . . . . . . . . . . . . . . . . . . . . . . . . . . . . . . . . . . . . . . . . . . . . . . . . . . . . . 18
Specifications . . . . . . . . . . . . . . . . . . . . . . . . . . . . . . . . . . . . . . . . . . . . . . . . . . . . . . . . . . . . 21
Warranty. . . . . . . . . . . . . . . . . . . . . . . . . . . . . . . . . . . . . . . . . . . . . . . . . . . . . . . . . . . . . . . . . 21
System Features
Features of the JENSEN VR187 mobile audio system include:
MOD
•
PLL Synthesizer Stereo Radio
SAT
•
Sirius-Ready Satellite Radio Function
AUX
•
Integrated 7" LCD Monitor with 5-Position Tilt Function
•
Compatible with Audiovox NPD 5500 Navigation System and VCCT130 Tilt Camera
DIS
•
Automatic Memory Storing
•
Preset Equalization
•
Electronic Shockproof (ESP) Function
•
Digital Compact Disc Player
•
CD Changer Control
•
Auxiliary Input Function
Advertisement
Table of Contents

Related Manuals for Jensen VR187


Summary of Contents for Jensen VR187
- Page 1 PUSH • Integrated 7” LCD Monitor with 5-Position Tilt Function AUDIO/MENU DISC TUNE LOUD • Compatible with Audiovox NPD 5500 Navigation System and VCCT130 Tilt Camera 3 SCAN 4 SHUF 1 ENTER 2 RPT 5 PAUSE • Automatic Memory Storing •...
-
Page 2: Table Of Contents
Moniteur intégré d'affichage à cristaux liquides de 7"avec la fonction de l'inclinaison 5-Position • Compatible con el sistema de navegación de Audiovox NPD 5500 y la cámara fotográfica de • Compatible avec le système de navigation d'Audiovox NPD 5500 et l'appareil-photo de l'incli- la inclinación VCCS130... -
Page 3: Preparación
VR187 Preparation Elección del Lugar para la Instalación Los siguientes consejos lo ayudarán a determinar el mejor lugar para instalar la unidad: Tools and Supplies • Seleccione un lugar en el cual el equipo no interfiera con las funciones propias del conduc- The following tools and supplies are needed to install the unit. - Page 4 VR187 Preparation (continued) Preparación (continuado) Disconnect Battery Desconexión de la Batería Before you begin, turn off the vehicle ignition and disconnect the battery negative terminal. Antes de empezar, apague la ignición del vehículo y desconecte el terminal negativo de la batería.
-
Page 5: Instalación
VR187 Installation Instalación Mounting the Sleeve Montaje de la Manga Insert the sleeve into the opening of the dashboard, and bend open the appropriate tabs with a Inserte la manga dentro de la apertura del tablero, luego doble las lengüetas correspondientes screwdriver to secure the sleeve in place. -
Page 6: Cableado
VR187 Wiring / Cableado / Câblage VCCT130 TILT CAMERA NOT INCLUDED (PURCHASED SEPARATELY) CAMERA NOT INCLUDED (PURCHASED SEPARATELY) WIRING CHART OSA FUSE BLUE (CH:1) ISA FUSE BROWN (CH:2) CAMERA GREEN (CH:3) NOT INCLUDED ORANGE (CH:4) (PURCHASED SEPARATELY) GREEN BLUE BROWN... -
Page 7: Operación Básica
VR187 Basic Operation Operación Básica 1. Potencia 1. Power Presione el botón de la energía (1) o cualquier otro botón en el frente del radio (excepto el botón de Press the power button (1) or any other button on the front of the radio (except the eject button) expulsar) para encender la unidad. - Page 8 VR187 Basic Operation (continued) Pitido Audible Cuando esta función se enciende, la unidad emitirá un pitido audible cada vez que se presione 6. Menu Operation un botón. Apagando la unidad se desactiva el pitido audible, y ya no se escucharán cuando se presionen los botones.
- Page 9 VR187 Basic Operation (continued) 9. Entrada Auxiliar Presione AUX (9) para ingresar en modo auxiliar cuando se conecte un dispositivo de audio 7. Equalizer Selector portátil a la unidad con el cable AUX IN en la parte trasera del panel.
-
Page 10: Operación De La Radio
VR187 Radio Operation Operación de la radio 11. Selección de Banda 11. Select a Band Pulse BND (11) para sintonizar la radio entre las tres bandas FM y dos bandas AM. Cada banda Press BND (11) to change between three FM bands and two AM bands. Each band stores up to Cuando opere la unidad en modo CD o CDC, almacena la selección de hasta seis emisoras. - Page 11 VR187 Radio Operation (continued) Operación de la radio (continuado) 14. Almacenamiento Automático / Preselección Mediante Escáner 14. Automatically Store / Preset Scan Almacenamiento Automático de Emisoras Automatically Store Seleccione seis emisoras de señal fuerte y almacénelas en la banda actual. Seleccione una To automatically select six strong stations and store them in the current band, select a band (if banda si fuera necesario.
-
Page 12: Operación Del Reproductor De Cd
VR187 CD Player Operation Operación del Reproductor de CD 16. Insert and Eject CD 16. Inserte y Quite CDs Insert a CD label-side up into the CD slot (16a), and the disc will begin to play. Press the eject button Inserte un CD con el sello hacia arriba (16a). -
Page 13: Operación Del Cambiador De Cd
VR187 CD Changer Operation 24. Consejos sobre Discos • Utilizar discos de formas no estándares, pueden dañar la unidad. Refer to the owner’s manual included with the CD changer for instructions on installing, loading • No pegue papel, cinta o ninguna otra sustancia a ningún lado del CD, pues puede causar el and using the CD magazine. -
Page 14: Operación De Radio Satelital Sirius
VR187 Sirius Satellite Radio Operation Operación de Radio Satelital Sirius 25. Select Sirius Mode 25. Radio Satelital Sirius presionando momentáneamente Para activar radio satelital Sirius, SAT (25). To directly access Sirius satellite radio mode, press SAT (25) momentarily. 26. Selección de Canal 26. - Page 15 VR187 Sirius Satellite Radio Operation (continued) Exhiba en pantalla el número de identificación Sirius de 12 dígitos presionando ENTER inmediatamente luego de ingresar al modo Sintonía Directa. Presione DIS (29) para pasar toda la pantalla. Para reasumir la operación normal, presione cualquier botón menos DIS.
-
Page 16: Operación Del Lcd
Presione NAV (32) para acceder directamente a la fuente de Navegación AV (AV4), el cual sirve the Audiovox NPD5500 navigation computer (sold separately). Audio from this source will be solamente para ser usado con el computador de navegación Audiovox NPD5500 (vendido por heard from the speaker on the back of the monitor screen. -
Page 17: Control Remoto
VR187 LCD Operation (continued) Presione PICTURE "-" o "+" para seleccionar el nivel deseado. Mantenga presionado PICTURE por más de tres segundos para acceder a un menú alternativo con las 33. Volume Level Adjustment siguientes opciones: AV1 (On/Off), AV2 (ON/OFF), AV3 (ON/OFF) y AV4 (Video/RGB). El menú AV4 Press VOLUME "-"... -
Page 18: Troubleshooting
VR187 Ignition and Interference Noise Troubleshooting Ignition Noise Problem Cause Corrective Action No power. Vehicle ignition switch is not on. If the power supply is connected to the The most common source of noise in reception is the ignition system, due to the fact that the vehicle accessory circuits but the radio is placed relatively close to the ignition system (engine). -
Page 19: Corrección De Problemas
VR187 Ruido de Ignición e Interferencia Corrección de Problemas Ruido de Ignición Problema Causa Acción Correctiva La fuente más común de ruido en la recepción es el sistema de ignición, debido al hecho de que No hay corriente. La llave de la ignición del Si la alimentación de energía está... -
Page 20: Dépannage
VR187 Bruit d'allumage et d'interférence Dépannage Bruit d'allumage Problème Cause Action corrective Pas de puissance L'allumage du véhicule n'est pas Si l'alimentation est branchée aux La source la plus commune du bruit dans la réception est le système d'allumage, à cause du fait que en marche circuits accessoires du véhicule mais... -
Page 21: Specifications
Power Supply Requirements......DC 12 Volts, Negative Ground AUDIOVOX SPECIALIZED APPLICATIONS, LLC (the Company) warrants to the original retail Chassis Dimensions . -
Page 22: Especificaciones
Suministro de corriente ........12 VDC, negativo a tierra AUDIOVOX SPECIALIZED APPLICATIONS, LLC (la Compañía) garantiza al comprador Dimensiones . -
Page 23: Caractéristiques
Alimentation ........12 VDC, mise à la terre négative Audiovox Specialized Applications LLC (la Société) garanti à l'acheteur en détail d'origine de Dimensions .
Need help?
Do you have a question about the VR187 and is the answer not in the manual?
Questions and answers