Table of Contents
Advertisement
Quick Links
Advertisement
Table of Contents

Subscribe to Our Youtube Channel
Related Manuals for Rompa snoezelen Magic Carpet


Summary of Contents for Rompa snoezelen Magic Carpet
- Page 1 Magic Carpet Installation Guide...
- Page 2 Magic Carpet Magic Carpet is an innovative, inter- active projection system that requires installation by a competent audiovisual engineer*. Please ensure that you read through the guide fully before attempting to install a Magic Carpet system. There are a num- ber of considerations that need to be taken into account before you begin.
-
Page 3: Table Of Contents
Contents 1. About Magic Carpet? ..........2. Tool List ................3. Risk Assessment ............4. Planning the install ........... 5. System Hardware List ..........6. Components List ............7. Ceiling Kit installation options ......8. Plate Assembly ............9. Wall Rack ................. 10. -
Page 4: About Magic Carpet
1 . About Magic Carpet Magic Carpet projects specially designed movement responsive software applications on to a variety of surfaces. Users simply move over the image to engage with the projected content. In most instances, the projector is installed on or above the ceiling to project on to the floor but it is also possible to install the system to project on to walls and other vertical surfaces. -
Page 5: Tools List
2. Tools List To install Magic Carpet you will need the following tools and equipment not supplied with the installation kit: Ladder / Podium Steps / Tower - when working at heights exceeding 3M Screwdrivers Tape Measure Pliers Wire Cutters Cordless Power Drill SDS Power Drill (if drilling into concrete) 2M+ Straight Edge / Cutting Ruler... -
Page 6: Risk Assessment
3. Risk Assessment Sensory Guru is keen for all parties to be aware of the risks associated with the installation of Magic Carpet, in order to reduce the likelihood of harm befalling installers, the public and end users. If you are undertaking the installation on behalf of Sensory Guru you will have a job specific Risk Assessment schedule in your installation pack. - Page 7 4. Planning It is important to plan out the installation so that you can be sure cable routes, power sources, fixings and other considerations permit a smooth trouble free install. The following set of steps are intended to help you think through each stage and avoid potential hold ups. Reconcile kit list with packing list –...
-
Page 8: Components List
5. Components List Ceiling Installation Kit & Wall Rack Projector Fixing Plate 1 x Ceiling Fixing Plate 600x600mm to mount projector, camera and the Front Surface Mirror. Designed to fit into a 600x600 ceiling grid tile opening. Z-Bracer Supports 2 x Z-Bracer plate ceiling supports for installation to concrete and plaster ceilings Mirror Bracket Assembly... - Page 9 Above Ceiling Plate Support Kit 4a = 8 x M6 Eye Bolts 4b = 2 x 2M Steel Wire 4c = 4 x Zipclips 4d = 4 x Eye Bolt Nut Fixings Projector Angle Bracket Fixings 4 x Angle Bracket Fixings 4 x M5 Hex Bolts (fix Bracket to Plate) 4 x M4 Cross Head Bolts (fix Bracket to Projector)
-
Page 10: System Hardware
6. System Hardware Components checklist 1 x Dell OptiPlex SFF PC (with Magic Carpet Software and USB Dongle) 1 x 1.5M IEC Power Cable (Power to PC) 1 x LogiTech Wireless USB Keyboard 1 x TP-Link Router 1 x Wireless Adapter 1 x Projector (NEC / Panasonic / Epson) 1 x 10M IEC Power Cable (Power to Projector) - Page 11 7. Installation Options Suspended Ceiling Installation Installation for Suspended Ceilings The fully populated plate fits into a 600x600mm ceiling grid tile opening. M8 Eye Bolts are screwed into the welded M8 nut on the top side of the plate. Steel Wire is threaded through the Eye Bolt and fixed using Zip Clips (each rated to support 80KG’s).
- Page 12 Plaster / Concrete Ceiling Installation Plate installation for Plaster / Concrete Ceilings Prior to populating the plate with the projector, mirror and camera, you will need to fix the plate to the Z-Bracers using the M6 Bolts and Washers. At this point you only need to nip the bolts up as you will be removing the plate once you have fixed the Z-Bracers to the ceiling.
-
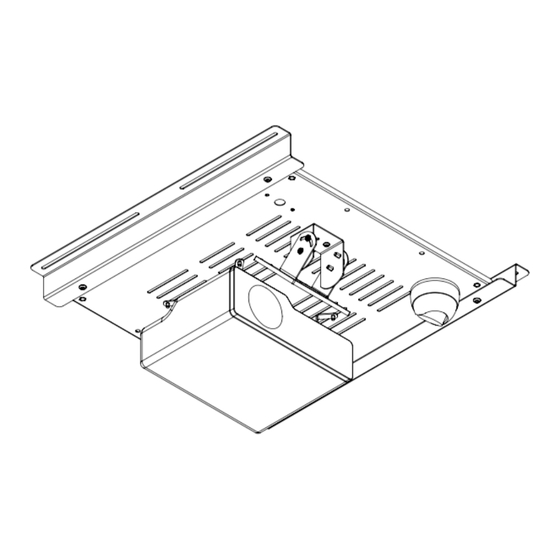
Page 13: Plate Assembly
8. Plate Assembly Populating the Projector Mounting Plate Mirror Camera Projector Mounting the Projector Fix the brackets to the underside of the projector using the M4 Bolts and nip them up finger tight allowing them to rotate slightly. The long side of the Projector Angle Bracket Fixings sit flush to the underside of the projector mounting plate, as shown in the image above. - Page 14 Mounting the Camera The camera can be mounted on either side of the plate. Detail on the left shows a 20mm hole with and 2 x 5mm holes. The camera cable threads though the 20mm hole and the Mounting Ring fixes to the plate using 2 x M4 15mm Bolts.
-
Page 15: Wall Rack
9. Wall Rack BOTTOM Fixings Ensure that you use the correct fixings. Magic Carpet Installation Guide 2022©... -
Page 16: Cabling
10. Cabling Amplifier Internal Speaker Cable into Terminal Connectors Terminal Connector Wall Speakers Dell OptiPlex SFF PC Power Supply Speaker Cable 3.5mm Audio 3.5mm Jack Software License Dongle CAT5 Cable USB Cable HDMI Port Wireless Router IEC Power Cable IEC Port Magic Carpet Installation Guide 2022©... - Page 17 NB Please ensure all cabling is neat and tidy, using surface mounted conduit 4 Way Extension Cable USB Cable USB Repeater Infrared Camera NB The camera IR points will illuminate red when connected to USB power. HDMI Cable Projector HDMI Port IEC Power Cable IEC Port Magic Carpet Installation Guide 2022©...
-
Page 18: Commissioning
11. Commissioning Power On Power on all hardware plugged into the 4 way. When PC boots make sure projector aspect ratio is set to 4:3. Align the Mirror Tilt the mirror into position. The projected image should hit the mirror at a 45 degree angle so the projection falls directly below it. -
Page 19: Testing & Handover
12. Testing & Handover Testing • Test iOS/Android App Connectivity: Connect your phone/tablet to the Magic Carpet to ensure the router is working and that you can control the system. • Router SSID: MagicCarpet: Password: magiccarpet. • Default IP for iOS APP: 192.168.0.200 •... - Page 20 Contact us Phone: +44(0)1246 211 777 Email: sales@rompa.com Address: Rompa Ltd, Goyt Side Road, Chesterfield, S40 2PH...
Need help?
Do you have a question about the snoezelen Magic Carpet and is the answer not in the manual?
Questions and answers