Table of Contents
Advertisement
Quick Links
1. Product Name
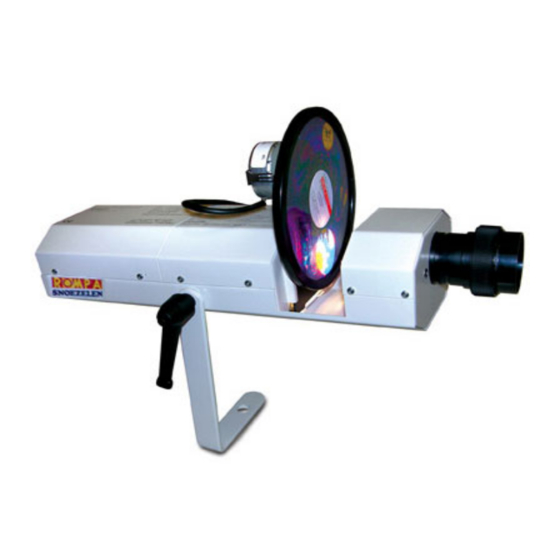
Super Solar 100C Projector
2. Product Code
18530 ‐ with Standard lens
18531 ‐ with 60mm lens
3. Colour
White
4. Brief Description
A quiet, low heat output projector. Light, compact and easy to use. Can be suspended from
the ceiling or clamped onto a shelf.
5. Contents
Super Solar Projector
IEC lead (power cable)
Advertisement
Table of Contents

Related Manuals for Rompa Super Solar 100C


Summary of Contents for Rompa Super Solar 100C
- Page 1 1. Product Name Super Solar 100C Projector 2. Product Code 18530 ‐ with Standard lens 18531 ‐ with 60mm lens 3. Colour White 4. Brief Description A quiet, low heat output projector. Light, compact and easy to use. Can be suspended from the ceiling or clamped onto a shelf. 5. Contents Super Solar Projector IEC lead (power cable) ...
- Page 2 6. Snoezelen® Stimulations • Sight 7. Best Use For best effect, use in a darkened room. The effects should be projected onto a pale coloured and un‐patterned wall. 8. Compatible ROMPA® Products The Super Solar 100C must also be used with an accessory in the rear gate, typically a Wheel Rotator: 13170 Wheel Rotator – 1 revolution in 2 minutes 16570 Wheel Rotator – 1 revolution in 6 minutes Please note: The Super Solar 100C Projector is not compatible with the 14719 Wheel Safe Rotator. An Effect Wheel must be used in the Wheel Rotator e.g. 13342 Deep, 20507 Sensory … Please see www.rompa.com for our extensive range of wheels Further accessories may be used with the Effect Wheels to move or multiply the effects e.g. 19742 Distortion Wheels, 14024 Panoramic Rotator … Please see www.rompa.com for our extensive range of accessories ® 15980 Replacement bulb for ROMPA Solar Projector (12V, 100W) 9. Starting Up • Connect the IEC lead to the socket at the rear of the Projector. • Place an Effect Wheel on a Wheel Rotator. ...
-
Page 3: Detailed Description
10. Detailed Description The perfect projector! Not only light, compact and straight‐forward to use, but also very quiet, with comparatively low heat output. The Super Solar 100C Projector can be suspended from a ceiling or clamped down to a shelf, and is a key component in a Snoezelen® environment. 1. Select the effect(s) G and the appropriate effect accessory. This projector requires either: A Wheel Rotator and Effect Wheels OR A Cassette Rotator and Effect Cassettes If using cassettes, make sure the Cassette Rotator is for the correct size cassette (50mm or 76mm 2. Fit the effect onto the effect accessory (e.g. put the Effect Wheel onto the Wheel Rotator). 3. -
Page 4: Technical Specification
11. Safety • Always supervise the use of this product • The projector comes with a 2 metre, 3 core IEC lead. A suitable 3 Amp fuse should be connected as follows : Brown = Live Blue = Neutral Green/Yellow = Earth • When hanging the projector, ensure the beam/frame is strong enough to support the weight of the projector 12. Technical Specification Lamp: 100W, Type ‘Thorn M28’ Lamp life: average 2000 hours Light Output: 575 lumens with new lamp Colour temperature: 3000K ... -
Page 5: Installation
13. Installation Points to consider: • Access to the projector if you intend to frequently change the accessories • Install OUT OF REACH ‐ the projector becomes warm with use • Do not position the projector to allow light to shine directly into someone’s eyes There are three methods of mounting the projector. Please note the information below and consider the most appropriate way to mount the projector. Suspend from above using the hanging bracket, firmly fixed to a strong beam or frame. It is your responsibility to make sure that the beam/frame is capable of supporting the weight of the projector. The hole in the bracket for a fixing e.g. a screw/bolt etc is 14mm diameter. Purchase an appropriate fixing – this is not included. Make sure the projector is securely attached to an appropriate mounting point and that the bracket knobs and locking levers as well as your fixtures used are securely tightened. Fit the safety chain or cable! One end of the chain or cable is fitted to the eye hole on the side rear fab grill on the Solar 100C. The other end is securely fitted as tight as possible to an immovable object. Methods of mounting continued: Mounted on top of a flat surface by using the ... - Page 6 III. Fixed with the hanging bracket under the projector bolted to an immovable flat surface. Consider the projection distances shown below: ...
-
Page 7: Care And Maintenance
14. Care and Maintenance To change the lamp: Do not handle the lamp with bare hands – hold by the pins, wearing gloves etc. 1. Switch off the Projector and unplug. Leave to cool for 20 minutes. 2. Remove the cover plate screws. There are four of these and you will require a Philips (positive/cross‐head) screw‐driver. ... - Page 8 3. Remove the cover plate F. ...
- Page 9 4. Lift the black cover flap. (Screws on black flap may need to be loosened first) Cover flap Remove old lamp without touching it with bare hands. ...
- Page 10 Align the 2 holes with the 2 pins 5. Replace with a new lamp not touching it with bare hands. Align the two pins of the lamp with the 2 holes in the lamp housing. 6. Flatten down the black cover flap. ...
-
Page 11: Troubleshooting
7. Replace and secure the cover plate. Important: a) A colour wheel or effect must always be in the gate of the property when in use. Failure to do so may result in the melting of the plastic parts in the assembly. b) The projector should always be used within 90° of the horizontal. c) Do not touch the lamp with bare hands, use gloves, a soft cloth or tissue. d) Do not attempt to service the projector without the help of a suitably qualified individual. Cleaning: a) After 3 months (or 500 hours) use, or when changing the bulb, the optical system may need cleaning. b) Use a soft tissue or lens cloth with a little methylated spirit or pure alcohol to clean the lens c) To clean the mirror, first remove the lamp Please note: any marks on the outside of the projector should be wiped off using a dry cloth. A damp cloth could damage the components inside. 15. Troubleshooting • Make sure the Projector has been plugged in and switched on (switch at the rear of the Projector). • The Effect Wheel should be in the rear gate so it is projected the correct way round. • If your Prism or other front‐attaching accessory will not fit, make sure the extension collar (the black ring at the front of the Projector that is sometimes referred to as a ... - Page 12 Further copies of these instructions can be downloaded at www.rompa.com We hope you find our instructions invaluable. If you have any suggestions for improving them further your comments will be greatly received – please contact us at producthelp@rompa.com ...
Need help?
Do you have a question about the Super Solar 100C and is the answer not in the manual?
Questions and answers