Advertisement
- 1 Product Introduction
- 2 What's in the Box?
- 3 Product Overview
- 4 Driving Instructions
- 5 Specifications
- 6 Micro SD Card Instrucons
- 7 System Interface Description
- 8 Screen Shortcut Operations
-
9
Settings Interface
- 9.1 Loop Recording
- 9.2 Video Encoding
- 9.3 Audio
- 9.4 G-Sensor Sensivity
- 9.5 Timelapse Recording
- 9.6 Frequency
- 9.7 Sleep Mode
- 9.8 Screensaver
- 9.9 Touch Tone
- 9.10 Volume
- 9.11 Screen Brightness
- 9.12 Rear Camera Display
- 9.13 Time Senttings
- 9.14 Time Format
- 9.15 Fatigue Reminder
- 9.16 Speed Units
- 9.17 Time Zone Settings
- 9.18 GPS Info
- 9.19 Language
- 9.20 Format SD Card
- 9.21 Factory Reset
- 9.22 About
-
10
Installation Guide
- 10.1 Front Camera Installation
-
10.2
Rear Camera Installation
- 10.2.1 Step 1: Place the rear camera
- 10.2.2 Step 2: Access your trunk's wiring areas
- 10.2.3 Step 3: Conceal the rear camera cable
- 10.2.4 Step 4: Connect the rear camera cable to the rear camera extension cable
- 10.2.5 Step 5: Connect the red trigger wire to one of the reverse lights
- 10.2.6 Step 6: Route the rear camera cable to the front of the vehicle and connect it to the main camera unit
- 10.2.7 Step 7: Start your car and turn on the Dashcam
- 11 Firmware Update Instruction
- 12 FAQ
- 13 Notes
- 14 Contact information
- 15 Documents / Resources
Product Introduction

Before using the product, make sure to read the manual to ensure that you are installing and using the product correctly. The product will not work with all makes / models and may not work with older vehicles.
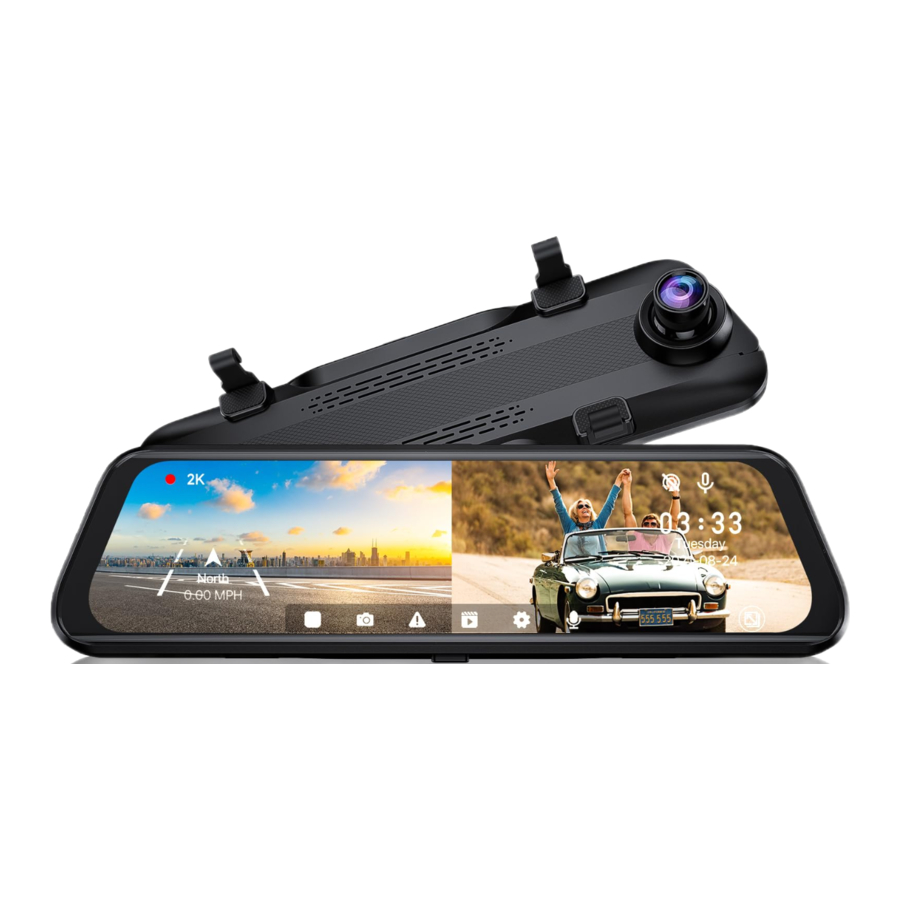
The NexiGo D81 Rearview Mirror Dashcam is a must-have for your vehicle. With both a front and rear camera to give you an all-encompassing view around your vehicle, it can record from both cameras simultaneously. Capture everything that is happening around you while driving or even when parked. The D81 comes with an emergency capture function. If involved in an accident, the system automatically will capture and store footage of the incident to provide crucial evidence.
What's in the Box?


Product Overview


Driving Instructions
![]()
Before driving it is suggested that you turn off the display so that your rearview mirror is not blocked. The one exception is while reversing, it is recommended to keep the unit on while reversing in order to be able to see cars or other obstacles behind you. To turn off the screen press the power button, to turn off the Dashcam press and hold the power button.- Ensure that you are familiar with the unit before using it while on the road.
- Do not use the Dashcam interface while driving. This is a distraction and could cause you to get into an accident. For safety, always ensure that the screen is off while you are moving.
Specifications
Display:
Display Size: 9.66inch
Display Type: IPS
Camera Resolution:
Front: 2560*1440P
Rear: 1920*1080P
General:
Working Temperature: -20°C - 70°C
Storage Temperature: -30°C - 85°C
Input Voltage: 9V - 24V
Power Supply: 12V to 5V Auxiliary Power Adapter
Micro SD Card Instrucons
![]() For optimal performance and reliability, it is recommended that you use UHS-1 or higher Micro SD cards from reputable manufacturers and brands.
For optimal performance and reliability, it is recommended that you use UHS-1 or higher Micro SD cards from reputable manufacturers and brands.- The Dashcam is compatible with 16-256 GB Micro SD cards.
- It is recommended that you reformat the Micro SD card at least once a month.
- It is recommended that you regularly back up your data from the Micro SD card to an external drive to ensure that the device can operate properly and that you do not overload the disk.
- Micro SD cards are subject to degradation over me due to repeated wring/erasing cycles. It is recommended that you replace the Micro SD Card every year or two to ensure that this degradation does not affect your recordings.
- To prevent data corruption, do not insert or remove the Micro SD card while the Dashcam is operating or powered on.
- The device has already been pre-installed with a 128G Micro SD card from the factory. Please format the Micro SD card for the first me.
System Interface Description
The system interface will display when the unit is first turned on as well as while driving.

 Video Recording Icon:
While the Dashcam is recording, this icon will blink slowly. If the icon is red, then the system is recording properly. If the icon is yellow, the Dashcam is in Emergency Recording Mode. If no icon is present then the system is not currently recording.
 GPS Direction Icons:
The GPS Direction icon indicates the current driving direction and speed of the vehicle. This icon is displayed on the le of the screen. This icon will not be displayed if the GPS antenna is not connected.
 Record Icon: Tap this icon to begin or pause recording.
 Snapshot Icon: Tap this icon to take a snapshot of the currently displayed screen.
 Emergency Lock Icon: Tap the lock icon to lock the current recording. It will be tagged as an Emergency Video and placed into the appropriate folder.
 Playback Icon: Tap this icon to enter playback mode. This allows you to playback previous recordings and view photos. Select the appropriate recording or picture to review it.
 Settings Icon: Tap this icon to enter the settings menu.
 Sound Recording Icon: Tap this icon to record sound or stop recording sound.
 GPS Status Icons:
When the GPS Antenna is connected and active it will display this icon: ![]() ,
,
When the GPS Antenna is connected but not active it will display this icon:  ,
,
When the GPS Antenna is not connected to the Dashcam, no icon will be displayed.
 Sound Recording Status Icon:
When the Dashcam is recording sound it will display this icon:![]() ,
,
When the Dashcam is not recording sound it will display this icon:  .
.
 Preview Interface Icon:
Tap this icon at the boom right of corner to enter the preview interface. The icon may only be partially visible depending on what is currently on the screen.
 Date/Time Stamp: The date and me will be displayed in the upper right hand corner of the primary display.
Screen Shortcut Operations
How to Use the Dashcam's Screen Interface
- Swipe up or down on the le-hand side of the screen to adjust the viewing angle.

- Swipe le or right on the screen to switch between front and rear view cameras.

- Swipe up or down on the right-hand side of the screen to adjust the brightness. When swiping in this area, the brightness indicator
![]() will appear and you can also use this indicator to adjust the brightness.
will appear and you can also use this indicator to adjust the brightness.

- Double-tap the screen to save the currently displayed image or video. Use this while operating the vehicle to quickly save the Dashcam's information.


 will appear and you can also use this indicator to adjust the brightness.

Preview Interface

 Note: In the Preview Interface, the device will display the full field of recording. You will not be able to change the viewing angle while in this view. This is intentional and allows you to get a good idea of the full field of view while installing the Dashcam.
Settings Interface
Loop Recording
Rather than recording your entire trip, you can record small segments if you want. These loops can be 1, 3, or 5 minutes in duration. When utilizing the loop recording function, if the Micro SD card is filled, the Dashcam will automatically erase the oldest files to make room for new recordings. Options: 1 Min / 3 Mins / 5 Mins
Video Encoding
Choose the video encoding you like.
Options: H.264 / H.265
Audio
Turn sound recording on or off.
Options: OFF / ON
G-Sensor Sensivity
The built-in "G-Sensor" will detect sudden accelerations, stops, and / or collisions. When this happens, the Dashcam will automatically lock the footage surrounding the incident. To ensure that this footage is not lost, it is highly recommended that you back up this footage onto an external drive or your computer immediately afterward to prevent it from being overwritten. You can adjust the sensivity of the G-Sensor. It has three separate settings: Low, Medium, and High sensivity as well as an option to turn it off.
Options: OFF / Low / Medium / High
Notes:
- When driving, if the road is bumpy such as on gravel or dirt, please adjust the sensivity to Low to prevent accidental emergency recordings. When parking, it is recommended to adjust the sensivity to Medium.
- Due to variables within the system, the Dashcam may not save every emergency video under the Emergency Video directory. If you are unable to locate an emergency video under the Emergency Video directory, please check under the normal directory.
Timelapse Recording
This function requires a connection to the Dash Cam Hardwire Kit (Not Included) to record.
Instructions on how to use this feature are included with that kit.
Options: OFF / 12H / 24H / 48H
Frequency
If you notice flickering from lights when playing back videos, please attempt to swap to the other powerline frequency. This should allow the video to correctly match the frequency of the power that is displayed in your area of residence and should eliminate flickering.
Options: 50Hz / 60Hz
Sleep Mode
Select a timer for the screen to enter Sleep Mode. When the Dashcam enters Sleep Mode, the screen's display will turn off and not show any video. However, the Dashcam will continue to record video.
Options: OFF / 1 Min / 3 Mins
Screensaver
Enter Screensaver Mode. The video display will only show the driving Direction, the speed of the vehicle, and the me if connected via GPS. No video image will be displayed while the Screensaver is active.
Options: OFF / ON
Touch Tone
Toggle the keypad sounds on or off.
Options: OFF / ON
Volume
Adjust the playback and system voice prompt volume.
Screen Brightness
Adjust the brightness of the screen.
Rear Camera Display
Flip the image in the rear camera vertically or horizontally.
Options: Mirror Vercally / Mirror Horizontally
Time Senttings
Adjust the current me and date.
Note:
Any me and date settings may be automatically overwritten when connecting to satellite data via GPS.
Time Format
This setting allows you to set different me formats.
Options: YY-MM-DD / DD-MM-YY / MM-DD-YY
Fatigue Reminder
Every two hours of active driving, the device will play a tone to remind you to rest. You can disable this under Settings.
Speed Units
Change the unit or measurement that speed is displayed in. This feature is ed to the GPS antenna, as such this is only available when the GPS antenna is connected.
Options: KM/H and MPH
Time Zone Settings
You can select your Time Zone. This feature is tied to the GPS antenna, as such this is only available when the GPS antenna is connected.
GPS Info
This will open another display providing a way to track GPS information. This feature is ed to the GPS antenna, as such this is only available when the GPS antenna is connected. The camera interface only has limited ability to display this information, for full GPS details please see the note below.
Notes:
- Please back up your footage on your computer and download the DVPlayer APP from nexigo.com/pages/dashcam or dvplayer.net/setup.html to see GPS tracking information.
- Registration code: A registration code can only be used on one computer.
Language
Select your preferred language.
Options: English / Simplified Chinese / French / Japanese / Spanish / German / Italian / Traditional Chinese / Korean
Format SD Card
This setting allows you to format the Micro SD card.
Note:
Formatting the Micro SD card WILL erase all data on your memory card.
Factory Reset
Reset the device to Factory Settings.
Note:
Resetting to Factory Settings will NOT erase data on your memory card.
About
View the Dashcam's technical information such as Model, software version, and contact information.
Installation Guide
Notes:
- Before installing, pre-fit and test the device to ensure each component works as intended.
- Installation may require professional assistance. If you do not have experience performing this type of aftermarket Installation, please contact a local professional for assistance.
Front Camera Installation
Note: The device has already been pre-installed with a 128G Micro SD card from the factory. Please format the Micro SD card for the first me.

Step 1: Place the Dashcam
Attach the Dashcam to the rearview mirror of your vehicle as shown in the figure below. Adjust its position as needed to ensure that the camera lens is not covered by the rearview mirror. Use the provided fastener to secure the Dashcam to the mirror.
Note:
The D81 is not intended to fully cover the rearview mirror on all makes/models of vehicles.

Step 2: Attach the GPS antenna
Connect the GPS antenna to the Dashcam GPS connection port. Then remove the double-sided tape from the GPS antenna and secure the GPS antenna at the corner of the dashboard as close to the windshield as possible. Refer to position in the figure below.
Note:
For best reception ensure that the side of the GPS antenna with the word "GPS" is pointed toward the front of the vehicle.

Step 3: Run the power cable
Using the included pry tool, pry up the edges of the interior paneling in the vehicle so the wiring can be run underneath. Run the power cable along the front windshield, down the structural pillar, and across the passenger dash panel to the cigarette lighter. Ensure that the wiring does not interfere with your vision and will not impede your ability to drive in any way. Plug the auxiliary power cable into the car's auxiliary power outlet, and plug the other end of the cable into the power input port on the Dashcam as shown in the figure below. Re-attach the interior panels when you have finished running the wiring.

Notes:
- It is important to ensure that the cable Installation does not interfere with the vehicle's airbags or other safety functions. If you are not sure if you can do this without risk to the safety features of the vehicle, contact a local professional for Installation assistance.
- Failure to properly run the wiring may be a violation of local regulations and could lead to fines, and it is also a safety hazard and could lead to damages to your vehicle or injury to yourself or others.
Rear Camera Installation

Rear Camera Installation Quick-View
Note:
Ensure that all mounting locations are cleaned thoroughly before applying the tape. The tape will not effectively stick to a dirty surface.
Step 1: Place the rear camera
Mount the rear camera above the rear license plate.
(Recommended for: Most Passenger Vehicles)

Rear Camera Installation Instrucons:
- Locate the included double-sided tape strip. Remove one side of the double-sided tape's backing. Adhere the double-sided tape to the bracket as shown in the image below.

- Remove the other side of the double-sided tape's backing. Secure the rear camera above the rear license plate pointing outward. Alternatively, you can hard mount the rear camera in place by utilizing the provided screw.

- Once you have confirmed that the angle of the camera is correct you can then tighten the hinge screw (shown below) to secure the unit in place.


Note:
Ensure that you are not blocking any sensors, latches, buttons, your license plate, or any other items needed for vehicle operation. Please ensure that the rear camera lens is pointed outward before securing the unit.
Step 2: Access your trunk's wiring areas
Open your trunk. Using the provided pry tool, or another trim removal tool, open the interior trunk panel as shown in the image below. Removing this panel will expose the vehicle's rear wiring bays so that the wiring for the rear camera can be run properly.

Step 3: Conceal the rear camera cable
Use the pry tool to remove the exterior tailgate trim strip as shown in the image below. Insert the rear camera cable into the trunk of the vehicle through the revealed holes. Replace the trim panel once all wiring has been run.

Step 4: Connect the rear camera cable to the rear camera extension cable

Step 5: Connect the red trigger wire to one of the reverse lights
- Locate your reverse lights. The location will be different from vehicle to vehicle. If you cannot locate them: consult your vehicle owner's manual for model-specific information, contact your local dealership, or ask a professional for assistance.
- Once you have located the lights, identify the positive wire leading to the reverse lights and the red trigger wire on the rear camera extension cable.
- To connect the red trigger wire to the positive wire from the reverse light you will need to strip a small section of the insulation from the reverse light wire

(![warning]() Note: You do not need to disconnect the wire to do so). Strip a small section of insulation from the middle of the wire as shown below in a convenient location.
Note: You do not need to disconnect the wire to do so). Strip a small section of insulation from the middle of the wire as shown below in a convenient location. - Connect the red trigger wire to the positive wire of the reverse light by wrapping the two wires firmly together. Use electrical tape or wire caps (Not provided) to wrap the connection and prevent any exposed wires.

Step 6: Route the rear camera cable to the front of the vehicle and connect it to the main camera unit

Step 7: Start your car and turn on the Dashcam
Test the device to ensure that it is functioning properly and that there is no issue with the wiring.
Installation Notes:
- Before installing the rear camera, please thoroughly clean the location where the rear camera is going to be mounted. Please pre-fit and test all components before beginning Installation to ensure that all pieces will work as intended.
- The provided double-sided tape CANNOT be reused. The adhesive may not hold effectively if used more than once.
- Ensure that the vehicle is off and the keys are removed from the ignition before Installation.
- The majority of rear camera malfunction issues are caused by loose or improperly connected wires.
Please double-check these first.
Firmware Update Instruction
Note:
Please DO NOT power off or unplug your Dashcam while updating the firmware. Otherwise, this will cause damage to the operating system.
- Remove the Micro SD card from the Dashcam. Copy / paste or drag / drop the latest version of the firmware you the nexigo.com/pages/dashcam into the root directory of the Micro SD card folder on your computer. DO NOT place it in a subfolder on the Micro SD card.
- Insert the Micro SD card with the updated firmware into the Dashcam when the Dashcam is powered on.
- Once the Dashcam recognizes the Micro SD card a dialog box will pop up asking if you want to update the system. Tap OK, and the system will begin to update automatically.
FAQ
Why is my unit not turning on?
- Ensure the power cable is firmly and fully connected.
- Make sure the socket of your vehicle's auxiliary power outlet is clean and free of corrosion or other damages.
- Make sure the power cable is firmly and fully seated in the auxiliary power outlet.
- Check to make sure the car fuse for the auxiliary power outlet has not been tripped.
Why does the Dashcam continuously display "No SD Card!"
- Option 1: Verify that a Micro SD card is fully inserted into the device.
- Option 2: If this error message is still showing, first try formatting the Micro SD card again, if that does not work replace the Micro SD card.
Why are all of the recorded videos blurry?
- Please ensure both front and rear camera lenses are clean and free from smudges. Use a cleaning fluid approved for cleaning lenses and a microfiber cloth.
- Ensure that you have removed the protective film off the lens.
- Make sure the windshield around the camera lens is clean and free of dirt and debris both inside and outside of the vehicle.
How do I format the Micro SD card?
- Option 1: In the NexiGo Dashcam menu navigate to Settings > Format SD Card.
- Option 2: Using a computer or laptop, follow the instructions provided by the operating system manufacturer to format a disk.
What can I do if the touchscreen is not working properly?
Turn off the Dashcam by pressing and holding the power button for ten seconds. Press it again to turn the unit back on.
The screen doesn't show the reversing assistant line when the vehicle is reversing.
- Ensure that the red trigger wire on the rear camera extension cable is correctly ed to the reverse light wiring as described in the Installation section.
- Please ensure all connections to the rear camera are plugged in securely and reboot the device. If it still does not work, please contact us at cs@nexigo.com at any me for further assistance.
How do I transfer files from the Dashcam to my computer?
Turn off the Dashcam and remove the Micro SD card from the device. Using a card reader, insert the Micro SD card into your computer. You can then transfer files from the Micro SD card onto your computer.
Note:
Do not insert or remove the Micro SD card while it is saving or reading data. The data may be damaged or lost. Only insert or remove the Micro SD card when the Dashcam is turned off.
Notes
- Do not attempt to alter or repair this device. Any alterations or unauthorized repairs will void the warranty.
- This device can only be used as directed. Any unauthorized power distribution (such as by attaching this item directly to the battery) will void the warranty.
- Remove the protective film from the lens before using it. Any obstruction may affect and degrade the quality of the recordings.
- Do not use or store this device in extreme temperatures.
- Do not operate the device under any circumstances while driving. Manufacturer will not be held liable for failure to follow local ordinances and laws regarding the usage of electronic devices while operating a vehicle.
- Do not place the Dashcam where it can obstruct the driver's view of the road.
- If the product is physically damaged during an accident, crash data may not be recorded.
Contact information
Tel: +1(458) 215-6088
Website: www.nexigo.com
If you have any problems please contact us at cs@nexigo.com at any me for further assistance.
Register to get an EXTRA ONE year warranty. Only valid if registering within 14 days of product delivery.

nexigo.com/warranty
Get in touch with FREE online services

facebook.com/nexigo1
Documents / Resources
References
![nexigo.com]() Dash Cam Firmware | NexiGo
Dash Cam Firmware | NexiGoDVPlayer
![www.nexigo.com]() NexiGo | Home Theater Projectors & Video Collaborations
NexiGo | Home Theater Projectors & Video Collaborations![nexigo.com]() NexiGo Warranty Registration | NexiGo
NexiGo Warranty Registration | NexiGo
Download manual
Here you can download full pdf version of manual, it may contain additional safety instructions, warranty information, FCC rules, etc.
Advertisement


Need help?
Do you have a question about the D81 and is the answer not in the manual?
Questions and answers