
Related Manuals for amzchef YL-CF8505


Summary of Contents for amzchef YL-CF8505
- Page 1 INSTRUCTION MANUAL Ceramic Hob MODEL: YL-CF8505 220-240V~,50-60Hz PLEASE READ INSTRUCTIONS CAREFULLY BEFORE ASSEMBLY RETAIN THIS MANUAL FOR FUTURE REFERENCE...
-
Page 2: Table Of Contents
Contents Safety Warnings..................1 Product Overview................6 How to choose right cookware............7 Use Instruction..................8 Cooking Guidelines…..............15 Care and Cleaning..............17 Technical Specification..............21 Installation instruction..............22 Warranty…..................26... -
Page 3: Safety Warnings
Safety Warnings Your safety important Please read this information before using your cooktop. Installation Electrical Shock Hazard • Disconnect the appliance from the mains electricity supply before carrying out any work or maintenance on it. • Connection to a good earth wiring system is essential and mandatory. - Page 4 • This appliance is to be properly installed and earthed only by a suitably qualified person. • This appliance should be connected to a circuit which incorporates an isolating switch providing full disconnection from the power supply. • Failure to install the appliance correctly could invalidate any warranty or liability claims.
-
Page 5: Important Safety Instructions
Cut Hazard • The razor-sharp blade of a cooktop scraper is exposed when the safety cover is retracted. Use with extreme care and always store safely and out of reach of children. • Failure to use caution could result in injury or cuts. Important safety instructions •... - Page 6 • Do not use scourers or any other harsh abrasive cleaning agents to clean your cooktop, as these can scratch the Induction glass. • If the supply cord is damaged, it must be replaced by the manufacturer, its service agent or similarly qualified persons in order to avoid a hazard.
- Page 7 The appliance is not intended to be operated by means of an • external timer or separate remote-control system. Congratulations on the purchase of your new Ceramic Hob. We recommend that you spend some time to read this Instruction / Installation Manual in order to fully understand how to install correctly and operate it.
-
Page 8: Product Overview
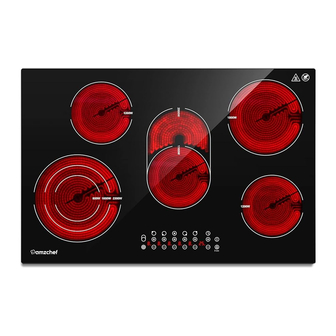
Product Overview Top View 1. max. 2300/1600/800 W zone 2. max. 1200 W zone 3. max. 1800 W zone 4. max. 1200 W zone 5. max. 2000/1100 W zone 6. Glass plate 7. Control panel Control Panel 1. Heating zone selection indicator 2. -
Page 9: Product Information
Product Information The microcomputer ceramic cooker hob can meet different kinds of cuisine demands because of resistance wire heating, micro- computerized control and multi-power selection, really the optimal choice for modern families. The ceramic cooker hob centers on customers and adopts personalized design. -
Page 10: Using Your Ceramic Hob
Make sure that the base of your pan is smooth, sits flat against the glass, and is the same size as the cooking zone. Always centre your pan on the cooking zone. Always lift pans off the ceramic hob – do not slide, or they may scratch the glass. -
Page 11: When You Have Finished Cooking
Select a heat setting by touching the “-” or “+” control of the cook zone. If you don’t choose a heat setting within 1 minute, the ceramic hob will automatically switch off. You will need to start again at step 1. You can modify the heat setting at any time during cooking. -
Page 12: Locking The Controls
Turn the cooking zone off by touching the “-”and scrolling down to “0”. Turn the whole cooktop off by touching the “ON/OFF” control. Beware of hot surfaces “H” will show which cooking zone is hot to touch. It will disappear when the surface has cooled down to a safe temperature. -
Page 13: Using The Timer
When the hob is in the lock mode, all the controls are disable except the ON/OFF , you can always turn the ceramic hob off with the ON/OFF control in an emergency, but you shall unlock the hob first in the next operation. Over-Temperature Protection A temperature sensor equipped can monitor the temperature inside the ceramic hob. -
Page 14: Using The Timer As A Minute Minder
Using the Timer as a Minute Minder If you are not selecting any cooking zone Make sure the cooktop is turned on. Note: you can use the minute minder even if you’re not selecting any cooking zones. Touch the “-“ or “+” controls of the timer , the minder indicator will start flashing and “00”... -
Page 15: Setting The Timer To Turn One Cooking Zone Off
When the time is set, it will begin to count down immediately. The display will show the remaining time and the timer indicator will flash for 5 seconds. Buzzer will beep for 30 seconds and the timer indicator shows “- -” when the set time finished. Setting the timer to turn one cooking zone off Touch the “-“... - Page 16 When the time is set, it will begin to count down immediately. The display will show the remaining time and the timer indicator flash for 5 seconds. NOTE: The red dot next to power level indicator will illuminate indicating that zone is selected. When cooking timer expires, the corresponding cooking zone will be automatically switch off and show “H”.
-
Page 17: Cooking Guidelines
2.When cooking timer expires, the corresponding cooking zone will be switch off automatically and show “H” . NOTE: If you want to change the time after the timer is set, you have to start from step. Cooking Guidelines Cooking Tips •When food comes to the boil, reduce the power setting. -
Page 18: For Stir-Frying
Searing steak To cook juicy flavoursome steaks: Stand the meat at room temperature for about 20 minutes before cooking. Heat up a heavy-based frying pan. Brush both sides of the steak with oil. Drizzle a small amount of oil into the hot pan and then lower the meat onto the hot pan. Turn the steak only once during cooking. -
Page 19: Care And Cleaning
Heat setting Suitability delicate warming for small amounts of food 1 - 2 • melting chocolate, butter, and foods that burn • quickly gentle simmering • slow warming • reheating 3 - 4 • rapid simmering • cooking rice • pancakes 5 - 6 •... - Page 20 or paper towel. and harsh/abrasive cleaning agents may Switch the power scratch the glass. to the cooktop Always read the label back on. to check if your cleaner or scourer is suitable. Never leave cleaning • residue on the cooktop: the glass may become stained.
- Page 21 Boilovers, Remove these Remove stains left by • melts, and hot immediately with a melts and sugary food sugary spills on fish slice, palette or spillovers as the glass knife or razor blade soon scraper suitable for as possible. If left to ceramic glass cool on the cooktops, but beware...
-
Page 22: Troubleshooting
sponge or cloth. before turning the cooktop back on. Wipe the area completely dry with a paper towel. Switch the power to the cooktop back on. Troubleshooting Problem Possible causes What to do The cooktop No power. Make sure the cooktop is cannot Be connected to the power turned on. -
Page 23: Technical Specification
(layers of different noises. metals vibrating differently). Technical Specification Cooking Hob YL-CF8505 Cooking Zones 5 Zones Supply Voltage 220-240V~,50-60Hz Installed Electric Power 7777-9255W Product Size L×W×H(mm) 770X520X52... -
Page 24: Installation Instruction
Building-in Dimensions A×B (mm) 740X490 Weight and Dimensions are approximate. Because we continually strive to improve our products we may change specifications and designs without prior notice. Installation Selection of installation equipment Cut out the work surface according to the sizes shown in the drawing. For the purpose of installation and use, a minimum of 5 cm space shall be preserved around the hole. - Page 25 well ventilated and the air inlet and outlet are not blocked. Ensure the ceramic cooker hob is in good work state. As shown below Note: The safety distance between the hotplate and the cupboard above the hotplate should be at least 760mm. A(mm) B(mm) C(mm)
- Page 26 Cautions The ceramic cooker hob must be installed by qualified personnel or technicians. We have professionals at your service. Please never conduct the operation by yourself. The ceramic cooker hob shall not be mounted to cooling equipment, dishwashers and rotary dryers. The ceramic cooker hob shall be installed such that better heat radiation can be ensured to enhance its reliability.
- Page 27 Connecting the hob to the mains power supply The power supply should be connected in compliance with the relevant standard, or a single-pole circuit breaker. The method of connection is shown below.
-
Page 28: Warranty
5.The cable must be checked regularly and only replaced by a properly qualified person. WARRANTY Thank you for choosing AMZCHEF product. We sincerely hope that you are satisfied with it. The manufacturer's warranty covers the product for a period of 12 months from the date of purchase against manufacturing faults. - Page 29 Please fill in the table and email it within 10 days from the date of purchase.
Need help?
Do you have a question about the YL-CF8505 and is the answer not in the manual?
Questions and answers