
Subscribe to Our Youtube Channel
Related Manuals for overstock N709P236480


Summary of Contents for overstock N709P236480
- Page 1 ASSEMBLY INTRUCTIONS INSTRUCTIONS DE MONTAGE ITEM CODE / CODE DE L'ARTICLE: N709P236480 PRODUCT NAME : FULL SIZE BED NOM DU PRODUIT: LIT PLEINE GRANDEUR Page 01 Of 27 Page 01 De 27...
-
Page 2: Safety Warning
SAFETY WARNING 1. This bed is designed for use only mattress (es) meeting the following specifications on the upper bunk, and lower bunk: Upper bunk (bunk bed and tribed included) Bed type Length Width Thickness Full Standard 74” – 75” 53'' -54'' 6’’... - Page 3 ALERTE DE SÉCURITÉ 1. Ce lit est conçu pour utiliser uniquement des matelas répondant aux spécifications suivantes sur la couchette supérieure et la couchette inférieure : Lit superposé supérieur (lit superposé et lit superposé inclus) Type de lit Longueur Largeur Épaisseur Norme complète 74”...
- Page 4 ASSEMBLY INTRUCTIONS 1. At the beginning: Tighten all hardware. Check metal parts for rust. If found, sand and repaint using a non-lead-based paint meeting the requirements of 16 CFR 1303 Check all wood members for deterioration and splinters. Sand down splinters and replace deteriorating wood members. Rake and check depth of loose fill protective surfacing materials to prevent compaction and to maintain appropriate depth Replace as necessary.
-
Page 5: Instructions De Montage
INSTRUCTIONS DE MONTAGE 1. Au commencement : Serrez tout le matériel. Vérifiez que les pièces métalliques ne présentent pas de rouille. Si vous en trouvez, poncez et repeignez avec une peinture sans plomb répondant aux exigences de la norme 16 CFR 1303 Vérifiez que tous les éléments en bois ne présentent pas de détérioration ni d'échardes. - Page 6 DETAIL VIEW / VUE DÉTAILLÉE Page 06 Of 27 Page 06 De 27...
- Page 7 PART LIST / LISTE DES PIÈCES 1 :N709P236480 Front leg - left / Back leg - left / Back leg - right / Front leg - right / Jambe avant - gauche (1pc) Jambe arrière - gauche (1pc) Jambe arrière - droite (1pc)
- Page 8 PART LIST / LISTE DES PIÈCES 1 :N709P236480 Right table pillar / Left table fringe / Table top support bar / Right table fringe / Frange de table gauche(1pc) Pilier de table droit (1pc) Barre de support de table (2pcs)
- Page 9 HARWAER LIST / LISTE DU MATÉRIEL:N709P236480 Hex - Head bolts / Hex - Head bolts / Boulon à tête hexagonale Boulon à tête hexagonale Ø1/4'' * 90 - 8pcs Ø1/4'' * 35 - 8pcs Hex - Head bolts / Hex - Head bolts / Boulon à...
- Page 10 STEP 1 / ÉTAPE 1 STEP 2 / ÉTAPE 2 Page 10 Of 27 Page 10 De 27...
- Page 11 STEP 3 / ÉTAPE 3 M4 * 15 - 4pcs STEP 4 / ÉTAPE 4 Ø1/4'' - 4pcs Ø8 * 30 - 6pcs Ø1/4'' * 90 - 4pcs Page 11 Of 27 Page 11 De 27...
- Page 12 STEP 5 / ÉTAPE 5 STEP 6 / ÉTAPE 6 Page 12 Of 27 Page 12 De 27...
- Page 13 STEP 7 / ÉTAPE 7 M4 * 15 - 4pcs STEP 8 / ÉTAPE 8 Ø1/4'' - 4pcs Ø8 * 30 - 6pcs Ø1/4'' * 90 - 4pcs Page 13 Of 27 Page 13 De 27...
- Page 14 STEP 9 / ÉTAPE 9 STEP 10 / ÉTAPE 10 Page 14 Of 27 Page 14 De 27...
- Page 15 STEP 11 / ÉTAPE 11 Ø1/4'' * 70 - 1pc STEP 12 / ÉTAPE 12 Ø1/4'' - 2pcs M4 * 15 - 4pcs Ø1/4'' * 25 - 2pcs Page 15 Of 27 Page 15 De 27...
- Page 16 STEP 13 / ÉTAPE 13 STEP 14 / ÉTAPE 14 Page 16 Of 27 Page 16 De 27...
- Page 17 STEP 15 / ÉTAPE 15 M4 * 15 - 6pcs STEP 16 / ÉTAPE 16 Ø8 * 30 - 8pcs Ø1/4'' * 45 - 4pcs Page 17 Of 27 Page 17 De 27...
- Page 18 STEP 17 / ÉTAPE 17 Ø1/4'' * 70 - 11pcs Ø1/4'' - 11pcs Ø8 * 30 - 7pcs Page 18 Of 27 Page 18 De 27...
- Page 19 STEP 18 / ÉTAPE 18 Ø8 * 30 - 1pcs Ø1/4'' * 70 - 1pc STEP 19 / ÉTAPE 19 Ø8 * 30 - 1pcs Ø1/4'' *45 - 3pc STEP 20 / ÉTAPE 20 Ø8 * 30 - 1pcs Ø1/4'' * 70- 1pc Page 19 Of 27 Page 19 De 27...
- Page 20 STEP 21 / ÉTAPE 21 Ø8 * 30 - 1pcs Ø1/4'' * 45 - 3pc STEP 22 / ÉTAPE 22 Ø8 * 30 - 4pcs Ø1/4'' * 45 - 4pc STEP 23 / ÉTAPE 23 Ø8 * 30 - 2pcs Ø1/4'' * 45 - 2pc Ø1/4'' * 70- 2pc Page 20 Of 27...
- Page 21 STEP 24 / ÉTAPE 24 Ø1/4'' * 35 - 4pcs Ø1/4'' - 4pcs Page 21 Of 27 Page 21 De 27...
- Page 22 STEP 25 / ÉTAPE 25 Ø1/4'' * 35 - 2pcs M4 * 25 - 14pcs Page 22 Of 27 Page 22 De 27...
- Page 23 STEP 26 / ÉTAPE 26 Ø1/4'' * 35 - 2pcs Page 23 Of 27 Page 23De 27...
- Page 24 STEP 27 / ÉTAPE 27 M4 * 25 - 28pcs 3-3/8'' Note: Do not lock the screws of the bed slats to be outemost edge the bed slats, you need to leave a certain space at the edges, ortherwise it will cause the board to break Remarque : Ne bloquez pas les vis des lattes du lit pour qu'elles soient situées à...
- Page 25 STEP 28 / ÉTAPE 28 Led light / Lumière menée-1pc Peel off the glue behind the lamp and stick it to the table / Décollez la colle derrière la lampe et collez-la sur la table Led light/ Lumière menée Page 25 Of 27 Page 25 De 27...
- Page 26 STEP 29 / ÉTAPE 29 Adapter/ Adaptatrice -1pc LED LIGHT CONNECTION WIRE / LUMIÈRE LED FIL DE CONNEXION Adapter/ Adaptatrice STEP 30 / ÉTAPE 30 Remote / Télécommande -1pc Plug in the adapter Go to Power Source, use Remote to turn on the Led light Branchez l'adaptateur Page 26 Of 27...
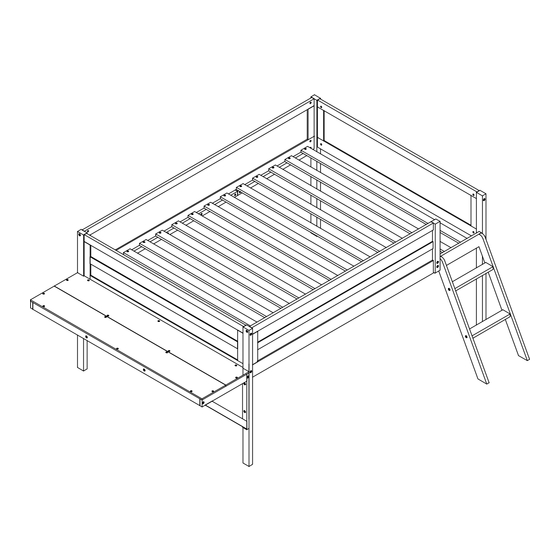
- Page 27 COMPLETED / COMPLÉTÉ Page 27 Of 27 Page 27 De 27...
Need help?
Do you have a question about the N709P236480 and is the answer not in the manual?
Questions and answers