Advertisement
NEXIGO DEVICE SETTINGS SOFTWARE
While all of our cameras are plug-and-play, this free software tool is best for those who want full control over settings like brightness, saturation, exposure, and focus. To download the latest version, head to nexigo.com/software.

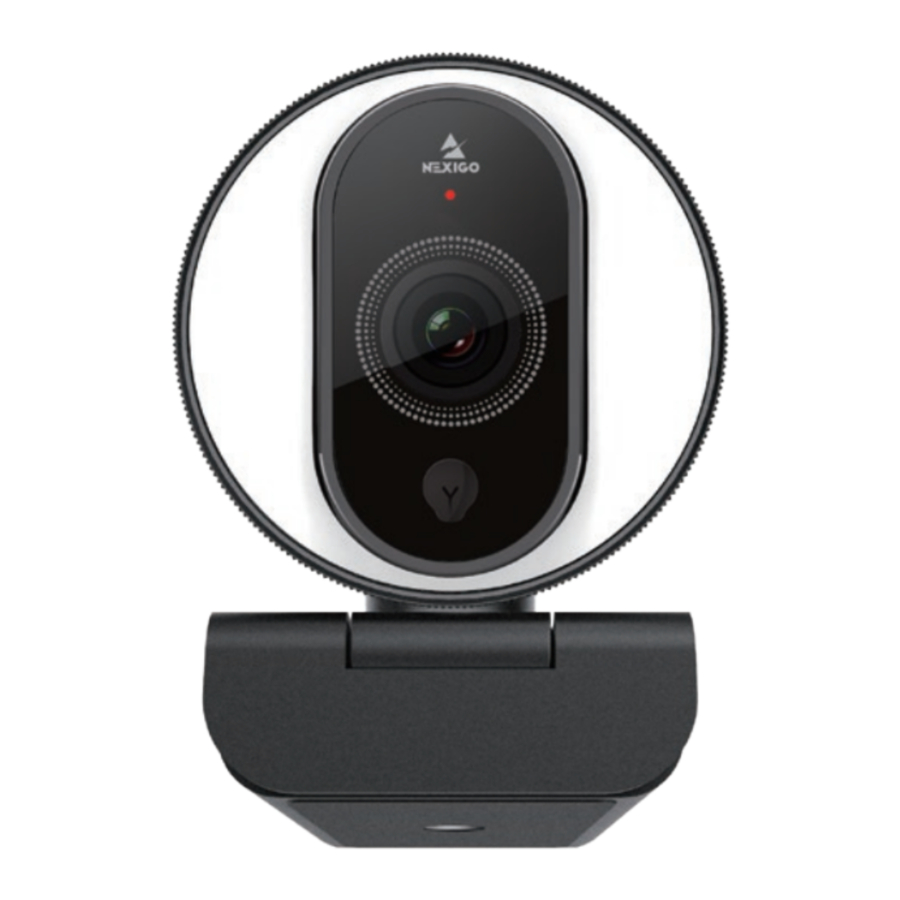
PRODUCT OVERVIEW

- FHD Lens
- Power Indicator
- Light Adjustment Touch Control
- Flexible Clip/base
- Noise Reduction Microphone
- 1/4" Tripod Screw Hole
PACKAGE INCLUDES
1 x FHD Webcam
1 x User Manual
2 x Privacy Cover
SPECIFICATION
| Video resolution | 1920x1080@30fps, 1280x720@30fps, 640x480@30fps | |
| Sensor | 1/2.7-inch CMOS digital image sensor | |
| Focus type | Autofocus | |
| Field of view | D=80°/H=67°/V=42° | |
| Application support | Chat software: Skype, FaceTime, Zoom, Microsoft Teams, Hangouts, etc. Streaming software: Open Broadcaster Software and Xsplit Photo or video: Using system Camera App (Camera for Windows, Photo Booth for macOS) | |
| System requirements |
| |
SETTING UP YOUR DEVICE
- PLACE/POSITION YOUR WEBCAM

- CONNECT THE WEBCAM TO YOUR COMPUTER USING THE USB CABLE


Notes:
- Make sure you are connected to your network before starting the setup.
- If you cannot use the camera within other apps, you will need to enable access.
- In Windows: Select Settings>Privacy>Camera, turn on allow apps to access your camera.
- On Mac: Select Apple menu>System Preferences> Security & Privacy>Privacy>Camera, and select which apps you want to use the camera. If you still have trouble connecting the Webcam, please refer to the FAQ sections.
- VIEW YOUR CAMERA
- Windows
Windows users can use the Camera app, which is pre-installed with Windows. To find the Camera app type "camera" (without the quotation marks) in the search bar at the bottom of the screen and press enter. Alternatively, go to the Start menu at the bottom right corner of the screen and left click. Scroll through the list of programs there until you get to the "C" section, the Camera application will be listed there. To view your webcam video you may need to select the "NexiGo camera" from the list of other devices. At the top right or left of your screen click the cycle camera icon (the arrow chasing itself, not the gear), and keep switching until you get to the NexiGo webcam. - Mac
Mac users can use the Photo Booth app, which is pre-installed with the OS. This will allow you to preview the camera images, capture still frames, and record video clips. To begin, select the Finder button, click Applications, and select Photo Booth.
Alternately, click the Search button in your menu bar, type "photo booth" (without the quotation marks), and press return. To see an image from your camera in Photo Booth, you may need to select the camera from the list of attached devices in the app. At the top of your screen, click Camera in the app menu, and select the Full HD Webcam from the list of options.

- Windows
- VIDEO CALLING REQUIREMENTS
- A computer with speakers (or a headset), your NexiGo webcam, and a microphone;
- Install a video-calling application such as FaceTime, Zoom, or Hangouts. (Both parties need a webcam and the same video application.)

FAQ
How do I know if my camera is being recognized by the system?

Connect the camera to any USB 2.0 or USB 3.0 port. It will take a few seconds for the camera to be recognized after it is connected to the system. To ensure the camera has been installed correctly on a Windows computer; check under Control Panel> System and Security>Device Manager.

To verify the webcam is connected on a Mac computer, click the Apple Menu (in the top left corner of your screen) and then click About this Mac. Click on System Report from the pop-up window that appears. The System Information window for your Mac will appear. Navigate to the USB section and check if the webcam is listed as a connected device (like the photo above)
What is the video recording frame-rate
The NexiGo webcam captures clear images and can record video at 1080p/30fps in a well-lit environment. The quality of the signal can be affected by low bandwidth availability or insufficient lighting. This can cause the frame rate to drop to 1080p/20fps, or possibly even lower.
What can I do if the images or video are an abnormal color? How to adjust image parameters such as brightness or contrast?
Please ensure that the light in your environment is free of unique tones or intense light sources. Things such as walls/floors/other large-area non-standard light sources, including areas with colored or intense light. In such environments photographed pictures are subjected to color cast due to the lighting impact of these light sources.
For Windows & Mac:
Using the NexiGo Webcam Settings Software, you can adjust the image parameter you want according to your needs.
Note: Download the NexiGo Webcam Settings Software from nexigo.com/software.

Why is my video not in 1080p in my video calling application?
Check the video output settings in your video capture software, these may be set to a lower capture format. There are various constraints on the system that could impede the ability to attain a 1080p video calling session. They center around processing power (i.e. CPU speed) and available network bandwidth. In all cases, review the requirements from the video calling application. They will guide as to the system performance required as well as the necessary bandwidth.
How to use the privacy shutter
- Remove 3M tape backing on the back of the privacy cover.
![]()
- Attach the cover to the top of the webcam and press firmly.

- Open/close the cover as needed.
![]()


Why does my screen go blank or black while trying to preview images?
There are several reasons this could happen:
- There is something wrong with the USB port. Please use a different USB port or another PC and test the camera again.
- The PC does not recognize the camera device.
- The operating system and computer configuration do not satisfy the requirements of the camera. Please check your system specifications.
- The video preview feature of the application is not turned on, or the application has a privacy feature that prohibits access to the camera. Please try with a different application.
Why is there flickering or banding on the video feed when I use the webcam?
This might be due to lighting inconsistencies in your room. To resolve this, download the NexiGo Webcam Setting Software from nexigo.com/software. In the software, select your NexiGo webcam in the device selection bar, then change the powerline frequency to either 50Hz or 60Hz depending on your needs. For example, if your screen flicks at 50Hz, you can switch to 60Hz to solve it.
Note: The camera defaults to indoor mode. Please do not aim the camera directly at the light source.

CONTACT INFORMATION
Website: www.nexigo.com
Manufacturer: Nexight INC
E-mail: cs@nexigo.com
Tel: +1(458) 215-6088
Address: 11075 SW 11th St, Beaverton, OR, 97005, US
If you have any problems please contact us at cs@nexigo.com anytime for further assistance. Make sure to register your purchase at nexigo.com/warranty within 14 days of the delivery date to extend your warranty coverage to TWO Years!
Documents / Resources
References
![www.nexigo.com]() NexiGo | Home Theater Projectors & Video Collaborations
NexiGo | Home Theater Projectors & Video Collaborations![nexigo.com]() Support and Download | NexiGo
Support and Download | NexiGo![nexigo.com]() NexiGo Warranty Registration | NexiGo
NexiGo Warranty Registration | NexiGo
Download manual
Here you can download full pdf version of manual, it may contain additional safety instructions, warranty information, FCC rules, etc.
Advertisement


Need help?
Do you have a question about the N680E and is the answer not in the manual?
Questions and answers