
Related Manuals for Ocular OC20-BA-7KW


Summary of Contents for Ocular OC20-BA-7KW
- Page 1 USER MANUAL & INSTALLATION GUIDE OC20-BA-7KW / OC20-BC-7.2KW ocularcharging.com.au OC20-BA-22KW / OC20-BC-22KW sales@ocularcharging.com.au 1300 912 650 Version 2.2...
-
Page 2: Table Of Contents
CONTENTS Welcome to Your LTE ..................3 User Manual ...................... 4 How to Charge - LTE ..................4 Functionalities of the Charging Screen ............5 Troubleshooting .................... 6 Installation Guide....................7 Specifications ....................7 Accessories of Tethered Model ..............8 Product Overview .................. -
Page 3: Welcome To Your Lte
Welcome to your Ocular LTE! Resource Library FAQs Follow the links or scan to QR codes to access all our user manuals and technical documents. You will also find answers to the most common questions we receive. -
Page 4: User Manual
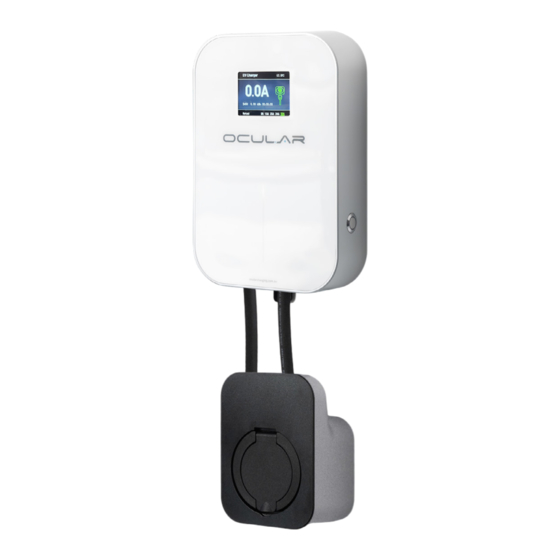
USER MANUAL SECTION 1 HOW TO CHARGE - LTE 1. STARTING A CHARGING SESSION LTE socket model 1. Grab a charging cable and plug each end into their respective ports. 2. The charging session will start automatically once it has been plugged in. LTE tethered model 1. -
Page 5: Functionalities Of The Charging Screen
SECTION 2 FUNCTIONALITIES OF THE CHARGING SCREEN SINGLE PHASE 1. Real-time current 2. Real-time voltage 3. Power consumed 4. Temperature 5. Charging icon 6. Charging time 7. Rated current THREE PHASE 1. Real-time power 2. Three Live Wire data 3. Charging Time 4. -
Page 6: Troubleshooting
2. If the fault persists, please contact us for further information. Over current warning/ Short Contact your installer or Ocular charging for more information. circuit warning My car 1. The current limit may be set incorrectly on the charger. -
Page 7: Installation Guide
INSTALLATION GUIDE SPECIFICATIONS Model Number OC20-BA-7.2kW OC20-BC-7.2kW OC20-BA-22kW OC20-BC-22kW Power Output 7.2kW (1- Phase) 22kW (3- Phase) Charging Connector Type-2 Socket 6m Type-2 Cable Type-2 Socket 6m Type-2 Cable Display 3.5” LCD Screen + LED indication lights Frequency (Hz) 50Hz Input and Output Voltage 230V ±... -
Page 8: Accessories Of Tethered Model
OCULAR LTE OVERVIEW ACCESSORIES OF TETHERED MODEL It is the installer’s responsibility to provide and install a suitable RCBO, cabling and isolator switch to complete the installation. Plate Station Holder Screws for Holder 30mm Screws 30mm Plastic Bolts Allen Key... -
Page 9: Installation Guide
INSTALLATION GUIDE Hammer the Place reference 30mm plastic paper on wall bolts into the holes Wall Drill the holes Take down the reference paper according to the reference paper from the wall Fix the plate with 30mm screws Mount charger onto the plate on the wall Isolation switch... -
Page 10: Accessories Of Universal Model
OCULAR LTE WALLBOX OVERVIEW ACCESSORIES OF UNIVERSAL MODEL It is the installer’s responsibility to provide and install a suitable RCBO, cabling and isolator switch to complete the installation. Plate Station Socket 30mm Plastic Bolts 95mm Screws 30mm Screws 30mm Metal Bolts... -
Page 11: Installation Guide
INSTALLATION GUIDE Hammer the Place reference 30mm plastic paper on wall bolts into the holes Wall Hammer the 30mm metal Drill the holes bolts into the holes according to the reference paper Remove the reference paper from the wall Fix the plate with Mount charger onto the back plate 30mm screws on... -
Page 12: Illustration Of Screen And Led
Continuous light Red flashing Note: The Ocular wallbox will automatically restart when minor problems occur. For serious failures, the system cannot automatically recover. In order to remind user of this failure, the system will automatically countdown 10 seconds to restart. -
Page 13: Adjustment Of Maximum Charge Rate
ADJUSTMENT OF MAXIMUM CHARGE RATE The maximum charge rate of the charger can be permanently set. This is useful when the charger is installed at a location where the default maximum of 32amps cannot be safely supplied, or in areas where the maximum rate is restricted by local regulations. -
Page 14: Safety Warning
SAFETY WARNING Failure to follow instructions may result in danger! • Regularly check whether the charging station has visible damage. • Make sure that all safety facilities are available at all times and are tested regularly to ensure they can operate normally. •... - Page 15 ocularcharging.com.au sales@ocularcharging.com.au 1300 912 650...
Need help?
Do you have a question about the OC20-BA-7KW and is the answer not in the manual?
Questions and answers