Fellowes Venus 125 (FEL5746101) Manual
- Instructions manual (14 pages) ,
- Instruction manual (7 pages) ,
- User manual (6 pages)
Advertisement
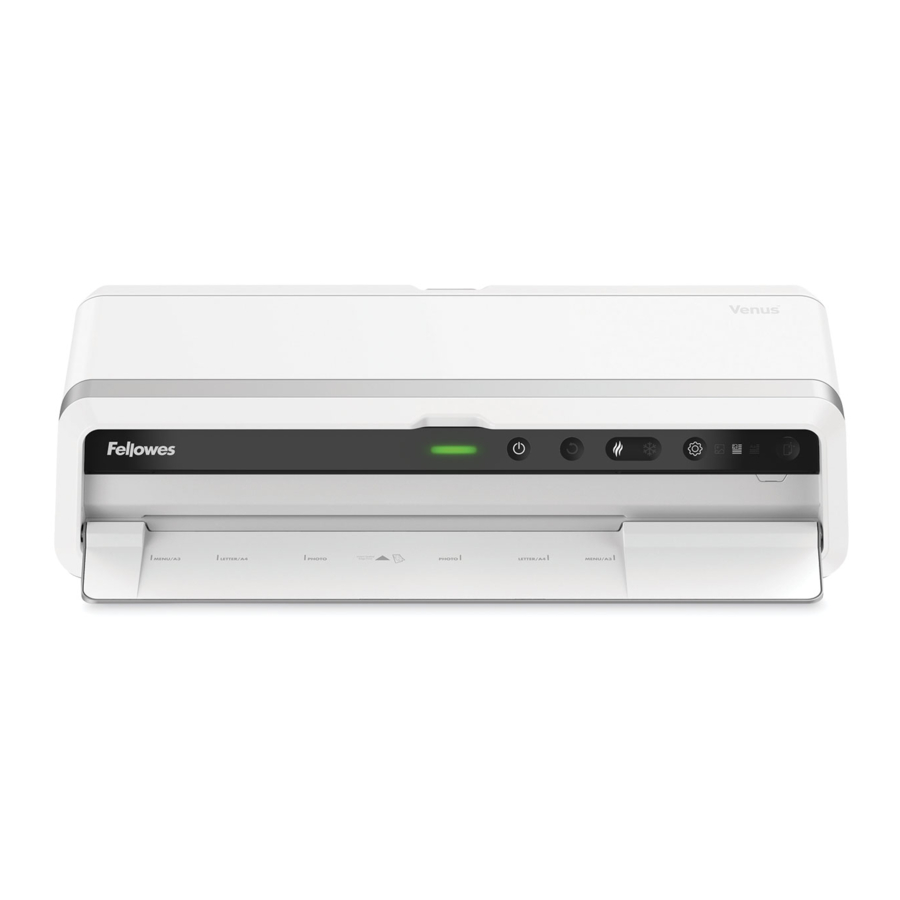
LAMINATOR CONTROLS

- Light Guide
- Standby/Power Button
- Reverse Button
- Hot/Cold Lamination Buttons
- Pro-Settings Button (photo/mixed/text)
- Clean Alert System Indicator/Button
- Carry Handles
- Integrated Entry Tray
- Pouch Entry Slot
- Pouch Entry Guide
- Pouch Exit Slot
- Integrated Exit Tray
- Integrated Exit Tray Extension Slots
- Integrated Exit Tray Extension
CAPABILITIES
Performance
| Entry width | 12.5" |
| Pouch thickness (min.) | 3 mil (per side) |
| Pouch thickness (max.) | 10 mil (per side) |
| Estimated heat-up time | 30-60 seconds |
| Lamination speed | up to 86"/min |
| Number of rollers | 6 |
| Ready indication | Light (green) |
| Reverse / Auto reverse | Yes/Yes |
| Auto Shut off | Yes |
Technical Data
| Voltage | 120V AC |
| Frequency | 60Hz |
| Wattage | 1200 Watts |
| Amps | 10 Amps |
| Max document thickness | .03"/0.7mm |
FEATURES & TIPS
Advanced Pouch Tracking System
This feature will detect and alert the user if there is a mis-feed or the document has not gone completely through the machine in normal operating time, and automatically reverse the document until the jam is cleared. This feature will also track the pouch as it is going through the machine and let the user know when the machine is ready for the next pouch.

AutoSense
Unique system detects pouch thickness and self-adjusts to optimal lamination setting.

'Reverse' function
To eject the laminating pouch during use, press and hold down the reverse button until the pouch has ejected from the machine.
Pro-settings Function
This feature allows the user to maximize performance & quality per media type laminated. When powered on, the machine will default to the 'Mixed Media' selection. To change selection, press the media selector button and toggle to preferred media setting.
Pro-settings: Press button to toggle through media types. Once selected, media icon will light up white and machine will automatically switch modes.
Media Types
- Photo Media: Use for the highest photo clarity lamination
- Mixed Media: Use for everyday laminations with text and graphics
- Text Media: Use for text only laminates
Light Guide
This features acts as a performance indicator using different color lights to guide the user through their lamination process.
Solid Yellow: Laminator is heating up or cooling down
Solid Green: Laminator is ready for pouch to be inserted
Pulsing Green: Lamination is in progress*
Flashing Red: Laminator is jammed & auto-reversing. Laminator will return to solid green once jam is cleared
Pulsing Blue: Laminator is in cleaning cycle*
*Only when a Fellowes cleaning sheet is used will the Light Guide pulse blue.
All other brands, machine will pulse green when the cleaning sheet is inserted.

Clean Alert System
This feature reminds the user to clean laminator rollers for jam-free performance.
- The Clean Alert button will light up white notifying the user to clean the laminator rollers.
- When the machine is warm, run cleaning sheet through the machine to clean any residue off the rollers. It's recommended to use the front and back sides of the cleaning sheet to run through the machine twice.
- The Clean Alert light will auto reset only when used with a Fellowes cleaning sheet. To manually reset this function, simply press the Clean Alert button, and the light will shut off.
Although the Clean Alert system can be bypassed, it is recommended that cleaning sheets are used with the machine regularly to ensure optimal performance. (Cleaning sheet order #5320603)

'Auto Shut-off' function
If the machine is not active for 30 minutes, the 'Auto Shut-Off' function will place the machine into standby mode. To operate the machine, press the 'Power On' button on the control panel
- For best results, use Fellowes ® brand thermal pouches: 3, 5, 7 or 10 mil pouches.
- This machine does not need a carrier to laminate. It is a carrierfree mechanism.
- Always put the item to be laminated into the appropriate sized pouch.
- Always test laminate with a similar size and thickness before final process.
- Prepare pouch and item for lamination. Place item within pouch centered and touching the leading sealed edge. Ensure the pouch is not too large for the item.
- If required, trim excess material from around the item after lamination and cooling.
BEFORE LAMINATING
- Ensure the machine is on a stable surface. Open integrated entry tray in front of machine.
- For best results, use the integrated exit tray. This machine is equipped with an exit tray extension. To open, simply glide each extension inward from the extension slots located on the exit tray.
- Check there is enough clear space (min 20") behind the machine to allow items to pass through freely.
- Plug the machine into an easily accessible main outlet. The machine will automatically power on when plugged in.
STEPS TO LAMINATE
- The machine will automatically begin warming up to hot lamination and the Light Guide will turn solid yellow until ready.
Note:
- The laminator features AutoSense which automatically recognizes the pouch thickness inserted into the laminator.
- Pro-Setter is automatically defaulted to the mixed media setting when the machine is powered on. Refer to 'Pro-settings' function under 'Features & Tips' for more details.
- When the machine is ready to laminate, the Light Guide will turn solid green to indicate the user can insert pouch.
- Place the pouch, sealed edge first, into the pouch entry slot. Keep the pouch straight and central within the document entry slot, not on an angle. Use the entry markings as a guide. The Light Guide will pulse green when lamination is in process and will return to solid green when it is acceptable to feed another pouch.
- This unit is equipped with an Advanced Pouch Tracking System that will detect and alert the user if there is a mis-feed. If a jam is detected the Light Guide will flash red, and the machine will beep as it automatically reverses the document to help clear the jam. The reverse button will come on while auto-reverse is engaged. After this, if the jam is not completely cleared the reverse button will blink/flash. Press and hold the reverse button while pulling on the pouch to completely remove the laminate from the machine. Once the jam is cleared the Light Guide will return to solid green.
- Upon exit, the laminated pouch may be hot and soft. For the best quality and to prevent jamming remove the pouch immediately. Place the pouch on to a flat surface to cool. Take care when handling a hot pouch. Always remove laminated document before starting next laminate. For best performance/results, use the exit tray.
- For cold laminates, press the cold lamination button. The Light Guide will turn yellow as the machine cools down. Note: to use the cold setting after hot lamination you may have to wait for the laminator to cool down for 30 – 60 minutes. Once the machine has cooled down and is ready for cold lamination, the Light Guide will turn solid green to indicate the user can insert pouch.
- To switch back to hot lamination after cold laminating, press the hot lamination button. Wait until the Light Guide turns solid green before inserting pouch.
STORAGE & CLEANING
Turning off the machine – if the power button is pushed, the machine will completely shut down, turning off the heaters and rollers. Unplug the machine at the wall. Ensure to close entry and exit trays prior to storing. The outside of the machine can be cleaned with a damp cloth. Do not use solvents or flammable materials to polish the machine. This machine is equipped with a 'Clean Alert System' that will remind the user to clean the laminator. When the machine is warm, simply feed the cleaning sheet through the laminator to clean any residue off the rollers. Please refer to 'Clean Alert System' under 'Features & Tips' for more information regarding this feature. Cleaning sheets can be purchased to clean the rollers of this machine. It is recommended that the cleaning sheets are used with the machine regularly for optimal performance. (Cleaning Sheet order # 5320603)
TROUBLESHOOTING
| Problem | Possible cause | Solution |
Pouch does not completely seal the item | Item may be too thick to laminate | Maximum document thickness equals.03". Pass through laminator a second time. |
Power button is pulsing | Laminator has gone to Auto Shut Off mode | Press the power button to re-start the machine |
Jamming | Pouch is jammed | Machine will automatically reverse the document. If jam is not completely cleared Reverse button will blink/flash. Press and hold reverse button while pulling on pouch to completely remove pouch. |
| Pouch was inserted open end first | ||
| Pouch was not centered on entry | ||
| Pouch was not straight upon entry | ||
| Empty pouch was used | ||
Pouch is damaged after lamination | Damaged rollers or adhesive on rollers | Pass cleaning sheets through the machine to test and clean rollers |
IMPORTANT SAFETY INSTRUCTIONS
 KEEP FOR FUTURE USE
- Plug the machine into an easily accessible socket.
- To prevent electrical shock - do not use the appliance close to water, do not spill water on to the appliance, power cord or wall socket.
- Keep away from moving parts.
- This equipment is not suitable for use in locations where children are likely to be present.
- Self-adhesive pouches can only be used with the cold setting.
DO ensure the machine is on a stable surface.
DO test laminate scrap sheets and set the machine before final laminations.
DO remove staples and other metal articles prior to laminating.
DO keep the machine away from heat and water sources.
DO turn off the machine after each use.
DO unplug the machine when not in use for an extended period.
DO use pouches designed for use at the appropriate settings.
DO keep away from pets, while in use.
DO NOT leave the power cord in contact with hot surfaces.
DO NOT leave power cord hanging from cupboards or shelves.
DO NOT use appliance if the power cord is damaged.
DO NOT attempt to open or otherwise repair the machine.
DO NOT exceed the machines quoted performance.
DO NOT allow children to use this machine without adult supervision.
DO NOT laminate sharp or metal objects (eg: staples, paper clips).
DO NOT laminate heat-sensitive documents (eg: tickets, ultrasounds etc) on hot settings.
DO NOT laminate an empty pouch.
Documents / ResourcesDownload manual
Here you can download full pdf version of manual, it may contain additional safety instructions, warranty information, FCC rules, etc.
Advertisement


Need help?
Do you have a question about the Venus 125 and is the answer not in the manual?
Questions and answers