Advertisement
Quick Links
Z:\DRAWING\AUTOCAD LIBRARY\LOGO\NEWCLASSICLOGO.png
Z:\DRAWING\AUTOCAD LIBRARY\LOGO\NEWCLASSICLOGO.png
Thank you for purchasing this quality product. Be sure to check all packing materials carefully for small parts,
which may have come loose inside the carton during shipment. Identify and count all items and compare with the
parts list and/or hardware list shown below.
Caution : please read the instruction thoroughly before assembly.
1. We recommended that you assemble this product with the assistance of another person, this will make the
assembly easier, and will help eliminate damage to the product or injury to persons during assembly.
2. Please do not tighten screws or bolt until the assembly is completed.
3. Please put all parts on a non-abrasive floor before assembly and follow the assembly steps to assemble your
newly purchased product correctly and efficiently.
NO.
DESCRIPTION
A
HEADBOARD
B
FOOTBOARD
C
SIDE RAIL
D
SLAT
E
SLAT SUPPORT LEG
STEP 1 :
Assembly the Side Rail (C) to Headboard (A) and Footboard (B) by using Allen Key M5 (3)
with hardware 1 and 2.
A
Created date :30/5/2024
PAGE 1 OF 2
ITEM NO.
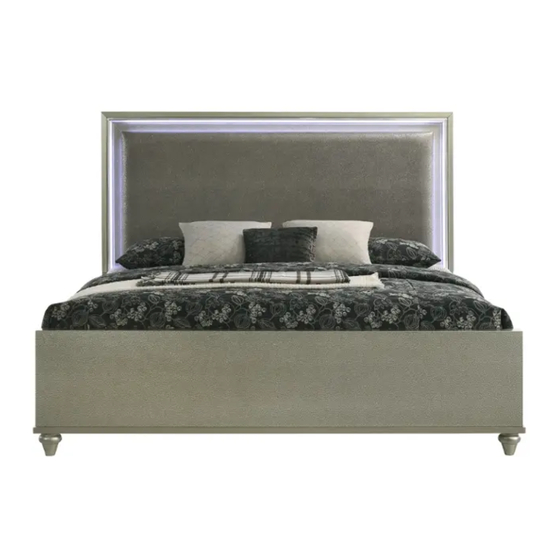
B2210-310 LUMINA - 5/0 Q LIGHTED HEADBOARD
B2210-320 LUMINA - 5/0 Q FOOTBOARD & SLATS
B2210-330 LUMINA - 5/0-6/6 Q/EK SIDE RAILS
PARTS LIST
SKETCH
WEIGHT CAPACITY
inch
Assembly Instructions
QTY
NO.
1
JCBB - M8 x 25/32''
1 pc
2
FLAT WASHER - M8 x 23/32''
1 pc
3
ALLEN KEY - M5
PANHEAD - M4 x 1-3/16''
4
2 pcs
5
AC/DC ADAPTER
4 pcs
8 pcs
800 lbs
C
B
HARDWARE LIST
DESCRIPTION
2
2
1
2
1
SKETCH
QTY
8 pcs
8 pcs
1 pc
8 pcs
1 pc
3
MADE IN MALAYSIA
Advertisement

Related Manuals for New Classic Furniture LUMINA B2210-310


Summary of Contents for New Classic Furniture LUMINA B2210-310
- Page 1 Assembly Instructions ITEM NO. Z:\DRAWING\AUTOCAD LIBRARY\LOGO\NEWCLASSICLOGO.png Z:\DRAWING\AUTOCAD LIBRARY\LOGO\NEWCLASSICLOGO.png B2210-310 LUMINA - 5/0 Q LIGHTED HEADBOARD B2210-320 LUMINA - 5/0 Q FOOTBOARD & SLATS B2210-330 LUMINA - 5/0-6/6 Q/EK SIDE RAILS Thank you for purchasing this quality product. Be sure to check all packing materials carefully for small parts, which may have come loose inside the carton during shipment.
- Page 2 Assembly Instructions ITEM NO. Z:\DRAWING\AUTOCAD LIBRARY\LOGO\NEWCLASSICLOGO.png Z:\DRAWING\AUTOCAD LIBRARY\LOGO\NEWCLASSICLOGO.png B2210-310 LUMINA - 5/0 Q LIGHTED HEADBOARD B2210-320 LUMINA - 5/0 Q FOOTBOARD & SLATS B2210-330 LUMINA - 5/0-6/6 Q/EK SIDE RAILS STEP 2 : Assembly the Slat Support Leg (E) into to the Slat (D). STEP 3 : Assembly the Slat (D) to the Side Rails (C) by using a screwdriver with hardware 4.
- Page 3 Assembly Instructions ITEM NO. B2210-060 LUMINA - LIGHTED MIRROR Thank you for purchasing this quality product. Be sure to check all packing materials carefully for small parts, which may have come loose inside the carton during shipment. Identify and count all items and compare with the parts list and/or hardware list shown below.
- Page 4 Assembly Instructions ITEM NO. B2210-060 LUMINA - LIGHTED MIRROR STEP 3 : Connect the AC/DC Adaptor (5) to the wire on the Mirror (A). Created date :30/5/2024 inch MADE IN MALAYSIA PAGE 2 OF 2...
- Page 5 Assembly Instructions ITEM NO. B2210-050 Z:\DRAWING\AUTOCAD LIBRARY\LOGO\NEWCLASSICLOGO.png Z:\DRAWING\AUTOCAD LIBRARY\LOGO\NEWCLASSICLOGO.png LUMINA - DRESSER Thank you for purchasing this quality product. Be sure to check all packing materials carefully for small parts, which may have come loose inside the carton during shipment. Identify and count all items and compare with the parts list and/or hardware list shown below.
- Page 6 Assembly Instructions ITEM NO. B2210-050 LUMINA - DRESSER STEP 3 : Assembly the Leg Support (C) to the Dresser (A). *Twist to adjust the height of the leveler on Leg Support (C) for stability. STEP 4 : Pull open the drawer and remove the handle from the inside of the drawer to the front of the drawer by using a screwdriver.
- Page 7 Assembly Instructions ITEM NO. B2210-050 LUMINA - DRESSER STEP 5 : Assembly the Anti-Tipping Kit (1) to the Dresser (A). Attach to wall Wall Attach to Dresser Created date :30/5/2024 inch MADE IN MALAYSIA PAGE 3 OF 3...
- Page 8 Assembly Instructions ITEM NO. B2210-040 Z:\DRAWING\AUTOCAD LIBRARY\LOGO\NEWCLASSICLOGO.png Z:\DRAWING\AUTOCAD LIBRARY\LOGO\NEWCLASSICLOGO.png LUMINA - NIGHTSTAND Thank you for purchasing this quality product. Be sure to check all packing materials carefully for small parts, which may have come loose inside the carton during shipment. Identify and count all items and compare with the parts list and/or hardware list shown below.
- Page 9 Assembly Instructions ITEM NO. B2210-040 LUMINA - NIGHTSTAND STEP 3 : Pull open the drawer and remove the handle from the inside of the drawer to the front of the drawer by using a screwdriver. Created date :30/5/2024 inch MADE IN MALAYSIA PAGE 2 OF 2...
Need help?
Do you have a question about the LUMINA B2210-310 and is the answer not in the manual?
Questions and answers