Advertisement
Introduction
Please read the following instructions carefully before first use and keep this user manual for future reference. Pay particular attention to the safety instructions. If you have any questions or comments about the device, please contact the customer line.
www.alza.co.uk/kontakt
+44 (0)203 514 4411
Importer Alza.cz a.s., Jankovcova 1522/53, Holešovice, 170 00 Prague 7, www.alza.cz
What's in the box?
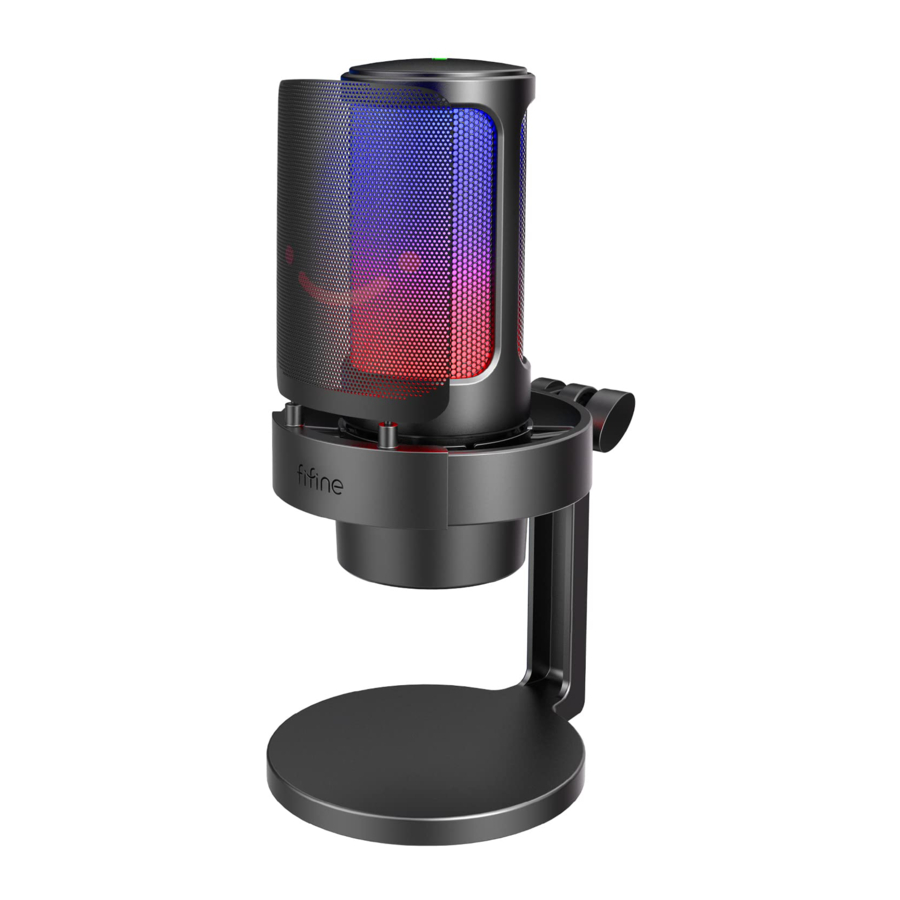
- 1 x Microphone with Based Stand, Shock Mount and Pop Filter
- 1 x Pivot Mount with Screw Adapter
- 1 x 6.5ft (2m) USB C to USB Cable
- 1 x User's Manual
Tips: A black gear ring, screw and thumbscrew are connected with the pivot mount (The three parts can be detached).
Product Description

- Microphone Capsule – Condenser microphone element with cardioid polar patter.
- RGB Lighting – The multicoloured RGB lighting on mic with dynamic multi-colour gradient, single-colour breathing, static two-tone colour, and static single colour lighting effect.
- RGB Button – Tap to select or turn on/off the RGB lighting. Select RGB modes or colours with one tap. RGB lighting can be off or on by long pressing the button for 5 seconds.
- Mute Button and LED indicator – Tap to mute or unmute the mic. If the LED indicator is green, the mic is active and if it is red, the mic is muted.
- Microphone Gain-Control the sensitivity of the mic capsule.
- Headphone Jack-1/8 inch (3.5 mm) stereo jack for monitoring your voice in real time.
- USB C Port-Connect the mic directly to computer or game console (expect Xbox) via the included USB cable.
- Pop Filter-Filter out the harsh p", t" and b" sounds.
- Shock Mount – Isolate the mic and supress the sound of unintentional rumbles and bumps.
- Mic Stand-Used to hold the mic.
- Black Gear Ring-Used to prevent the microphone from sliding or hanging down.
- Thumbscrew-Screw to adjust the microphone angle.
- Screw-Used to connect the mic with stand.
- USB Cable (6.5ft) – Type A to Type C cable for connecting the mic to computer or game console (expect Xbox). (Only the included USB cable is 100% guaranteed for compatibility)
- Pivot Mount – Used to connect with the arm stand (Not included), if you need to use the microphone with arm stand.
Guidance for use
The microphone has been installed already. You can start to use it by following steps.
- Tightly plug the provided USB cable into the Type-C port at the bottom of the microphone. Plug the USB A connector to the USB port of your computer or game console (expect Xbox)

- Adjust the angle of the mic with the thumbscrew to keep the mic capsule facing the sound source. We suggest the optimal recording distance of 6-12 inches.

- To get the optimum result of recording, we suggest to turn down the mic gain first, and then turn it up gradually until you get the desired loudness.
Tips:
If you want to use the microphone with an arm stand, you can install it by following steps.

- Take apart the pivot mount-Unscrew the thumbscrew to separate it and the screw from the pivot mount. No need to take the back gear ring out, keep it inside the pivot mount. Be careful of screw lost when unscrew.
![]()
- Detach the microphone from the based stand-Hold the mic with your hand. Unscrew the thumbscrew to separate it and the screw from the stand joint. Keep the back gear ring in the hole on the side of the stand joint. (Notice to keep the disassembled parts)
![]()
- Install the mic on the arm stand – Screw the pivot mount into the arm stand, and then place the microphone into the pivot mount joint and hold the mic with your hand.

- Put the screw into the hexagonal hole on the side of the joint and press it with your finger. Screw the thumbscrew to the other side of the joint (keep your finger pressing the screw), until the microphone is firmly connected with the mic stand.

- After installation, you can use the microphone according to step 1-3 from GUIDANCE FOR USE" above.


Mute Button Operation
Tap the mute button on the top to mute/unmute the mic. The LED indicator light is green when the mic is active, and it is red when the mic is muted.

- Make sure the LED light green when you use the mic.
- RGB lighting effect are not affected by mute function operation.
RGB Lighting Modes
There are four lighting modes in total: dynamic multi-colour gradient, single-colour breathing, static two-tone colour and static single colour lighting effects.
Dynamic Multi-Colour Gradient

Single-Colour Breathing
The RGB changes automatically with single-colour breathing.

Static Two-Tone Colour
You can manually select the RGB light colour, and it will stay in the colour of your choice. Colour order as below, pink-purple, cyan-pink, orange-blue, pink-orange, yellow-green and pink-green.

Static Single Colour
You can manually select the RGB light colour, and it will stay in the colour of your choice. Colour order as below, yellow, green, blue, red, cyan and white.

RGB Button Operation
Tap the RGB button to select RGB modes or colour. RGB lighting can be off or on by long pressing the button for 5 seconds. Power-off memory function: When the mic is powered or RGB is turned on next time, it is still in the mode you last powered/turned off. (The two static colour modes still keep the last colour that was off. The two dynamic modes start over the default first colour.)

Headphones Jack Operation
Plug the headphone to the headphone jack at the bottom of the mic if you want to monitor your voice in real time. Choose the mic fifine Microphone" as the input device of your computer if you want to monitor your voice mixed with the sound from computer.
Tips.
- Make sure to plug your headphone into the headphone jack on the mic fully.

- When the mic is on (the mute button indicates green) and the mic gain is not turned to zero, you will hear your voice at once. No need to login any recording software (Apple-Macintosh systems) or click Listen to this device" (Windows system).

- If you don't want to monitor your voice but just listen to computer audio, you can follow below steps. Go to Sound Control Panel – Playback" tab-select fifine Microphone" Speaker-Properties- Level" tab-disable the microphone volume. (See the Tips" below for more details.)


Computer Set Up
Apple MAC OS
Plug the free end of the provided USB cable into the USB port on your computer. The RGB light will be on while the indicator light will be green, indicating the mic is powered. Your computer will automatically recognize the USB device and install a driver. There may be no pop-up window or message though.
Input Settings
- Go to System Preferences.

- Click Sound to display the Sound preference pane.

- Click the Input tab and make certain fifine Microphone" is selected as the default input device. Turn up or down the mic volume by adjusting the gain knob on the mic. (Mic input volume is only controlled by the gain knob but not by computer setting).


Output Settings
Output the audio from Mac
- The mic will become the default output device automatically when it is plugged into the Mac. If you want to listen to the sound from the built-speaker of mac directly, please choose the Internal Speakers" as output device.

- If you want to connect your earphone to Mac and listen to the sound, please select the Headphones as output device.


Output the audio from the mic
Plug the headphone to the 3.5mm jack at the bottom of the mic if you want to monitor voice in real time. Click the Output tab and choose fifine Microphone" as output device, if you want to monitor your voice mixed with the sound from mac.

Tips: If your Mac only has UBC port, you need a genuine Apple USB-C to USB female adapter (Not included) for connection. And please plug the USB adapter into your Mac first, then connect the mic with the adapter.
Windows
Plug the free end of the provided USB cable into the USB port on your computer. The RGB light will be on while the indicator light will be green, indicating the mic is powered. Your computer will automatically recognize the USB device and install a driver. There may be no pop-up window or message though.
Input Settings
- Right click the speaker icon at the bottom right of the screen. Click Open Sounds Settings".

- Click the Sound Control Panel.

- Click the Recording tab, and choose fifine Microphone" as the default device. When you speak into mic, bar-type icon will turn green and bounce. If it remains unchanged, please reset computer and replug the mic in the available USB ports of the computer.

- Adjust input volume. Double click the fifine Microphone" to open the Microphone Properties window and click the Level" tab. Turn up or down the mic volume by adjusting the gain knob on the mic. (Mic input volume is only controlled by the gain knob but not by computer setting.)


Output Settings
Output the audio from the computer
- The mic will become the default output device automatically when it is plugged into the computer. If you want to listen to the sound from the built-in speaker of the computer directly, please click the Playback" tab from the Sound pane and choose Realtek High Definition Audio" as the default output.

- If you want to connect your earphone to the computer and listen to the sound, please select the Headphone as output device.
![]()
- Click the speaker that is being used – Properties – Levels. Drag the progress bar to adjust volume of output.


Output the computer from the mic
- Plug the headphone to the headphone jack at the bottom of the mic if you want to monitor your voice in real time. Click the Playback" tab from the Sound pane, select fifine Microphone" as the default output device if you want to monitor your voice mixed with computer audio.

- Click the speaker (fifine Microphone) – Properties – Levels, and drag progress bar to adjust output volume.

Tips:


- Make sure the speaker and the microphone are active under the Levels tab.
- If you don't want to monitor your voice but just listen to computer audio, you can follow below steps. Go to Sound Control Panel – Playback" tab select fifine Microphone" Speaker – Properties – Level" tab – disable the microphone volume.


 Note (Applicable for MAC and Windows):
- If computer prompts that it's unable to identify USB devices, please restart computer and replug the microphone into USB port of your computer.
- If the mic is recognized but no sound coming out, please check whether System Sound is muted and make sure LED indicator on the top is green (means the mic is active)
- If your computer runs windows, please check off the box Listen to this device" when you are using any recording software (such as Audacity) or chatting software (such as Skype)m, otherwise you would hear a double audio just like echo.
Click the Recording" tab and click the fifine Microphone – Properties – Listen – check off the box Listen to this device" – Apply.
![]()
- If the mic is recognized but no sound comes out, and your PC is running on Windows 10, please go to Settings – Privacy – Microphone and click the Allow apps to access the microphone" to ON, then restart your PC.
- If the sound of your mic is inconsistent or the volume randomly changes, please disable the sound activated recording function of the application (like Automatically adjust volume" of Zoom). And if you're using Windows computer, please go to Settings – Privacy – Microphone, disable XBOX Console Companion and XBOX Game Bar under it.

Recording Software Settings
- Pls select fifine Microphone" as the input device from the setting when using recording software. Take the Audacity for example.
- If your monitor your audio from headphone jack of computer, please choose Headphone (Realtek (R) Audio)" as output device. If you monitor from the mic headphone jack, choose fifine Microphone" as output.

- Make sure click off Listen to this device" in your computer system when you are using any recording software, or else you would hear duet of yourself just like too much echo. (Click the Recording" tab and click the fifine Microphone – Properties – Listen – check off Listen to this device" – Apply.)
- There are several ways to improve the usage. Come to our website, find Technical Support under the SUPPORT" tab or directly search the Technical Support solution for your interested subject.
- For windows computers, we recommend audacity. For Apple computer, you can use Apple's own QuickTime player to test the recording.

Important Notice
Choose your output setting
When you plug the mic to your PC, it cancels the audio from any other audio file played or no sound on the playback, you need to manually select speaker (Realtek High-Definition Audio)" as the default playback device, if you want to output computer audio via the computer built-in speaker.
Setting your software levels
Ideally, the mic level should be as high as possible without overloading the input of your computer. If you hear distortion, or your recording program shows levels that are consistently overloaded (at peak levels), turn the mic volume (or level) down through the gain control on the mic. If your recording program shows insufficient level, you can increase the mic gain through the gain control on the mic.
Selecting software
Many recording software can be chosen. Audacity, available for free online is a widely used software. If you plug the mic AFTER you load Audacity, it may not recognize the mic while it may still record, the results will be unsatisfactory. If that happens, restart Audacity AFTER plugging the USB into your computer and click on fifine Microphone option.
Positioning the microphone
To achieve the best frequency response, it is important to have the mic capsule (the side with pop filter) pointed as the user's mouth, instrument or any other sound source. For speaking/singing applications, the ideal position of the microphone is directly in front of the speaker. The same position is optimal when miking an instrument. Test the mic different distances to find the best sound for your particular setup.
Protecting your microphone
Avoid leaving your microphone in the open air or in areas where temperatures exceed 110°F (43°C) for extended periods. Extremely high humidity should also be avoided.
Specification
| Model Number | A8 |
| Element | Condenser |
| Polar Pattern | Cardioid |
| Power Supply | 5V |
| Operating Current | 200mA |
| Output | USB |
| Sensitivity | -40 ± 3dB |
| Frequency Response | 50Hz – 20KHz |
Documents / Resources
References
Download manual
Here you can download full pdf version of manual, it may contain additional safety instructions, warranty information, FCC rules, etc.
Advertisement


Need help?
Do you have a question about the A8 and is the answer not in the manual?
Questions and answers