Advertisement
Available languages
Available languages
Quick Links
CONTENTS
WARRANTY
Guidelines For Use
. . . . . . . . . . . . . . . . . . . . . . . . . . . . . . . . . .
3-8
Fifine microphone warrants its hardware product defects in materials and
Computer set-up(windows&
MAC OS
)
. . . . . . . . . . . . . . . . . . . . . . .
9-15
workmanship for a period of one year from the date of original retail purchase,
provided the purchase was made from an authorized Fifine microphone dealer.
Recording Software Settings
. . . . . . . . . . . . . . . . . . . . . . . . . . . .
15-16
This warranty is void if the equipment is altered, misused, mishandled, suffers
Important Notice
. . . . . . . . . . . . . . . . . . . . . . . . . . . . . . . . . . .
16-17
excessive wear or is serviced by any parties not authorized by Fifine Microphone.
For warranty service ,contact your local distributor or web@fifine.cc
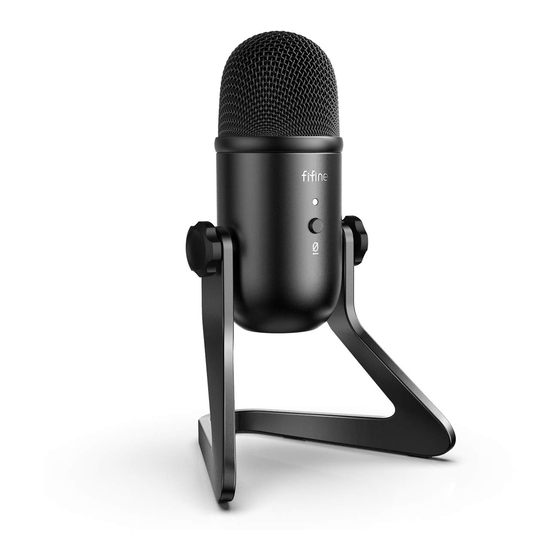
WHAT'S IN THE BOX?
CONTROL PANEL
1 X Microphone
1 X Adjustable Desk Stand
Microphone Capsule - Condenser microphone element with cardioid polar pattern.
1 X 6.56' Type A to Mini B USB Cable
LED Indicator - Green light shows microphone is on. Red light shows microphone
1 X 5/8" Male to 3/8" Female Adapter
is muted.
1 X User's Manual
Mute Button - Press the button for mid-stream when you need to have a rest.
USB Output - Connect directly to your computer via the included USB cable.
Headphone Jack - 1/8 inch (3.5 mm) stereo jack for monitor your voice in real time.
Microphone Gain - Control the sensitivity of the mic capsule.
Headphone Volume - Control the volume of sound in your headphone.
USB Cable (6.56') - Type A to Mini B USB Cable.
CONTACT US
5/8 inch Male to 3/8 inch Female Mic Thread Screw Adapter-For connecting
Get Social:
Microphone toSuspension Boom Scissor Arm Stand(Not included) if you need.
Facebook page: http://bit.ly/FifinePage
Contact Info:
Email: web@fifine.cc
1
2
After installation, you can test the mic by speaking to it. If the mic picks up no
sound, please follow procedures below.
1. Right-click the speaker icon at the bottom right of the screen. Click "Sounds".
5. Click the output tab and make certain "K678-Stereo Microphone" is selected as
the default output device.
(This should have happened automatically.)
2.Confirm the loudspeaker is open.
Click the loudspeaker is being used-"Properties"--"levels",drag progress bar to
adjust volume of output
Please wait for a few secs when first time operation, since driver of microphone
takes time to automatically install. There may be no pop-up window or message
though. (If plugging USB connector in a different USB port, driver installs again).
10
11
Sound
Source
3. The front of the microphone should be facing the sound source. (A FIFINE icon and LED
indicate the front of the microphone; the microphone gain and headphone volume knob
displayed on the rear of the microphone.)
Front
GUIDELINES FOR USE
1. Easily mount K678 microphone to the stand using the screws.
Front
Rear
2. Adjust and pivot the microphone in relation to the sound source to optimize your sound
quality.
3
4
4. Two way to monitor your speaking voice:
1) Output from the microphone jack--Please plug earphone in the headphone jack on the
base of K678, you can hear your voice at once ,no need to set the output devices
through computer and no need to click "listen to this device" under the "listen" tab.
3. Select the Recording tab, and choose "K678-Stereo Microphone" as the default
device. When you speak to mic, bar-type icon will turn green and bounce. If it
remains unchanged, please reset computer and replug in the USB port. If there's
still no "K678-Stereo Microphone", please contact FIFINE after service.
2) Output from the Computer-Plug your earphone into the 3.5mm earphone jack of
computer/laptop, manual operate output from "Realtek High Definition Audio" under
"Playback",then click Microphone"K678-Stereo Microphone"- "Properties"-"Listen"-
click "Listen to this device"-"Apply".
NOTE:
1). Click off "Listen to this device" when you are using any recording software or
chatting software(Skype).
2). Make sure the led is on green color indicate that microphone's on.
12
13
6. You can use the included 5/8" male to 3/8" female adapter to install the mic on the
standard boom arm.
Rear
Front
5/8" Male to 3/8" Female Adapter
4. Maintain a distance of approximately 15-20 cm(5.9-7.9 in.) between the sound source
and the microphone.
MUTE BUTTON OPERATION
Press the button on the microphone to turn the mute on/off. Mute is indicated by a LED
on the microphone body.
Mute Button
5. Fully plug the provided USB cable with the right angle into the USB output at the base
of the microphone
HEADPHONE OUTPUT
K678 includes a standard 1/8"(3.5mm) headphone jack for monitoring and playback.
Microphone Gain
When your preliminary setup is completed (Choose "K678-Stereo Microphone"as input),
Headphone Volume
and your USB microphone is connected to your Computer's USB port (the microphone's
green LED is illuminated), Use K678 Headphone output to monitor your microphone
recording in real-time or tracks recordings from your computer.
5
Note: (Applicable for MAC and Windows)
1. If computer prompts that it's unable to identify USB devices, please restart computer
and replug the microphone into other USB port.
2. If mic recognized but no sound comes out, please check whether System Sound is
mute and whether you have turned volume control on microphone to minimum.
3. If mic recognized but no sound out, and your computer runs windows 10, please go
to settings > privacy > microphone and click the Allow apps to access the
microphone to ON then restart.
Recording Software Settings
1. Pls select "K678-Stereo Microphone"as the input device from the setting when using
5. Double click the "K678-Stereo Microphone" to open the Microphone Properties
recording software. if you need to monitor your sound from 1/8" (3.5 mm)headphone
window. Right click the speaker icon under the Levels tab, change to decibels from
jack of computer, pls Choose "Realtek High Definition" .Choose output "K678-Stereo
percentage. To get the best sound of the mic, please adjust the mic level during this
range (+6.8 to +10.0 dB), when the output volume of the speaker is max.
Microphone" if you monitor from the microphone jack.
Note:
Make sure that the microphone gain and headphone volume knob is not on the zero
position.
lnput: K678-Stereo Microphone
Output: Pls choose correct output
14
Note:
* 1. Fully Plug your earphone into the 3.5mm earphone jack of microphone.
Click!
* 2. Plug earphone in the mic jack, you can hear your voice at once, no need to log in any
SPECIFICATION
recording software or click" listen to this Device".
Power Supply:
* 3. If there is no sound out when you plug earphone into the base of microphone, check
Operating Current:
by clicking "K678-Stereo Microphone"- "Properties"-"Levels". make sure the speaker
Polar Pattern:
and the microphone is on under the levels tab.
Frequency Response:
Red = Microphone is muted
Sensitivity:
Equivalent Noise Level:
Dynamic Range:
Green = Microphone is on
S/N Ratio:
Max.SPL:
Typical Frequency Response Curve
Frequency Response (0dB=1V/pa)
+20
+10
0
-10
-20
-30
20
50
Listen music from computer
6
7
Notice: logging out of AUDACITY(or other recording software) if you find usb microphone
either through your control panel (or system preferences) settings, or through your
recording software. If your recording program shows insufficient level, you can
is unavailable. And then plug in mic first , secondly log in software again.
increase the microphone gain either from the control panel (or system preferences)
2. Make sure to click off "Listen to this device" in your computer system when you are
settings or through your recording program.
using any recording software, or else your would hear duet of yourself just like too
much echo.
Selecting software
You have many choices in recording software. Audacity, available for free online at
http://audacity.sourceforge.net/, is a widely used software program that provides
basic recording software.
Note: The microphone must be plugged in first and secondly turning on the
recording software.
Positioning your microphone
It is important to position the microphone directly in line (on axis) with the person
speaking/ singing or instrument (or other sound source) to achieve the best frequency
response of the microphone. For use in speaking/singing applications, the ideal
placement for the microphone is directly in front of the person speaking/singing. The
same placement is optimal when miking an instrument such as an acoustic guitar,
drums or piano. Experiment with different mic placements to find the best sound for
3. There are several ways to improve the recording by using Audacity.Come to
your particular setup.
https://fifinemicrophone.com/blogs/news to search the better solution or SEARCH
WIDGET for your interested subject in our blogs.
Protecting your microphone
4. For windows computers, we recommend audacity, and for Apple computers, you
Avoid leaving your microphone in the open sun or in areas where temperatures
exceed 110° F (43° C) for extended periods. Extremely high humidity should also be
can use Apple's own QuickTime player to test the recording.
avoided.
Choose your output setting
IMPORTANT NOTICE
When you plug microphone to your pc, it cancels the audio from any other audio
file played or there's no sound on the playback, you need to manually select the
Setting your software levels
"speaker (Realtek High Definition Audio)" as the default playback device if you want
Correct adjustment of microphone level is important for optimum performance. Ideally,
to output sound via the computer built-in speaker.
the microphone level should be as high as possible without overloading the input of
your computer. If you hear distortion, or if your recording program shows levels that
are consistently overloaded (at peak levels), turn the microphone gain (or level) down,
15
16
COMPUTER SETUP
Apple MAC OS
1. Plug the free end of the provided USB cable into the USB port on your computer.
The microphone's green LED will illuminate, indicating the microphone is receiving
power. Your computer will automatically recognize the USB device and install a
driver.There may be no pop- up window or message though.
2. To select the K678 as your audio input, first, open your System Preferences.
5V
80mA
Uni-directional
3. Next, click Sound to display the Sound preference pane.
40Hz—20kHz
-45±3dB (at 1kHz)
66dB-A
88dB
85dB
130dB
0
330
30
60
60
300
4. Click the Input tab and select the "K678-Stereo Microphone" as the device for
90
270
sound input.
120
240
100
200
500
1K
2K
5K
10K
20K
210
150
180
Frequency Hz
8
9
K678
USER'S GUIDE
17
B2B Version:Feb-11-2020
Advertisement

Related Manuals for Fifine K669B


Summary of Contents for Fifine K669B
- Page 1 Press the button on the microphone to turn the mute on/off. Mute is indicated by a LED recording software or click” listen to this Device”. 3. The front of the microphone should be facing the sound source. (A FIFINE icon and LED 1 X User’s Manual on the microphone body.
- Page 2 Fifine microphone dealer. This warranty is void if the equipment is altered, misused, mishandled, suffers excessive wear or is serviced by any parties not authorized by Fifine Microphone.
- Page 3 Pagina 4 3. The front of the microphone should be facing the sound source (a fifine icon and LED indicate the front of the microphone; the microphone gain and headphone volume knob displayed on the rear of the microphone)
- Page 4 Note: 1. fully plug your earphone into the 3.5mm earphone jack of microphone 2. plug your phone in the mic Jack you can hear your voice at once no need to log in any recording software or click listen to this device 3.
- Page 5 When you speak to mic, bar-type icon will turn green and bounce. If it remains unchanged, please reset computer and replug in the USB port. If there’s still no “K678-Stereo Microphone” ,please contact FIFINE after service. NOTE: 1. Click off “Listen to this device” when you are using any recording software or chatting software (Skype).
- Page 6 the best sound of the mic, please adjust the mic level during this range (+6.8 to +10.0 dB), when the output volume of the speaker is max. Note: Make sure that the microphone gain and headphone volume knob is not on the zero position.
- Page 7 (or level) down, either through your control panel (or system preferences) settings, or through your recording software. If your recording program shows insufficient level, you can increase the microphone gain either from the control panel (or system preferences) settings or through your recording program. Pagina 17 ...
- Page 8 Fifine-microfoondealer. Deze garantie vervalt als het apparaat werd gewijzigd, verkeerd of slecht werd gehanteerd, overmatige slijtage vertoont of hersteld werd door een partij die niet is geautoriseerd door Fifine Microphone. Neem voor garantieservice contact op met uw lokale distributeur of web@fifine.cc Controlepaneel 1.
- Page 9 Pagina 4 3. De voorkant van de microfoon moet naar de geluidsbron zijn gericht (een FIFINE icoon en een LED- lampje geven de voorkant van de microfoon aan; de knop voor microfoonversterking en hoofdtelefoonvolume wordt weergegeven op de achterkant van de microfoon)
- Page 10 2. Sluit je koptelefoon aan op de microfoonaansluiting, je kunt je stem meteen horen, je hoeft niet in te loggen op opnamesoftware of te klikken op “luisteren naar dit apparaat” 3. Als er geen geluid is wanneer u de oortelefoon in de onderkant van de microfoon steekt, controleer dan door op "K678-stereomicrofoon"...
- Page 11 Als het ongewijzigd blijft, reset u de computer en sluit u de USB-poort opnieuw aan. Als er nog steeds geen "K678- stereomicrofoon" is, neem dan na service contact op met FIFINE. NOTITIE: 1.
- Page 12 1. Als de computer aangeeft dat het geen USB-apparaten kan identificeren, start u de computer opnieuw op en sluit u de microfoon weer aan op een andere USB-poort. 2. Als de microfoon wordt herkend maar er komt geen geluid uit, controleer dan of het systeemgeluid is gedempt en of u de volumeregeling op de microfoon op het minimum hebt gezet.
- Page 13 te bereiken. Voor gebruik in spreek- / zangtoepassingen is de ideale plaatsing van de microfoon direct voor de spreker/zanger • Bescherming van uw microfoon Laat uw microfoon niet gedurende langere tijd in de open lucht of in gebieden waar de temperatuur hoger is dan 43°C.
- Page 14 à compter de la date d'achat originel, à condition que l'achat ait été effectué auprès d'un revendeur de microphones Fifine agréé. Cette garantie est nulle si l'appareil a été modifié, mal manipulé, s’il présente une usure excessive ou s’il a été réparé par une partie non autorisée par Fifine Microphone.
- Page 15 Page 4 3. L'avant du microphone doit faire face à la source sonore (une icône FIFINE et un voyant LED indiquent l'avant du microphone; le bouton de gain du microphone et de volume du casque sont affichés à l'arrière du microphone)
- Page 16 2. Connectez vos écouteurs à la prise microphone, vous pouvez entendre votre voix tout de suite, pas besoin de vous connecter au logiciel d'enregistrement ou de cliquer sur «écouter cet appareil» 3. S'il n'y a pas de son lors de l'insertion de l'écouteur dans le bas du microphone, veuillez vérifier en cliquant sur «microphone stéréo K678»...
- Page 17 Lorsque vous parlez au microphone, l'icône du type de barre devient verte et rebondit. S'il reste inchangé, réinitialisez l'ordinateur et reconnectez le port USB. S'il n'y a toujours pas de "microphone stéréo K678", veuillez contacter le service après-vente de FIFINE. REMARQUE: 1.
- Page 18 1. Si l'ordinateur indique qu'il ne peut pas identifier les périphériques USB, redémarrez l'ordinateur et reconnectez le microphone à un autre port USB. 2. Si le microphone est reconnu mais qu'aucun son ne sort, vérifiez que le son du système ne soit pas coupé...
- Page 19 • Positionnement de votre microphone Il est important de placer le microphone directement en ligne (sur l'axe) avec la personne qui parle/chante ou avec l'instrument (ou toute autre source sonore) pour obtenir la meilleure réponse en fréquence du microphone. Pour une utilisation dans les applications de parole/chant, le placement idéal du microphone se trouve directement devant le haut-parleur/chanteur •...
Need help?
Do you have a question about the K669B and is the answer not in the manual?
Questions and answers