Advertisement
Quick Links
Advertisement

Subscribe to Our Youtube Channel
Related Manuals for Gorenje GV693A65UVAD


Summary of Contents for Gorenje GV693A65UVAD
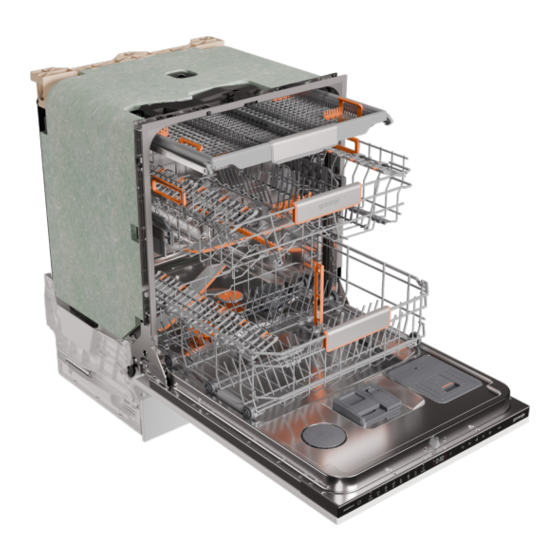
- Page 1 User manual Dishwasher GV693A65UVAD...
- Page 2 Contents Your dishwasher ........................Safety instructions ........................Installation ..........................Overflow guard ......................... Packaging ..........................Disposal ............................ Symbols on the appliance ......................Before washing for the first time ................... 1. Water hardness ........................2. Basic settings ........................Top up with rinse aid ........................ Top up with salt ........................
- Page 3 Care and cleaning ........................Top up with rinse aid ........................ Top up with salt ........................Top up dishwasher detergent gel for automatic dosing ............Clean the filter ........................... Cleaning the spray arms ......................Clean the outside of the dishwasher ..................CLn - Run the Self-clean program ...................
- Page 4 Your dishwasher Install the dishwasher, see the chapter Installation. Then open the door and press The first time the dishwasher is switched on, it is important that you choose the right settings to ensure good dishwashing results. See the chapter Before washing for the first time. On/Standby mode WiFi Start/Stop...
- Page 5 Safety instructions Read the user manual and keep it in a safe place! Number of standard place settings: 16 Never use the dishwasher for any purpose other than that specified in these operating instructions. Do not load the dishwasher door or dishwasher baskets with anything other than dishes.
- Page 6 WARNING! Knives and other pointed items must be placed horizontally in the dishwasher's special cutlery baskets. WARNING! Children must be supervised – dishwasher detergent is corrosive! Installation See the chapter Installation. Overflow guard The overflow guard starts pumping out the water and turns off the water supply if the water level in the dishwasher exceeds the normal level.
- Page 7 Before washing for the first time 1. Water hardness In order to achieve good dishwashing results, the dishwasher needs soft water (water with low mineral content). Hard water leaves a white coating on dishes and the dishwasher. Checking water hardness Water hardness is specified using German degrees of water hardness (°dH), French degrees of water hardness (°fH), English degrees of water hardness (°eH) or millimoles per litre (mmol/l).
- Page 8 2. Basic settings The first time the dishwasher is switched on, it is important that you choose the right settings to ensure good dishwashing results. See page 24. Set up: Rinse aid Water hardness TAB (All-in-one detergent) Automatic dosing of detergent Top up with rinse aid Drying is faster and a better result is achieved Lift up to open...
- Page 9 Top up dishwasher detergent gel for automatic dosing If you have selected Automatic dosing of Lift up to open detergent 6:15 - 6:40 (15-40 ml), top up the automated dosage compartment with dishwasher detergent gel. 1. Open the lid of the automatic dosing compartment for dishwasher detergent gel. 2.
- Page 10 Greener dishwashing Save energy and water When using a dishwasher in a residential setting, less energy and water are generally used compared to washing the dishes by hand. Do not rinse under running water Do not rinse the dishes under running water as this will lead to increased energy and water consumption. Simply scrape off large food particles before loading the dishwasher.
- Page 11 Loading the dishwasher Fragile dishes Some cookware is not dishwasher safe. This can be for several reasons. Some materials cannot withstand high heat, others can be damaged by dishwasher detergent. Exercise caution with, for example, handmade items, fragile decoration, crystal/glassware, silver, copper, tin, aluminium, wood and plastic.
- Page 12 Upper basket Place glasses, cups, bowls, side plates and saucers in the upper basket. All dirty surfaces should face inwards and downwards! Wine glasses are placed on the wine glass shelf and knives are placed in the knife stand on the right. 3 positions Knife stand Raising and lowering the upper basket...
- Page 13 Adjustable plate supports The adjustable plate supports can be folded down to make it easier to load pots, bowls and glasses. Lower basket Place plates, side plates, serving dishes and pots in the lower basket. Cutlery can be placed in the cutlery holder.
- Page 14 Adaptable power zones The dishwasher's two adaptable power zones can be opened in two different positions or turned off. For vases and bottles For pots and pans For higher spray pressure in the lower spray arm Pre-selected at factory: Off Leave the power zones open if you want an increased water flow where, for example, you have placed pots and pans or vases and bottles.
- Page 15 Using the dishwasher Add detergent You have two options for adding detergent – manual or automatic. The manual detergent compartment can be used as a supplement even when Automatic dosing of detergent is activated (e.g. for dishwasher detergent with bleaching agent or if the automated dosage compartment is empty). Follow the instructions on the detergent packaging.
- Page 16 On/Standby mode WiFi Start/Stop Display NOTE! The control panel only reacts to use when the door is open. On/Standby mode Open the door and press . Also turn on the water tap if it is turned off. Select program Select a program to suit the type of dishes and how dirty they are. Eco 55° is always pre-selected. Press the desired program until it is activated, which is indicated by an indicator light.
- Page 17 Hygiene 70° This program is ideal to use where demands on hygiene are extra high, e.g. for baby bottles and cutting boards. The temperature is high both in the main wash and in the final rinse. Night 55° A quieter dishwashing program, suitable for running at night. The program time is extended. Remote (WiFi) You can remote control this dishwasher with your smartphone/tablet.
- Page 18 SmartDry The dishwasher's fan, together with the automatic door opening function, shortens the program time and improves the drying results. Wait until the dishwasher indicates that the program has ended and the dishes have cooled before unloading the dishwasher. The drying time of the SmartDry option varies (from 5 to 90 minutes) depending on the model, program and temperature of the final rinse.
- Page 19 Status LedLight The status light on the bottom part of the dishwasher indicates that a program has started. Flashing light A flashing light indicates that the door has been opened while a program is in progress. If it flashes when the door is closed, an error has occurred. See the chapter Troubleshooting. A lens for a forward-facing status light can be fitted.
- Page 20 Activate the SmartDry option. Allow the dishes to cool before unloading the dishwasher. Unloading the dishwasher Hot porcelain is more fragile. Leave the dishes to cool in the dishwasher before unloading them. Unload the lower basket first to avoid any water drops from the upper basket falling onto the dishes in the lower basket.
- Page 22 ConnectLife ConnectLife is a smart home platform that connects people, devices and services. The ConnectLife application includes advanced digital services and carefree solutions that allow users to monitor and control appliances, receive notifications from a smartphone, and update software (supported features may vary depending on your appliance and the region/country in which you are located).
- Page 23 Remote control the dishwasher The dishwasher's network symbol is shown on the display when the dishwasher is paired with a smartphone/tablet. You can use the ConnectLife app to monitor the dishwasher and change settings. Remote start the dishwasher To remote start the dishwasher, press and then .
- Page 24 Settings 1. Open the door and press 2. To open the dishwasher's settings menu, press and hold until SEt is shown on the display. 3. Press to step through the settings menu. 4. Press to step through the alternatives. 5. Confirm the selected setting by pressing 6.
- Page 25 Settings Alternatives 5:00 (Off) Activate the setting when using all-in-one detergent con- (All-in-one detergent) 5:01 (On) taining rinse aid. (Also applies to dishwasher detergent gel for automatic dosing that contains rinse aid.) This setting reduces the rinse aid dosage and affects how often the dishwasher's built-in softener is regenerated.
- Page 26 Care and cleaning Top up with rinse aid When the rinse aid needs topping up, the above symbol lights on the display. Lift up to open Press to close 1. Open the rinse aid compartment lid. 2. Carefully top up with rinse aid to the level marked MAX. 3.
- Page 27 Top up dishwasher detergent gel for automatic dosing When the dishwasher detergent gel has run out and needs to be refilled, the above symbol appears on the display. (You can run 1-2 programs before the compartment is completely empty.) Lift up to open 1.
- Page 28 Clean the filter The filter traps larger food particles, which cannot get past the drainage pump. Empty the filter when necessary. It should be cleaned at regular intervals depending on how often the dishwasher is used. 1. Turn the locking ring anticlockwise and lift the filter straight up. 2.
- Page 29 Lower spray arm Pull the lower spray arm straight up to release it. Clean the outside of the dishwasher Door and door seal Open the door. Clean the sides of the door and the door seal regularly with a slightly damp cloth. Clean the door seal at the lower front edge of the dishwasher with a washing-up brush.
- Page 30 6. Refit the drainage pump stop along with the fine and coarse filters. 7. Plug the machine in again. Drainage pump stop NOTE! Do not forget to refit the drainage pump stop. Unblocking the inlet hose filter If the water supply contains small particles, the outer filter on the inlet hose may become blocked, which results in the Water inlet fault error message.
- Page 31 Troubleshooting Error messages Action Overfilling water Unblocking the drainage pump. See the chapter Care and cleaning. If the problem persists, contact your nearest service centre. Water outlet fault See "Water remains in the dishwasher" under "Problem" in the table below. If the problem persists, contact your nearest service centre.
- Page 32 Problem Possible causes Action Dirt on the control panel. Clean with a dry or slightly damp cloth. The control panel requires calib- Turn off the water tap. Remove ration. the plug from the wall socket and wait for 60 seconds. Then plug the appliance back into the wall socket and turn on the wa- ter tap.
- Page 33 Problem Possible causes Action Spray arm holes or bearings Clean the spray arms. See the blocked. chapter Care and cleaning. Unsuitable dishwashing pro- Select a program with a high gram. temperature to dissolve grease on very dirty dishes, such as In- tensive 70°.
- Page 34 Problem Possible causes Action Spots or films on the dishes. Incorrect rinse aid dosage set- See the chapter Settings. ting. The setting TAB is activated and Switch all-in-one detergents or all-in-one detergent with insuffi- deactivate the TAB setting and cient drying effect is being used. top up with salt and separate rinse aid.
- Page 35 Problem Possible causes Action Rattling sound when dishwash- The dishes are not correctly Check that the dishes are ing. placed or the spray arms are not placed securely. Spin the spray rotating freely. arms to make sure they can ro- tate.
- Page 36 Problem Possible causes Action The setting TAB is activated and Switch all-in-one detergents or all-in-one detergent with insuffi- deactivate the TAB setting and cient drying effect is being used. top up with salt and separate rinse aid. See Rinse aid in the chapter Settings.
- Page 37 WiFi Problem Possible causes Action The dishwasher's network sym- The dishwasher is not connec- Connect the dishwasher to your ted to your wireless network. wireless network. See the does not appear on the chapter ConnectLife. display. The WiFi connection is deactiv- Activate the WiFi connection.
- Page 38 Installation It is important that you read through and follow the instructions and directions below. Conduct installation and connection in accordance with the separate installation instructions. [mm] Remove the plastic strips if the recess dimension is 596-598 mm. Exercise caution! The edges may be sharp. Wear protective gloves! Cover door length.
- Page 39 Setup The recess and connection dimensions are included in the separate installation instructions. Check that all dimensions are correct before starting the installation. Note that the height of the cover door can be adjusted to match other fittings. Make sure the area on which the dishwasher is to be installed is firm. Adjust the adjustable feet so that the dishwasher is level.
- Page 40 Electrical connection Information about the electrical connection can be found on the serial number plate. This specification must match the electricity supply. The dishwasher must be connected to an earthed socket. The electric wall socket must be placed outside of the installation area to be easily accessible after installing the dishwasher.
- Page 41 Read the chapter Troubleshooting before contacting the service centre. If you have encountered a problem that you cannot resolve, please contact your nearest service centre for professional help, see www.gorenje.com. Our website also has information about spare part availability and what you can repair yourself.
- Page 42 2) In accordance with the EN 60436 standard. Information for consumers Information about your appliance can be found at www.gorenje.com. You can also find information in the EU Product Registration database for Energy Labelling, EPREL. Scan the QR code on the energy label supplied with the dishwasher (or go to https://eprel.ec.europa.eu and search for the model name).
- Page 43 Your notes...
- Page 44 939939-a4 We reserve the right to make changes.
Need help?
Do you have a question about the GV693A65UVAD and is the answer not in the manual?
Questions and answers