Advertisement
Quick Links
Advertisement

Related Manuals for Certa CTMWR18PTSPA


Summary of Contents for Certa CTMWR18PTSPA
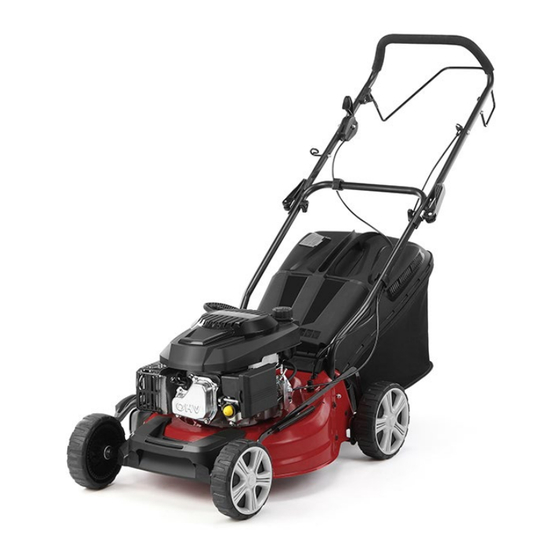
- Page 1 18" 146CC 4 IN 1 SELF PROPELLED FUEL LAWN MOWER CTMWR18PTSPA...
- Page 2 Safety & Warnings Overview Assembly Before First Use Operation Cleaning & Care Troubleshooting Specifications Notes...
- Page 3 SAFETY AND WARNINGS Intended use This lawn mower is suited for private use in a household garden environment. Any application that is not listed in this guide is prohibited. This lawn mower is capable of amputating hands and feet and throwing objects. Failure to observe the following safety instructions could result in serious injury or death.
- Page 4 o Do not store, spill, or use fuel near an open flame. o If fuel is spilled, do not attempt to start the engine. Move the lawn mower away from the area of spillage and avoid creating any source of ignition until fuel vapours have dissipated.
- Page 5 • Ensure skin does not come into contact with used engine oil. If this occurs, wash your skin with soap and water immediately. • Do not pull the lawn mower backwards unless absolutely necessary. Always look down and behind before and while mowing backwards. •...
- Page 6 OVERVIEW Operator presence control bar Push handle Water nozzle Throttle control Knob Knob Fuel cap Air filter Grass catcher Mulching plug (inside) Oil dipstick Spark plug Height adjustment handle Discharge chute Exhaust muffler Throttle control STOP position START position RUN position...
- Page 7 ASSEMBLY Read this user guide entirely before attempting to assemble and operate your new lawn mower. 1. Removing the lawn mower from the packaging Remove the lawn mower and loose components out of the packaging. 2. Assembling the wheels Align and place a washer (1), inner wheel cover (2), and front wheel (3) onto the lawn mower. Using the provided wrench, secure the components with a self-locking nut (4).
- Page 8 3. Unfolding and adjusting the handle assembly Raise the lower handle section until it locks into place. This will be the standard mowing position. Remove the protective padding and then raise and align the upper handle section with the lower handle section. Tighten both handle knobs. Remove the handle padding holding the operator presence control bar to the upper handle.
- Page 9 5. Rear bagging (optional) Remove the pre-installed mulching plug and install the grass catcher.
- Page 10 BEFORE FIRST USE Adding oil Set the lawn mower on a flat surface so the engine is level. Remove the oil dipstick from the fill spout and wipe clean. Pour 500ml of SAE 30 engine oil (not supplied) into the mower as shown below.
- Page 11 Adding fuel R emove the fuel cap. Using fresh, clean, regular unleaded fuel (containing up to 10% ethanol), fill the fuel tank to just under the tank neck. Do not overfill. Fuel cap Notes: • This lawn mower contains a 4-stroke engine. Do not mix oil with fuel. •...
- Page 12 OPERATION Starting the engine Ensure that the spark plug is fitted, and that the lawn mower is filled with sufficient oil and fuel. Push the throttle control forward to the START position (towards the tortoise icon). Depending on the ambient temperature, push the primer bulb on the air filter (as referenced below).
- Page 13 Self-propulsion function • Holding the operator presence control bar towards the push handle when mowing will activate the self-propelling function. This allows the lawn mower to move automatically with less effort needed by the user. Turning and direction controls are still required.
- Page 14 CLEANING & CARE Ensure the lawn mower is turned off and unplugged before performing any maintenance or cleaning. Maintenance advice IMPORTANT: Regular, careful maintenance is essential for keeping your safety and keeping optimal performance of the lawn mower. • Keep all nuts, bolts, and screws tight to ensure that the lawn mower is in a safe working condition.
- Page 15 Cleaning • Carefully clean the lawn mower with water after each cut. This removes the grass debris and mud accumulated inside of the chassis to avoid their drying and making the next start-up difficult. • Remove the transmission casing by removing the screws and clean around the transmission and drive belts with a brush or compressed air once or twice a year.
- Page 16 Changing the oil 1. Wait until the engine has stopped and cooled slightly. 2. Disconnect the spark plug wire and keep away from the spark plug. 3. When engine is still warm, remove the oil drain plug. Drain any remaining oil into a proper container.
- Page 17 Draining the fuel tank and carburettor 1. Place a fuel container below the carburettor and use a funnel to avoid spilling fuel. 2. Remove the float bowl, drain bolt and washer, then move the throttle control to the START position. Allow the fuel to drain into the container. 3.
- Page 18 Maintenance schedule Below is a table of recommended intervals particular components of the lawn mower should be checked or replaced. If unsure, contact a professional for assistance. Time period Perform at either every indicated month or hour interval, First Every 3 Every 6 Every Every...
- Page 19 TROUBLESHOOTING Engine does not start Possible causes Solution Out of fuel Refuel Bad fuel. The engine was stored without Drain the fuel tank and carburettor and refuel treating or draining fuel or refuelled with with fresh fuel. bad fuel. The spark plug is faulty, fouled or Remove and inspect the spark plug.
- Page 20 SPECIFICATIONS Fuel engine 2.6kW Engine speed 2800/min Cutting width 457mm Adjustable cutting height 20–70mm Grass collection capacity Sound pressure level LpA 83.1dB(A), k=3dB(A) Sound power level LwA 95.05dB(A), k=0.47 dB(A) Guaranteed sound power level LwA 96dB(A) Maximum vibration value 5.856m/s² (k=1.5 m/s²) Spark plug gap 0.7–0.8mm IN: 0.06±0.02mm...
- Page 21 NOTES...
- Page 24 Need more information? We hope that this user guide has given you the assistance needed for a simple set-up. For the most up-to-date guide for your product, as well as any additional assistance you may require, head online to help.kogan.com...
Need help?
Do you have a question about the CTMWR18PTSPA and is the answer not in the manual?
Questions and answers