Advertisement
Quick Links
Advertisement

Related Manuals for ETNA Vega 3


Summary of Contents for ETNA Vega 3
- Page 1 Technical manual Vega © ETNA Vending Technologies b.v.
- Page 2 Technical manual Vega Manufacturer: ETNA Vending Technologies b.v. P.O. Box 200 7130 AE Lichtenvoorde The Netherlands Distributor: © ETNA Vending Technologies b.v. Articlecode: Status: Revision:...
- Page 3 Check the ingredient containers ......... . . 23 © ETNA Vending Technologies b.v.
- Page 4 9.10 Replacing the outlet valve ........... . 53 © ETNA Vending Technologies b.v.
- Page 5 9.18 Replacing the peristaltic pump ..........59 © ETNA Vending Technologies b.v.
- Page 6 Technical manual Vega © ETNA Vending Technologies b.v.
- Page 7 The following pictograms are used on the Vega: • Electrical hazard WARNING DISCONNECT THE MAINS SUPPLY BEFORE REMOVING COVER Figure 1-2 • Risk of fingers being trapped DANGER Follow service procedure as in manual. Figure 1-3 © ETNA Vending Technologies b.v.
- Page 8 Your dealer will be pleased to assist you. If you contact your dealer, always have the following information at hand: • model number • serial number • software versions © ETNA Vending Technologies b.v.
- Page 9 Figure 1-4 Inside the machine 1. Model number 2. Voltage 3. Frequency 4. Power rating 5. Serial number 6. Water pressure The identification plate is on the inside on the right-hand frame plate. Figure 1-5 © ETNA Vending Technologies b.v.
- Page 10 Therefore, they must not be covered or removed. They must be kept within reach and be clearly legible throughout the entire service life of the machine. • If icons, symbols or instructions are illegible, ring your supplier straightaway to rectify this. © ETNA Vending Technologies b.v.
- Page 11 Use of the product within the confines of the intended use also includes complying with the instructions in the user manual. © ETNA Vending Technologies b.v.
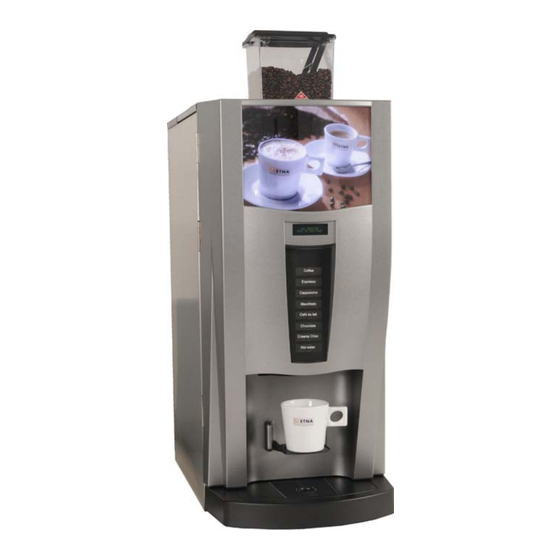
- Page 12 • a drink is being prepared • a fault has occurred. Main components 2.2.1 Front view 1. Bean container 2. Display 3. Selection panel 4. Dispenser 5. Cup stand 6. Drip tray Figure 2-1 © ETNA Vending Technologies b.v.
- Page 13 Figure 2-2 1. Door detection switch 2. ON/OFF switch 3. Brewer (brewing group) 4. Dispenser nozzles 5. Waste container 6. Dispenser holder 7. Mixer parts 8. Dispenser nozzle 9. Instant coffee containers vega 4 Figure 2-3 © ETNA Vending Technologies b.v.
- Page 14 Figure 2-4 Container lay-out The different types are fitted with the following containers. Machine Bean container Instant coffee Ingredient container bag holder Vega 3 Vega 4 Vega liquid container lay-out vega 3 Figure 2-5 © ETNA Vending Technologies b.v.
- Page 15 • The water and the ingredients are mixed in the mixer or compressed by the brewer group. • The drink is dispensed through the dispenser nozzle into the cup placed on the stand. © ETNA Vending Technologies b.v.
- Page 16 Pos.2- pressed in: door is closed • Pos.3- pulled out: machine operational for repair and testing purposes. The machine contains rotating and moving parts. Ensure that your fingers do not become trapped when work is carried out. Figure 2-10 © ETNA Vending Technologies b.v.
- Page 17 Disregarding the above instructions can jeopardise the safe use of the machine. Filling containers The containers hold the ingredients required to prepare drinks. Ensure that your fingers do not become trapped when filling the containers. © ETNA Vending Technologies b.v.
- Page 18 2. Fill the bean hopper with coffee beans. The bean hopper has a capacity of approx.1 kg (2.2 lbs) of beans. 3. Close the bean hopper and lock with the key. 4. Remove the key. Figure 3-2 © ETNA Vending Technologies b.v.
- Page 19 8. Place the liquid container with the ingredient bag in the machine. 9. Connect the pump hose to the valve. 10.Open the valve between the pump and the ingredient bag. (see figure 3-5). Figure 3-4 Closed © ETNA Vending Technologies b.v.
- Page 20 18.Press on ✱1 on the service panel to clean valve + rinse mixers; the mixing bowl will be rinsed with water. 19.Close the cover and the door of the machine. © ETNA Vending Technologies b.v.
- Page 21 • Replace the products when the use by date is up. • Only use the cleaning agents referred to in the cleaning schedule and follow the instructions on the packaging. See also par. 4.4. © ETNA Vending Technologies b.v.
- Page 22 Clean and empty the waste container under the brewer group. • Clean and empty the drip tray. • Rinse the mixers and brewer (at least 2x a day). • Clean the outside of the machine, including the selection panel. © ETNA Vending Technologies b.v.
- Page 23 6. Pull the door detection switch out (Pos. 3). Figure 4-2 7. Press on ✱6 of the service panel (on the inside of the door) to reset the waste container. 8. Close the door. Figure 4-3 © ETNA Vending Technologies b.v.
- Page 24 3. Place a jug (min. 300 ml) under the dispenser holder. 4. Press on ✱2 of the service panel (on the inside of the door) to rinse the brewer group. 5. Remove the cup and close the door. 6. Empty the cup. Figure 4-6 © ETNA Vending Technologies b.v.
- Page 25 – The bottom of the door. Weekly maintenance The following activities should be carried out once a week: • Clean the mixer parts • Clean the brewer automatically • Clean the brewer manually (take apart) • Clean the bean hopper © ETNA Vending Technologies b.v.
- Page 26 12.Put the cleaned parts back into the machine and connect the hoses. ☞ Figure 4-7 The mixing compartment must latch securely in place to prevent leaks. Ensure that the green catch snaps back into place. 13.Switch ON the machine (on/off switch). 300ml Figure 4-8 © ETNA Vending Technologies b.v.
- Page 27 6. Press on a random button on the service panel. The cleaning process is resumed. 7. Wait until the cleaning process has been finished. 8. Remove and empty the jug. 9. Close the door. Figure 4-10 © ETNA Vending Technologies b.v.
- Page 28 5. Twist the closing lever and the brewer will open (see figure 4-12). Figure 4-12 6. Thoroughly rinse the brewer clean under the tap (see figure 4-13). Figure 4-13 7. Twist the closing lever back and the brewer will close (see figure 4- 14). Figure 4-14 © ETNA Vending Technologies b.v.
- Page 29 9. Put the hose with the dispenser nozzle back in the dispenser nozzle holder. ☞ Check that the locking lever is in the correct position. 10.Switch ON the machine (on/off switch). 11.Close the door. Figure 4-15 © ETNA Vending Technologies b.v.
- Page 30 8. Fill the bean hopper with coffee beans. The bean hopper has a capacity of approx.1 kg (2.2 lbs) of beans. 9. Close the bean hopper and lock with the key. 10.Remove the key. 11.Switch ON the machine (on/off switch). 12.Close the door. Figure 4-16 © ETNA Vending Technologies b.v.
- Page 31 (see paragraph 4.3) De-scale Contact your supplier Fill machine No water in machine Check the water supply to the machine. Press the button to fill the machine with water © ETNA Vending Technologies b.v.
- Page 32 - changing minutes - changing year Figure 5-2 - changing month - changing day Temperature - changing the temperature Grinder cleaning - clean the bean grinder using a cleaning tablet. This has not been supplied © ETNA Vending Technologies b.v.
- Page 33 - reading the machine counters MACHINE COUNTERS Machine settings - changing the machine parameters MACHINE SETTINGS Pin menu - changing the pin codes PIN MENU Coin mechanism - setting the coin mechanism for the machine PAYMENT MENU Figure 5-4 © ETNA Vending Technologies b.v.
- Page 34 CALIBRATION LIST SWITCH RECIPE DRINK 1 - 14 DRINK ENABLE DRINK 1 - 14 MACHINE COUNTERS DRINK COUNTERS DRINK 1 - 14 CONTAINER COUNTERS CONTAINER 1 - 3 ADVANCED COUNTERS To part 2 Figure 5-5 © ETNA Vending Technologies b.v.
- Page 35 START DESCALING ADVANCED FACTORY DEFAULTS SOFTWARE VERSION DURATION TEST PIN MENU OPERATOR ENGINEER PAYMENT MENU SET COIN MECH SET COIN VALUE PRICE DRINK DRINK 1 - 14 SET CREDIT SIGN DELETE CREDIT DISPLAY CREDIT Figure 5-6 © ETNA Vending Technologies b.v.
- Page 36 CON 2 1 2 3 4 bk bk rd rd Encoder Home Door position Interlock 24V + PSU 24V DC 865005200 Nr: 000868395000 Links / left 230V/ 50Hz Line Filter 2 Mains Power switch Figure 5-7 © ETNA Vending Technologies b.v.
- Page 37 Pump Grinder 1200W/230V 1200W/230V yl/gn Nr: 000868395000 yl/gn Rechts / right Wire Colors = red = white = black = grey = green = violet = blue = brown = yellow = orange Figure 5-8 © ETNA Vending Technologies b.v.
- Page 38 Technical manual Vega Flow chart Cold Cold VEGA 3 VEGA 4 VEGA 3L Figure 5-9 © ETNA Vending Technologies b.v.
- Page 39 8 bar (800 kPa) pressure 1. It the pressure is higher, a pressure reducer must be installed. Sound level Description Value In operation max. m70 dB(A) ☞ Measurements according to DIN 45635, with normal use. © ETNA Vending Technologies b.v.
- Page 40 Max. height (h2) (incl. bean container) 885 mm Width (w) 320 mm Depth (d) 600 mm Weight when empty 42 kg Weight when full 47 kg Instant coffee containers 1x 2.3 l 1x 4.8 l © ETNA Vending Technologies b.v.
- Page 41 Each level has its own specific options and possibilities. You can access the levels by pressing # on the service panel. The standard pin codes for the operator and service engineer are: Level Pin code User 4321 Figure 7-1 Service engineer 4231 © ETNA Vending Technologies b.v.
- Page 42 Drink settings ADV.DRINK SET. Menu subject Description EDIT RECIPE Adjusting the drink - changing the drink settings per drink JUG SETTINGS recipes settings Figure 7-4 Multi cup - assigning the number of cups per jug © ETNA Vending Technologies b.v.
- Page 43 Waiting time ing 2 - entering waiting time in seconds Dosage ing 3 - entering dosage in grams Mixing time ing 3 - entering mixing time in seconds Waiting time ing 3 - entering waiting time in seconds © ETNA Vending Technologies b.v.
- Page 44 - setting the alarm level for the containers in ADVANCED COUNTERS grams Figure 7-8 - setting the descaling level in litres Advanced - reading water volume flow - reading number of rinses - reading software version - testing the software (EVT engineer) © ETNA Vending Technologies b.v.
- Page 45 Entering coin values 1 to 6 PRICE DRINK Credit sign Switching the credot sign ON and OFF SET CREDIT SIGN DELETE CREDIT Clear credit Erase option credit value DISPLAY CREDIT Credit on display Switching ON and OFF Figure 7-11 © ETNA Vending Technologies b.v.
- Page 46 Weigh the given quantity "MOTOR 3" • Enter the measured value WATER • Empty the cup. • Repeat these steps for every ingredient GRINDER 8 Restart the machine, see restart procedure par. 9.4. Figure 7-13 © ETNA Vending Technologies b.v.
- Page 47 8. Switch ON the machine with the on/off switch. • Wait until the software is ready. • The text indicating that machine is ready will be displayed. The supplier is not liable for damage to the machine resulting from improper or incorrect use. © ETNA Vending Technologies b.v.
- Page 48 6.5. 1 Read the safety instructions, see par. 9.1. 2 Open the door. 3 Switch the machine OFF with the on/off switch; see par. 2.5. 4 Disconnect the plug from the socket. © ETNA Vending Technologies b.v.
- Page 49 4 Remove the plate from the left side of the machine. Accessing the right side of the machine: 1 Loosen the two screws in back. 2 Slide the plate forwards. 3 Remove the plate from the right side of the machine. © ETNA Vending Technologies b.v.
- Page 50 • The text indicating that machine is ready will be displayed. 8 Check that nothing leaks. 9 Carry out the filling procedure, see Filling procedure (if applicable) 10 The machine is now ready to operate. © ETNA Vending Technologies b.v.
- Page 51 2 Remove the plate on the left side, see par. 9.2.2. 3 Disconnect the wiring from the intake valve. 4 Disconnect the water hoses from the intake valve. 5 Loosen the two screws of the intake valve. 6 Replace the intake valve. Figure 9-3 © ETNA Vending Technologies b.v.
- Page 52 7 Connect the water hoses to the flow meter. 8 Connect the wiring to the flow meter. 9 Restart the machine, see restart procedure par. 9.4. Also carry out the filling procedure, par. 9.4. 10 Calibrate the machine, see par. 7.10. © ETNA Vending Technologies b.v.
- Page 53 8 Connect the wiring to the valve block. 9 Connect the water hoses to the valves. Use new hose clamps! Figure 9-7 10 Restart the machine, see restart procedure par. 9.4. Also carry out the filling procedure, par. 9.4. © ETNA Vending Technologies b.v.
- Page 54 5 Connect the wiring to the bean grinder. 6 Connect the coffee-conducting pipe to the bean grinder. 7 Restart the machine, see restart procedure par. 9.4. 8 Calibrate the bean grinder, see par. 7.10. Figure 9-8 © ETNA Vending Technologies b.v.
- Page 55 19 Fasten the five screws on the right side. 20 Fasten the two screws on the back side. Figure 9-9 21 Put the brewer in place, see par. 4.6.3. 22 Restart the machine, see restart procedure par. 9.4. © ETNA Vending Technologies b.v.
- Page 56 4 Loosen the four screws of the ventilator fastener. 5 Replace the ventilator. 6 Fix the ventilator in place using the four screws. 7 Connect the wiring. 8 Restart the machine, see restart procedure par. 9.4. Figure 9-11 © ETNA Vending Technologies b.v.
- Page 57 7 Put the plugs from the main print, LCD display and the selection panel into place. 8 Take the plate, replace the cable of the service panel and tighten the screws on the panel (6x screw). 9 Restart the machine, see restart procedure par. 9.4. © ETNA Vending Technologies b.v.
- Page 58 5 Carefully pull the flat cable through the plate (from front to back). 6 Carefully remove the protective layer from the service panel. 7 Carefully place the service panel onto the plate, press firmly into place. 8 Tighten the screws on the panel (6x screw). © ETNA Vending Technologies b.v.
- Page 59 11 Slide the catch over the pump head. 12 Restart the machine, see restart procedure par. 9.4. Also carry out the filling procedure, par. 9.4. 13 Calibrate the liquid pump, see par. 7.10. © ETNA Vending Technologies b.v.
- Page 60 Technical manual Vega © ETNA Vending Technologies b.v.
Need help?
Do you have a question about the Vega 3 and is the answer not in the manual?
Questions and answers