
Subscribe to Our Youtube Channel
Related Manuals for ETNA Tucana Small Instant


Summary of Contents for ETNA Tucana Small Instant
- Page 1 C O F F E E T E C H N O L O G I E S Technical manual Dorado/Tucana Small Instant © ETNA Co ee Equipment b.v.
- Page 2 Technical manual Dorado Small Instant Manufacturer: ETNA Coffee Equipment b.v. P.O. Box 146 7000 AC Doetinchem The Netherlands Distributor: © ETNA Coffee Equipment b.v. Articlecode: Article code Status: Draft Revision:...
-
Page 3: Table Of Contents
Checking the ingredient containers ......... 19 © ETNA Coffee Equipment b.v. - Page 4 9.20 Service panel ............. . . 44 © ETNA Coffee Equipment b.v.
-
Page 5: Introduction
The following pictograms are used on the Dorado Small Instant: • Electrical hazard WARNING DISCONNECT THE MAINS SUPPLY BEFORE REMOVING COVER Figure 1-2 • Risk of fingers being trapped DANGER Follow service procedure as in manual. Figure 1-3 © ETNA Coffee Equipment b.v. -
Page 6: Pictograms And Safety Symbols In The Manual
Your dealer will be pleased to assist you. If you contact your dealer, always have the following information at hand: • model number • serial number • software versions © ETNA Coffee Equipment b.v. -
Page 7: Machine Identification On Outside Of The Machine
6. Water pressure The identification plate is on the rear of the machine. Model: xxxxxxx Voltage: a.c. xxxv xx Hz x kw Water: xxx - xxx kPa 012540E1 ETNA Coffee Technologies BV Doetinchem Holland Figure 1-4 © ETNA Coffee Equipment b.v. -
Page 8: Machine Identification Inside The Machine
Ask your local authority for information on ways to recycle materials safely and in an environmentally friendly manner. Ask your local authority for information on ways to dispose of materials safely and in an environmentally friendly manner. © ETNA Coffee Equipment b.v. -
Page 9: General Safety Instructions And Restrictions
These individuals will be familiar with the potential risks of opening the machine. 1.9.4 Technical specifications • The technical specifications may not be modified. 1.9.5 Modifications • Modifications may not be made to the machine (or parts of the machine). © ETNA Coffee Equipment b.v. -
Page 10: Intended Use
Use of the product within the confines of the intended use also includes complying with the instructions in the user manual. © ETNA Coffee Equipment b.v. -
Page 11: Description Of The Machine
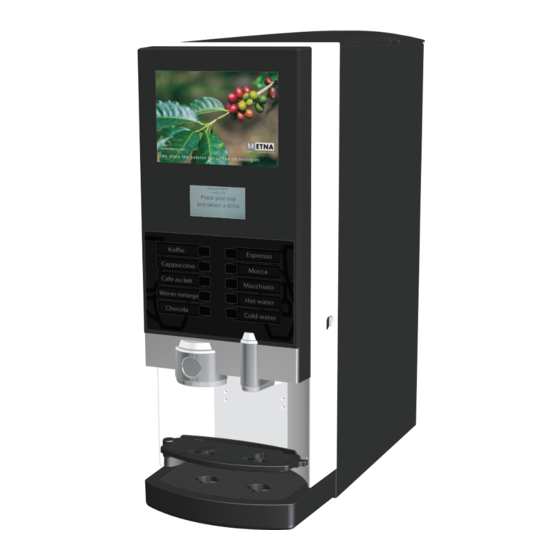
Main components 2.2.1 Front view 1. window light 2. Display 3. Selection panel 4. Dispenser water 5. Dispenser hot drinks 6. Cup sensor 7. Cup standard (double) 8. Drip tray Figure 2-1 © ETNA Coffee Equipment b.v. -
Page 12: Interior View
C O F F E E T E C H N O L O G I E S 2.2.2 Interior view 1. Ingredient containers 2. Dispensing spout 3. Mixer parts 4. Dispenser holder 5. On/off switch Figure 2-2 © ETNA Coffee Equipment b.v. -
Page 13: Container Layout
• The water and the ingredients are mixed in the mixer or compressed by the brewer group. • The drink is dispensed through the dispenser nozzle into the cup placed on the cup stand. © ETNA Coffee Equipment b.v. -
Page 14: Switching On And Off
Select the drink by pressing the button. The strength can be changed by pressing the selected drink again. This is also an option when adding items such as sugar and milk, if the machine allows for this. © ETNA Coffee Equipment b.v. -
Page 15: Selecting Jug Function (If Applicable)
(the switch) and turning it to the right. 2.6.3 Stand by Stand by mode is indicated by the following: • The display shows a standby position. Press any button to bring the machine out of stand by. © ETNA Coffee Equipment b.v. -
Page 16: Use
In case of danger, disconnect the power supply by removing the plug from the wall socket. Do not pull the plug out of the wall socket by the cable. Disregarding the above instructions can jeopardise the safe use of the machine. © ETNA Coffee Equipment b.v. -
Page 17: Filling Containers
10.Place a 1.5 l cup under the dispensing spout. 11.Press button *00* on the service panel; clean valves = rinse mixers. The valves will be rinsed with water. Repeat if necessary (if applicable). 12.Close the door of the machine. Figure 3-1 © ETNA Coffee Equipment b.v. -
Page 18: Maintenance And Cleaning
Do not use opened ingredients for longer than the use by date indicated. • Replace any opened ingredients whose use by date has passed. • Only use the cleaning agents referred to in the cleaning schedule and follow the instructions on the packaging. © ETNA Coffee Equipment b.v. -
Page 19: Service Panel
4.5.1 Checking the ingredient containers 1. Open the door. 2. Check whether the ingredient containers still contain sufficient ingredients. 3. If necessary, prime the containers as described in (see chapter 3.2). 4. Shut the door of the machine. © ETNA Coffee Equipment b.v. -
Page 20: Cleaning Drip Tray
Pay special attention to: • The selection panel • The area around the drink dispenser unit. • The bottom of the door. Weekly maintenance Carry out the following operations on a weekly basis: • Clean the mixer components © ETNA Coffee Equipment b.v. -
Page 21: Cleaning Mixer Parts
10.Turn the mixerbase a quater and remove forward. 11.Remove the O-ring, seal and seal ring. 12.Clean all parts in hot water and dry them carefully. 13.Clean the area directly surrounding the mixer in the machine with a damp cloth. Figure 4-5 © ETNA Coffee Equipment b.v. -
Page 22: Maintenance Overview
19.Check that nothing leaks. 20.Close the door of the machine. Figure 4-7 Maintenance overview The stickers with an overview of the maintenance activities to be carried out are affixed on the inside of the door. © ETNA Coffee Equipment b.v. - Page 23 2 ou 3 fois (touche *00*). Weekly maintenance Entretien hebdomadaire Remove mixer(s), filter housing and hoses and Démontez les mixeurs, le filter et les tuyaux clean in hot water et rincez avec l’eau chaude. © ETNA Coffee Equipment b.v.
-
Page 24: Resolving Problems
+ or -, these keys are used to navigate the menu, or to increase or decrease values. • ENTER, this key confirms the value that is set. • # (on the service panel), this key is used to navigate back through the menu. © ETNA Coffee Equipment b.v. -
Page 25: User Menu (Operator)
= blue = brown = yellow = orange Power Electrical configuration: switch 230V / 50Hz Heater Configuration : 1 = 2,25kW – 230V AC 2 = 3,3kW – 230V AC Line Filter yl/gr Figure 5-2 © ETNA Coffee Equipment b.v. -
Page 26: Diagram Of User Menu
8 bar (800 kPa) sure 1. It the pressure is higher, a pressure reducer must be installed. Sound level Description Value In operation max. 70 dB(A) ☞ Measurements according to DIN 45635, with normal use. © ETNA Coffee Equipment b.v. -
Page 27: Ambient Conditions
0°C. This is to keep the water in the machine from freezing. Dimensions and weight Figure 6-1 Description Value Height 651 mm Width 242 mm Depth 545 mm Weight when empty 29,5 kg Weight when full 41.5 kg © ETNA Coffee Equipment b.v. -
Page 28: Software
2 Put the files on a USB-stick. 3 Turn the machine off with the on / off switch. 4 Open the door and place the USB stick 5 Press *75* on the service panel simultaneously. © ETNA Coffee Equipment b.v. - Page 29 7 Navigate the menu to DRINK SETTINGS / COPY RECIPE LIST.. 8 Select "Import recipe list ' and press Enter. 9 The display provides information on progress and completion. 10 Remove the USB-stick and close the door. 11 The machine is ready for use. © ETNA Coffee Equipment b.v.
-
Page 30: Installation
2 Access the machine; see par. . Remove the rear- or side panel. 3 Twist the adjusting screw on the valve using a 5 mm Allen key. 4 Close the rear or side panel. 5 Close the door. Figure 8-1 © ETNA Coffee Equipment b.v. -
Page 31: Replacement Of Parts
Disconnect the plug from the wall socket before repairing anything. Close the water tap and disconnect the water supply hose, where applicable. Position the machine so that there is easy access to the left and right sides and the rear. © ETNA Coffee Equipment b.v. -
Page 32: Emptying The Boiler
Switch the machine on at the on/off switch or insert the service key. 6 Carry out the daily maintenance activities, see par. 4.5. 7 Close the door. Wait until the software is ready. The text indicating that machine is ready will be displayed. © ETNA Coffee Equipment b.v. -
Page 33: Drink Selection Labels
6 Replace the inlet valve. 7 Connect the water hose to the inlet valve. 8 Connect the wiring to the inlet valve. Figure 9-3 9 Restart the machine; see the restart procedure in par. 9.4. © ETNA Coffee Equipment b.v. -
Page 34: Replacing Boiler
5 Disconnect the boiler sensor wiring. 6 Disconnect the wiring from the elements. 7 Disconnect the inlet pipe from the boiler by pressing the ring on the coupling downwards and steadily pulling the inlet pipe out of the coupling. © ETNA Coffee Equipment b.v. - Page 35 11 Take the boiler out of the machine by pulling it out at the side. 12 Replace the boiler and put it back in the machine in the reverse order. 13 Carry out the restart procedure, see par.9.4. INSTANT MEDIUM Figure 9-5 © ETNA Coffee Equipment b.v.
-
Page 36: Replacing Boiler Sensor
6 Disconnect the wiring from the elements. 7 Disconnect the inlet pipe from the boiler by pressing the ring on the coupling downwards and pulling the inlet pipe out of the coupling at the same time. © ETNA Coffee Equipment b.v. -
Page 37: Replacing The Valve
1 Empty the boiler, see par. 9.3. 2 Remove the plug from the wall socket so that the machine carries no voltage. 3 Close the water tap. 4 Remove the plate; see par. . © ETNA Coffee Equipment b.v. -
Page 38: Replacing Extraction Ventilator
13 Restart the machine, see restart procedure par. 9.4. 9.12 Replacing the mixer engine 1 Open the door. 2 Access the machine, see par. 9.2. 3 Loosen the screws (A) to take out the mixer base and motor. 4 Disconnect the wiring. © ETNA Coffee Equipment b.v. -
Page 39: Replacing Drip Tray Sensor
8 Disconnect the drip tray sensor wiring. 9 Replace the drip tray sensor. 10 Connect the drip tray sensor wiring. 11 Fasten the front of the console onto the machine. 12 Restart the machine, see restart procedure par. 9.4. Figure 9-13 © ETNA Coffee Equipment b.v. -
Page 40: Door Plate
1 Connect the ribbon cable of the service panel to the display PCB (B). 2 Fix the plate (A) in place. 3 Test service and selection buttons. 4 Restart the machine, see restart procedure par. 9.4. © ETNA Coffee Equipment b.v. -
Page 41: Replacing Cup Sensor
1 Open the door. 2 Loosen the plate (C). 3 Remove the plate. 9.15 Replacing cup sensor Be careful! : PCBs are ESD-sensitive. Put on an ESD wrist strap and connect it to the machine frame. © ETNA Coffee Equipment b.v. -
Page 42: Lcd Display And Display Pcb
4 Connect the connectors to the display PCB (B). 5 Fix the door plate in place. 9.17 Replacing the illumination panel Be careful! : PCBs are ESD-sensitive. Put on an ESD wrist strap and connect it to the machine frame. © ETNA Coffee Equipment b.v. -
Page 43: Replacing Power Supply
1 Access the machine; see par. 9.2. 2 Remove the connectors from the on/off switch. 3 Replace the on/off switch. 4 Reconnect the connectors of the on/off switch. 5 Restart the machine; see the restart procedure in par. 9.4. © ETNA Coffee Equipment b.v. -
Page 44: Service Panel
1 Remove the door plate, see par. 9.14 2 Remove the service panel. Figure 9-20 3 Thoroughly clean and degrease the surface of the door plate. 4 Replace the service panel. 5 Fix the door plate in place, see par.9.14 © ETNA Coffee Equipment b.v.
Need help?
Do you have a question about the Tucana Small Instant and is the answer not in the manual?
Questions and answers
ETNA Dorado model DLIB11BWL1ECNLO, doesn’t warm the water. What should I do?
If the ETNA Dorado model DLIB11BWL1ECNLO doesn't warm the water, the heating element or the boiler sensor may be faulty. To address this:
1. Turn off the water tap.
2. Open the machine door and remove the side and upper plates.
3. Empty the boiler.
4. Check the boiler sensor:
- Disconnect its wiring.
- Remove it and inspect or replace it if needed.
- Install the new sensor, ensuring the seal is correctly placed.
- Reconnect the wiring.
If the sensor is not the issue, check the heating element by following the relevant procedure.
After replacing any component, carry out the restart procedure.
This answer is automatically generated