Table of Contents
Advertisement
Available languages
Available languages
Quick Links
Advertisement
Table of Contents

Related Manuals for VTech VM4263


Summary of Contents for VTech VM4263
- Page 1 VM4263 3.5” Pan & Tilt Video Baby Monitor with Night Light En ....It ....70 De ....19 ....87 Es ....36 Pt ....104 Fr ....53 Quick start guide...
-
Page 2: Technical Specifications
VM4263 3.5” Pan & Tilt Video Baby Monitor with Night Light Quick start guide Technical specifications Frequency control Crystal controlled PLL synthesizer Transmit frequency Baby unit: 2405 - 2475 MHz Parent unit: 2405 - 2475 MHz Channels 3.5” Colour LCD (8,9 cm) -
Page 3: Important Safety Instructions
Power adaptor information: unless they have been given supervision or instruction Parent unit output: 5V DC 1A concerning use of the appliance by a person responsible VTech Telecommunications Ltd. for their safety. Model: VT05EEU05100 SAVE THESE INSTRUCTIONS Baby unit output: 5V DC 1A Cautions VTech Telecommunications Ltd. -
Page 4: What's In The Box
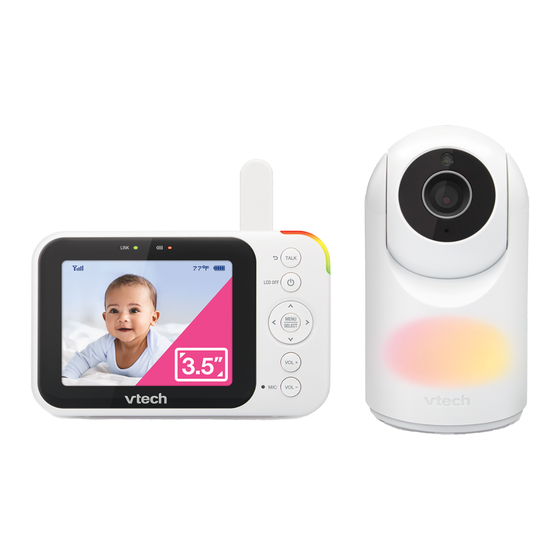
What’s in the box Quick start guide Overview - Parent unit Antenna Link LED light • On when the parent unit is linked to the baby unit. • Flashes when the link to the baby unit is lost. Battery LED light 3-level sound indicator light (Talk /Exit) •... -
Page 5: Overview - Baby Unit
Overview - Baby unit PAIR key Night light key • The parent unit and baby unit Light Sensor provided are already paired. Camera lens Speaker Infrared LEDs Temperature sensor Microphone Power jack Night light Slots for wall mounting... - Page 6 Connect the baby monitor The parent unit turns on automatically after connecting the power adaptor to the power sock- et and the battery LED light illuminates. NOTES NOTE • The rechargeable battery in the parent unit is built-in. • Use only the power adaptors supplied with this product. •...
-
Page 7: Positioning The Baby Monitor
Power on or off the baby monitor Connect the baby unit to a power Press and hold Power to power on or supply to turn it on. Disconnect the off your parent unit. baby unit to turn it off. press and Press and hold hold NOTE:... -
Page 8: Status Check
Status check Once you power on both your baby unit and parent unit, the parent unit displays images from the baby unit, and the Link LED light turns on. Parent unit icons Parent Unit Indication Lights Warning icons and messages LINK •... - Page 9 Parent unit icons Main Sub-menu Main Sub-menu menu menu Volume Zoom • Zoom in and out of the video displayed from the • Adjust the parent unit baby unit. speaker volume. Temperature Settings Brightness • Set temperature display in • Adjust the parent unit LCD Fahrenheit ( F) or Celsius ( screen brightness level.
-
Page 10: Status Icons
Parent unit icons (cont’d) Night Light Night vision • Displays when the baby unit Adaptive night light being viewed has activated the night vision feature. • Turn on/off the night light’s ability to automatically Lullaby adjust its brightness based on surrounding lighting •... - Page 11 Basic operation - Parent unit Use the menu Press MENU to enter the menu, or save a setting. You can use the parent unit for advanced settings or operations, such as to play or stop the baby unit lullaby, or to adjust the baby unit sound sensitivity.
-
Page 12: Turn Off The Screen
Turn off the screen Press to switch off the screen. You can still hear sound from the selected baby unit. • Press any key on the parent unit to turn the screen on again. Adjust parent unit speaker volume Press to adjust your parent unit speaker volume. - Page 13 Sound sensitivity and sound activation Adjust the sound sensitivity of the baby unit The parent unit screen will turn on only when the detected sounds exceed a set level. Use the parent unit to adjust the microphone sensitivity of your baby unit. The higher the sensitivity level, the more sensitive the baby unit is in detecting sounds that transmit to the parent unit.
-
Page 14: Dim Mode
Dim mode Dim mode helps you save parent unit power. When your parent unit is not charging, the display will automatically dim after 10 minutes of inactivity if no keys are pressed or alerts are received from the baby unit. 10 min inactivity Press any button Note... - Page 15 Mount the baby unit on dry wall (optional) Items to purchase You will need to purchase the following items separately to mount your baby unit: 2 screws 2 wall plugs Note NOTES NOTE • The types of screws and wall plugs you need depend on the composition of the wall.
-
Page 16: Frequently Asked Questions
Frequently asked questions Below are the questions most frequently asked about the baby monitor. Why does the Try the following (in the order listed) for common cure: baby monitor 1. Disconnect the power to the baby unit and the parent unit. not respond 2. -
Page 17: General Product Care
General product care To keep this product working well and looking good, follow these guidelines: • Avoid placing it near heating appliances and devices that generate electrical noise (for example, motors or fluorescent lamps). • DO NOT expose it to direct sunlight or moisture. •... -
Page 18: Product Warranty
This equipment compiles with the essential requirements for the Radio Equipment and Telecommunications Terminal Equipment Directive 2014/53/EU. VTech Telecommunications Ltd. hereby declares that this Video Baby Monitor VM4263 is in compliance with the essential requirements and other relevant provisions of Directive 2014/53/EU. -
Page 19: Technische Daten
VM4263 Video-Babyphone mit 3,5” Bildschirm, Nachtlicht und Pan-Tilt-Kamera Schnellstart-Anleitung Technische Daten Frequenzsteuerung Quarzgesteuerter PLL-Synthesizer Übertragungsfrequenz Babyeinheit: 2405 - 2475 MHz Elterneinheit: 2405 - 2475 MHz Kanäle 3,5 Farb-LCD (8,9 cm) (QVGA 320x240 Pixel) Nomineller Der tatsächliche Wirkungsbereich kann abhängig von Wirkungsbereich den Umweltbedingungen bei der Verwendung variieren. -
Page 20: Wichtige Sicherheitshinweise
Technische Daten der kompatiblen Netzteile: (einschließlich Kinder) mit eingeschränkten körperlichen, Elterneinheit: 5 V DC, 1 A sensorischen oder geistigen Fähigkeiten oder mangelnder VTech Telecommunications Ltd. Erfahrung oder Kenntnis gedacht, sofern sie nicht von einer Modell: VT05EEU05100 für ihre Sicherheit verantwortlichen Person beaufsichtigt oder in Babyeinheit: 5 V DC, 1 A... - Page 21 Paketinhalt Schnellstart- Anleitung Überblick: Elterneinheit Antenne Verbindungs-LED • An, wenn die Elterneinheit mit der Babyeinheit verbunden ist. • Blinkt, wenn die Verbindung zur Babyeinheit unterbrochen ist. Akku-LED 3-stufiger LED-Tonanzeiger ( Sprechen/ Schließen) • Drücken und halten, um zu Ihrem Baby zu sprechen.
- Page 22 Überblick: Babyeinheit PAIR-Öffnung Nachtlicht-Taste • Die Eltern- und Babyeinheit sind Lichtsensor bereits werkseitig gekoppelt. Kameraobjektiv Lautsprecher Infrarot-LEDs Temperatursensor Mikrofon Stromanschluss Nachtlicht Aussparungen für Wandmontage...
- Page 23 Babyphone verbinden Die Elterneinheit schaltet sich nach dem Anschluss an die Steckdose automatisch ein, und die Akku-LED leuchtet auf. Hinweise NOTES NOTE • Der Akku ist in die Elterneinheit eingebaut. • Verwenden Sie mit diesem Produkt nur die mitgelieferten Netzteile. •...
- Page 24 Babyphone ein-/ausschalten Schließen Sie die Babyeinheit an das Halten Sie die Ein-/Aus-Taste Stromnetz an, um sie einzuschalten. gedrückt, um Ihre Elterneinheit ein- Trennen Sie die Babyeinheit vom oder auszuschalten. Stromnetz, um sie auszuschalten. Drücken Press and hold und halten HINWEIS: Entfernen Sie die Schutzfolien des Objektivs und des Bildschirms vor der Verwendung.
- Page 25 Statusprüfung Sobald Sie Ihre Baby- und Elterneinheit eingeschaltet haben, zeigt die Elterneinheit das Bild von der Babyeinheit und die LED geht an. Symbole der Elterneinheit Anzeigeleuchten der Elterneinheit Warnsymbole und Meldungen • An, wenn die Elterneinheit mit der Babyeinheit verbunden ist. Der Akku ist leer und muss •...
- Page 26 Symbole der Elterneinheit Haupt- Haupt- Untermenü Untermenü menü menü Lautstärke Helligkeit • Lautstärke des Lautsprechers • Passen Sie die Helligkeit der Elterneinheit einstellen. des LCD-Bildschirms der Elterneinheit an. Zoom Einstellungen • Heran- und Herauszoomen aus dem von der Babyeinheit angezeigten Video. Timer für Bildschirm-Timeout Temperatur •...
- Page 27 Symbole der Elterneinheit (Fortsetzung) Haupt- Haupt- Untermenü Untermenü menü menü Nachtlicht ein/aus Nachtlicht-Timer • Nachtlicht ein-/ausschalten. • Stellen Sie den Timer ein, um das Nachtlicht auszuschalten. Farbe des Nachtlichts • Wählen Sie eine der acht Nachtlichtfarben aus. Statussymbole Nachtlicht Verbindungsstatus •...
- Page 28 Erste Schritte: Elterneinheit Menübedienung Drücken Sie , um das Menü hervorzurufen oder eine Einstellung zu bestätigen. Sie können die Elterneinheit für erweiterte Einstellungsvorgänge und Bedienung der Babyeinheit benutzen, z.B. um die Schlaflieder der Babyeinheit abzuspielen oder um die Empfindlichkeit der Babyeinheit einzustellen. Wenn das Menü...
- Page 29 Bildschirm abschalten Drücken Sie , um den Bildschirm abzuschalten. Sie können weiterhin Geräusche von der ausgewählten Babyeinheit hören. • Um den Bildschirm wieder anzuschalten, drücken Sie einfach eine beliebige Taste auf der Elterneinheit. Lautstärke des Lautsprechers der Elterneinheit anpassen Drücken Sie , um die Lautstärke des Lautsprechers der Elterneinheit anzupassen.
- Page 30 Empfindlichkeit und Geräuschaktivierung Empfindlichkeit der Babyeinheit anpassen Der Bildschirm der Elterneinheit schaltet sich nur ein, wenn die erkannten Geräusche einen bestimmten Pegel überschreiten. Verwenden Sie die Elterneinheit, um die Mikrofon- empfindlichkeit Ihrer Babyeinheit einzustellen. Je höher die Empfindlichkeitsstufe, desto empfindlicher ist die Babyeinheit bei der Erkennung von Geräus- chen, die an die Elterneinheit übertragen werden.
- Page 31 Dimm-Modus Der Dimm-Modus hilft, den Akku der Babyeinheit zu sparen. Wenn Ihre Elterneinheit nicht aufgeladen wird, wird das Display nach 10 Minuten Inaktivität automatisch gedimmt, wenn keine Tasten gedrückt werden oder keine Alarme von der Babyeinheit empfangen werden. 10 Minuten Inaktivität Beliebige Taste drücken Hinweis NOTES...
- Page 32 Wandmontage der Babyeinheit (optional) Nicht inbegriffen Um Ihre Babyeinheit an die Wand zu befestigen, brauchen Sie die folgenden Artikel, die separat erworben werden müssen: Schrauben Dübel Hinweis NOTES NOTE • Welche Arten von Schrauben und Dübel benö- tigt werden, hängt von der Wandaufbau ab. Setzen Sie die Schrauben in die Löcher in den Pegeln ein und ziehen Sie die Schrauben an, bis nur...
-
Page 33: Häufig Gestellte Fragen
Häufig gestellte Fragen Nachfolgend finden Sie die am häufigsten gestellten Fragen zum Babyphone. Warum funktioniert das Versuchen Sie Folgendes (in der aufgeführten Reihenfolge) zur allgemeinen Abhilfe: Babyphone nicht normal? 1. Trennen Sie die Stromversorgung der Babyeinheiten und der Elterneinheit. 2. Warten Sie einige Sekunden, bevor Sie die Babyeinheiten und die Elterneinheit wieder an die Stromversorgung anschließen. -
Page 34: Allgemeine Pflegehinweise
Allgemeine Pflegehinweise Befolgen Sie diese Hinweise, damit dieses Produkt immer gut aussieht und perfekt funktioniert: • Stellen Sie es nicht in der Nähe von Heizgeräten und Geräten auf, die elektrische Interferenz erzeugen können (z. B. Motoren oder Leuchtstofflampen). • Setzen Sie das Produkt KEINER direkten Sonneneinstrahlung aus und schützen Sie es vor Nässe. •... -
Page 35: Kundendienst Und Garantie
Dieses Produkt ist für den Einsatz innerhalb Europas vorgesehen. Dieses Produkt entspricht den wesentlichen Bedingungen der Richtlinie über Funkanlagen und Telekommunikationsendeinrichtungen 2014/53/EU. VTech Telecommunications Ltd. erklärt hiermit, dass dieses Video-Babyphone VM4263 die wesentlichen Bedingungen und gültigen Vorschriften von Direktive 2014/53/EU einhält. Die Konformitätserklärung für das VM4263 ist unter www.vtech.com/rtte-directive. -
Page 36: Guía De Inicio Rápido
VM4263 Monitor de vídeo para bebés de 3,5” con luz nocturna y cámara panorámica orientable Guía de inicio rápido Especificaciones técnicas Control de frecuencia Sintetizador PLL controlado por cristal Frecuencia de Unidad para el bebé: 2405 - 2475 MHz transmisión... -
Page 37: Instrucciones De Seguridad Importantes
(incluidos niños) con capacidades físicas, sensoriales o men- Salida de la unidad parental: 5 VCC 1 A tales reducidas, o con falta de experiencia y conocimientos, VTech Telecommunications Ltd. a menos que hayan recibido supervisión o instrucciones so- Modelo: VT05EEU05100 bre el uso del aparato por parte de una persona responsable Salida de la unidad para el bebé: 5 VCC 1 A... - Page 38 Qué incluye la caja Guía de inicio rápido Vista general - Unidad parental Antena Luz LED de ENLACE • Encendida cuando la unidad parental está emparejada con la unidad para el bebé. • Parpadea cuando se pierde el emparejamiento con la unidad para el bebé. Luz LED de la batería Indicador luminoso de 3 niveles de sonido (Hablar / Volver)
- Page 39 Vista general - Unidad para el bebé Tecla PAIR Tecla de luz nocturna • La unidad parental y la unidad Sensor de luz o unidades para bebés sumi- nistradas ya están emparejadas. Objetivo de la cámara Altavoz LED infrarrojos Sensor de temperatura Micrófono Clavija de alimentación Luz nocturna...
- Page 40 Conectar el monitor para bebés La unidad parental se enciende automáticamente tras conectarse a la toma de corriente y se ilumina la luz LED de la batería. NOTES NOTE otas • La batería recargable de la unidad parental está integrada. •...
- Page 41 Encender o apagar el monitor para bebés Conecte la unidad para el bebé a la Mantenga pulsado para encender corriente eléctrica para encenderla. o apagar la unidad parental. Desconéctela para apagarla. Mantener Press and hold pulsado NOTA: Retire los protectores de la lente y de la pantalla antes de utilizarla.
- Page 42 Comprobación de estado Una vez que encienda la unidad para el bebé y la unidad parental, esta última mostrará las imágenes de la unidad para el bebé y se encenderá su luz LED. Iconos de la unidad parental Iconos y mensajes de advertencia Luces LED de la unidad parental Encendida cuando la unidad •...
- Page 43 Iconos de la unidad parental Menú Submenú Menú Submenú prin- prin- cipal cipal Brillo Volumen • Ajusta el volumen del • Ajusta el nivel de brillo altavoz de la unidad de la pantalla LCD de la parental. unidad parental. Zoom Ajustes •...
-
Page 44: Iconos De Estado
Iconos de la unidad parental (continuación) Menú Submenú prin- cipal Temporizador de luz nocturna • Ajusta el temporizador para apagar la luz nocturna. Color de luz nocturna • Selecciona uno de los colores de luz nocturna. Luz nocturna (encendido/apagado) • Enciende y apaga la luz nocturna. -
Page 45: Uso Del Menú
Funcionamiento básico - unidad parental Uso del menú Pulse para entrar en el menú o guardar un ajuste. Puede utilizar la unidad parental para realizar ajustes u operaciones avanzadas, como reproducir o detener las melodías de la unidad para el bebé, o ajustar la sensibilidad del sonido de la unidad para el bebé. Mientras permanece en el menú: •... - Page 46 Apagar la pantalla Pulse para apagar la pantalla. Seguirá oyendo los sonidos de la unidad para el bebé seleccionada. oNsejo • Pulse cualquier tecla de la unidad parental para volver a encender la pantalla. Ajustar el volumen del altavoz de la unidad parental Pulse para ajustar el volumen del altavoz de la unidad parental.
- Page 47 Sensibilidad acústica y activación del sonido Ajuste de la sensibilidad del sonido de la unidad para el bebé La pantalla de la unidad parental se encenderá solamente si los sonidos detectados superen un determinado nivel. Utilice la unidad parental para ajustar la sensibilidad del micrófono de la unidad para el bebé.
-
Page 48: Visión Nocturna
Modo de atenuación El modo de atenuación ayuda a ahorrar batería en la unidad parental. Cuando no se esté cargando la unidad parental, la pantalla se atenuará tras 10 minutos de inactividad, si no se pulsan teclas ni se reciben alertas de la unidad para el bebé. 10 min de inactividad Pulsar cualquier botón Nota... - Page 49 Montar la unidad para el bebé en la pared (opcional) No incluido Deberá comprar los siguientes elementos por separado para montar la unidad para el bebé: 2 tornillos 2 tacos Nota NOTES NOTE • Los tipos de tornillos y tacos que se necesitan dependen de la composición de la pared.
-
Page 50: Preguntas Frecuentes
Preguntas frecuentes A continuación encontrará las preguntas más frecuentes sobre el monitor para bebés. ¿Por qué el monitor para Pruebe lo siguiente (en el orden indicado) para solucionarlo: bebés no responde con 1. Desconecte la alimentación de la unidad para el bebé y de la unidad parental. normalidad? 2. -
Page 51: Cuidado General Del Producto
Cuidado general del producto Para que este producto siga funcionando correctamente y tenga un buen aspecto, siga estas pautas: • Evite ponerlo cerca de aparatos de calefacción y dispositivos que generen ruido eléctrico (por ejemplo, motores o lámparas fluorescentes). • NO lo exponga a la luz solar directa ni a la humedad. •... -
Page 52: Garantía Del Producto
Este equipo cumple con los requisitos esenciales de la Directiva de Equipos radioeléctricos y equipos terminales de telecomunicaciones 2014/53/UE. VTech Telecommunications Ltd. declara por la presente que este monitor de vídeo digital VM4263 cumple con los requisitos esenciales y otras disposiciones pertinentes de la Directiva 2014/53/UE. -
Page 53: Guide De Démarrage Rapide
VM4263 Moniteur vidéo pour bébé avec écran de 3,5 pouces, veilleuse, caméra panoramique et inclinable Guide de démarrage rapide Caractéristiques techniques Régulation de fréquence Synthétiseur PLL commandé par cristal Fréquence d’émission Unité bébé : 2405 - 2475 MHz Unité parents : 2405 - 2475 MHz Canaux ÉCRAN LCD... -
Page 54: Consignes De Sécurité Importantes
25. Le produit n’est pas destiné à être utilisé par des personnes Sortie de l’unité parents : 5 V CC 1 A (y compris les enfants) ayant des capacités physiques, sen- VTech Telecommunications Ltd. sorielles ou mentales réduites, ou un manque d’expérience Modèle : VT05EEU05100 et de connaissances, à moins qu’elles n’aient reçu une Sortie de l’unité... -
Page 55: Contenu De L'emballage
Contenu de l’emballage Guide de démarrage rapide Vue d’ensemble - Unité parents Antenne Voyant LED LINK • S’allume lorsque l’unité parents est appariée à l’unité bébé. • Clignote lorsque la liaison avec l’unité bébé est perdue. Voyant LED de la pile rechargeable Témoin lumineux sonore à 3 niveaux (Parler / Retour) •... - Page 56 Vue d’ensemble - Unité bébé Touche PAIR Touche veilleuse • L’unité parents et l’unité bébé Capteur de lumière fournies sont déjà appariées. Objectif de la caméra Haut-parleur LED infrarouges Capteur de température Microphone Prise d’alimentation Veilleuse Fentes pour le montage mural...
- Page 57 Branchement de l’écoute bébé L’unité parents s’allume automatiquement après avoir été branchée sur la prise de courant et le voyant LED de la batterie s’allume. NOTES NOTE eMaRQUes • La pile rechargeable de l’unité parents est intégrée. • Utilisez uniquement les adaptateurs d’alimentation fournis avec ce produit. •...
- Page 58 Mise en marche ou arrêt de l’écoute bébé Connectez l’unité bébé à une Appuyez et maintenez la touche alimentation secteur pour l’allumer. pour mettre sous tension ou éteindre Débranchez l’unité bébé pour l’unité parents. l’éteindre. Appuyez et Press and hold maintenez REMARQUE : Retirez les protections de l’objectif et de l’écran avant utilisation.
-
Page 59: Icônes De L'unité Parents
Vérification de l’état Une fois que vous allumez votre unité bébé et votre unité parents, votre unité parents affiche l’image de l’unité bébé, et le voyant s’allume. Icônes de l’unité parents Icônes et messages d’avertissement Voyants d’indication de l’unité parents S’allume lorsque l’unité... - Page 60 Icônes de l’unité parents Menu Sous-menu Menu Sous-menu prin- prin- cipal cipal Luminosité Volume • Réglage du niveau de • Réglage du volume du luminosité de l’écran LCD haut-parleur de l’unité de l’unité parents. parents. Zoom • Zoom avant et arrière sur la Réglage vidéo affichée par l’unité...
- Page 61 Icônes de l’unité parents (suite) Menu Sous-menu prin- cipal Minuteur veilleuse • Réglage du minuteur pour éteindre la veilleuse. Couleurs de la veilleuse • Sélectionnez l’une des huit couleurs de la veilleuse. Marche/arrêt de la veilleuse • Allumez ou éteignez la veilleuse. Icônes d’état État de la connexion Veilleuse...
-
Page 62: Utilisation Du Menu
Opérations de base - Unité parents Utilisation du menu Appuyez sur pour entrer dans le menu ou enregistrer un paramètre. Vous pouvez utiliser l’unité parents pour les réglages ou les opérations, par exemple pour jouer ou arrêter les mélodies de l’unité bébé, ou pour régler la sensibilité sonore de l’unité bébé. Dans le menu : •... - Page 63 Pour éteindre l’écran Appuyez sur pour éteindre l’écran. Vous pouvez toujours entendre le son de l’unité bébé sélectionnée. Suggestion • Appuyez sur n’importe quelle touche de l’unité parents pour rallumer l’écran. Réglage du volume du haut-parleur de l’unité bébé Appuyez sur pour régler le volume du haut-parleur de l’unité...
- Page 64 Sensibilité sonore et activation du son Réglage de la sensibilité sonore de l’unité bébé L’écran de l’unité parents s’allume uniquement lorsque les sons détectés dépassent un certain niveau. Utilisez l’unité parents pour régler la sensibilité du microphone de votre unité bébé. Plus le niveau de sensibilité...
-
Page 65: Mode Économie
Mode économie Le mode économie est destiné à vous aider à économiser la batterie de l’unité parents. Lorsque l’unité parents n’est pas en charge, l’écran s’assombrira pour économiser l’énergie après 10 minutes d’inactivité, lorsqu’aucune touche n’est appuyée ou qu’aucune alerte n’est reçue de l’unité bébé. 10 min. - Page 66 Montage de l’unité bébé sur des parois sèches (en option) Non inclus Vous devrez acheter les articles suivants séparément pour monter votre unité bébé : 2 vis 2 chevilles Remarque NOTES NOTE • Les types de vis et des chevilles dont vous avez besoin dépendent de la composition du mur.
-
Page 67: Questions Fréquemment Posées
Questions fréquemment posées Vous trouverez ci-dessous les questions les plus fréquemment au sujet de l’écoute bébé. Pourquoi l’écoute Essayez les solutions suivantes (dans l’ordre indiqué) pour les remèdes standards : bébé ne répond-il pas 1. Débranchez l’alimentation des unités bébé et de l’unité parents. normalement ? 2. - Page 68 Entretien général des produits Pour que ce produit continue à bien fonctionner et à avoir une belle apparence, suivez ces directives : • Évitez de le placer à proximité d’appareils de chauffage et de dispositifs qui génèrent des bruits électriques (par exemple, des moteurs ou des lampes fluorescentes). •...
-
Page 69: Garantie Du Produit
Cet équipement est conforme aux exigences essentielles de la directive 2014/53/CE sur les équipements hertziens et les équipements terminaux de télécommunications. Vtech Telecommunications Ltd. déclare par la présente que cet écoute bébé vidéo VM4263 est conforme aux exigences essentielles et autres dispositions pertinentes de la directive 2014/53/CE. -
Page 70: Guida Di Avvio Rapido
VM4263 3,5” Video Baby Monitor con Luce Notturna e telecamera orientabile Guida di avvio rapido Specifiche tecniche Controllo di frequenza Sintetizzatore PLL a controllo di cristallo Frequenza di Unità bambino: 2405 - 2475 MHz trasmissione Unità genitore: 2405 - 2475 MHz Canali LCD a colori da 3,5“ (8,9 cm) (QVGA 320x240 pixel) Raggio d’azione... -
Page 71: Istruzioni Importanti Per La Sicurezza
Potenza di uscita dell’unità genitore: 5 V DC 1 A 25. Il prodotto non è destinato all’uso da parte di persone VTech Telecommunications Ltd. (compresi i bambini) con ridotte capacità fisiche, sensoriali Modello: VT05EEU05100 o mentali, a cui manca esperienza e conoscenza, a meno che non siano stati incaricati alla supervisione e abbiano... -
Page 72: Contenuto Della Confezione
Contenuto della confezione Guida di avvio rapido Informazioni generali - Unità genitore Antenna Spia LED di connessione • Accesa quando l’unità genitore è collegata all’unità bambino. • Lampeggia quando si perde il collegamento con l’unità bambino. Spia LED batteria Spia luminosa di livello sonoro a 3 livelli (Parla / Invio) •... - Page 73 Informazioni generali - Unità bambino Tasto PAIR Pulsante della luce notturna • L’unità genitore e l’unità bambi- Sensore luminosità no fornite sono già abbinate. Lente della telecamera Altoparlante LED a infrarossi Sensore di temperatura Microfono 10. Presa di alimentazione Luce notturna Fessure per il montaggio a parete...
- Page 74 Collegare il baby monitor L’unità genitore si accende automaticamente dopo il collegamento alla presa di corrente e la spia LED della batteria si illumina. NOTES NOTE • La batteria ricaricabile è integrata nell’unità genitore. • Utilizzare solo gli adattatori forniti con questo prodotto. •...
- Page 75 Accensione e spegnimento del baby monitor Collegare l’unità bambino a un Tenere premuto per accendere alimentatore per accenderla. o spegnere l’unità genitore. Scollegare l’unità bambino per spegnerla. Tenere Press and hold premuto NOTA: Rimuovere le protezioni della lente e dello schermo prima dell’uso. Posizionare il baby monitor Attenzione •...
- Page 76 Verifica stato Una volta accese sia l’unità bambino che l’unità genitore, l’unità genitore visualizza l’immagine dell’unità bambino e la luce LED si accende. Icone dell’unità genitore Icone e messaggi di avviso Indicatori luminosi dell’unità genitore Accesa quando l’unità genitore • è collegata all’unità bambino. La batteria è scarica Batteria scarica Lampeggia quando si perde il...
- Page 77 Icone dell’unità genitore Menu Sub-menu Menu Sub-menu prin- prin- cipale cipale Volume Zoom • Regola il volume • Ingrandisce e rimpicciolisce dell’altoparlante dell’unità il video visualizzato dall’unità genitore. bambino. Impostazioni Temperatura • Imposta il formato della Timer spegnimento schermo temperatura visualizzata in •...
-
Page 78: Icone Di Stato
Icone dell’unità genitore (cont.) Menu Sub-menu prin- cipale Colore della luce notturna • Seleziona uno degli otto colori della luce notturna. Luce notturna ON/ OFF • Attiva/disattiva la luce notturna. Icone di stato Stato connessione Luce notturna • o viene visualizzata quando •... - Page 79 Funzionamento di base - Unità genitore Utilizzare il menu Premere per accedere al menu o salvare un’impostazione. È possibile utilizzare l’unità genitore per impostazioni o operazioni avanzate, come riprodurre o interrompere la ninna nanna dell’unità bambino o regolare la sensibilità sonora dell’unità bambino. Mentre si è nel menu: •...
- Page 80 Spegnere lo schermo Premere per spegnere lo schermo. Si potranno ancora sentire dei suoni dall’unità bambino selezionata. Consiglio • Premere un tasto qualsiasi sull’unità genitore per riaccendere lo schermo. Regolare il volume degli altoparlanti dell’unità genitore Premere per regolare il volume dell’altoparlante dell’unità...
- Page 81 Sensibilità al suono e attivazione del suono Regolare la sensibilità del suono dell’unità bambino Lo schermo dell’unità genitore si accenderà solo quando i suoni rilevati superano un certo livello. Utilizzare l’unità genitore per regolare la sensibilità del microfono dell’unità bambino. Maggiore è il livello di sensibilità, più...
-
Page 82: Visione Notturna
Modalità scura La modalità attenuata aiuta a risparmiare energia dell’unità genitore. Quando l’unità genitore non è in ricarica, il display si oscura automaticamente dopo 10 minuti di inattività, se non vengono premuti tasti o se non vengono ricevuti avvisi dall’unità bambino. 10 min di inattività... - Page 83 Montaggio a parete dell’unità bambino (facoltativo) Non incluso Sarà necessario acquistare i seguenti articoli per montare l’unità bambino: 2 viti 2 tasselli Nota NOTES NOTE • I tipi di viti e ancoraggi necessari dipendono dal tipo di muro. Inserire le viti nei fori e stringere le viti fino a quando sono esposti solo 6,5 mm delle viti.
-
Page 84: Domande Frequenti
Domande frequenti Di seguito sono riportate le domande più frequenti sul baby monitor. Perché il baby Provare quanto segue (nell’ordine elencato) come soluzioni più comuni: monitor non risponde 1. Scollegare l’alimentazione dalle unità bambino e dall’unità genitore. normalmente? 2. Attendere alcuni secondi prima di ricollegare l’alimentazione alle unità bambino e all’unità... - Page 85 Cura generale del prodotto Per mantenere questo prodotto funzionante e in bell’aspetto, seguire queste linee guida: • Evitare di posizionarlo vicino ad apparecchi di riscaldamento e dispositivi che generano disturbi elettrici (ad esempio motori o lampade fluorescenti). • NON esporlo alla luce diretta del sole o all’umidità. •...
-
Page 86: Garanzia Del Prodotto
Questa apparecchiatura soddisfa i requisiti essenziali della Direttiva sulle apparecchiature radio e sulle apparecchiature terminali di telecomunicazione 2014/53/UE. Vtech Telecommunications Ltd. dichiara che il presente Video Baby Monitor VM4263 è conforme ai requisiti essenziali e alle altre disposizioni pertinenti della Direttiva 2014/53/UE. La dichiarazione di conformità del monitor VM4263 è disponibile al sito www.vtech.com/rtte-directive. -
Page 87: Technische Specificaties
VM4263 Babyfoon met 3,5 inch beeldscherm, draai- en kantelbare kamera en nachtlampje Snelstartgids Technische specificaties Frequentieregeling Kristalgestuurde PLL-synthesizer Uitzendfrequentie Babyeenheid: 2405 - 2475 MHz Oudereenheid: 2405 -2475 MHz Kanalen 3,5" kleuren-LCD (8,9 cm) (QVGA 320 x 240 pixels) Nominaal effectief bereik Het werkelijke werkingsbereik kan variëren afhankelijk van de omgevingsomstandigheden op het moment van gebruik. -
Page 88: Belangrijke Veiligheidsinstructies
Uitgang oudereenheid: 5 V DC 1 A ke vermogens, of met een gebrek aan ervaring en kennis, tenzij VTech Telecommunications Ltd. zij onder toezicht staan of instructies hebben gekregen over het Model: VT05EEU05100 gebruik van het apparaat van een persoon die verantwoordelijk Uitgang babyeenheid: 5 V DC 1 A... -
Page 89: Inhoud Van De Doos
Inhoud van de doos Snelstartgids Overzicht: oudereenheid Antenne Verbindingsled • Aan wanneer de oudereenheid aan de babyeenheid is gekoppeld. • Knippert wanneer de verbinding met de babyeenheid is verbroken. Batterijled Geluidsindicatielampje met 3 niveaus PRATEN/ AFSLUITEN • Houd dit ingedrukt om tegen de babyeenheid te praten. •... - Page 90 Overzicht: babyeenheid Koppelingstoets Toets voor nachtlampje • De ouder- en babyeenheid zijn Lichtsensor reeds gekoppeld. Cameralens Luidspreker Infraroodleds Temperatuursensor Microfoon Stroomaansluiting Nachtlampje Sleuven voor wandmontage...
- Page 91 De babyfoon aansluiten De oudereenheid wordt automatisch ingeschakeld wen de batterijled gaat aan wanneer de netadapter wordt aangesloten op het stopcontact. Opmerkingen NOTES NOTE • De oplaadbare batterij in de oudereenheid is ingebouwd. • Gebruik alleen de voedingsadapters die bij dit product zijn geleverd. •...
-
Page 92: De Babyfoon Plaatsen
De babyfoon in- of uitschakelen Sluit de babyeenheid aan op Houd ingedrukt om uw een stroomvoorziening om deze oudereenheid in of uit te schakelen. in te schakelen. Ontkoppel de babyeenheid om deze uit te schakelen. Houd Press and hold ingedrukt OPMERKING: Verwijder de lens- en schermbeschermer voorafgaand aan gebruik. - Page 93 Statuscontrole Zodra u zowel de babyeenheid als de oudereenheid inschakelt, geeft de oudereenheid beel- den van de babyeenheid weer en gaat het ledlampje aan. Pictogrammen voor oudereenheid Waarschuwingspictogrammen Indicatielampjes van de en -berichten oudereenheid • Aan wanneer de oudereen- heid aan de babyeenheid is De batterij is leeg en moet gekoppeld.
- Page 94 Pictogrammen voor oudereenheid Hoofd- Submenu Hoofd- Submenu menu menu Volume Helderheid • Pas het helderheidsniveau • Pas het luidsprekervolume van het LCD-scherm van de van de oudereenheid aan. oudereenheid aan. In-/uitzoomen Instellingen • In- en uitzoomen op de video van de babyeenheid. Schermuitschakeltimer Temperatuur •...
- Page 95 Pictogrammen voor oudereenheid (vervolg) Hoofd- Submenu menu Nachtlampjetimer • Stel de timer in om het nachtlamp- je uit te schakelen. Nachtlampjekleur • Selecteer een van de acht nacht- lampjekleuren. Nachtlampje AAN/UIT • Het nachtlampje in/-uitschakelen. Statuspictogrammen Nachtlampje Verbindingsstatus • wordt weergegeven •...
- Page 96 Basisbediening: oudereenheid Gebruik van het menu Druk op om het menu te openen of een instelling op te slaan. U kunt de oudereenheid gebruiken voor geavanceerde instellingen of handelingen, zoals het afspelen of stoppen van het slaapliedje van de babyeenheid of het aanpassen van de geluidsgevoeligheid van de babyeenheid.
- Page 97 Het scherm uitschakelen Druk op om het scherm uit te schakelen. U kunt nog steeds geluid horen van de geselecteerde babyeenheid. • Druk op een willekeurige toets op de oudereenheid om het scherm weer in te schakelen. Het luidsprekervolume van de oudereenheid aanpassen Druk op om het luidsprekervolu- me van de oudereenheid aan te passen.
- Page 98 Geluidsgevoeligheid en geluidsactivering Pas de geluidsgevoeligheid van de babyeenheid aan Het scherm van de oudereenheid wordt alleen ingeschakeld als de gedetecteerde geluiden een ingesteld niveau overschrijden. Gebruik de oudereenheid om de microfoongevoe- ligheid van uw babyeenheid aan te passen. Hoe hoger het gevoeligheidsniveau, hoe gevoeliger de babyeenheid is in het detecteren van geluiden die naar de oudereenheid worden gezonden.
- Page 99 Dimstand De dimmodus helpt u stroom te besparen op de oudereenheid. Als uw oudereenheid niet wordt opgeladen, wordt het scherm automatisch gedimd na 10 minuten inactiviteit als er geen toetsen worden ingedrukt en geen meldingen worden ontvangen van de babyeenheid. 10 min.
- Page 100 De babyeenheid bevestigen op een muur (optioneel) Niet inbegrepen U moet de volgende artikelen afzonderlijk aanschaffen om uw babyeenheid te monteren: 2 schroeven 2 muurpluggen Opmerking NOTES NOTE • Welke soorten schroeven en pluggen u nodig hebt, is afhankelijk van de samenstelling van de muur.
-
Page 101: Veelgestelde Vragen
Veelgestelde vragen Hieronder vindt u de meestgestelde vragen over de babyfoon. Waarom reageert de Probeer het volgende (in de aangegeven volgorde) voor een veel gebruikte oplossing: babyfoon niet normaal? 1. Schakel de stroom naar de baby- en de oudereenheid uit. 2. Wacht een paar seconden voordat u de babyeenheid en de oudereenheid weer van stroom voorziet. - Page 102 Algemene productverzorging Volg deze richtlijnen om dit product goed te laten werken en er goed uit te laten zien: Plaats de eenheid niet in de buurt van verwarmingstoestellen en apparaten die elektrische geluiden • produceren (bijvoorbeeld motoren of fluorescentielampen). Stel de eenheid NIET bloot aan direct zonlicht of vocht. •...
-
Page 103: Verklaring Van Conformiteit
Deze apparatuur voldoet aan de essentiële vereisten van EU-richtlijn 2014/53/EU betreffende radiosystemen en telecommunicatieapparatuur. VTech Telecommunications Ltd. verklaart hierbij dat deze Babyfoon VM4263 voldoet aan de essentiële eisen en aan de overige relevante bepalingen van Richtlijn 2014/53/EU. De verklaring van conformiteit voor de VM4263 is verkrijgbaar via www.vtech.com/rtte-directive. -
Page 104: Guia De Início Rápido
VM4263 Monitor vídeo para bebé de 3,5” com luz noturna e câmerade rotação horizontal e vertical Guia de início rápido Especificações técnicas Controlo da frequência Sintetizador PLL controlado por cristal Frequência de Unidade de bebé: 2405 - 2475 MHz transmissão... -
Page 105: Instruções De Segurança Importantes
Saída da unidade para pais: 5 V CC 1 A 25. O produto não foi previsto para ser utilizado por pessoas VTech Telecommunications Ltd. (inclusive crianças) com capacidades físicas, sensoriais ou Modelo: VT05EEU05100 mentais reduzidas ou com falta de experiência e conheci- Saída da unidade de bebé: 5 V CC 1 A... -
Page 106: O Que Está Incluído Na Caixa
O que está incluído na caixa Guia de início rápido Visão geral - Unidade para pais Antena Luz LINK LED • Ligado quando a unidade para pais está ligada à unidade de bebé. • Pisca quando é perdida a ligação à unidade de bebé. Luz LED de bateria Luz indicadora de som 3 níveis (Falar / Voltar) •... - Page 107 Visão geral - Unidade de bebé Tecla PAIR Tecla de luz noturna • A unidade para pais e a unidade Sensor de luz de bebé fornecidas já estão emparelhadas. Lente da câmara Altifalante LEDs infravermelhos Sensor de temperatura Microfone Tomada de alimentação Luz noturna Ranhuras para montagem de parede...
- Page 108 Ligar o monitor de bebé A unidade para pais liga-se automaticamente após a ligação do adaptador de alimentação à alimentação e a luz LED da bateria ilumina-se. NOTES NOTE otas • A bateria recarregável na unidade para pais está integrada. • Utilize apenas os adaptadores de corrente fornecidos juntamente com este produto. •...
- Page 109 Ligar ou desligar o monitor de bebé Ligue a unidade de bebé a uma fonte Prima continuamente para ligar ou de alimentação para a ligar. Remova desligar a sua unidade para pais. a ficha da tomada da unidade de bebé para a desligar. Premir Press and hold continuamente NOTA: Retire as proteções da lente e do ecrã...
- Page 110 Verificação de estado Assim que ligar a unidade de bebé e a unidade para pais, a unidade para pais mostra imagens da unidade de bebé e a sua luz LED acende. Ícones da unidade para pais Luzes de indicação da unidade para pais Ícones e mensagens de advertência Ligado quando a unidade para •...
- Page 111 Ícones da unidade para pais Menu Submenu Menu Submenu prin- prin- cipal cipal Volume Luminosidade • Ajuste o nível de • Ajuste o volume do luminosidade do ecrã LCD altifalante da unidade para da unidade para pais. pais. Zoom Definições • Amplie ou diminua o tamanho do vídeo exibido a partir da unidade de bebé.
- Page 112 Ícones da unidade para pais (cont.) Menu Submenu prin- cipal Temporizador da luz noturna • Definir o temporizador para apagar a luz noturna. Cor da luz noturna • Selecione uma das oito cores de luz noturna. Luz noturna ligada/desligada • Ligue/desligue a luz noturna. Ícones de estado Estado de ligação Luz noturna...
-
Page 113: Utilizar O Menu
BFuncionamento básico - Unidade para pais Utilizar o menu Prima para entrar no menu ou guardar uma definição. Pode utilizar a unidade para pais para definições ou operações avançadas, como reproduzir ou parar a canção de embalar da unidade de bebé ou para ajustar a sensibilidade do som da unidade de bebé. Enquanto estiver no menu: •... - Page 114 Desligar o ecrã Prima para desligar o ecrã. Ainda pode ouvir o som da unidade de bebé selecionada. Dica • Prima qualquer tecla na unidade para pais para voltar a ligar o ecrã. Ajustar o volume do altifalante da unidade para pais Prima para ajustar o volume do altifalante da sua unidade para pais.
- Page 115 Sensibilidade sonora e ativação por som Ajustar a sensibilidade sonora da unidade de bebé O ecrã da unidade dos pais só se liga se os sons detetados excederem um determinado nível. Utilize a unidade dos pais para ajustar a sensibilidade do microfone da sua unidade do bebé.
-
Page 116: Visão Noturna
Modo de escurecimento O modo de escurecimento ajuda-o a poupar a energia da unidade para pais. Quando a sua unidade para pais não estiver a carregar, o visor irá escurecer automaticamente após 10 minutos de inatividade se nenhuma tecla for premida nem forem recebidos alertas da unidade de bebé. - Page 117 Montar a unidade de bebé em pladur (opcional) Não incluído Terá de adquirir os seguintes artigos separadamente para montar a sua unidade de bebé: 2 parafusos 2 buchas Nota NOTES NOTE • Os tipos de parafusos e buchas que necessita dependem da composição da Insira os parafusos nos orifícios parede.
-
Page 118: Perguntas Frequentes
Perguntas frequentes Abaixo encontram-se as perguntas mais frequentes sobre o monitor de bebé. Porque é que o monitor Experimente o seguinte (na ordem listada) para uma resolução geral: de bebé não responde 1. Desligue a alimentação das unidades de bebé e da unidade para pais. normalmente? 2. - Page 119 Cuidados gerais com o produto Para manter este produto a funcionar bem e com bom aspeto, siga estas orientações: • Evite colocá-lo perto de aparelhos e dispositivos que geram ruído elétrico (por exemplo, motores ou lâmpadas fluorescentes). • NÃO o exponha à luz solar direta ou humidade. •...
-
Page 120: Garantia Do Produto
Este equipamento está em conformidade com os requisitos essenciais da Diretiva de Equipamento de Rádio e Equipamento Terminal de Telecomunicações 2014/53/UE. A VTech Telecommunications Ltd. declara pela presente que este Monitor de Vídeo para Bebé VM4263 está em conformidade com os requisitos essenciais e outras disposições relevantes da Diretiva 2014/53/UE.
Need help?
Do you have a question about the VM4263 and is the answer not in the manual?
Questions and answers