Advertisement
Quick Links
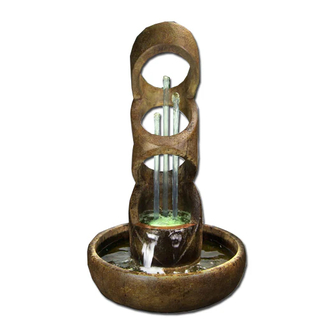
SETTING UP THE 5383F2
1)
Prepare a suitable location for your new fountain. Place the
6383 Basin on the location with the groove underneath
pointed toward your power supply. Set the 5383
Balancing Rings figure on its back next to the basin.
2)
Place the pump in the center of the basin. Connect
the five meter long Extension Cord (from the light kit) to
the 3-Way Cord Adapter. Slide both the pump cord and
the extension cord down through the large hole in the
basin. Lift the side of the basin nearest your power source
and pull the cords out along the prepared groove.
3)
Gently pull open the slit in the rubber Stopper.
Near the basin floor, place the stopper around the pump
cord (larger hole) and the light extension cord. Then
tightly press the stopper into the floor's hole.
4)
The three mounting holes for the vertical tubes are
found in the floor of the 5383 Top piece. The holes are
protected by factory installed plastic, threaded plugs.
Unscrew the plugs and thread each of the clear tubes into
the mounting holes in the 5383 floor. The longest tube is
recommended to be at the back. (The tubes can swivel
over their mounting fitting so you can easily adjust the
tube straightness later by hand.)
5)
Slide a Light Ring down over each of the clear
tubes, until they sit near the floor of the 5383. Slip the
power cords of the three Light Rings down through the
small hole in the 5383 and pull out underneath. Plug each
of them into the 3-Way Cord Adapter. Thread the three
Small Barbed Adapters into the underside of the 5383.
6)
Thread the Large Barbed Adapter into the top of the pump.
Attach a short tube to the adapter and clamp. Study the tube
arrangement in the drawing. Push the side end of a tee into the short
tube. Push the other short tube over the opposite end of that tee and
push a side end of the remaining tee into that tube's open end. [The
tubing should be clamped to each end of the tees as they are attached.]
7)
Install a Flow Restrictor around the middle of each of the three
remaining tubes. Tighten the restrictors just enough to hold in place.
Push the tube (center) going to the tallest pipe onto the end of the top
tee as shown. Then push the other tubes onto the middle legs of the
tees (shown coming out to the left and right of the tee assembly). (You
can tighten the flow restrictors later in order to adjust and balance the
water flow.)
Make sure to place your fountain on a firm
area which will not settle. Note: Always
follow local electrical codes and use a
110V GFCI protected outlet.
Advertisement

Related Manuals for FOUNTAINS.COM 5383F2


Summary of Contents for FOUNTAINS.COM 5383F2
- Page 1 Make sure to place your fountain on a firm area which will not settle. Note: Always SETTING UP THE 5383F2 follow local electrical codes and use a 110V GFCI protected outlet. Prepare a suitable location for your new fountain. Place the 6383 Basin on the location with the groove underneath pointed toward your power supply.
- Page 2 With help, lift the 5383 over the basin. One person should attach the three tubes to the barbed adapters under the 5383 – then the others can gently set the 5383 on the basin facing your chosen primary viewing angle. Close the hole through which the light cords run by pushing the small piece of caulk tape into it.
Need help?
Do you have a question about the 5383F2 and is the answer not in the manual?
Questions and answers