Advertisement
We have designed this unit for the purpose of effortless rosin extraction for up to 3.5 grams of flower.
Quick Start Guide
When starting your unit make sure the plates are closed (surface of plates should be pressed together) this will allow the temperature sensor in the bottom plate to get an accurate top and bottom reading and distribute the desired temperature to both plates.

Additionally, bring plates together for a minimum of 20 seconds between presses if more than 5 minutes passes to ensure accurate temperature readings. It is best to leave the plates together any time the machine is on and not in use.
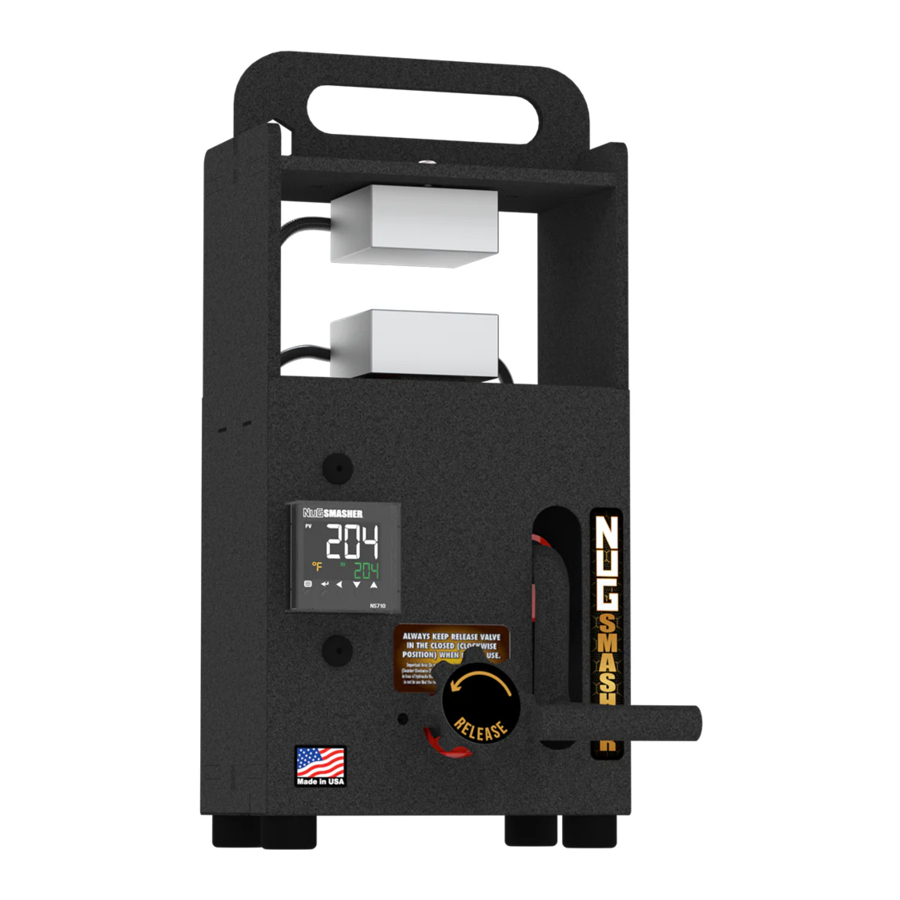
KEEP RELEASE VALVE IN CLOSED "CLOCKWISE POSITION" WHEN NOT IN USE
Please note that under any circumstances do not turn release valve more then ½ a turn in the open (counter clockwise) direction as this will void your warranty and may result in hydraulic fluid loss. Also make sure when not in use or stored, the release valve must be in closed tight (clockwise) position.

Never turn your release knob more than ½ full turn counter clockwise from tight.

Please Note: Your release knob is factory designed to be a slight upward
To Initiate Auto Tune
Once you set up your Nugsmasher Mini in the desired operating location, you can auto tune your temperature control if the factory settings aren't holding temps within expected tolerance levels. (Ideal temp range is 180-220F for flower presses)

To Initiate Auto Tune:
Hold the "<</AT" key for more than 3 seconds until the green AT lamp (light) comes on and the auto tune process will begin. The unit will heat up and cool down around the set temp approx. 3 times and will adjust its settings each pass to fine tune itself. Auto tune is complete when AT lamp (light) turns off. (Note the factory settings as follows P).90 I) 50 D) 13.5)
For other settings refer to temperature controller instructions, manual enclosed.
Make sure you have the handle inserted properly or the press pump won't work, the handle piece sits on the lower end when inserted.
For more tips and tricks; follow our pages on Instagram and Facebook. Also, Google and YouTube are the best resources for "how to press" video tutorials and remember, practice makes perfect!
*Note, customer is liable for any shipping charges or damage as a result of sending unit to PMG for service or warranty repair. It is recommended you hold onto the packaging that comes with the unit. Please feel free to contact us with any questions
Adjusting Temperature

To adjust the plate set temperature press the  "<</AT" button once and you will notice the first row of digits start to flash. Press the "<</AT" button again and it moves over one more digit. Continue to press the AT button until the number you want to change is flashing and then press the
  up or down arrows to select desired temperature setting. Once you have changed to your desired temperature press the set button once to lock in temperature. It is not advised to go into any other programming modes as your unit has been factory preset for optimum settings. Note: US models are set for Fahrenheit and all international orders are set in Celsius unless specified otherwise.

Set power switch to the "on" position. You will notice on your control screen there are two rows of digits. The top is the current temperature of the heat plates. The bottom is the set temperature. The mini comes preset at 200 degrees Fahrenheit and will take approximately 5-7 minutes to reach set temperature depending on your location.
Operating Unit
Before your unit is turned on, insert handle into the vertical opening on the right side of unit. Notice there is a round tube that your shaft handle will be inserted into for plate compression operation. Pump handle until plates are lightly pressed together. The Nugsmasher mini has 1 heating element in each plate and between presses of more than 3 minutes and especially during initial warm-up, it is advised to bring the plates back together to ensure exact set temperature is maintained in both plates.

Ideal Temperature
The ideal pressure and temperature will vary depending on strain and growing techniques so don't be discouraged on your results when you press new material. We recommend when pressing a new strain to start at approx. 220 degrees for flower and notate your yield results (weight of material in vs. rosin out). Perform additional test presses and drop 5 - 10 degrees per press until you notice your yield percentage starting to drop. Adjust back to the previous temp and that will be your ideal temp for that strain. It is advised to have a thermal temp gun to verify and check temperatures from time to time. Use a small piece of electrical tape as the high gloss on heat plates will affect accurate temp readings if using a thermal temp gun.
Loading Micron Bags
Nugsmasher extraction bags, are recommended for optimal yield and clean quality rosin. Our bags are hand-made and packaged in the USA! Nugsmasher extraction bags are specifically designed to work with the weight of fresh cured flower and are labeled accordingly at: 3.5 g (1.1g-3.5g), 7 g (3.6g-7g) and 14 g (7.1g-14g). This assumes the bags are loaded (BTS) or bottle/barrel-tech style (upright so that you end up with the round coin like puck once fully pressed). This perfected method allows you the ability to put the proper weight of flower into the bag and get a consistent extraction every time. This method also applies the proper pounds per square inch of pressure (PSI) on your product and eliminates the guess work.
3.5g bag (1.1g-3.5g) = 1.5"-1.6"Diameter
7g bag (3.6g-7g) = 2"-2.2"Diameter
14g bag (7.1g-14g) =2.4"-2.7"Diameter
As the micron gets smaller the diameter gets larger, this is the reason for the variance in the diameter numbers above. We prefer to use 160 micron for fresh flower, as flower dries we go down in micron screen size (for dry flower use 90 micron). Micron size determines the diameter (surface area) of the smashed bag. For nugs 1g and smaller no bag is necessary. For more details about loading Bottle-Tech and/or Barrel-Tech style (BTS) please visit Nugsmasher on YouTube: https://www.youtube.com/watch?v=0osvcD7CLK0 Remember "Fire in fire out"!
Pressure
Once your unit reaches set temperature you're ready to start pressing. Once you have your material between parchment paper (do not use wax paper!), slowly start raising plates by pumping handle. It is key to do this slowly to properly build heat into your material. The entire pressing process should be between 90-120 seconds depending on your strain. Your Nugsmasher mini is almost incapable of over pressing your material so if you're pressing 3.5 grams you need to give it a full final press once fully compressed. There are several videos available online on the Nugsmasher official Instagram account as well as the Nugsmasher YouTube channel that are very beneficial for techniques and tips of your rosin extraction. Note the leverage designed with your pump handle is only designed for hand operation. Do not use any other leverage device or foot to push handle down as you will cause damage not covered by warranty.
While our products are sturdy and built to last, they are also heavy and shippers can be rough during handling. If there are any problems from shipping and your item does not deliver safely please contact us direct so we can resolve the matter immediately.
As always, please feel free to call us at any point with any questions or concerns at 951-272-9800 or Contact@Nugsmasher.com.
Documents / Resources
References
Download manual
Here you can download full pdf version of manual, it may contain additional safety instructions, warranty information, FCC rules, etc.
Advertisement


Need help?
Do you have a question about the Mini and is the answer not in the manual?
Questions and answers