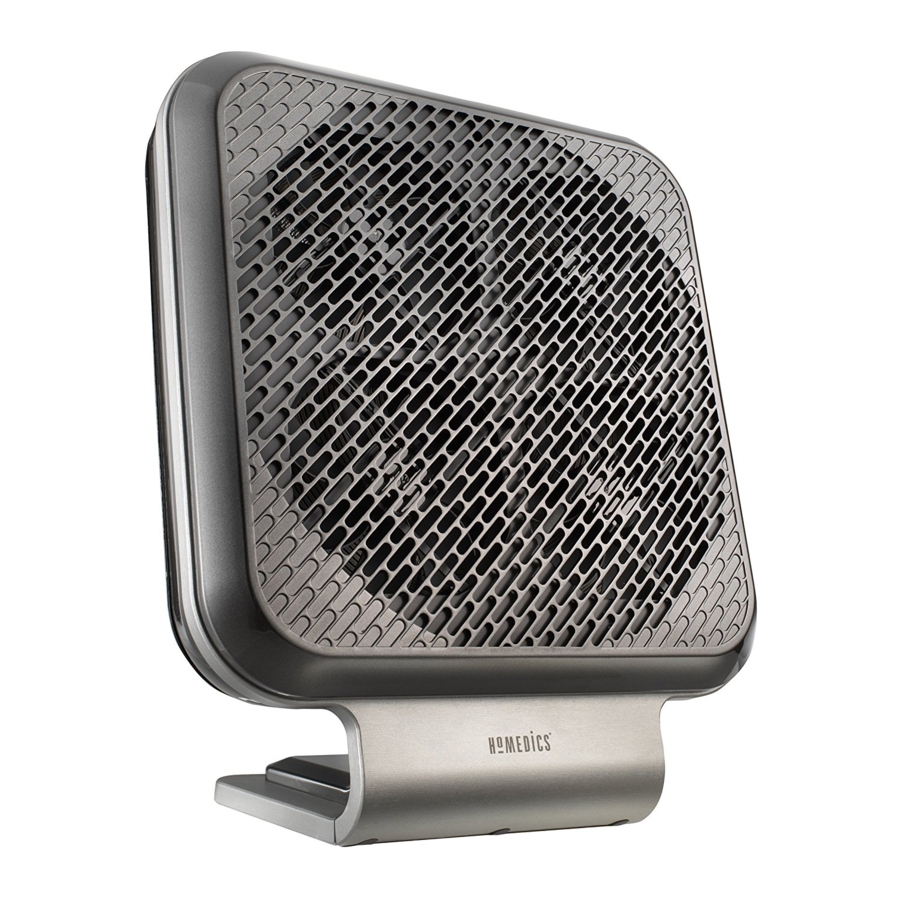
Homedics Brethe AR-NC01 / AR-NC01GY Manual
- Replacement parts (1 page) ,
- Instruction manual (17 pages) ,
- Instruction manual and warranty information (17 pages)
Advertisement
Technical Specifications
| Input voltage | 120 V |
| Rated Frequency | 60 HZ |
| Power | 24 Watts |
| Weight | 6.654 lbs |
| Noise Level | <60 dB |
| Unit Height | 15.4" |
Main Features on The Sharper Image Brethe Air Cleaner

Pre-Filter: Captures large particles and fibers
Nano-Coil Filter: Cleanable spiral filter that captures charged air contaminants
VOC/Odor Filter: (optional) Removes VOC (Volatile Organic Compounds)
Operating Instructions
Getting Started
- Take the air cleaner out of the box and remove the clear protective plastic bag.
- Place the air cleaner on a firm level surface.
- BEFORE TURNING ON THE AIR CLEANER, if you choose to use the optional VOC filter, you will need to install it and confirm that all the filters are firmly in place.
- Open the rear grill by gently pushing the release tabs toward the outside of the unit. See Fig. 1

Fig. 1 - Pull the grill away from the body until the tabs at the bottom of the grill plate easily slide away from the unit. See Fig. 2 & 3

Fig. 2&3


- The pre-filter and nano-coil filter will be installed already. To install the VOC/Odor filter (optional), remove the VOC/Odor filter from the plastic bag. Place the VOC filter into the unit flush against the pre-filter, secured by four clips.
See Fig. 4

Fig. 4 - Place the tabs at the bottom of the grill plate into the base of the unit.
See Fig. 5

Fig. 5 - Hold engaged bottom of the grill plate in place and push the top of the grill plate back toward the unit. The release tabs at the top of the grill will click back into place.
See Fig. 6

Fig. 6


 NOTE: Unit will not operate unless nano-coil, pre-filter and grill are properly installed.
Control Panel

On/Off and Speed Settings
- To turn the air cleaner on, press the ON/OFF
![]() button. When the air cleaner is on, the LED light will be lit and the air cleaner will start to operate on LOW
button. When the air cleaner is on, the LED light will be lit and the air cleaner will start to operate on LOW ![]() speed.
speed. - There are four speed settings: Quiet
![]() (low)
(low) ![]() (medium)
(medium) ![]() TURBO. Quiet mode is whisper quiet – below normal room noise – and is recommended particularly for night use and uninterrupted sleep. TURBO mode gives a cleaning power boost. When the fan is set at TURBO, it will run for 30 minutes and then return to
TURBO. Quiet mode is whisper quiet – below normal room noise – and is recommended particularly for night use and uninterrupted sleep. TURBO mode gives a cleaning power boost. When the fan is set at TURBO, it will run for 30 minutes and then return to ![]() (low) speed.
(low) speed. - To turn the air cleaner OFF, simply press the ON/OFF
![]() again.
again.
 speed.
 (low)
(low)  (medium)
  TURBO. Quiet mode is whisper quiet – below normal room noise – and is recommended particularly for night use and uninterrupted sleep. TURBO mode gives a cleaning power boost. When the fan is set at TURBO, it will run for 30 minutes and then return to
 Timer Settings
There are four possible timer settings: 1 (one) hour, 4 (four) hours, 8 (eight) hours, and 12 (twelve) hours. To activate the timer, press the ![]() on the control panel. Each time it is pressed, it will advance to the next timer setting. The timer LED will be illuminated while the timer function is on. Cycle through 1, 4, 8, 12, then off to operate the unit without the timer feature.
on the control panel. Each time it is pressed, it will advance to the next timer setting. The timer LED will be illuminated while the timer function is on. Cycle through 1, 4, 8, 12, then off to operate the unit without the timer feature.
Using the Remote Control
BEFORE FIRST USE, REMOVE PLASTIC PULL TAB FROM BATTERY COMPARTMENT.
Battery Installation
One CR2032 3V battery is included with the remote control. To change the battery, remove the battery door at the back of the remote by squeezing the tab and pulling the door away from the back of the remote. Please insert the battery into the remote with the positive side up as shown on the drawer.
NOTE: Always keep the battery and remote control out of the reach of children.
BATTERY NOTE

- If the unit is not going to be used for a long period of time, remove batteries to prevent damage due to possible battery leakage.
- Clean the battery contacts and also those of the device prior to battery installation.
- Remove used batteries promptly.
- Dispose of properly in accordance with all state, province, and country regulations.
- Do not dispose of batteries in fire. Batteries may explode or leak.
- Use only the size and type of batteries specified.
- When installing batteries, observe proper polarity +/-. Improper installation of batteries may cause damage.
Filter Cleaning and Maintenance
Make sure the air cleaner is turned off and unplugged from the outlet before cleaning. Check the filters every 30 days to see if they need cleaning. If you use your air cleaner daily, we recommend checking the filters more frequently.
Nano-Coil Filter
- Open the rear grill by gently pushing the release tabs toward the outside of the unit. See Fig. 7

Fig. 7 - Pull the grill away from the body until the tabs at the bottom of the grill plate easily slide away from the unit. See Fig. 8 & 9


- Remove the nano-coil filter from the unit by grasping the center handle and pulling out from the center hub. See Fig. 10

Fig. 10 - Use the brush attachment with your vacuum cleaner. Run the attachment along both sides of the nano-coil filter, taking care not to dislodge the combs. See Fig. 11

Fig. 11 - Replace the nano-coil filter. Make sure to align the center of the filter handle with the center hub. Filter handle should be vertical. Be sure the post on the center hub comes through the hole on the filter's handle. See Fig. 10
- Place the tabs at the bottom of the grill plate into the base of the unit. See Fig. 12

Fig. 12 - Hold engaged bottom of the grill plate in place and push the top of the grill plate back toward the unit until the release tabs at the top of the grill click back into place. See Fig. 13

Fig. 13
DO NOT USE WATER OR ANY HOUSEHOLD CLEANERS OR DETERGENTS TO CLEAN THE NANO-COIL FILTER OR PRE-FILTER


Pre-Filter
- Open the rear grill by gently pushing the release tabs toward the outside of the unit. See Fig. 14

Fig. 14 - Pull the grill away from the body until the tabs at the bottom of the grill plate easily slide away from the unit. See Fig. 15 & 16


- If you are using the VOC filter, remove it by sliding out of the 4 clips. See Fig. 17

Fig. 17 - Remove the pre-filter by gently pulling it off and away from the 4 posts. See Fig. 18

Fig. 18 - Use the brush attachment with your vacuum cleaner. Run the attachment along both sides of the pre-filter. See Fig. 11
- Replace the pre-filter by pushing the 4 loops of the filter onto the 4 posts of the grill. See Fig. 18
- If you are using the VOC filter, put it back in and secure with 4 clips. See Fig. 17
- Place the tabs at the bottom of the grill plate into the base of the unit. See Fig. 19

Fig. 19 - Hold engaged bottom of the grill plate in place and push the top of the grill plate back toward the unit until the release tabs at the top of the grill click back into place. See Fig. 20

Fig. 20


Clean Filter Indicator
This air cleaner is equipped with a CLEAN FILTER indicator to let you know when it is time to clean the Nano-Coil filter, about every 732 hours of use. When the NanoCoil filter is ready to be cleaned, the CLEAN FILTER indicator will light up on the control panel.
Once the Nano-Coil filter has been cleaned, press and hold the CLEAN FILTER button until it beeps to reset the filter indicator.
We recommend replacing your VOC filter, if you choose to use it, when you replace your Nano-Coil filter (about every 18 months, with regular maintenance).
To purchase a Nano-Coil replacement filter, model # AR-NCFL1, go back to the retailer (where you purchased your air cleaner) or visit www.homedics.com. Replacement VOC filter, model # PP-ARNC01VOC, can also be purchased at www.homedics.com.
Cleaning and Maintenance
We recommend that the air cleaner be cleaned at least once a month and before storage.
- Turn the air cleaner OFF and unplug it from the outlet
- Use a dry cloth to clean the external surfaces of the air cleaner
- The grill plate may be cleaned with a damp cloth or the brush attachment of your vacuum cleaner.
DO NOT USE WATER, WAX, POLISH, OR ANY CHEMICAL SOLUTION
Troubleshooting
| Problem | Possible Cause | Solution |
| The unit won't turn on |
|
|
|
| |
|
| |
|
| |
| No air flow or noticeable cleaning effect |
|
|
|
| |
|
| |
|
|
SERVICE & WARRANTY
e-mail: cservice@homedics.com
1.800.466.3342
8:30a.m. – 7:00p.m. (EST) M – F
LIMITED TWO YEAR WARRANTY
To obtain warranty service on your HoMedics product, contact a Consumer Relations Representative by telephone at 1-800-466-3342 for assistance. Please make sure to have the model number of the product available.
For more information regarding our product line in the USA, please visit: www.homedics.com
REGISTER YOUR PRODUCT AT: www.homedics.com/register
Your valuable input regarding this product will help us create the products you will want in the future.
IMPORTANT SAFETY INSTRUCTIONS
WHEN USING ELECTRICAL PRODUCTS, ESPECIALLY WHEN CHILDREN ARE PRESENT, BASIC SAFETY PRECAUTIONS SHOULD ALWAYS BE FOLLOWED, INCLUDING THE FOLLOWING:
READ ALL INSTRUCTIONS BEFORE USING

TO REDUCE THE RISK OF ELECTRIC SHOCK:
- Always unplug the air cleaner from the electrical outlet immediately after using and before cleaning.
- Keep cord away from heated surfaces
- Always place the air cleaner on a firm, level surface.
- Always place the air cleaner at least twelve (12) inches away from walls and three (3) feet from heat sources such as stoves, radiators, or heaters.
- DO NOT operate where aerosol (spray) products are being used or where oxygen is being administered.
- DO NOT reach for an appliance that has fallen into water. Unplug it immediately.
- DO NOT place or store appliance where it can fall or be pulled into a tub or sink.
- DO NOT place in or drop into water or other liquid.
- Keep dry - DO NOT operate in a wet or moist condition.
- Check your air cleaner cord and plug connections. Faulty wall outlet connections or loose plugs can cause the outlet or plug to overheat. Be sure the plug fits tight in the outlet.

TO REDUCE THE RISK OF BURNS, FIRE, ELECTRIC SHOCK OR INJURY TO PERSONS:
- Extreme caution is necessary when any air cleaner is used by or near children or invalids and whenever the air cleaner is left operating and unattended.
- Always unplug the air cleaner when not in use.
- Do not operate the air cleaner with a damaged cord or plug, or after the air cleaner malfunctions, has been dropped or damaged in any manner. Return to HoMedics Consumer Relations for examination, electrical or mechanical adjustment, or repair.
- This air cleaner is not intended for use in bathroom, laundry areas and similar moist indoor locations. Never locate air cleaner where it may fall into a bathtub or other water container.
- Do not run cord under carpeting. Do not cover cord with throw rugs, runners or similar coverings. Do not route cord under furniture or appliances. Arrange cord away from traffic areas where it can be tripped over.
- To disconnect the air cleaner, first turn controls to the OFF position, then remove plug from outlet.
- Do not tilt or move the air cleaner while it is in operation. Shut off and remove plug from outlet before moving.
- Do not insert or allow foreign objects to enter any ventilation or exhaust opening as this may cause an electric shock or fire, or damage the air cleaner.
- To prevent a possible fire, do not block air intakes or exhaust in any manner. Do not use on soft surface, like a bed, where openings may become blocked.
- Use this air cleaner only for its intended use as described in this manual. Any other use not recommended by the manufacturer may cause fire, electric shock, or injury to persons.
- DO NOT use outdoors.
SAVE THESE IMPORTANT INSTRUCTIONS FOR EASY REFERENCE

This product earned the ENERGY STAR by meeting strict energy efficiency guidelines set by the US EPA. US EPA does not endorse any manufacturer claims of healthier indoor air from the use of this product.
The energy efficiency of this ENERGY STAR qualified model is measured based on a ratio between the model's CADR for Dust and the electrical energy it consumes, or CADR/Watt.
Grounding Instructions
To reduce the risk of electric shock, this product has a grounding type plug that has a third (grounding) pin (Fig. 1).

Fig. 1
This plug will only fit into a grounding type power outlet. If the plug does not fit into the outlet, contact qualified personnel to install the proper outlet. Do not alter the plug in any way. If your home is not equipped with a grounded outlet, you may use a temporary adapter (Fig. 2).

Fig. 2
The tab for grounding screw extending from the temporary adapter must be connected to a permanent ground such as a properly grounded outlet box cover and it must be held in place by a metal screw (Fig. 3).

Fig. 3
The temporary adapter should be used only until a properly grounded outlet (Fig. 4) can be installed by a qualified electrician.

Fig. 4
SAVE THESE IMPORTANT INSTRUCTIONS FOR EASY REFERENCE
Documents / Resources
References
![www.homedics.com]() Homedics Office Site - Massage, relaxation and wellness products - HoMedics.com
Homedics Office Site - Massage, relaxation and wellness products - HoMedics.com![www.homedics.com]() Register Your Homedics Product - Homedics
Register Your Homedics Product - Homedics
Download manual
Here you can download full pdf version of manual, it may contain additional safety instructions, warranty information, FCC rules, etc.
Advertisement


Need help?
Do you have a question about the Brethe AR-NC01 and is the answer not in the manual?
Questions and answers