Advertisement
Quick Links
Advertisement

Related Manuals for Baxton Studio Pavone BBSFP-2402-2001B


Summary of Contents for Baxton Studio Pavone BBSFP-2402-2001B
- Page 1 Assembly Instruction WI14025 1 of 14...
-
Page 2: Part List
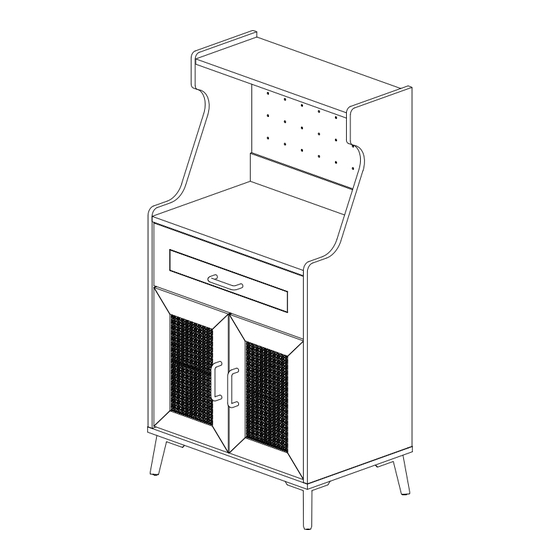
Assembly Instruction Part List Part List Qty. Top Panel-B 1 Pc B Top Panel-S 1 Pc 1 Pc C Side Panel-L 1 Pc D Side Panel-R 1 Pc E Bottom Panel 1 Pc F Stand Panel G Back Crossbar (Upper) 1 Pc H Back Crossbar (Lower) 1 Pc... -
Page 3: Hardware List
Assembly Instruction M5x8mm Screw 4 Pcs Hardware List (Euro Screw) Minifix Cap 6 Pcs Qty. No. SHAPE DESCRIPTION 8x25mm Wood Dowel 30 Pcs 3 Pcs HD8522 / HANDLE PVC 15MM 16 Sets M4x30mm Screw 6 Pcs Myfix Minifix LG9019 M5x40mm Screw 13 Pcs 4 Pcs AIR PLANE LEG H120... - Page 4 Assembly Instruction STEP 2 *Install Drawer Slide (9) with screw (10) panel as shown. STEP 3 *Install Minifix Bolt (2) to all panels as shown. 4 of 14...
- Page 5 Assembly Instruction STEP 4 *Assemble Back Crossbar (Upper) (G) to Top Panel-B (A) secure with Minifix (2) as shown. STEP 5 *Assemble Back Crossbar (Lower) (H) & Front Crossbar (Lower) (I) to Stand Panel (F) secure with Screw (3) as shown. 5 of 14...
- Page 6 Assembly Instruction STEP 6 *Assemble Side Panel-R (D) secure with Minifix (2) as shown. STEP 7 *Insert Back Panel (Upper) as shown. 6 of 14...
- Page 7 Assembly Instruction STEP 8 *Assemble Side Panel-L (C) secure with Minifix (2) as shown. *Attach Minifix Cap (11) as shown. STEP 9 *Insert Back Panel (Lower) as shown. 7 of 14...
- Page 8 Assembly Instruction STEP 10 *Assemble Bottom Panel (E) secure with Screw (3) as shown. STEP 11 *Install all Metal Leg (14) with screw (5) as shown. 8 of 14...
- Page 9 Assembly Instruction STEP 12 *Install all Z Bracket (6) with screw (7) as shown. STEP 13 *Assemble Drawer Back Panel secure with Screw (3) as shown. *Attach Minifix Cap (11) as shown. *Assemble Drawer Side Panel-L, Drawer Side Panel-R, Drawer Crossbar & Drawer Bottom Panel to Drawer Front Panel (L) secure with Minifix (2) as shown.
- Page 10 Assembly Instruction STEP 14 *Install Handle (12) with Screw (13) as shown. *Install Drawer Slide (9) with Screw (5) as shown. STEP 15 *Install Handle (12) with Screw (13) as shown. *Install Hinges (4) with Screw (5) to both Doors (K) as shown. 10 of 14...
- Page 11 Assembly Instruction STEP 16 *Attach Shelf Support (8) to all panels as shown. STEP 17 *Assemble both Doors Panel (K) secure with Screw (5) into cabinet as shown. 11 of 14...
- Page 12 FURNITURE TIPPING RESTRAINT 1.First mark the wall with pencil as in diagram. (1.57") 3. Insert plastic wall plug (16). 16 x2 12 of 14...
- Page 13 FURNITURE TIPPING RESTRAINT 4. Add safety strap (18), washer (19) using 3.5x15mm screw (15) to back of cabinet. 15 x2 18 x2 19 x2 M3.5x15mm 5. Finally, attach safety strap (18) and washer (19) using 4x30mm screw (17) to the wall. 17 x2 19 x2 M4x30mm...
- Page 14 ANTI-TIPPING KIT is provided with the products and it is required for assembly, any accident occurs due to failing to fix the product with Anti-tipping is at your own risk Anti-Topple hardware included for added safety and stability 14 of 14...
Need help?
Do you have a question about the Pavone BBSFP-2402-2001B and is the answer not in the manual?
Questions and answers