Advertisement
Quick Links
Advertisement

Subscribe to Our Youtube Channel
Related Manuals for Russell Taylors R10


Summary of Contents for Russell Taylors R10
- Page 1 ROBOT VACUUM CLEANER USER MANUAL www.russelltaylors.co.uk...
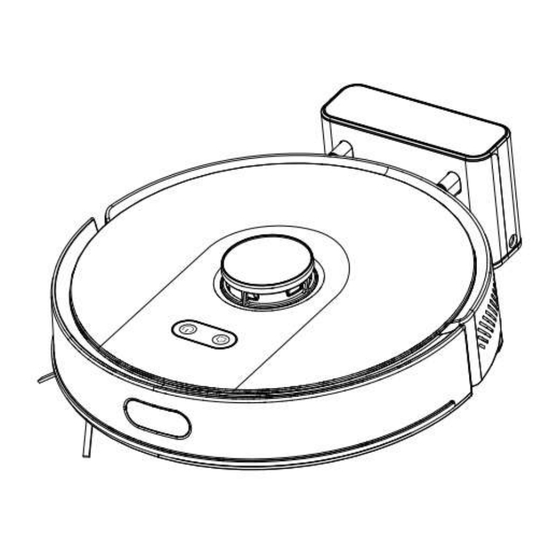
- Page 2 On off button/Cleaning/Pause Product Introduction Short Press to start • cleaning/pause Long press to turn on/off • Recharge/Pause Short Press to • recharge/pause Laser Head Impact Sensor Laser Ranging Sensor White: Normal • working/Charging Red: Abnormal state or low • battery.
- Page 3 Sensor & Structure...
- Page 4 Charging Base...
- Page 5 Accessories List...
- Page 6 Before First Use 1. Before starting the robot, clean the area of any scattered wires, hard, sharp objects on the ground and remove any items that may topple, are fragile, valuable and potentially dangerous. Avoid any personal injury or property damage that may be caused by machine entanglement, jamming, dragging or collision.
- Page 7 Reminder: 1. During the first cleaning process, it is recommended to follow the robot throughout the process to assist with some possible minor issues. Once the mapping has been familiarized, the robot will smoothly clean the surrounding in the future. 2.
- Page 8 Installation 1. Connect the power cable and tidy up the excess wire. 2. Do not move the charging dock casually and avoid direct sunlight on the charging station. Sunlight exposure can interfere with the signal coming from the charging dock and may prevent the robot from returning to the docking station.
- Page 9 3. Place to charging base against the wall on a flat surface and connect the power supply. Ensure that there is a 0.5M gap on both sides of the charging base. 4. To start up the robot, hold on to the button for a few seconds to turn on the robot.
- Page 10 Start Up/Power Down Hold the button for 3 seconds to start up the robot vacuum. To turn off the vacuum, ensure that it is in standby mode, then hold the button for 3 seconds and the robot will shut down. Cleaning/Pause After the robot is turned on, press the to start the cleaning process.
- Page 11 • If the battery is below 15%, the robot will not complete the cleaning task and will return to the docking station to recharge. • Tidy all kinds of cables on the ground before running the robot to avoid any damage. Charging Automatic Mode: After cleaning, the robot will automatically return back to the docking station to charge.
- Page 12 Automatic Cleaning Once you have started up the robot, it will first plan the cleaning path via edge and arch filling, to clean your space efficiently. After cleaning, the robot will return back to the charging base to recharge.
- Page 13 Suction Adjustment You can choose between Quiet, Standard, Strong and MAX by using the Tuya app on your smart phone. Water Level Adjustment You can choose high, medium and low by using the Tuya app on your smart phone. Appointment Cleaning The Tuya app allows you to set up scheduled cleaning times and the host will automatically start cleaning at the specified timing.
- Page 14 Tuya App Installation 1. The Tuya app can be downloaded from the Apple App Store or Google Playstore. 2. Install the app and sign in. (You will need to create an account if you do not have one already). Reset WIFI 1.
- Page 15 Tips : Only WIFI networks in the 2.4Ghz band will support this function. 2. In the app, click on the “+” icon located on the top right of the screen.
- Page 16 3. In the add device page, select the “Small Home Appliance” on the left and scroll down to the “Clean” category. Select “Robot Vacuum (2.4Ghz & 5Ghz).
- Page 17 4. The app will prompt you to enter the Wi-Fi password of your household. Once the password has been entered, click next.
- Page 18 5. Confirm that the indicator light on the robot is blinking and click “Confirm”...
- Page 19 6. After confirming that the lights on the robot is blinking, click on “AP Mode” to connect the robot to your household Wi-Fi.
- Page 20 7. Connect your mobile phone to the hotspot of the robot. Click “Go to Connect” and the app will bring you to your Wi-Fi page. Select network “Smartlife-XXXX”.
- Page 21 8. After selecting the robot hotspot network, go back to the Tuya app to complete the connection. Daily Maintenance Main Brush (Clean once a week) 1. Turn the machine over and press the buckle on the main brush cover to remove it.
- Page 22 2. Remove the main brush 3. Use a cleaning brush to remove from the main brush and main brush cavity, then remove any entanglements from the main brush. Side Brush (Clean once a week) 1. Turn the machine over and pull out the edge brush. 2.
- Page 23 Dust box & Filter Screen 1. Press the button on the back of the robot and remove the dust box. 2. Press and hold the dust box switch to open and container and dump the dust and debris. Clean the Dust Container 1.
- Page 24 3. After cleaning, make sur everything is dried and then place them back into the robot. Water Tank 1. Do not use the mop function on a carpet. After the mop is completed, empty the water tank and remove the rag.
Need help?
Do you have a question about the R10 and is the answer not in the manual?
Questions and answers