Dell Dimension 4100 Removing Manual
Hide thumbs
Also See for Dimension 4100:
- Manual (160 pages) ,
- Solution manual (146 pages) ,
- User manual (139 pages)
Advertisement
Quick Links
Removing and Replacing Parts: Dell Dimension 4100 System Reference
Back to Contents Page
Removing and Replacing Parts: Dell™ Dimension™ 4100
System Reference
Overview
Precautionary Measures
Recommended Tools
Cover
Front Panel
Drive Cage
3.5-Inch Front-Panel Insert
5.25-Inch Front-Panel Insert
Upper 3.5-Inch Drive
Lower 3.5-Inch Drive
3.5-Inch Floppy Drive
5.25-Inch Drive
Overview
Unless otherwise noted, each of the following procedures assumes:
You have the
You have performed the steps listed in the Caution in
You have
You can replace or reinstall a part by performing the removal procedure in reverse order.
Precautionary Measures
Before you remove or replace parts in the computer, read the following warning and caution for
your personal safety and to prevent damage to the computer from electrostatic discharge (ESD).
1 of 29
recommended
tools.
removed the computer
Primary Hard Drive
Secondary Hard Drive
Power Supply
Fan Assembly
Card Guide Assembly
Control Panel Board
Cards
Memory
Socketed Microprocessor
Battery
System Board
Precautionary
cover.
http://support.dell.com/support/edocs/systems/dzuul/rr.htm
Measures.
6/12/2009 5:56 PM
Advertisement

Related Manuals for Dell Dimension 4100


Summary of Contents for Dell Dimension 4100
- Page 1 Removing and Replacing Parts: Dell Dimension 4100 System Reference http://support.dell.com/support/edocs/systems/dzuul/rr.htm Back to Contents Page Removing and Replacing Parts: Dell™ Dimension™ 4100 System Reference Overview Primary Hard Drive Precautionary Measures Secondary Hard Drive Recommended Tools Power Supply Cover Fan Assembly Front Panel...
- Page 2 Removing and Replacing Parts: Dell Dimension 4100 System Reference http://support.dell.com/support/edocs/systems/dzuul/rr.htm CAUTION FOR YOUR PERSONAL SAFETY AND PROTECTION OF THE EQUIPMENT. Before you start to work on the computer, perform the following steps in the sequence listed: Turn off your computer and all devices.
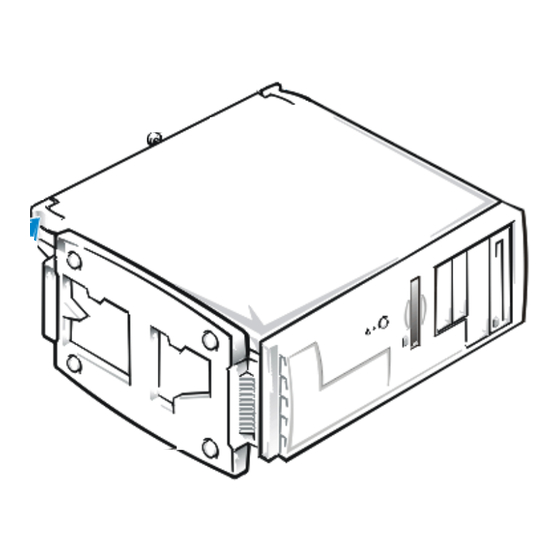
- Page 3 Removing and Replacing Parts: Dell Dimension 4100 System Reference http://support.dell.com/support/edocs/systems/dzuul/rr.htm 1 Cover- mounting thumbscrew 2 Computer foot stand 3 Cover release latches (2) 3 of 29 6/12/2009 5:56 PM...
- Page 4 Removing and Replacing Parts: Dell Dimension 4100 System Reference http://support.dell.com/support/edocs/systems/dzuul/rr.htm NOTICE: To avoid inadvertently damaging the system board while performing the following procedure, be sure that you disconnect the computer’s power cable from the electrical outlet and from the back of the computer, and then press the...
- Page 5 Removing and Replacing Parts: Dell Dimension 4100 System Reference http://support.dell.com/support/edocs/systems/dzuul/rr.htm 1 Front panel 2 Tabs To remove the front panel: With the cover removed, press in the tabs along the top and side of the front panel. Swing the front panel away from the computer, disengage the hooks and carefully pull the front panel away from the computer.
- Page 6 Removing and Replacing Parts: Dell Dimension 4100 System Reference http://support.dell.com/support/edocs/systems/dzuul/rr.htm 1 Drive cage 2 Screw 3 Drive-cage slots (6) 4 Tabs (6) To remove the drive cage: Remove the front panel. Note the location and orientation of all cables attached to the drives in the drive cage; then disconnect the cables.
- Page 7 Removing and Replacing Parts: Dell Dimension 4100 System Reference http://support.dell.com/support/edocs/systems/dzuul/rr.htm 1 Tabs (2) 2 Release tab To remove a 3.5-inch insert: Remove the front panel. From the back of the front panel, as shown for the mini tower computer, press the release tab to the side, rotate the insert toward you, and remove it from the bezel.
- Page 8 Removing and Replacing Parts: Dell Dimension 4100 System Reference http://support.dell.com/support/edocs/systems/dzuul/rr.htm 1 Tabs (2) 2 Front-panel insert 3 Retaining hook The insert for the lower 5.25-inch bay is mounted to the drive cage. Press in the two tabs on the right side, and rotate the insert toward you until the retaining hook disengages from the drive cage.
- Page 9 Removing and Replacing Parts: Dell Dimension 4100 System Reference http://support.dell.com/support/edocs/systems/dzuul/rr.htm Remove the drive cage. Remove the 6/32 x 1/4-inch screw securing the drive bracket to the drive cage, and then remove the bracket as shown. NOTES: The three screws that secure the drive to the bracket and the left side of the drive cage have 3-millimeter (mm) threads.
- Page 10 Removing and Replacing Parts: Dell Dimension 4100 System Reference http://support.dell.com/support/edocs/systems/dzuul/rr.htm Remove the three drive-mounting screws, one from the bottom and two from the left side. Slide the drive out of the drive cage. When you replace a drive, set the jumpers on the replacement drive to match the jumpers on the drive you removed.
- Page 11 Removing and Replacing Parts: Dell Dimension 4100 System Reference http://support.dell.com/support/edocs/systems/dzuul/rr.htm 1 Drive- mounting screws (3) To remove the 5.25-inch drive: Remove the front panel. Remove the drive cage. Remove the three drive-mounting screws and slide the drive out of the drive bay.
- Page 12 Removing and Replacing Parts: Dell Dimension 4100 System Reference http://support.dell.com/support/edocs/systems/dzuul/rr.htm 1 Primary hard drive 2 Card guide assembly 3 Drive-assembly mounting screws (2) To remove the primary hard drive: Remove the front panel. Remove the two drive-assembly mounting screws. Lift the primary hard drive out of the card guide assembly.
- Page 13 Removing and Replacing Parts: Dell Dimension 4100 System Reference http://support.dell.com/support/edocs/systems/dzuul/rr.htm 1 Secondary hard drive assembly 2 Card guide assembly 3 Drive- assembly mounting screws (2) To remove the secondary hard drive: Remove the front panel. Disconnect the DC power and interface cables from the back of the drive.
- Page 14 Removing and Replacing Parts: Dell Dimension 4100 System Reference http://support.dell.com/support/edocs/systems/dzuul/rr.htm 1 Screw 2 Drive bracket 3 Tabs (2) 4 Secondary hard drive When you replace a hard drive, set the jumpers on the replacement drive to match the jumpers on the drive you removed.
- Page 15 Removing and Replacing Parts: Dell Dimension 4100 System Reference http://support.dell.com/support/edocs/systems/dzuul/rr.htm 1 Power-supply mounting screws (2) 2 Power supply To remove the power supply: Disconnect the AC power cable from the power supply. Disconnect the DC power cables from the POWER connector AUX POWER connector on the system board.
- Page 16 Removing and Replacing Parts: Dell Dimension 4100 System Reference http://support.dell.com/support/edocs/systems/dzuul/rr.htm 1 Fan assembly 2 FAN 2 connector 3 Release buttons To remove the fan assembly: Disconnect the fan cable from the FAN 2 connector on the system board. While you push the fan assembly upward, press the two release buttons on the back of the computer and lift the fan assembly out of the computer.
- Page 17 Removing and Replacing Parts: Dell Dimension 4100 System Reference http://support.dell.com/support/edocs/systems/dzuul/rr.htm 1 Card guide assembly 2 Mounting tabs (4) 3 J8C3 connector 4 Tab To remove the card guide assembly: Disconnect any cables connected to full-length cards, and remove these cards.
- Page 18 Removing and Replacing Parts: Dell Dimension 4100 System Reference http://support.dell.com/support/edocs/systems/dzuul/rr.htm 1 Control panel board 2 Mounting tab 3 Card guide assembly To remove the control panel board: Remove the front panel. Remove the card guide assembly. Press the mounting tab to release the control panel board from the card guide assembly, and remove the control panel board.
- Page 19 Removing and Replacing Parts: Dell Dimension 4100 System Reference http://support.dell.com/support/edocs/systems/dzuul/rr.htm 1 Retaining screw 2 Card 3 Card guide assembly 4 Card connector 5 Card connector 6 Card-mounting bracket To remove a card: Disconnect any cables from the card. Remove the retaining screw from the card-mounting bracket.
- Page 20 Removing and Replacing Parts: Dell Dimension 4100 System Reference http://support.dell.com/support/edocs/systems/dzuul/rr.htm Memory To remove a memory module, press down and out on the securing clips at each end of the socket. The module should pop up, allowing you to lift it out of the socket.
- Page 21 Removing and Replacing Parts: Dell Dimension 4100 System Reference http://support.dell.com/support/edocs/systems/dzuul/rr.htm snap into the cutouts at each end of the module. Socketed Microprocessor NOTICE: Do not perform this procedure unless you are upgrading the installed socketed processor and heat sink assembly with an upgrade kit. Do not reuse the installed heat sink when replacing the socketed processor.
- Page 22 Removing and Replacing Parts: Dell Dimension 4100 System Reference http://support.dell.com/support/edocs/systems/dzuul/rr.htm 1 Retaining clip 2 Heat sink assembly 3 Socketed processor 4 ZIF socket connector CAUTION: The socketed processor and heat sink assembly can get extremely hot. To avoid burns, be sure the processor and assembly have had sufficient time to cool before you touch them.
- Page 23 Removing and Replacing Parts: Dell Dimension 4100 System Reference http://support.dell.com/support/edocs/systems/dzuul/rr.htm 1 Socketed processor 2 Socket release lever 3 ZIF socket connector To replace the socketed processor and heat sink assembly: Unpack the new socketed processor. NOTICE: You must position the socketed processor correctly in the ZIF socket connector to avoid permanent damage to the microprocessor and the computer when you turn on the computer.
- Page 24 Replace the computer cover, and reconnect the computer to an electrical outlet. Insert a diskette copy of the Dell Diagnostics into the diskette drive, and restart the computer. Run the System Set test group in the Dell Diagnostics. If the tests do not complete successfully, see "Contacting Dell" in the Solutions Guide for instructions on obtaining technical assistance.
- Page 25 Discard used batteries according to the manufacturer's instructions. To remove the 3-volt (V), CR2032 coin-cell battery: Dell recommends that you write down the system configuration information in the system setup program screens for future reference. Remove the computer cover.
- Page 26 Removing and Replacing Parts: Dell Dimension 4100 System Reference http://support.dell.com/support/edocs/systems/dzuul/rr.htm System Board 1 3.5-inch floppy drive 2 Secondary hard drive bracket 3 System board 4 I/O gasket To remove the system board: If possible, enter the system setup program and write down the system setup program screen information before you turn off the computer because you will have to restore the configuration information after the system board is replaced.
- Page 27 Removing and Replacing Parts: Dell Dimension 4100 System Reference http://support.dell.com/support/edocs/systems/dzuul/rr.htm 1 System-board mounting bracket 2 Mounting screw 27 of 29 6/12/2009 5:56 PM...
- Page 28 Removing and Replacing Parts: Dell Dimension 4100 System Reference http://support.dell.com/support/edocs/systems/dzuul/rr.htm Lift the system board from the three plastic standoffs that secure the system board to the computer. Carefully lift the system board out from the I/O gasket (see System Board), and remove the board from the computer.
- Page 29 Removing and Replacing Parts: Dell Dimension 4100 System Reference http://support.dell.com/support/edocs/systems/dzuul/rr.htm system board. When you reconnect the cables to a system board with built-in sound, connect the CD drive sound cable to the CD IN connector on the system board. The...
Need help?
Do you have a question about the Dimension 4100 and is the answer not in the manual?
Questions and answers