Advertisement
Available languages
Available languages
Quick Links
WARNING! IF THE INFORMATION IN THIS MANUAL IS NOT FOLLOWED EXACTLY, A FIRE
MAY RESULT CAUSING PROPERTY DAMAGE, PERSONAL INJURY OR LOSS OF LIFE.
Made in China
This product contains chemicals including di(2-ethylhexyl) phthalate (DEHP), which is known to the State
of California to cause cancer and birth defects or other reproductive harm. For more information go to:
www.P65Warnings.ca.gov
ANSI/UL 1278. MOVABLE AND WALL-OR CEILING HUNG ELECTRIC ROOM HEATERS
Homeowner's Manual
COMFORT GLOW PHONE NUMBER:
(800) 776-9425
http://www.worldmkting.com
World Marketing of America, Inc
PO Box 192
Mill Creek, PA 16652
CALIFORNIA RESIDENTS ONLY-WARNING:
DO NOT DISCARD THIS MANUAL
QEH1346
INFRARED
CABINET HEATER
•
Adjustable Thermostat
•
Three settings
• HIGH
• LOW
• ECO
Remote Control
4 Bulbs
Safety Overheat Device
Safety Tip-Over Device
Parental Lock
Advertisement

Subscribe to Our Youtube Channel
Related Manuals for Comfort Glow QEH1346


Summary of Contents for Comfort Glow QEH1346
- Page 1 CABINET HEATER Homeowner's Manual WARNING! IF THE INFORMATION IN THIS MANUAL IS NOT FOLLOWED EXACTLY, A FIRE MAY RESULT CAUSING PROPERTY DAMAGE, PERSONAL INJURY OR LOSS OF LIFE. • COMFORT GLOW PHONE NUMBER: Adjustable Thermostat • (800) 776-9425 Three settings http://www.worldmkting.com...
- Page 2 Page 2 IMPORTANT INSTRUCTIONS INTENDED USE This product is intended ONLY for indoor household or office use. It is NOT intended for industrial or commercial use. Do not use the product outdoors. When using electrical appliances, basic precautions should always be followed to reduce the risk of fire, electric shock, injury to persons, and hyperthermia, including the following: 1) Read all instructions before using this heater.
- Page 3 Page 3 ALWAYS OBSERVE THESE SAFETY PRECAUTIONS WHEN OPERATING YOUR ELECTRIC HEATER ALWAYS Read all instructions before operating. ALWAYS Locate your electric heater away from furniture or loose hanging drapes. ALWAYS Keep the rear grill away from walls or drapes so as not to block the air intake. (If applicable) ALWAYS Unplug electric heater when not in use.
- Page 4 Page 4 PRODUCT DIAGRAM FRONT REAR HEAT OUTPUT REMOTE CONTROL TEMP PANEL SENSOR AIR INTAKE FEET PADS OVERHEAT SAFETY FEATURE This heater is equipped with an automatic overheat protection device. If the heater grill is obstructed, or if the heater gets too hot for any reason, the automatic overheat device will turn the heater off. To reset the heater, simply turn off the power and unplug the heater, remove any obstructions, check the cord and the plug for damage.
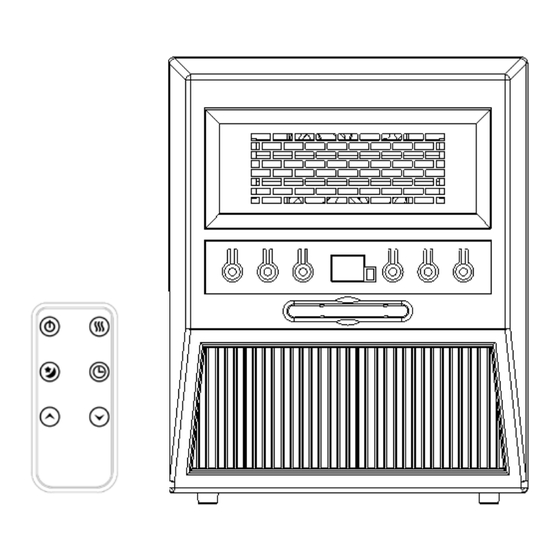
- Page 5 Page 5 CONTROL PANEL 1. ON/OFF button: Powers the display on and off. 2. Temp up button: To increase desired temperature. 3. Temp down button: To decrease desired temperature. 4. Digital display:Indicate set room temperature or time or heating mode or lock. 5.
- Page 6 1. Start and select working mode. Turn the heater on by pressing the ON/OFF button on the control panel or by pressing the Power button on the supplied remote control. Once the power is off, the heating element will stop working at first. Fan will CONTINUE working for 3 min to cool interior of heater.
- Page 7 4. Setting the POWER-ON-TIMER Function (Note: The Power-ON-Timer Function will allow for the heater to power ON after a certain set time and can only be set while the heater’s display is in the “Off” position. Turn the heater to the “OFF” position. Press the Timer button on the heater’s control panel or the remote.
- Page 8 Page 8 BASIC TROUBLESHOOTING If the heater will not operate, please check the following before seeking repair advice: 1. Check if the power cord is plugged into an electrical outlet, if not, plug in. 2. Check if the electricity to the main fuse is working. 3.
- Page 9 Page 9 LIMITED WARRANTY: A limited warranty is extended to the original purchaser of this heater and warrants against malfunction due to manufacturing defects for a period of (1) one year from the date of retail purchase. Please read and follow all details noted below.
- Page 10 ¡ADVERTENCIA! SI LA INFORMACIÓN EN ESTE MANUAL NO SE SIGUE EXACTAMENTE, PUEDE RESULTAR EN UN INCENDIO Y CAUSAR DAÑOS A LA PROPIEDAD, LESIONES PERSONALES O LA PÉRDIDA DE LA VIDA. COMFORT GLOW PHONE NUMBER: Safety Overheat Device • Termostato ajustable...
- Page 11 INSTRUCCIONES IMPORTANTES Página 2 USO PREVISTO Este producto está destinado ÚNICAMENTE para uso en interiores, domésticos o de oficina. NO está destinado a uso industrial o comercial. No utilice el producto al aire libre. Al usar aparatos eléctricos, siempre se deben seguir las precauciones básicas para reducir el riesgo de incendio, descargas eléctricas, lesiones a personase hipertermia, incluyendo lo siguiente: 1.
- Page 12 Página 3 SIEMPRE OBSERVE que ESTAS MEDIDAS DE SEGURIDAD AL OPERAR SU CALENTADORA ELECTRICA Siempre Lea todas las instrucciones antes de operar Siempre Sitúe su calentadora eléctrica lejos de muebles o afloje cortinas colgantes. Siempre Mantenga la parrilla trasera lejos de paredes o cortinas por no bloquear la toma de aire. (Si aplicable) Siempre Desenchufe calentadora eléctrica cuando no en uso Siempre...
- Page 13 DIAGRAMA DEL PRODUCTO Página 4 DELANTERA TRASERA SALIDA DE CALOR REMOTA PANEL DE SENSOR DE CONTROL TEMPERATUR TOMA DE AIRE ALMOHADILLAS PARA LOS PIES FUNCIÓN DE SEGURIDAD SOBRECALENTAMIENTO: Este calentador está equipado con un dispositivo automático de protección contra sobrecalentamiento. Si la rejilla del calentador está...
- Page 14 Página 5 PANEL DE CONTROL 1. Botón de aumento de temperatura: para aumentar la temperatura deseada. 2. Botón ON/OFF: Enciende y apaga la pantalla. 3. Botón para bajar temperatura: Para disminuir la temperatura deseada. 4. Botón Modo: Para seleccionar entre los modos Alto, Bajo y Eco. 5.
- Page 15 Página 6 INSTRUCCIONES DE OPERACIÓN 1. Inicie y seleccione el modo de trabajo. Encienda el calentador presionando el botón ON/OFF en el panel de control o presionando el botón Power en el control remoto suministrado. Seleccione un modo de calor. Presione el botón MODE para alternar entre los tres modos de calefacción.
- Page 16 3. Configuración de la función TEMPORIZADOR DE APAGADO Nota: La función de temporizador de apagado permitirá que el calentador se apague después de un cierto tiempo establecido y solo se puede configurar mientras la pantalla del calentador está en la posición "Encendido". Gire el calentador a la posición "Encendido".
- Page 17 Página 7 5. Configuración de la función TEMPORIZADOR DE ENCENDIDO Nota: La función de temporizador de encendido permitirá que el calentador se encienda después de un cierto tiempo establecido y solo se puede configurar mientras la pantalla del calentador está en la posición "Apagado". Gire el calentador a la posición "APAGADO".
- Page 18 Página 8 SOLUCIÓN DE PROBLEMAS BÁSICOS Si el calentador no funciona, verifique lo siguiente antes de buscar asesoramiento sobre reparación: 1. Compruebe si el cable de alimentación está enchufado a una toma de corriente; de lo contrario, conéctelo. 2. Verifique si la electricidad que llega al fusible principal está funcionando. 3.
- Page 19 Página 10 GARANTIA ELECTRICA PORTATIL de CALENTADORA La GARANTIA LIMITADA: Una garantía limitada es extendida al comprador original de esta calentadora y autorizaciones contra falla debido a defectos industriales por un período de (1) un año de la fecha de la compra de la venta al por menor. Lea por favor y siga todos los detalles PARA REGISTRAR LA GARANTÍA DE SU NUEVO PRODUCTO, VISITE: www.worldmkting.com notados abajo.
Need help?
Do you have a question about the QEH1346 and is the answer not in the manual?
Questions and answers