Advertisement
Quick Links
QUICK START GUIDE
Braukmann
L5 WiFi Water Leak
Shutoff Valve
APPLICATION
Thank you for purchasing Resideo's new L5 WiFi Water Leak
Shutoff Valve. When paired with Resideo's WiFi Leak
Detector(s), as soon as water is detected, the L5 could
automatically shut off the water to reduce your potential water
damage. This guide will take you through everything you need
M38768
to know to get started.
WHAT'S IN THE BOX?
E
D
A
B
Fig. 1. Included parts.
A. L5 Actuator: Connects to WiFi and controls the status of your valve.
B. Water Ball Valve: Lead-free ball valve. (Can be installed in any orientation.)
C. Power Supply: 10 ft power adapter used to power your L5 Actuator.
D. Metal Clip: Connects the actuator with the water ball valve.
E. Leak Detection Cable: This 5 ft add-on rope sensor can be connected to the L5
actuator and can be linked with multiple rope sensors to extend the detection
area.
33-00602—01
1
OVERVIEW
Auto Shutoff Through Water Leak & Freeze Sensor: When paired with Resideo's
WiFi Leak Detector(s), L5 WiFi Water Leak Shutoff Valve should be able to shut off
your water line automatically before the damage becomes catastrophic. One L5
WiFi Water Leak Shutoff Valve can be paired up to 30 Resideo WiFi Leak
Detectors.
Control the L5 WiFi Water Leak Shutoff Valve Remotely Via the App: Whether you
are on your way to the airport or at a remote location, control the valve's on or off
status wherever you are.
Manual Override to Turn On or Off Water: When needed, the valve can be turned
on or off by using the emergency handle on the L5 Actuator. We recommend this
handle be used only in emergencies. For normal manual override, short press the
power button to open or close the valve.
Easy Install: Standard ball valve makes it easy for a licensed plumber to install.
33-00602-03
MOBILE APP SETUP
1.
Download the Resideo app.
Search for Resideo in the App Store or Google Play. After downloading,
launch the app, register (if first time user), and then click the "+" icon at
C
the bottom of the home screen.
2.
Follow the app guidance, choose location and name your L5 valve.
a.
b.
3.
Power up your L5 device, follow the app instructions to connect your L5 to
WiFi. Make sure your local network is enabled if you are using iOS device.
4.
Configure your L5 valve.
a.
b.
INSTALLATION
1.
Locate and turn off the water main valve.
2.
Drain the remaining water in the pipe by opening several faucets in the
home.
M38762
3.
Install the L5 Water Valve on the main water line after your main water
shutoff valve and the pressure reducing valve (if applicable).
•
Make sure the ball valve is in the open position before installation to
ensure alignment with the actuator. See Fig. 3.
Manual Override:
•
Mechanical valve override (for emergency usage)
•
Note: Using the emergency handle won't trigger LED status change,
or valve status change in the app
Button:
•
Power button. It can also open/close valve, initiate Bluetooth signal
broadcasting and factory reset
•
Short press (1s): Power on/off & open/close valve
•
Long press (>5s): Initiate Bluetooth signal broadcasting
•
Extra long press (>15s): Factory reset
LED:
•
Connectivity LED and valve status LED
Power input port:
•
15 V⎓ power input
Auxiliary Input:
•
Water sensing rope/plug
Actuator Output:
•
Up to 6 Nm torque, <10 seconds runtime, 90 degree
Valve Interface:
M38761
•
ISO flange valve interface
Fig. 2. Components.
Provide a location for your L5 valve.
Name your L5 valve.
Set up water leak protection via wireless leak detectors.
Set up a maintenance cycle.
M38763
Fig. 3. Example of open ball valve.
2
4.
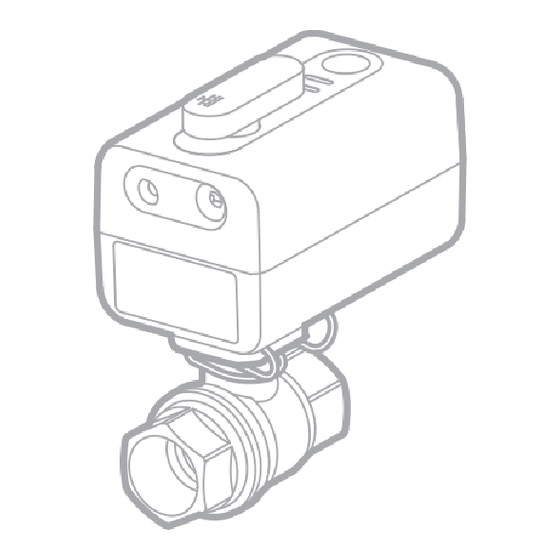
Install the actuator on the ball valve and connect both with the supplied
clip, as shown in the picture below.
Fig. 4. Connect ball valve to actuator.
•
Make sure the L5 Actuator is in the open position before installation
to ensure alignment with the ball valve. To manually adjust the
position: push the handle down and turn the handle 90 degrees to
reach either the open or close position. After powering up the device,
you may notice a slight position alignment forced by the motor.
CLOSED
Fig. 5.
5.
Carefully turn the water main valve back on and make sure there is no
leakage at the installation.
6.
Turn off the faucets and check the installation again to make sure there is
no leakage spotted.
7.
Connect the power adapter for the actuator. Wait for the actuator to con-
nect online. Make sure the power LED is showing a green color and the
WiFi LED is showing blue.
8.
Your installation is completed.
LED STATUS
Table 1. Valve LED Status Light.
Description
Valve Open
Solid Green
Valve Closed
Solid Red
Valve Opening
Blinking Green
Valve Closing
Blinking Red
M38787
Error State
Blinking Red and Green
Table 2. WiFi LED Status Light.
Description
WiFi not Connected
Off
In Pairing Mode
Blinking Blue
WiFi Connected, No Cloud
Solid Blue
Connection
M38786
WiFi Connected, Cloud Connection
Solid Blue, But Blinks Every 5s
Established
3
M38767
OPEN
M38759
LED Status
LED Status
Advertisement

Related Manuals for resideo Braukmann VWS01Y-1/2


Summary of Contents for resideo Braukmann VWS01Y-1/2
- Page 1 WiFi Leak Detector(s), L5 WiFi Water Leak Shutoff Valve should be able to shut off your water line automatically before the damage becomes catastrophic. One L5 WiFi Water Leak Shutoff Valve can be paired up to 30 Resideo WiFi Leak Detectors.
- Page 2 Only for domestic water usage and to be installed indoors. • Backflow preventers are required if used to control outside water supply L5 works with both Resideo's new L1 and the original WiFi Water Leak and Freeze Power Adapter lines.
Need help?
Do you have a question about the Braukmann VWS01Y-1/2 and is the answer not in the manual?
Questions and answers