Advertisement
Quick Links
E-mail: info@comhoma.com
www.comhoma.com
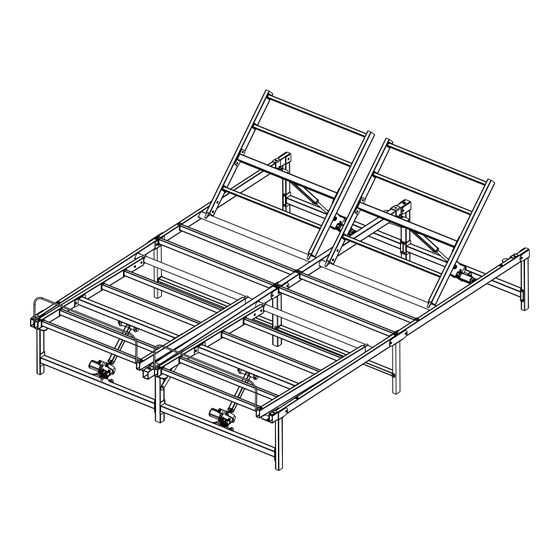
Assembly Instructions
READ THIS MANUAL
Do not use this product until you read and understand the
instructions in this manual.
KEEP THIS MANUAL FOR FUTURE REFERENCE.
This manual is intended for installation and use. The pattern
should be subject to the product you receive.
If you have any questions about the product, please
contact us through the contact information on the left.
We will strive to resolve your problem within 24 hours
on business days.
Installation QR
Version 24.06.03
Advertisement

Related Manuals for COMHOMA B102-K


Summary of Contents for COMHOMA B102-K
- Page 1 Version 24.06.03 If you have any questions about the product, please contact us through the contact information on the left. E-mail: info@comhoma.com We will strive to resolve your problem within 24 hours on business days. www.comhoma.com...
- Page 2 SAFETY INFORMATION IMPORTANT: Read advisory information in the owner’s manual carefully before using this product. The potential for electrical shock exists ifelectrical components are not installed oroperated properly. 1. Not intended for use by children. Please keep your children closely supervised. 2.
- Page 3 The installation position of the main accessories ◆ Please check and ensure all the things are in the package. Please contact us if something is not included. We will reply within 24 hours and try our best to solve it. ��...
- Page 4 Check Various Accessories Details of accessories Please check and ensure all the things are in the package. Please contact us for help if something is not included. ��x1 ��x1 ��x1 ��x4 Side Leg Frame L Center Leg Frame Side Leg Frame R Adjustment Rod ��x4 ��x4...
- Page 5 ��x2 ��x2 ��x2 ��x1 Lift Column (Foot) Lift Column (Head) Bed Rail Control Unit Box ��x1 ��x2 ��x2 Power Adapter Power Cable Power Cable Parts Name ➊ Wrench ➋ 52PCS M8x16 Screw ➌ 28PCS M6x16 Screw ➍ 8PCS Socket Tube ➎...
- Page 6 Installation Please keep the original box in case you might need to return or replace the product. ➋ M8x16 ➋ ➋ ➋ ➋ ➋ ➋ ➋ ➋ ➋ �� ➋ �� �� �...
- Page 7 ➌ M6x16 �� ➌ �� �� ➌ �� �� ➌ �� �� ➌ �� �� The direction indicated by the arrow ″↓″ is the head of the bed frame. �...
- Page 8 ➌ ➋ M6x16 M8x16 ➋ �� ➋ �� �� ➋ ➌ �� ➌ �� �� ➌ ➌ ➋ ➌ �� ➋ ➌ �� ➋ ➌ �� �� ➌ �� ➌ �� �...
- Page 9 ➋ M8x16 �� �� ➋ �� 100% �� ➋ �� �...
- Page 10 ➋ M8x16 �� �� �� 100% �� �� �� ➋ �...
- Page 11 ➋ M8x16 100% HEAD �� I I I �� ➋ ➋ ➋ ➋ ➋ Check to ensure that the installation direction of �� is correct as shown. �...
- Page 12 �� �� 100% Socket ➏ �� Extension �� Socket ➍ Tube * See P12 for installation skills. ➎ Dowel Pin Notice the installation direction of the lift columns (Foot & Head) as shown. �...
- Page 13 How to assemble the lift columns to the bed frame? �� / �� ➏ �. Insert ➏ on �� and ��. �. Attach �� / �� to ➏. ➍ ➎ �. Secure �� / �� with ➏. �. Lock ➍ with ➎. !...
- Page 14 * See P14 for installation skills. �� �� �� �� ➐ �� �� * Use the cable ties to fix the control unit boxes and organize the cables. ➐ ➐ �...
- Page 15 How to connect the cables? Long Short ��x2 ��x2 �� �� * Connect the short cable �� from �� to �� (Head port) Connect the long cable �� from �� to �� (Foot port) Connect the power adpter �� to the power port of ��. �...
- Page 16 �� �� TIPS:Please RESET this product before first use. Long press the RST button to reset. Check and confirm that all cables are properly connected and all screws are fully tightened. �...
- Page 17 FUNCTIONS 1.Cabling Diagram * TIPS:Regularly check your bed cables to be sure they are not damaged, loose or frayed, or twisted around power cables or other objects. �...
- Page 18 2. Hand Control Raise head Raise foot section section Lower head Lower foot section section Raise bed Lower bed (Raise foot and head (Lower foot and section simultaneously) head section simultaneously) Reset 2.1. Double-click the button as needed to continue running, and press any button to stop.
- Page 19 MAINTENANCE Electronics Check all controls to make sure all functions work properly. • Power cable • Power adapter cable • Check to make sure all cables are routed and connected properly so they do not interfere with any moving parts. •...
- Page 20 Dear Customer, Thank you for choosing us. ComHoma is always here waiting for you at home as its name suggests. We specialize in researching, developing, selling household and office products. Our goal is to provide you with high-quality products that inspire happiness, ensuring trust and satisfaction.
Need help?
Do you have a question about the B102-K and is the answer not in the manual?
Questions and answers