DeLonghi NESPRESSO Lattissima Pro Manual
- User manual (50 pages) ,
- Manual (46 pages) ,
- Service manual (56 pages)
Advertisement
- 1 Generality
-
2
Use
- 2.1 Preparing to use the machine for the first time or after a long period of non-use
- 2.2 Coffee preparation
- 2.3 Assembling/disassembling the Rapid Cappuccino System
- 2.4 Preparing Cappuccino and Latte Macchiato
- 2.5 Daily cleaning
- 2.6 Hand washing of Rapid Cappuccino System
- 2.7 Volume factory settings
- 2.8 Descaling
- 2.9 Setting water hardness
- 3 Maintenance
- 4 Repair
- 5 Safety test
- 6 Wiring diagrams
- 7 General safety notes
- 8 Documents / Resources
Generality
Technical data

| Lattissima Pro | ||
| Main voltages range | 220-240 V - 50/60 Hz - 1400 W | |
| Coffee extraction | Consumption: (40 ml) | 6 Wh |
| Milk frothing (100 ml) | 9 Wh | |
| Pump pressure | 19 bar | |
| Water tank | 1,3 lt | |
| Milk tank | 0,5 lt | |
| Capsule container capacity | 13 - 16 | |
| Operating temperature | from 5°C to 45°C | |
| Storage temperature | from -25 to 60° | |
| Safety temperature | Coffee thermoblock: 192°C Steam container: 318°C | |
| Coffee temperature at outlet | 86 +\- 3°C | |
| Cable length | 80 cm | |
| Preheating time | approx 40 sec. | |
| Noise | 55 dB (A) | |
| Weight | 6 kg | |
| Dimensions (LxHxP) | 194x274x332 mm | |
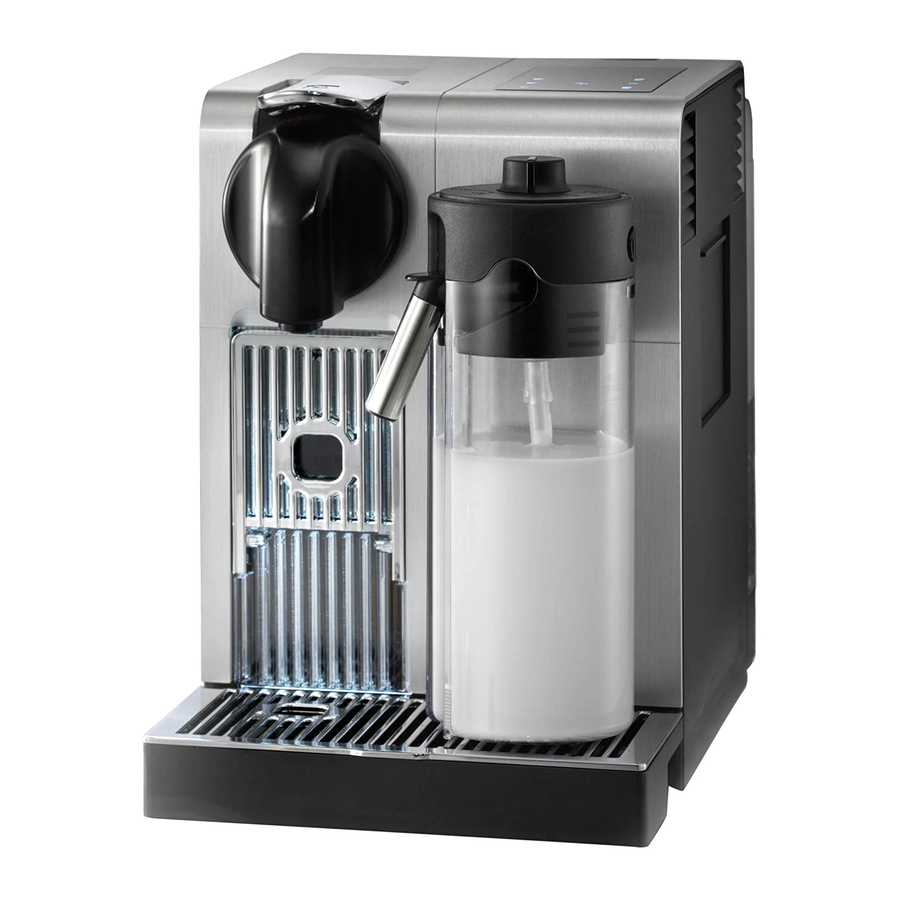
Main components

- Main switch (ON/OFF)
- Lever
- Water tank (1.3 litres)
- Coffee outlet
- Capsule container
- Drip tray
- Drip grid
- Hot water outlet storage area
- Telescopic hot water outlet
- Steam connector hatch
- Steam connector
"Rapid Cappuccino System" (R.C.S.)
- Milk container (0.5 litres)
- Milk container lid
- R.C.S. release button
- Milk froth adjustment knob
- R.C.S. connector
- Milk outlet tube
- Milk tube
- Function removal knob
- Min. froth function
- Max. froth function
- "CLEAN" rinse function
Display

- Lungo
- Espresso
- Ristretto
- Hot water
- Latte Macchiato (or scrolling up when Menu is activated)
- Cappuccino (or option selection when Menu is activated)
- Warm milk (or scrolling down when Menu is activated)
- Navigation Menu
Description of navigation Menu
To access the Menu, press  ;
;
To exit from the Menu, scroll to the "Exit" function and select or press for at least 2 minutes;
To scroll the Menu, use buttons  ;
;
To exit from the option and return to the Menu, scroll to the "Exit" function and select or quickly press ;
To confirm the option, press  ;
;
For an automatic machine check, press for at least 3 seconds or select "Maintenance" from the Menu;
To skip a warning message, press  ;
;
Navigation Menu

- Select this option to set your preferred language.
- Select this option once the descaling alert appears on the display.
- Select this option to set the water hardness level at your location. Use the water hardness sticker provided to determine it. This will optimize the descaling frequency.
- Select this option to set the time after which the machine switches off automatically (possible options are 9 minutes, 30 minutes, 2 hours, 8 hours).
- Select this option to reset all parameters of the machine to factory settings.
- Select this option to empty the water inside the machine in case you need to send it for repair or before a long period of non use. You will not be able to use the machine for 10 minutes after this process.
- Select this option to program the volume of beverages. In addition, you can reset all the beverages volumes to factory settings.
- Select this option to get access of all machines settings at a glance.
- Select this option to check the overall status of machin. The consumption statistics are available either from the first use (absolute) or since the last descaling (relative). The serial number of machine is provided as well.
- Select this option to get the best advice on how to get optimal milk froth quality day after day. In addition, you can select the level of guidance that you would like the machine displays for your daily use. The internet link is provided to know more about this feature.
- Exit from the menu list and return to machine ready mode.
Water circuit
Water circuit coffee

- Water tank
- Water tank valve
- Flowmeter
- Pump
- Thermoblock
- Coffee outlet
- Drip tray
Steam milk circuit

- Water tank
- Water tank valve
- Flowmeter
- Pump
- Thermoblock
- Steam pipe
- Solenoid valve
- Condensation chamber
- Drip tray
Hydraulic scheme

Identification plates
The identification labels for product recognition are affixed under the machine (see figure).

The serial number consists of 19 numbers that identify the machine:
- Year of manufacture (last two digits of the year)
- Progressive number of the day of the year (e.g. 15 April: 31+28+31+15=105)
- Type of machine
- Place and line of production
- Progressive number
- in this example, 182 are:
1= Partner
8= Mains voltage
2= Type of mains plug - Colour
- Check Sum
Use
Preparing to use the machine for the first time or after a long period of non-use


Read the general safety notes to prevent risk of electric shock and fire.
- Remove the water tank, drip tray and capsule container. Adjust the length of the cord using the special compartment located under the machine.

- Position the machine in an upright position and plug it in.

- The water tank can be removed by holding the lid.
![]()
- Rinse the water tank before filling it with drinking water up to maximum level.
![]()
- Insert the hot water spout and turn on the machine.


 See section Display for information about the display's buttons.
- Set the preferred language. Press
![]() to continue.
to continue.
![]()
- Select the language by scrolling the options using
![]() arrow. Press
arrow. Press ![]() to continue; the machine heats up
to continue; the machine heats up
![]()
- Rinsing: place a container under the coffee outlet and press the Lungo button. Repeat three times.

- Rinsing: Move the container under the hot water outlet and press the Hot water button. Repeat three times. Once finished, remove it and store it back in the storage area located on the machine right side. Close the steam connector door.

 to continue.
 arrow. Press


The machines are fully tested after production. Some traces of coffee may be found in the rinse water.
- Disassemble the "Rapid Cappuccino System" (R.C.S.) and clean all components in the upper level of your dishwasher. In case a dishwasher is not available, refer to section Hand washing of "Rapid Cappuccino System" (R.C.S.).


Refer to section Assembling/Disassembling of Rapid Cappuccino System.
Coffee preparation
 Read the general safety notes.
- Lift the lever up fully and insert a NESPRESSO capsule. Close the lever and position a cup on the turning support under the coffee outlet.

- To use the glass for Latte Macchiato, close the turning support.

- Press the Ristretto (25 ml/0.75 oz), Espresso (40 ml/1.35 oz) or the Lungo (110 ml/3.7 oz) button. The flow will stop automatically. To halt it manually or to fill the cup fully, press the same button again.
![]()
- Remove the cup. Lift and close the lever to eject the used capsule into the container.


Assembling/disassembling the Rapid Cappuccino System
Read the general safety notes.
- Remove the milk container lid and detach the tube.

- Remove the milk froth adjustment button by turning it until the
![]() symbol and pulling it upwards.
symbol and pulling it upwards.

- Remove the Rapid Cappuccino System tube, releasing it from
![]() to
to ![]() and pulling it.
and pulling it.

- Pull the milk outlet tube and remove it.


 symbol and pulling it upwards.
 to
to  and pulling it.

Preparing Cappuccino and Latte Macchiato
Read the general safety notes.
For a perfect milk froth, use skimmed or semi skimmed milk at a temperature of about 4°C.
- Fill the container with the desired amount of milk. Do not exceed the MAX level.


When the milk container is empty, before filling it, rinse it thoroughly with drinking water, together with the milk tube.
- Close the milk container. Open the steam connector hatch by sliding it to the right. Connect the Rapid Cappuccino System to the appliance.

- Lift the lever up fully and insert a NESPRESSO capsule.

- Lower the lever, place the Cappuccino cup or Latte Macchiato glass under the coffee outlet and adjust the milk outlet tube.

- Turn the knob and position it on the amount of milk froth desired.

- Press the Cappuccino or Latte Macchiato button. Preparation begins after a few seconds (first the milk and then the coffee) and stops automatically.

- Once preparation is complete, lift and lower the lever to eject the capsule into the used capsule container.

- Rinse the milk system after each use.
![]()
- Place a container under the milk outlet tube.

- Rotate the milk regulator knob in "CLEAN" position. Hot water combined with steam flows through the milk spout, starting the milk system rinsing process.
The rinsing process last approximately 15 sec. and stops automatically.

- Once rinsing has finished, turn the milk froth regulator knob back in milk position.

- Disconnect the R.C.S. from the machine and put it back in the refrigerator.
Close the machine's steam connector hatch.

- Every two days, disassemble the Rapid Cappuccino System.


Refer to section Assembling/Disassembling of Rapid Cappuccino System.
The same milk should not be kept for more than 2 days. In the case the milk container is kept outside refrigerator for longer than 2 hours, disassemble the R.C.S. and clean all components.
- Clean all components in the upper level of your dishwasher. In case a dishwasher is not available, refer to section Hand washing of "Rapid Cappuccino System" (R.C.S.).


do not use the milk container for any other liquid other than milk or potable water. Do not use raw milk and be sure not to use milk after its expiration date indicated on its packaging.
Daily cleaning
Wait for the machine to cool down and Read the general safety notes.
Do not use abrasive detergents or solvents. Clean the surface of the machine regularly using a damp cloth and mild detergent. Do not put any machine components in dishwasher, except the Rapid Cappuccino System components
- Remove the drip tray, the capsule container and the water tank. Empty, rinse it before filling with potable water up to maximum level.

- Lift and close the lever to eject the used capsule into the container. Place a container under coffee outlet and press the Lungo button to rinse. Clean the coffee outlet with a clean damp cloth.

- Rinse the hot water spout and clean it with a clean damp cloth.


Hand washing of Rapid Cappuccino System
Wait for the machine to cool down and Read the general safety notes.
INFORMATION: when a dishwasher is not available, the R.C.S. components can be washed manually. In that case, the procedure must be performed daily for a maximum efficiency.
- Disassemble the "Rapid Cappuccino System" (R.C.S.).
Refer to section Assembling/Disassembling of Rapid Cappuccino System.
- Rinse away carefully any milk residue under tap water.
- Soak all components in warm water (approximately 40°C) together with soap detergent for at least 30 minutes.
- Rinse with potable water and dry them with a clean damp cloth.
Volume factory settings
 | Lungo 110 ml |
 | Espresso 40 ml |
 | Ristretto 25 ml |
 | Latte Macchiato - Milk*:150 ml Coffee: 40 ml |
 | Cappuccino - Milk*: 50 ml Coffee: 40 ml |
 | Warm milk 120 ml |
 | Hot water 125 ml |
NOTE: *the milk volume depends on the kind of milk that is used, its temperature and the position of the milk regulator knob.
Water volume can be programmed from 25 to 400 ml.
Milk volume can be programmed from 30 to 200 ml.
Coffee volume can be progammed from 25 to 200 ml.
Descaling
Read the general safety notes.
- Lift and close the lever to eject any capsule in the used capsule container.

- Enter the Menu, browse the options and select DESCALING. You will be guided throughout the whole process. Follow machine display instructions.
![]()
- Empty the drip tray and the used capsule container. Fill the water tank with 100 ml of NESPRESSO descaling solution and 500 ml of water.

- Open the compartment and remove the hot water spout. Connect the tube to the machine's steam connector.

- Place a container with a minimum capacity of 1 litre under the coffee outlet and hot water spout (as shown in the figure).

- Press
![]() to confirm. The descaling solution passes alternately through the coffee outlet, the hot water spout and the drip tray.
to confirm. The descaling solution passes alternately through the coffee outlet, the hot water spout and the drip tray.
![]()
- Empty the used capsule container and the drip tray and rinse under tap water.

- Fill the tank with fresh drinking water up to the MAX level. Repeat step 5 again.
![]()
- Press
![]() to confirm again. The rinse cycle continues through the coffee outlet, the hot water spout and the drip tray until the water tank is empty.
to confirm again. The rinse cycle continues through the coffee outlet, the hot water spout and the drip tray until the water tank is empty.
![]()
- Once the rinsing system has finished, the machine turns itself off.

- Remove, rince and place the hot water spout in the relative compartment. Empty the drip tray and the used capsule container. Fill the tank with fresh drinking water.


 to confirm. The descaling solution passes alternately through the coffee outlet, the hot water spout and the drip tray.


 to confirm again. The rinse cycle continues through the coffee outlet, the hot water spout and the drip tray until the water tank is empty.


Setting water hardness
The descaling cycle is requested after a set period of operation, which depends on the water hardness. The appliance is factory set for a hardness value of 5. The appliance can also be programmed according to the actual hardness of the mains water in the various regions, thereby running the descaling process less frequently.

- Enter the Menu, browse the options and select WATER HARDNESS. You will be guided throughout the whole process. Follow machine display instructions.
![]()
- Unpack the "TOTAL HARDNESS TEST" strip. Fully immerse the strip in a glass of water for approximately one second.

- Remove the strip from the water and shake it gently. After about a minute, 1, 2, 3, 4 or 5 red squares form, according to the water hardness.

- Set the value accordingly.
![]()


Maintenance
Checking pressure and leaks
Read the general safety notes.
- Open the machine as indicated in section General disassembly, on the 2-3-4 points.

- Insert the blue "false capsule" instrument (2) supplied into the extraction chamber (1). Make sure it is well positioned and secured.

- Insert the blue pressure gauge locking support (4) and push it downwards. Once the support is fully inserted, lower the lever.

- Connect the pressure gauge to the "false capsule" instrument as shown in the figure.
Place an empty container under the pressure gauge drain tube (3).

- Open the pressure gauge valve (5).

- Turn on the machine.

- Press the Espresso button and allow water to fill the container for 10 seconds.
![]()
- After 10 seconds, close the valve (5).
The pressure starts to rise and stabilise at 17.5 +/- 1.5 bar (pump pressure control).


Keep an eye on the pressure gauge. If the pressure exceeds 23 bar, the machine must be turned off and the pressure lowered using the pressure valve.
Check for leaks in all hydraulic connections.
The pump should not run for more than 50 seconds without water flow.
If there is any micro leakage, the indicator of the manometer will drop down very fast under 10 bars.
After checking, the residual pressure must be released by opening the pressure valve!
Measuring coffee temperature
- Switch the machine ON.

- Place a measuring cup under the coffee outlet. Lift up the lever and insert the capsule.

- Close the lever and press the Espresso button. Wait until there is at least 20 ml of coffee in the measuring cup.

- Measure the temperature of the flow at a distance of about 2-10 mm from the outlet (as shown in the figure).


Coffee temperature should be 86°C ± 3°C (187°F ± 5.4°F)
Measuring milk temperature
- Switch the machine ON.

- Fill the milk container with about 200 ml of low fat milk at a temperature of 5°C ± 2°C. Place the lid and connect the milk container to the machine with the foam knob regulator in MAX position. Place a 250 ml graduated glass beaker under the milk outlet tube.

- Use a digital thermometer equipped with a "K" type thermocouple sensor and place it under the milk outlet tube.

- Press either Cappuccino or Latte Macchiato button and deliver around 100 ml of milk during the brewing measure the milk temperature.


Check the following aspects:
Brewing aspect: without splashing
Temperature milk: 57 - 67°C
Foam quantity: on the transparent container the final result must be 1/2 milk and 1/2 foam.
Repair
General disassembly
- Press the coffee outlet lid on both sides and remove it, turning it downward. Using a screwdriver, detach the points shown and remove the coffee outlet.

- Remove the water tank and the drip tray together with the grounds container

- Unscrew and remove the four screws shown and remove the rear panel.

- Lift the lid slightly, carefully move the side panels toward the rear of the machine and remove them.

- Disconnect the connector from the main board.


Do this with caution.
- Disconnect the two earthing Faston connectors shown.

- Using a screwdriver, detach the two lateral points shown in the figure.

- Lift the lid slightly and carefully move it towards the front of the machine and remove it.


Removing the LED board
Follow the steps described in section General disassembly.
- Disconnect the connectors shown by the board and, using a screwdriver, detach the micro support and remove it.


Do this with caution.
- Detach the two points shown and remove the LED lens. Remove the board.


Removing the display board
Follow the steps described in section General disassembly.
- Disconnect the connector shown by the board and, using a screwdriver, detach the micro support and remove it.


Do this with caution.
- Remove the shown nuts and remove the case holding the board.


Removing the extraction unit
Follow the steps described in section General disassembly.
- Lift the lever up fully. Remove the coffee outlet tube holder clip.

- Unscrew and remove the four screws and remove the whole extraction unit.


Removing the panel
Follow the steps described in sections General disassembly. and Removing the extraction unit.
- Disconnect all wiring and, using a screwdriver to remove the boards from their slot.


Removing the Thermoblock/Steamer unit/Pump
Follow the steps described in sections General disassembly, Removing the extraction unit and Removing the panel.
- Using a screwdriver, detach the points shown and remove the rear casing.

- Remove the tube as shown in the figure.

- Remove the tube shown and remove the tank.

- Turn the machine, unscrew the two screws shown and remove the lid. Using a screwdriver, detach the rear protection at the points shown and remove it.

- Unscrew the shown screw. Using a screwdriver, detach the shown Thermoblock/Steamer unit/Pump support unit point.

- Turn and remove the milk connector nozzle with its relative tube. Remove the entire unit.

- Remove the Thermoblock/Steamer unit/Pump lid clamping screw. Detach the three points shown and remove the lid.

- Remove the shown tube-holder clips, detach relative tubes and disconnect the Faston connector.

- Disconnect the shown Faston connector from the solenoid valves and remove the pump.

- Remove the two shown tube-holder clips, remove the tube and detach the water outlet unit.

- Remove the shown tube-holder clip and remove the tube from the Thermoblock. Detach the solenoid valve lid and remove it.

- Remove the solenoid valves after having disconnected the shown Faston connectors.

- Remove the two clips shown and the associated tubes.

- Remove the clip shown and the associated tube. Remove the Thermoblock/Steamer unit.

- Remove the two thermoblock and steamer joining brackets and disconnect the faston connectors shown. Remove the two thermal fuses by unscrewing the two bracket fixing screws shown.

- Unscrew and remove the two nuts and remove the two TCO, disconnecting their faston connectors.

- Remove the two insulation tubes from the two steamer connector clips. Detach the two clips from the steamer.

- Remove the sensors by removing the brackets shown.


ONLY FOR US/CA MODELS
The fiberglass sleeve must be leaned to the boiler junction (see position A in the picture).
After a repair, in order to bring the machine back under compliance of the UL1082 regulation, it is necessary to apply a plastic strip as shown in position B in the picture.

Safety test
After any repair and /or replacement of any part, in any case whenever the coffee maker is split apart, once re-assembled, is necessary to perform the safety test, according to the EN/IEC 60335-1.
The test to perform, using a proper test device (e.g. model TG uni 1 produced by GMW Gossen METRAWATT, or an equivalent one), are the following.
- Protective Earth continuity test( ohmic resistance must be less than 0,1 Ohm);
- Protective insulation test (supply 500 DC, ohmic resistance must be over than 2MOhm).
Procedure:
The machine has not external metal parts, you will have to connect the probe of the test device through the dedicated hole on the bottom of the machine (see picture) in order to assure a contact with the lower metallic part of the steamer. Then plug the machine on the dedicated socket on the test device.

Wiring diagrams


LEGEND
EV1 COFFEE VALVE
EV2 STEAM VALVE
STEAM HE: STEAM HEATING EL
COFFEE HE: HEATING EL. COFFEE
P: PUMP
THS: PUMP MOTOPROTECTOR
M: STEAM - IFD MICROSWITCH
General safety notes
To prevent possible injury and damage, read and follow the instructions completely.
To prevent the risk of a fatal electric shock and fire
- Connect the appliance to suitable earthed mains connections only. Make sure the power supply is the same as that indicated on the rating plate. The use of incorrect connections will void the warranty.
- In the event that an extension cord is required, use only one earthed cord with a conductor cross section of at least 1.5 mm2.
- Do not move the cord close to sharp edges. Block it or allow it to hang. Keep the cord away from sources of heat and humidity.
- Do not operate the appliance if the cord is damaged.
- To prevent hazardous damage, do not place the appliance on or next to hot surfaces such as radiators, electric or gas stoves, naked flames or similar. Place it only on stable and level surfaces. The surface must be resistant to heat and liquids, such as water, coffee, descaling products or similar.
- To prevent damage, unplug the appliance holding the plug. Never pull the cord. Never touch the plug with wet hands.
To prevent damage during operation
- The appliance has been designed for domestic use only. If it is not used in accordance with the instructions, the manufacturer assumes no responsibility and is authorised not to apply the warranty conditions.
- Keep the appliance out of reach of children.
- To prevent scalding, keep the lever closed during operation and do not put your finger under the coffee or milk outlet.
- To prevent injury, do not put your fingers inside the tank or the capsule container.
- Do not use damaged or deformed capsules. The water may flow around a capsule that is not properly perforated and cause damage to the appliance.
![]()
To prevent burns, always use the milk container (Rapid Cappuccino System) supplied and make sure it is inserted correctly.- If dispensing of more than 150 ml of coffee is programmed, allow the appliance to cool down for at least 5 minutes to prevent overheating.
- Descale the machine when the descaling light comes on.
Read the precautions for use shown on the pack carefully: descaling solution can be harmful. Avoid contact with eyes, skin or other surfaces. To prevent damage to the machine, do not use products other than those provided.

Troubleshooting enclosed to the Service manual (see the enclosed to the Service manual)
Documents / ResourcesDownload manual
Here you can download full pdf version of manual, it may contain additional safety instructions, warranty information, FCC rules, etc.
Advertisement


Need help?
Do you have a question about the NESPRESSO Lattissima Pro and is the answer not in the manual?
Questions and answers