DeLonghi Nespresso Gran Lattissima - Espresso Machine with Milk Frother Manual
- User manual (58 pages) ,
- User manual (58 pages) ,
- User manual (69 pages)
Advertisement
- 1 Specifications
- 2 Packaging Content
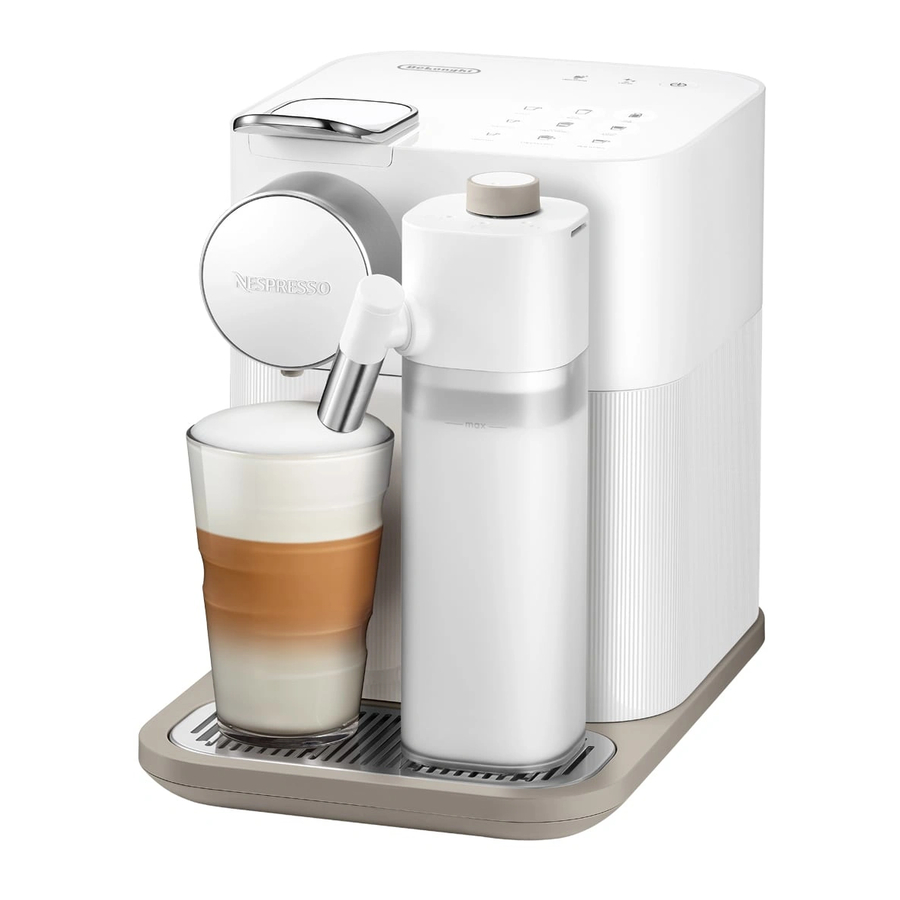
- 3 Gran Lattissima
- 4 Overview
- 5 Milk recipes
- 6 First use or after a long period of non-use
- 7 Coffee preparation
- 8 Assembling / Disassembling of Rapid Cappuccino System
- 9 Preparing Milk-based beverages
- 10 Daily care
- 11 Hand washing of Rapid Cappuccino System
- 12 Programming quantity
- 13 Restoring quantity to factory settings
- 14 Factory settings
- 15 Descaling
- 16 Water hardness setting
- 17 Emptying the system before a period of non-use, for frost protection or before a repair
- 18 Changing Automatic power off
- 19 Troubleshooting
- 20 Contact Nespresso
- 21 Important Safeguards
- 22 Documents / Resources
Specifications

Get online assistance by visiting: www.nespresso.com/machine-assistance
Packaging Content

- Coffee Machine
- User Manual
- Capsules set
- "Welcome to Nespresso folder"
- 1x Water Hardness Test Stick, in the User Manual
Gran Lattissima
THE CLASSIC ESPRESSO EXPERIENCE
With the Nespresso Original system, you're invited to enjoy the essence of an espresso, with or without milk. Inspired by the Italian coffee tradition, it's a timeless experience at the touch of a button. The Nespresso Original machines and capsules offer an array of aromas to fit all coffee tastes. Espresso or lungo, black or in a recipe, always layered with a soft crema or an indulgent foam. This is only made possible thanks to the 19-bar pressure in every machine. It extracts the optimal flavours from each capsule, to reveal them in your cup. Nespresso Original, classic in its own way.

When you see this sign, please refer to the safety precautions to avoid possible harm and damage.
 INFORMATION: when you see this sign, please take note of the advice for the correct and safe usage of your coffee machine.
Overview


Overview of machine
- Machine without Rapid Cappuccino System
- Machine with Rapid Cappuccino System (for milk-based recipes)
- Water tank (1.0 L/ 34fl oz)
- Lever
- Capsule compartment
- Steam connector door
- Steam connector
- Coffee outlet
- Drop collector housing
- Used capsule container
- Drip tray
- Small cup grid
- Small cup support
- Cup grid
- Drop collector
- Descaling pipe storage
- Descaling pipe
- Descaling pipe cover
Alerts
- "DESCALING"
![]() : descaling alert refer to section "Descaling"
: descaling alert refer to section "Descaling" - "CLEAN"
![]() : milk system cleaning alert refer to section "Preparing Milk-based beverages"
: milk system cleaning alert refer to section "Preparing Milk-based beverages"
 : milk system cleaning alert refer to section "Preparing Milk-based beverages"
Tactile beverage buttons
- On-Standby button (standby mode consumption: 0.22 Wh)
- Lungo 110 ml/ 3.71 fl oz
- Espresso 40 ml/ 1.35 fl oz
- Ristretto 25 ml/ 0.84 fl oz
- Cappuccino
- Flat white
- Caffè latte
- Hot milk
- Latte macchiato
- Hot foam
Rapid Cappuccino System (R.C.S.)
- Milk froth regulator knob
- Milk container lid
- R.C.S. housing
- R.C.S. connector
- Lid detach buttons
- Milk spout connector
- Milk spout
- Milk aspiration tube
- Milk container
- "Remove knob" position
- "Froth" position
- "Clean" position
Milk recipes
CAPPUCCINO
A cappuccino is characterized by a milky coffee topped with a thick layer of milk froth on the top.
Recommended proportions:

Quantity: 100ml/ 3.38 fl oz milk foam
40ml/ 1.35 fl oz coffee
Choice of coffee:
Ristretto or espresso capsule
Choice of cup:
A cappuccino cup
Tips:
The milk froth quality and aspect could be affected by the type, freshness and temperature of the milk (ideally stored at 4°C/ 39.2°F)
CAFFE LATTE
A caffè latte is a coffee to which a generous amount of hot slightly frothed milk is added.
Recommended proportions:

Quantity: 110ml/ 3.71 fl oz coffee
140 ml/ 4.73 fl oz milk
60ml/ 2.02 fl oz milk foam
Choice of coffee:
Lungo capsule
Choice of cup:
A recipe glass
Tips:
The thin layer of milk froth on top should be about 1cm. It is usually brownish, tented with coffee colour.
LATTE MACCHIATO
A latte macchiato is a recipe in which coffee is poured into a glass full of frothed milk. It is characterised by the 3 "milk-coffee-froth" layers.
Recommended proportions:

Quantity: 140 ml/ 4.73 fl oz milk
140 ml/ 4.73 fl oz milk foam
40ml/ 1.35 fl oz coffee
Choice of coffee:
Ristretto or espresso capsule
Choice of cup:
A recipe glass
Tips:
The milk froth quality and aspect could be affected by the type, freshness and temperature of the milk (ideally stored at 4°C/ 39.2°F)
FLAT WHITE
A flat white is an espresso coffee to which a generous amount of hot slightly frothed milk is added.
Recommended proportions:

Quantity: 40ml/ 1.35 fl oz coffee
100ml/ 3.38 fl oz milk
Choice of coffee:
Espresso or ristretto capsule
Choice of cup:
A cappuccino cup
Tips:
The layer of milk froth on top should be thin of about half centimeter. It is usually brownish, tainted with coffee colour and more liquid and shiny with very tiny bubbles.
First use or after a long period of non-use
First read the safety precautions to avoid risks of fatal electrical shock and fire.
NOTE: to turn off the machine, press the On-Standby button (standby mode consumption: 0.22 Wh).
Please ensure ground continuity when plugging the machine in the power outlet
- When unpacking the machine, remove the plastic film, water tank, drip tray, and capsule container. Adjust the cable length and store the excess in the cable guide under the machine.
![]()
- Rinse the water tank before filling with fresh potable water up to maximum level. Plug machine into mains.
![]()
- Switch the machine on by pressing the on-standby button- Blinking lights (coffee buttons): heating-up (25 s)- Steady lights: ready
![]()
- Rinsing: place a container (not provided with the machine) under coffee outlet and press the
![]() (lungo) button. Repeat three times.
(lungo) button. Repeat three times.
![]()
![information]() Machines are fully tested after being produced. Some traces of coffee powder could be found in rinsing water.
Machines are fully tested after being produced. Some traces of coffee powder could be found in rinsing water. - Disassemble the Rapid Cappuccino System and clean all 6 components in the upper level of your dishwasher. In case a dishwater is not available, refer to the "Hand Washing of Rapid Cappuccino System" section. After reassemble and re-attach the R.C.S. to the machine, use the
![]() (Clean) function before preparing milk beverage.
(Clean) function before preparing milk beverage.
![]()
![information]() Refer to section "Assembling / Disassembling of Rapid Cappuccino System" section
Refer to section "Assembling / Disassembling of Rapid Cappuccino System" section


Coffee preparation
NOTE: during heat up, you can press any coffee buttons. The coffee will then flow automatically when the machine is ready.
- Lift the lever completely and insert the capsule.
![]()
- Close the lever and place a cup under the coffee outlet.
![]()
- Press the
![]() (ristretto),
(ristretto), ![]() (espresso) or
(espresso) or ![]() (lungo) button. Preparation will stop automatically.
(lungo) button. Preparation will stop automatically.
![]()
- To stop the coffee flow or top up your coffee, press again. Lift and close the lever to eject the capsule into the used capsule container.
![]()


Assembling / Disassembling of Rapid Cappuccino System
- Remove the milk container by pressing the buttons on the sides of the milk jug. Unplug the aspiration tube.
![]()
![]()
When assembling the R.C.S., insert well the aspiration tube until it cannot move. - Position the milk spout vertically to disassemble and to reassemble.
![]()
- Turn the Rapid Cappuccino System connector until the "unlock
![]() " symbol and extract it.
" symbol and extract it.
![]()
- Turn the milk froth regulator knob on the "remove knob" position and extract it.
![]()


Preparing Milk-based beverages
For a perfect milk froth, use skimmed or semi-skimmed, cow milk at refrigerator temperature (about 4°C/ 39.2°F). The milk system has not been designed to work with vegetable milk.
The milk should not be kept for more than 2 days in the refrigerator. In the case the milk container is kept outside refrigerator for longer than 30 min, disassemble the Rapid Cappuccino System and clean all components (refer to dishwashing or hand washing recommendations).
- Fill the milk container.
Do not overfill the milk container: respect the MAX level.
Close the milk container.
![]()
- Lift the lever completely and insert the capsule. Close the lever. Close the milk container and connect the Rapid Cappuccino System to the machine. Machine heats up for approximately 15 seconds (blinking lights).
![]()
- Place a Cappuccino cup or a Latte Macchiato glass under the coffee outlet and adjust milk spout position by rotating it up to the centre of the cup. Turn the milk froth regulator knob to the
![]() (Froth) position.
(Froth) position.
![]()
- Press the button relative to the desired milk-based beverage. See the information on each milk-based beverage.
![]()
![information]() The preparation starts after a few seconds and will stop automatically.
The preparation starts after a few seconds and will stop automatically. - At the end of the preparation, the
![]() (Clean) alert illuminates orange to indicate it is necessary to clean the Rapid Cappuccino System.
(Clean) alert illuminates orange to indicate it is necessary to clean the Rapid Cappuccino System.
![]()
- Place a container under the coffee outlet. Turn the milk froth regulator knob to
![]() (Clean) position. Milk system rinsing process starts and hot water combined with steam flows through the milk spout. The rinsing process stops automatically.
(Clean) position. Milk system rinsing process starts and hot water combined with steam flows through the milk spout. The rinsing process stops automatically.
![]()
- Lift and close the lever to eject the capsule into the used capsule container.
![]()
- When the rinsing process is finished, the clean alert is resumed. Put back the knob to
![]() (froth) position.
(froth) position.
![]()
-
- If there is milk in the Rapid Cappuccino System:
Disconnect the Rapid Cappuccino System from machine and place it immediately in the refrigerator. Close the machine steam connector door.
![]()
![information]() NOTE: refer to section "Assembling/Disassembling of Rapid Cappuccino system".
NOTE: refer to section "Assembling/Disassembling of Rapid Cappuccino system". - If there is no more milk in the R.C.S or not enough for the following recipes or 2 days have passed, before refilling it, disassemble the R.C.S and clean all the components in the upper side of your dishwasher. In case a dishwasher is not available, refer to section "Hand washing of Rapid Cappuccino System".
![]()
- If there is milk in the Rapid Cappuccino System:


Daily care
Do not use any strong cleaning agent or solvent cleaner. Use a clean damp cloth and mild cleaning agent to clean the surface of the machine. Do not put any machine components in dishwasher, except the Rapid Cappuccino System components, drip tray and used capsule container. Always check if the component is dishwasher safe before putting it in dishwasher.
- Lift and close the lever to eject the capsule into the used capsule container. Remove drip tray, used capsule container, cup support and drop collector. Empty and rinse. Remove water tank. Empty, rinse it before filling with fresh potable water.

- Place a container under coffee outlet and press the
![]() (lungo) button to rinse.
(lungo) button to rinse.
![]()
- Clean the coffee outlet and machine surface with a clean damp cloth.
![]()


Hand washing of Rapid Cappuccino System
Dishwashing is recommended: when a dishwasher is not available, the Rapid Cappuccino System components can be washed by hand. The procedure must be performed after each use.
- Disassemble the Rapid Cappuccino System. Refer to section "Assembling / Disassembling of Rapid Cappuccino System". Rinse away carefully any milk residue with hot potable water (40°C / 104°F). Remove all the visible dirt with a sponge.
![]()
- Soak all components in with hot potable water (40°C / 104°F) together with mild / soft detergent for at least 30 minutes and rinse thoroughly with hot potable water (40°C / 104°F). Do not use odor mild / soft detergents.
![]()
- Clean the interior of the milk tank, the milk spout connector, and the milk knob with mild/ soft detergent and rinse with hot potable water (40°C/104°F).
* Ensure air inlet is clean. This will ensure perfect foam.
Do not use abrasive material that might damage the surface of the equipment.
![]()
- Dry all parts with a fresh and clean towel, cloth or paper and reassemble. If the Rapid Cappuccino System was very dirty, proceed with two rinsing of the system by turning the milk froth regulator knob to
![]() (Clean) position. Milk system rinsing process starts and hot water combined with steam flows through the milk spout.
(Clean) position. Milk system rinsing process starts and hot water combined with steam flows through the milk spout.
![]()


If you see that after the cleaning process the Rapid Cappuccino System is still dirty, we recommend to purchase a new one addressing to a Service Centre.
Programming quantity
NOTE: please refer to factory settings section for min / max programmable quantities.
- Touch and hold the button relative to the drink you want to programme for at least 3 s. to enter the programming mode. Brewing starts and button blinks fast.
![]()
- Release button when desired volume is reached. If the recipe includes other ingredients, press again the button and keep pressed until the desired volume is reached, then release. When the last ingredient is delivered (see charts), button blinks 3 times to confirm the new drink volume. Drink volume is now stored for the next preparations.
![]()


Restoring quantity to factory settings
- Switch the machine ON.
![]()
![information]() NOTE: remove milk jug.
NOTE: remove milk jug. - Press simultaneously
![]() (hot milk) and
(hot milk) and ![]() (flat white) buttons for 3 seconds to enter Menu mode: descaling and clean alert start blinking.
(flat white) buttons for 3 seconds to enter Menu mode: descaling and clean alert start blinking.
![]()
![information]() NOTE: the Menu mode exits automatically after 30 seconds if no actions are performed or can be exited manually by pressing simultaneously
NOTE: the Menu mode exits automatically after 30 seconds if no actions are performed or can be exited manually by pressing simultaneously ![]() (hot milk) and
(hot milk) and ![]() (flat white) buttons for 3 seconds.
(flat white) buttons for 3 seconds. - Press
![]() (flat white): it blinks.
(flat white): it blinks.
![]()
- Press
![]() (flat white) button: it blinks 3 times rapidly to confirm restoring the quantity to factory setting
(flat white) button: it blinks 3 times rapidly to confirm restoring the quantity to factory setting


Factory settings
If coffee volumes higher than 150 ml/ 3.55 fl oz are programmed: let the machine cool down for 5 minutes before making the next coffee. Risk of overheating!
Recipes charts (default quantities)
| Recipe | Ingredients and Machine Sequence | Quantity (ml/ fl oz) |
 | Coffee | 110/ 3.71 |
 | Coffee | 40/ 1.35 |
 | Coffee | 25/ 0.85 |
 | Milk | 200/ 6.76 |
 |
| 140/ 4.73 140/ 4.73 40/ 1.35 |
 |
| 100/ 3.71 40/ 1.35 |
 | Milk | 150/ 5.07 |
 |
| 110/ 3.71 140/ 4.73 60/ 2.02 |
 |
| 40/ 1.35 100/ 3.71 |
NOTE: the milk froth volume depends on the kind of milk that is used and its temperature.
NOTE: we recommend you to keep factory settings for ![]() (espresso) and
(espresso) and ![]() (lungo) to ensure the best in cup results for each of our coffee varieties.
(lungo) to ensure the best in cup results for each of our coffee varieties.
Coffee volume can be programmed from 25 to 150 ml (from 0.85 to 5.07 fl.oz).
Max milk (+ milk foam, if required by the recipe) volume programmable: 400ml (13.52 fl oz).
Descaling
Refer to safety precautions.
NOTE: descaling time is approximately 20 minutes.
NOTE: to ensure the proper functioning of your machine over its lifetime and that your coffee experience is as perfect as the first day, follow the below process.
- Descale the machine when
![]() (descaling) alert shines orange in ready mode.
(descaling) alert shines orange in ready mode.
![]()
- Lift and close the lever to eject any capsules in the used capsule container.
![]()
- Empty the drip tray, used capsule container, cup support, and drop collector. Fill the water tank with 100 ml (3.71 fl oz) of Nespresso descaling agent. Add water up to the Descaling mark on the water tank (~500 ml/ 16.9 fl oz).
![]()
- Take the descaling pipe situated at the back of the machine and plug the descaling pipe into steam connector of machine. Replace water tank.
![]()
- The machine enters the descaling mode. The descaling alert blinks orange during the entire descaling process. The flat white button illuminates white.
![]()
- Place a container with a minimum 1 litre/34fl oz capacity under both the coffee outlet and under the descaling pipe nozzle.
![]()
- Press the
![]() (flat white) button. Descaling product flows alternately through the coffee outlet, descaling pipe and drip tray. When the descaling cycle is finished (water tank runs empty), the flat white button shines.
(flat white) button. Descaling product flows alternately through the coffee outlet, descaling pipe and drip tray. When the descaling cycle is finished (water tank runs empty), the flat white button shines.
![]()
- Empty the drip tray, used capsule container, cup support, and drop collector, rinse out and fill the water tank with fresh potable water up to level MAX.
![]()
- Press the
![]() (flat white) button again. The rinsing cycle continues through the coffee outlet, descaling pipe and drip tray until the water tank turns empty.
(flat white) button again. The rinsing cycle continues through the coffee outlet, descaling pipe and drip tray until the water tank turns empty.
![]()
- Once the rinsing process is finished, the machine switches off. Remove descaling pipe with handles or knobs, and store it. Empty drip tray and used capsules container. Fill water tank with fresh potable water.
![]()
![]()
![burn hazard]() Descaling pipe becomes hot during operation. Use handles or knobs to avoid possible burns.
Descaling pipe becomes hot during operation. Use handles or knobs to avoid possible burns. - Clean the machine using a damp cloth. You have now finished descaling the machine.
![]()


Water hardness setting
- Take water hardness sticker placed in the user manual and place it under water for 1 second.
![]()
- The number of red squares indicates the water hardness level.
![]()
- Switch the machine ON.
![]()
![information]() NOTE: remove milk jug.
NOTE: remove milk jug. - Press simultaneously
![]() (hot milk) and
(hot milk) and ![]() (flat white) buttons for 3 seconds to enter Menu mode: descaling and clean alert start blinking.
(flat white) buttons for 3 seconds to enter Menu mode: descaling and clean alert start blinking.
![]()
![information]() NOTE: the Menu mode exits automatically after 30 seconds if no actions are performed. It can be exit manually by pressing simultaneously
NOTE: the Menu mode exits automatically after 30 seconds if no actions are performed. It can be exit manually by pressing simultaneously ![]() (hot milk) and
(hot milk) and ![]() (flat white) buttons for 3 seconds.
(flat white) buttons for 3 seconds. - Press
![]() (cappuccino) button.
(cappuccino) button.
![]()
- The number of red squares indicates which button you should press (see table below). Now, within 30 seconds, you can set the desired value by pressing the corresponding button. They blink 3 times rapidly to confirm new value. The menu exits automatically and machine returns to ready mode.


Emptying the system before a period of non-use, for frost protection or before a repair
- Switch the machine ON.
![]()
![information]() NOTE: remove milk jug.
NOTE: remove milk jug. - Remove the water tank. Lift and close the lever to eject any remaining capsule. Place a container under the coffee outlet.
![]()
- Press simultaneously
![]() (hot milk) and
(hot milk) and ![]() (flat white) buttons for 3 seconds to enter Menu mode: descaling and clean alert start blinking.
(flat white) buttons for 3 seconds to enter Menu mode: descaling and clean alert start blinking.
![]()
![information]() NOTE: the Menu mode exits automatically after 30 seconds if no actions are performed. It can be exit manually by pressing simultaneously
NOTE: the Menu mode exits automatically after 30 seconds if no actions are performed. It can be exit manually by pressing simultaneously ![]() (hot milk) and
(hot milk) and ![]() (flat white) buttons for 3 seconds.
(flat white) buttons for 3 seconds. - Press
![]() (espresso).
(espresso).
![]()
- Press the
![]() (espresso) button for confirmation. Once pressed, the emptying starts. All buttons blink alternately: emptying mode in progress. When the process is finished, the machine switches off automatically.
(espresso) button for confirmation. Once pressed, the emptying starts. All buttons blink alternately: emptying mode in progress. When the process is finished, the machine switches off automatically.


NOTE: appliance will be blocked for approximately 10 minutes after emptying.
Storing the machine in a cold environment, might cause damages by frost to the water circuit and create leakages.
Changing Automatic power off
This machine is equipped with an excellent energy consumption profile as well as an automatic power off function (0W) which enables you to save energy. Based on factory settings, the appliance switches off after 9 minutes after last use.
- Switch the machine ON.
![]()
![information]() NOTE: remove milk jug.
NOTE: remove milk jug. - Press simultaneously
![]() (hot milk) and
(hot milk) and ![]() (flat white) buttons for 3 seconds to enter Menu mode: descaling and clean alert start blinking.
(flat white) buttons for 3 seconds to enter Menu mode: descaling and clean alert start blinking.
![]()
![information]() NOTE: the Menu mode exits automatically after 30 seconds if no actions are performed. It can be exit manually by pressing simultaneously
NOTE: the Menu mode exits automatically after 30 seconds if no actions are performed. It can be exit manually by pressing simultaneously ![]() (hot milk) and
(hot milk) and ![]() (flat white) buttons for 3 seconds.
(flat white) buttons for 3 seconds. - Press
![]() (ristretto).
(ristretto).
![]()
- Now, within 30 seconds, you can change the automatic power off and set the desired value by pressing the corresponding button. See table for more details.
They blink 3 times rapidly to confirm new value. The menu exists automatically and machine returns to ready mode.
![]()


Troubleshooting
| No light indicator. |
|
| No coffee, no water. |
|
| Coffee comes out very slowly. |
|
| No coffee, just water runs out (despite inserted capsule). |
|
| Coffee is not hot enough. |
|
| Capsule area is leaking (water in capsule container). |
|
| Irregular blinking. |
|
| All buttons blink simultaneously for 10 seconds and then machine switches off automatically. |
|
| All coffee buttons blinking fast 3 times and then machine goes back in ready mode. |
|
| Descaling and clean alerts blink. |
|
| Descaling alert shines orange. |
|
| Descaling alert blinks orange and flat white button steady light. |
|
| Clean alert shines orange. |
|
| All coffee buttons and all milk recipe buttons flash alternatively. |
|
| Lever cannot be closed completely. |
|
| Quality of Milk froth is not up to standard. |
|
| I cannot enter Menu mode. |
|
| Milk jug cannot be dismantled. |
|
| Turn off the machine. |
|
| Milk jug is inserted but the milk buttons are not enabled |
|
 position. Turn it to
  (Froth) position.
Contact Nespresso
As we may not have foreseen all uses of your appliance, should you need any additional information, in case of problems or simply to seek advice, call Nespresso or your Nespresso authorized representative.
Contact details for your nearest Nespresso or your Nespresso authorized representative can be found in the «Welcome to Nespresso» folder in your machine box or at nespresso.com
Important Safeguards
 Is used to alert you to potential personal injury hazards. Obey all safety messages that follow this symbol to avoid possible injury or death.

Indicates a hazardous situation which, if not avoided, could result in death or serious injury.
Indicates a hazardous situation which, if not avoided, could result in minor or moderate injury.
Is used to provide important information not related to personal injury. When you see this sign, please take note of the advice for the correct and safe use of your appliance.
Read all instructions
- Do not touch surfaces that become hot during and after operation and descaling: telescopic hot water spout and milk spout. Use handles or knobs.
- Always attach plug to appliance first, then plug cord into wall. To disconnect, turn any control to «off», then remove plug from wall outlet. Do not unplug by pulling the cord.
- Do not let cord hang over edge of table or counter, or touch hot surfaces or sharp edges. Do not allow cord to dangle (risk of accident).
- Do not operate any appliance with a damaged cord, or plug in after the appliance malfunctions, or has been damaged in any manner. Unplug cord immediately. Contact the Assistance Service of the Nespresso Club.
- Do not place on or near a hot gas or electric burner, in a heated oven, radiators or range top. Always place on a stable and even surface. The surface must be resistant to heat and fluids, like water, coffee, descaler, or similar.
- Do not use outdoors.
- Unplug from outlet when not in use and before cleaning. Allow to cool before adding or removing parts, and before cleaning the appliance. Do not use any strong cleaning agent or solvent cleaner. Use a damp cloth and mild cleaning agent to clean the surface of the machine.
- To protect against fire, electric shock and injury to persons, do not immerse cord, plugs or appliance in water or other liquid. Never touch cord with wet hands. Do not overfill water tank. Never put the appliance or part of it into dishwasher, except the Rapid Cappuccino System (R.C.S.).
![]()
To reduce the risk of fire or electric shock, do not remove the cover. No user serviceable parts inside. Do not attempt to repair or modify the machine, doing so will void the warranty. Repair should be done by authorized service personnel only.- Do not put fingers under coffee outlet or milk spout due to risk of scalding. The milk spout gets hot. Risk of burns. Use with care.
- This is a household appliance only. It is not intended to be used in: staff kitchen areas in shops, offices and other working environments; farm houses; by clients in hotels, motels and other residential type environments; bed and breakfast type environments.
- Never allow the appliance to be used by children.
- Do not lift lever during brewing cycles. Scalding may occur.
- Coffee-maker shall not be placed in a cabinet when in use.
![burn hazard]() Heating element surface is subject to residual heat after use.
Heating element surface is subject to residual heat after use.- Never use an already used, damaged or deformed capsule. Water could flow around the capsule when not perforated by the blades and damage appliance.
- The use of accessory attachments not recommended by the appliance manufacturer may result in fire, electric shock or injury to persons. Always use the milk container (Rapid Cappuccino System) supplied with the machine. Risk of scalding if milk container is not inserted properly.
- If coffee volumes are programmed higher than 150 ml (5 oz): let the machine cool down for 5 minutes before making the next coffee to prevent the risk of overheating!
- Descale the machine when you see the descaling alert. Read the safety precautions on the descaling package carefully. The descaling solution can be harmful. Avoid contact with eyes, skin and surfaces. We recommend the Nespresso descaling kit available from the Nespresso Club as it is specifically adapted to your machine. Do not use other products (such as vinegar) that would affect the taste of the coffee. For any additional questions you may have regarding descaling, please contact your Nespresso Club.
- This machine works with Nespresso capsules available exclusively through the Nespresso Club.
- This appliance is designed for Nespresso coffee capsules available exclusively through the Nespresso Club or your Nespresso authorized representative.
Short cord Instructions
This appliance has a polarized plug (one blade is wider than the other). To reduce the risk of electric shock, this plug is intended to fit into a polarized outlet only one way. If the plug does not fit fully into the outlet, reverse the plug. If it still does not fit, contact a qualified electrician. Do not defeat the safety purpose of the polarized plug.
- A short power-supply cord or detachable power-supply cord is to be provided to reduce risks resulting from becoming entangled in or tripping over a longer cord.
- Longer detachable power-supply cords or extension cords are available and may be used if care is exercised in their use.
- If an extension cord is used:
- The marked electrical rating of the detachable power supply cord or extension cord should be at least as great as the electrical rating of the appliance;
- If the appliance is provided with 3-wire, grounding type cord, the extension should be a GROUNDING TYPE 3 - WIRE CORD.
- The longer cord should be arranged so that it will not drape over the counter top or table top where it can be pulled on by children or tripped over.
SAVE THESE INSTRUCTIONS
Pass them on to any subsequent user.

Documents / Resources
References
Download manual
Here you can download full pdf version of manual, it may contain additional safety instructions, warranty information, FCC rules, etc.
Download DeLonghi Nespresso Gran Lattissima - Espresso Machine with Milk Frother Manual
Advertisement


Need help?
Do you have a question about the Nespresso Gran Lattissima and is the answer not in the manual?
Questions and answers