Bosch MultiTalent 3 / 3Plus Manual
- Original instructions manual (244 pages) ,
- Instruction manual (180 pages) ,
- Information for use (168 pages)
Advertisement
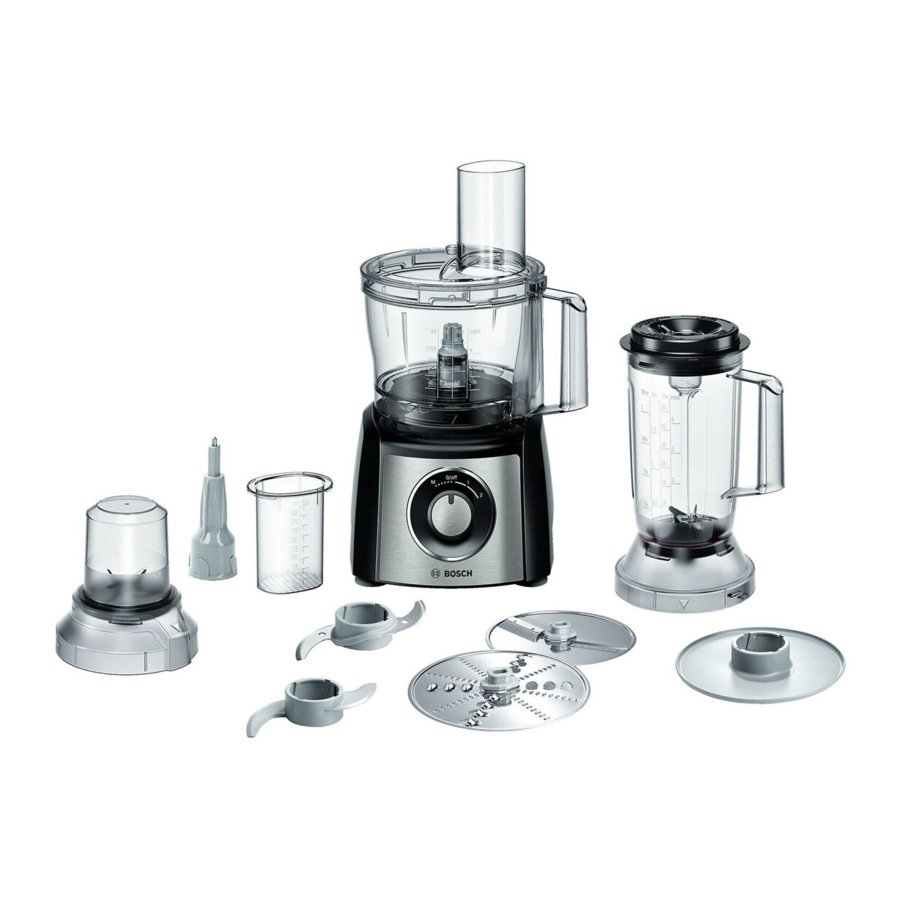
Familiarising yourself with your appliance
Overview
After unpacking all parts, check for any damage in transit and completeness of the delivery.
→ Fig. 


1 Depending on the model
Note: If an accessory is not included in the scope of supply, it can be ordered from customer service.
Symbols
| Symbol | Description |
 | Do not reach into the filling shaft. |
 | Position marking on main unit |
 | Fit the attachment  and screw on securely and screw on securely  |
 | Maximum quantity |
 | Blade insert with grinding blade (black seal) |
 | Blade insert with blender and chopping blade (red seal) |
 | Lock or unlock blade insert. |
Rotary switch
| Symbol | Description |
 | Switch off the appliance. |
 | Instantaneous switching (pulse function): Highest speed as long as the rotary switch is held in this position. Note: Use instantaneous switching to blend ingredients only briefly or in intervals. |
 | Process ingredients at low speed. |
 | Process ingredients at maximum speed. |
Overview of tools
| Designation | Use |
 Universal blade | for cutting up, chopping, stirring and kneading food. |
 Dough tool | for kneading dough and mixing in ingredients that are not to be cut up (e.g. raisins, chocolate chips). |
 Whipping / beating disc | for beating egg whites or cream and making mayonnaise. Recommendation for a perfect result:
|
Cutting discs
| Designation | Use |
 Reversible cutting disc, thick/ thin | Cutting food into thick or thin slices, e.g. fruit and vegetables.
Note: Not suitable for processing hard cheese, bread, rolls or chocolate. |
 Reversible shredding disc, coarse/fine | Shredding food coarsely or finely, e.g. fruit, vegetables or cheese as Gouda or Edam.
Note: Not suitable for processing nuts or hard cheese, e.g. Parmesan. |
 Reversible slicing / shredding disc | Grating raw potatoes or cutting into slices. Note: Not suitable for processing very fibrous foods, e.g. leek or mango. |
Safety systems
Start lock-out
Start lock-out prevents your appliance from being switched on accidentally.
You can switch on and operate the appliance once the bowl has been correctly positioned and the lid is locked.
Note: If the bowl becomes detached or the lid is opened, the appliance automatically switches off.
Overload protection
The overload protection system prevents the motor and other components from being damaged through being overloaded.
Operation
Setting up appliance
- Place the appliance on a stable, level, clean and flat work surface.
- Adjust the power cable to the required length.
- To shorten the cord, push it into thecord storage compartment.
- To lengthen the cord again, pull it out of the cord storage compartment.
- Do not insert the mains plug.
Attaching the bowl
Tip: Always hold the bowl straight when placing it on the main unit.
→ Fig. 


Processing ingredients with tools
Notes
- Always fit tools before adding ingredients.
- Fit the tool with the correct side facing up and push down to the lower stop of the tool holder.
Requirement: The bowl with the tool holder is placed on the main unit.
→ Fig. 


Processing ingredients with the cutting discs
Note: Place the required cutting disc on the tool holder with the desired side facing up.
Requirement: The bowl with the tool holder is placed on the main unit.
→ Fig. 


Accessories
Overview

→ Fig. 
 | Funnel |
 | Lid with filling opening |
 | Blender jug |
 | Blade insert with blender/chopping blade, red seal and  symbol symbol |
 | Blade insert with grinding blade, black seal and  symbol symbol |
 | Chopper jug |
Checking the seal
- Check whether the seal is inserted correctly.
→ Fig.![]()


Note: If the seal is damaged or not correctly positioned, liquid may run out.
Blender attachment
Use the blade insert with the red seal and symbol ![]() , for:
, for:
- blending liquid or semi-solid food,
- mixing light doughs,
- puréeing food,
- crushing ice cubes.
Restrictions on processing:
- Do not use it to chop ingredients like almonds, onions, parsley and meat.
- Use sufficient liquid when mixing solid food.
- Mix powdered food with sufficient liquid before blending, or dissolve it entirely in liquid. Examples of powdered food include icing sugar, cocoa powder, roasted soybeans, flour, protein powder.
- The blender cannot produce spreads, such as peanut butter, coconut butter or nut spreads.
Preparing and fitting the blender attachment
→ Fig. 


Processing quantities
| Liquids | max. 1000 ml |
| Hot or frothing food | max. 400 ml |
Processing ingredients with the blender attachment
Note: Hold the lid in position during processing.
→ Fig. 


Precleaning the blender attachment
- Follow the cleaning instructions in the table.
→ Fig.![]()


Chopper
Use the blade insert with the red seal and symbol ![]() , for cutting up and chopping meat, hard cheese, onions, herbs, garlic, fruit and vegetables.
, for cutting up and chopping meat, hard cheese, onions, herbs, garlic, fruit and vegetables.
Use the blade insert with the black seal and symbol ![]() , for grinding up small quantities of:
, for grinding up small quantities of:
- spices, e.g. pepper, cumin, juniper, cinnamon, dried star anise, saffron,
- cereals, e.g. wheat, millet, linseed,
- coffee,
- sugar.
Restrictions on processing:
- Do not grind very dry or solid food larger than coffee beans. Unsuitable food includes e.g. nutmeg and dry ginger.
- Only process roasted coffee or espresso beans.
Preparing and fitting the chopper
→ Fig. 


Processing ingredients with the chopper
→ Fig. 

Overview of cleaning
Clean all parts immediately after use so that residues do not dry on.
- Do not use cleaning agents containing alcohol or spirits.
- Do not use sharp, pointed or metal objects.
- Do not use abrasive cloths or cleaning agents.
Tips
- When processing food such as carrots, plastic parts may become discoloured. Remove discolouration with a soft cloth and a few drops of cooking oil.
- Do not wedge plastic parts in the dishwasher as they could become permanently deformed.
Note: Do not leave blade inserts or the universal blade in water.

Clean the individual parts as indicated in the table.
→ Fig. 
Note: After cleaning, leave all parts to dry or dry with a soft cloth.
Application examples
Always observe the maximum quantities and processing times in the tables. When processing the maximum quantity, use the maximum recommended time.
→ Fig.  -
- 


| Sample recipes | |
 | Honey and hazelnut spread (CNCM12C)
Processing:
|
 | Hot chocolate
Processing:
|
 | Heavy fruit cake
Processing:
Process no more than 1.5 times this quantity each time. Possibly extend the processing time. |
 for 5 seconds.
 Troubleshooting
The appliance is not working
Appliance has no power supply
- Check whether your appliance is supplied with power.
Appliance does not start processing or switches off during processing.
Processing quantity is too big or processing time was too long.
- Set the rotary switch to
![]() .
. - Reduce the quantity of ingredients.
- Allow the appliance to cool down to deactivate the overload protection device.
 .
. Appliance or accessory is blocked.
- Set the rotary switch to
![]() .
. - Remove the blockage.
Jug, lid or accessory is not fitted properly.
- Fit the jug, lid or accessory properly.
Safety
- Read this instruction manual carefully.
- Please note the additional instructions when using supplied or optionally available accessories.
- Keep the instruction manual and the product information safe for future reference or for the next owner.
- Do not connect the appliance if it has been damaged in transit.
Only use this appliance:
- with genuine parts and accessories.
- for mixing, kneading, beating, cutting and shredding food.
- for additional applications described in the instructions for accessories that are optional or come with the appliance.
- under supervision.
- for normal processing quantities and for normal processing times for domestic use.
- in private households and in enclosed spaces in a domestic environment at room temperature.
- up to an altitude of max. 2000 m above sea level.
Disconnect the appliance from the power supply when:
- not using the appliance.
- the appliance is unattended.
- assembling the appliance.
- taking the appliance apart.
- cleaning the appliance.
- approaching rotating parts.
- changing tools.
- confronted with a fault.
This appliance can be used by persons with reduced physical, sensory or mental capabilities or a lack of experience and/or knowledge if they have been given supervision or instruction concerning use of the appliance in a safe way and if they understand the hazards involved.
Do not let children play with the appliance.
Cleaning and user maintenance must not be performed by children.
The appliance must not be used by children. Keep children away from the appliance and power cord.
- Never operate a damaged appliance.
- Never operate an appliance with a cracked or fractured surface.
- Never pull on the power cord to unplug the appliance. Always unplug the appliance at the mains.
- If the appliance or the power cord is damaged, immediately unplug the power cord or switch off the fuse in the fuse box.
- Call customer services. → Customer Service
- Connect and operate the appliance only in accordance with the specifications on the rating plate.
- Repairs to the appliance should only be carried out by trained specialist staff.
- Only use genuine spare parts when repairing the appliance.
- If the power cord of this appliance is damaged, it must be replaced by the manufacturer, the manufacturer's Customer Service or a similarly qualified person in order to prevent any risk.
- Never immerse the appliance or the power cord in water or clean in the dishwasher.
- Only use the appliance in enclosed spaces.
- Never expose the appliance to intense heat or humidity.
- Do not use steam- or high-pressure cleaners to clean the appliance.
- Do not use the appliance with damp hands.
- Never let the power cord come into contact with hot appliance parts or heat sources.
- Never let the power cord come into contact with sharp points or edges.
- Never kink, crush or modify the power cord.
- Never place the appliance on or near hot surfaces.
- Be careful if hot liquid is poured into the food processor as it can be ejected out of the container due to a sudden steaming.
- Add a maximum of 400 ml of hot or frothing food to the blender jug.
- Be careful when processing hot food.
- Do not lean over the appliance.
- Do not process food that is hotter than 70°C in the blender jug.
- Keep hands, hair, clothing and utensils away from rotating parts.
- Only attach and remove tools and accessories once the drive has stopped and you have unplugged the appliance.
- Before changing tools or cleaning the appliance, switch off and disconnect it from the mains.
- Parts which show cracks or other damage or do not fit correctly must be replaced with genuine spare parts.
- Only use the accessories once fully assembled.
- Never place fingers in the attached blender jug.
- Never operate the blender attachment without fitting the lid.
- Only grip the universal knife by the plastic part.
- Never touch the edges of the blades with bare hands.
- Care should be taken when handling sharp blades, emptying the container and during cleaning.
- Only grip the cutting discs by the plastic ring in the centre.
- Do not reach into the filling shaft.
- Only use the pusher to push down ingredients.
- Keep packaging material away from children.
- Do not let children play with packaging material.
- Keep small parts away from children.
- Do not let children play with small parts.
- Follow the cleaning instructions.
- Clean surfaces which come in contact with food before each use.
Avoiding material damage
- Never operate the appliance longer than necessary.
- Do not operate the appliance at no-load.
- Never use genuine parts and accessories for other appliances.
- Do not exceed maximum processing quantities.
- Before use, check the bowl and accessory for foreign objects and remove.
- Never expose the blender jug to temperatures above 80°C.
- Do not insert objects into the container or filling shaft, e.g. wooden spoons, knives.
- Do not process food that contains hard components, e.g. bones, gristle or stones.
- Do not process frozen ingredients in the blender attachment, except for ice cubes.
- Do not apply great force with the pusher.
Customer Service
Detailed information on the warranty period and terms of warranty in your country is available from our after-sales service, your retailer or on our website.
The contact details for Customer Service can be found in the enclosed Customer Service directory or on our website.
Register your new device on MyBosch now and get free benefits:
bosch-home.com/welcome
Documents / Resources
References
Download manual
Here you can download full pdf version of manual, it may contain additional safety instructions, warranty information, FCC rules, etc.
Advertisement


Need help?
Do you have a question about the MultiTalent 3 and is the answer not in the manual?
Questions and answers