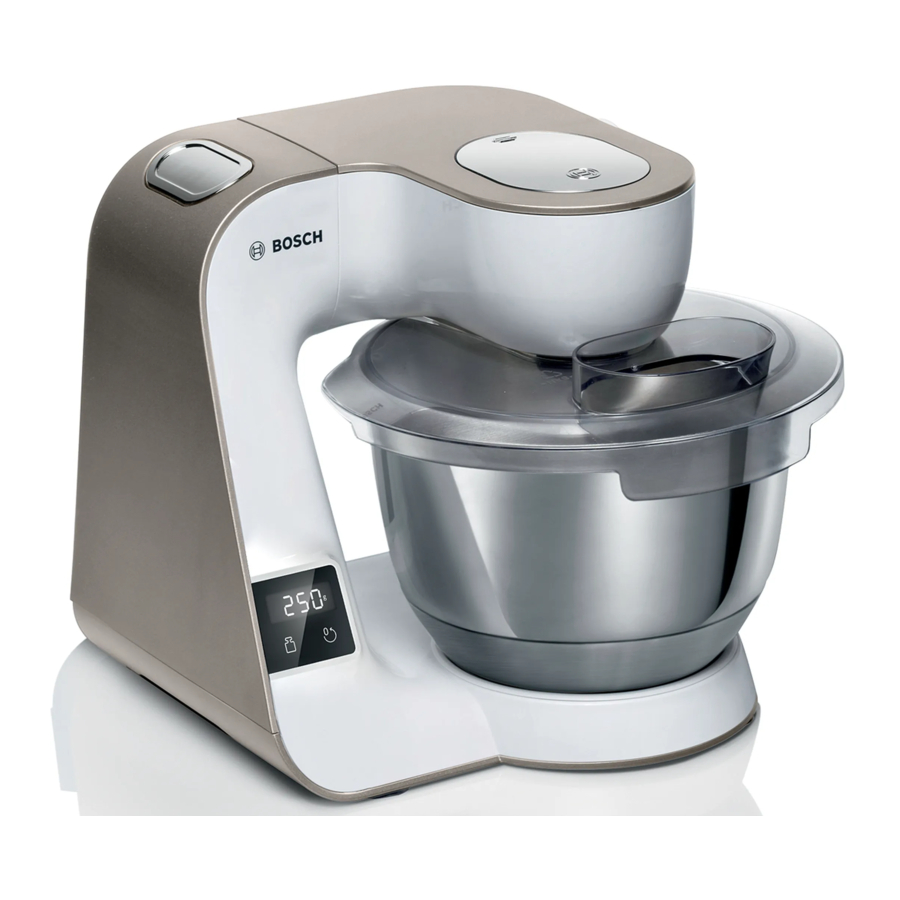
Bosch MUM5XW40G, MUM5X Series Manual
- User manual (252 pages) ,
- Information for use (196 pages) ,
- User manual (220 pages)
Advertisement

Avoiding material damage
- Never use different drives at the same time.
- Never operate the appliance longer than necessary.
- Do not operate the appliance at no-load.
- Never use genuine parts and accessories for other appliances.
- Do not exceed maximum processing quantities.
- Before use, check the bowl for foreign objects and remove.
- Do not place the appliance on moving or vibrating surfaces.
Familiarising yourself with your appliance
Overview
After unpacking all parts, check for any damage in transit and completeness of the delivery.
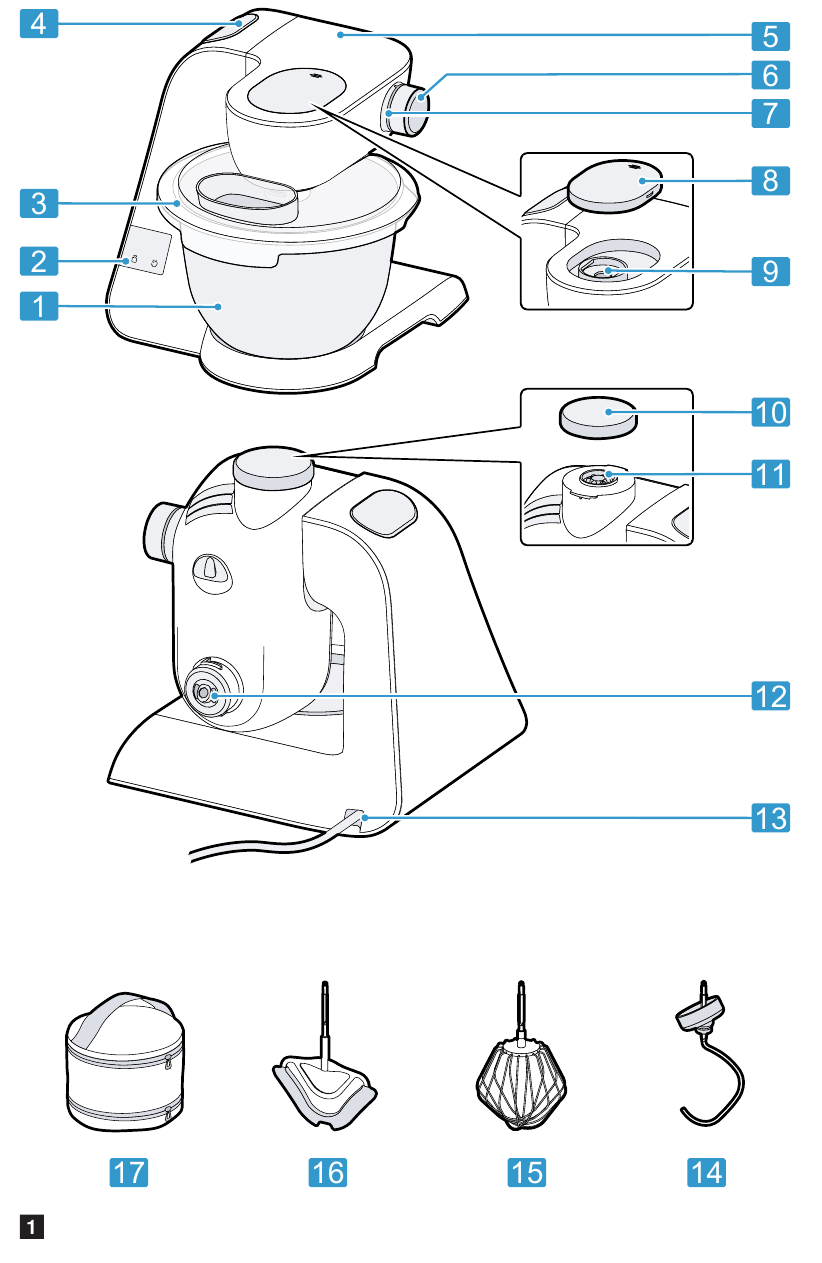
- Stainless steel mixing bowl
- Control panel
- Lid with integrated filling shaft
- Release button for swivel arm
- Swivel arm
- Rotary switch
- Illuminated ring
- Protective cover for drive 2
- Drive 2
- Protective cover for drive 3
- Drive 3
- Main drive
- Cord storage
- Kneading hook
- Professional beating whisk
- Professional flexible stirrer
- Storage pouch
Symbols
| Symbol | Description |
 | Marking on the protective cover for drive 2 |
 | Attachment marking on the protective cover for drive 3 |
 | Position marking on drive 3 |
Rotary switch
| Symbol | Description |
 | Stop processing |
| 1 | Low speed |
| 7 | maximum speed |
| M | Non-locking switch: highest speed as long as the rotary switch is held in this position |
Tip: You can change the speed at any time during processing or interrupt processing.
Illuminated ring
| Status | Description |
| Lit | The appliance is functioning perfectly. |
| Flashing |
|
| Not lit |
|
Tip: You can find further information here: → "Safety systems", → "Troubleshooting".
Control panel
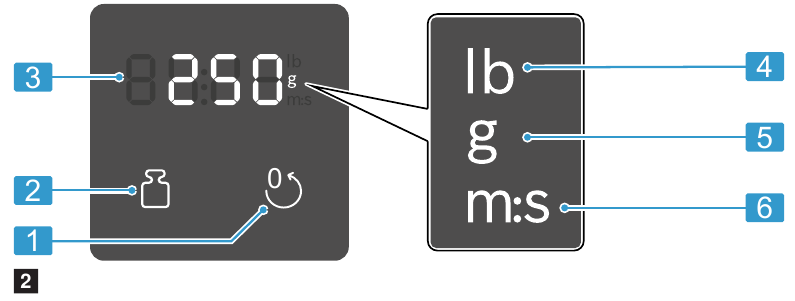
- Reset button
- Scales button
- Display
- Symbol Weight in pounds
- Symbol Weight in grammes
- Symbol Time in minutes and seconds
Function buttons
| Symbol | Function |
 | Switch scales on and off. |
 |
|
Note: Press the buttons with your fingers without wearing rubber/oven gloves. Do not operate buttons with objects, e.g. a wooden spoon.
Display
The display shows values and messages about the operating status.
Note: The display will switch off automatically if the appliance is not operated for a given period of time. To reactivate the display, press a button or start processing.
Swivel arm, drives and recommended speeds
If the release button is pressed, the swivel arm can be moved to the required position. The swivel arm must be engaged in every operating position. Observe the recommended speeds in the table.
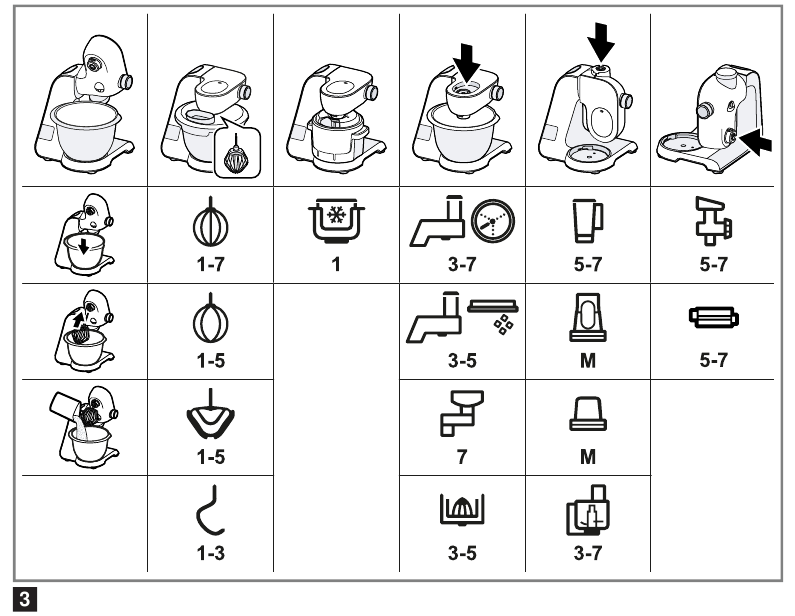
Note: The swivel arm features the EasyArm Lift function. This function supports upwards movement of the swivel arm.
Tools
The kneading hook is equipped with a removable protective cap to protect the drive from soiling.
| Tool | Use |
 | Kneading hook
|
 | Professional flexible stirrer
|
 | Professional beating whisk
|
Fine adjustment of the professional beating whisk
Use the fine adjustment system to correct the distance between the bowl and the professional beating whisk.
Note: The professional beating whisk is factory-set so that ingredients are mixed together perfectly.
Correcting tool adjustment
- Never operate a tool that touches the bowl.
Requirements
- The mains plug is not inserted.
- The swivel arm is open.
- The professional beating whisk is inserted.
- The bowl has been inserted.
- Hold the beating whisk at the bottom with one hand and release the lock nut clockwise using a spanner wrench.
![Bosch - MUM5X Series - Correcting tool adjustment - Step 1 Correcting tool adjustment - Step 1]()
- To change the setting, turn the tool in the desired direction.
![Bosch - MUM5X Series - Correcting tool adjustment - Step 2 Correcting tool adjustment - Step 2]()
Optimum setting Distance to the bowl approx. 3 mm Turn clockwise Lift tool Turn anticlockwise Lower tool
- Press the release button and push the swivel arm down until it engages.
- Check the setting.
- Press the release button and raise the swivel arm until it engages.
- Hold the beating whisk at the bottom with one hand and tighten the lock nut anticlockwise using a spanner wrench.
Parked position
After the appliance has switched off, the drives will continue moving for a few seconds until the correct parked position is reached.
Note: The swivel arm will only open or close with the inserted tool when the drive is located in the correct parked position.
Tip: You can easily adjust an incorrect parking position yourself. → "Troubleshooting".
Safety systems
Start lock-out
Start lock-out prevents your appliance from being switched on accidentally. The appliance can only be switched on and operated if the swivel arm is correctly engaged in the work position. For some models: The appliance can only be switched on and operated if one of the following conditions is satisfied:
- The swivel arm is engaged in horizontal position and the bowl or ice cream maker is inserted.
- The swivel arm is engaged in vertical position and the protective drive cover or an assembled accessory is secured correctly.
Restart lock-out
Restart lock-out prevents your appliance from automatically restarting processing after a power failure. The appliance is switched on again after a power failure. Processing cannot start again until the rotary switch has been set to  .
.
Overload protection
The overload protection system prevents the motor and other components from being damaged through being overloaded.
Operation
Setting up appliance
- Place the appliance on a stable, level, clean and flat work surface.
- Adjust the power cable to the required length.
- Pull the power cable out to the required length and slowly let go.
- To roll the cable up again, briefly pull on the cable and let it wind up.
Note: Do not push the cable into the cable rewinder by hand. If the cable jams, pull right out and let it wind up again.
- Do not insert the mains plug.
Preparing the appliance
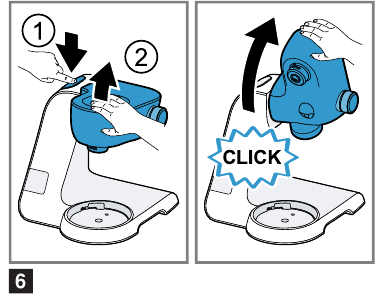
- Press the release button and raise the swivel arm until it engages.
![Bosch - MUM5X Series - Preparing the appliance - Step 1 Preparing the appliance - Step 1]()
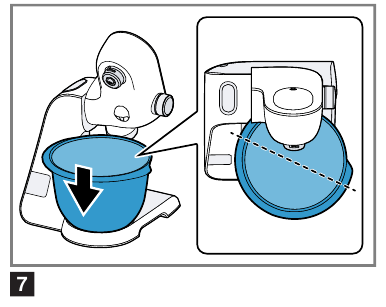
- Place the bowl in the main unit.
Use the recesses on the main unit.
![Bosch - MUM5X Series - Preparing the appliance - Step 2 Preparing the appliance - Step 2]()
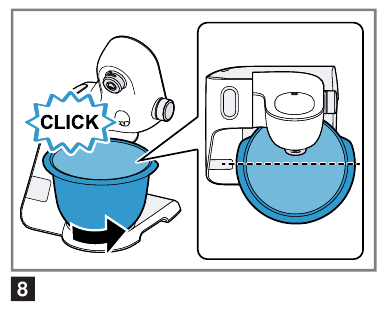
- Turn the bowl anticlockwise until it engages.
![Bosch - MUM5X Series - Preparing the appliance - Step 3 Preparing the appliance - Step 3]()
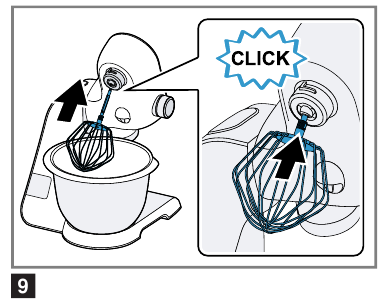
- Press the tool into the main drive until it engages.
![Bosch - MUM5X Series - Preparing the appliance - Step 4 Preparing the appliance - Step 4]()
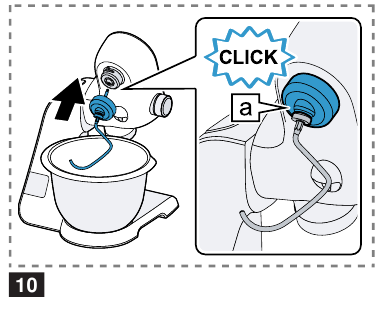
- To insert the kneading hook:
- Insert the kneading hook with the protective cap fitted in the main drive.
- Turn the protective cap until the kneading hook engages fully.
The protective cap![]() must cover the main drive completely.
must cover the main drive completely.
![Bosch - MUM5X Series - Preparing the appliance - Step 5 Preparing the appliance - Step 5]()
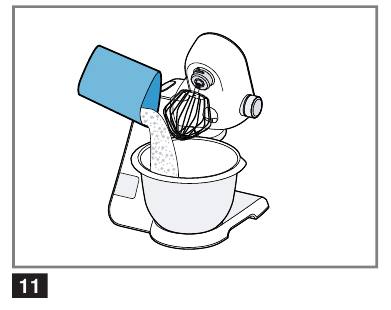
- Add the ingredients to the bowl.
![Bosch - MUM5X Series - Preparing the appliance - Step 6 Preparing the appliance - Step 6]()
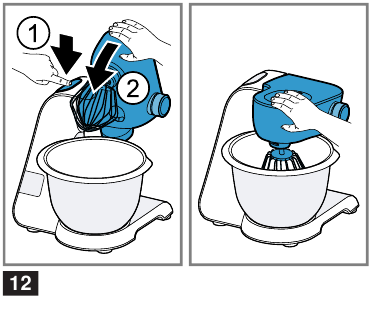
- Press the release button and push the swivel arm down but not fully down.
Hold the swivel arm in a slightly open position.
![Bosch - MUM5X Series - Preparing the appliance - Step 7 Preparing the appliance - Step 7]()
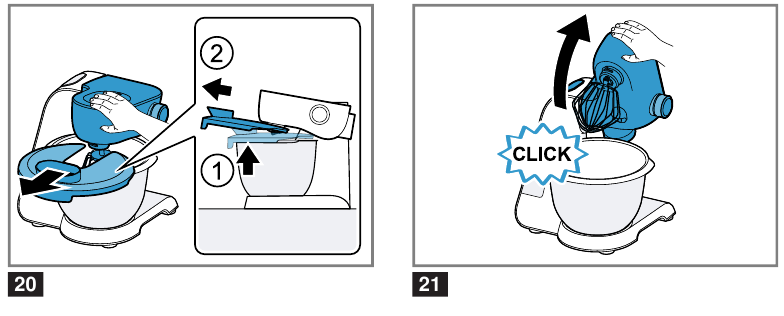
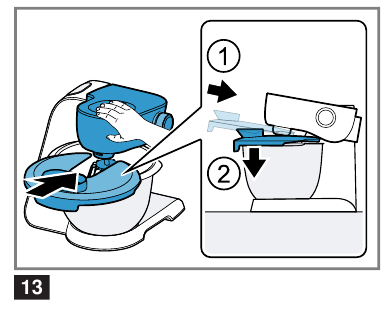
- Lift the lid slightly at the front, slide fully onto the bowl and set down.
![Bosch - MUM5X Series - Preparing the appliance - Step 8 Preparing the appliance - Step 8]()
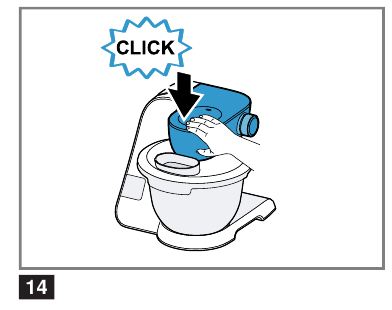
- Push the swivel arm down until it engages.
![Bosch - MUM5X Series - Preparing the appliance - Step 9 Preparing the appliance - Step 9]()
Processing ingredients with tools
- Insert mains plug.
- Set the rotary switch to the required speed.
![Bosch - MUM5X Series - Processing ingredients with tools - Step 1 Processing ingredients with tools - Step 1]()
- To process the ingredients at maximum speed for a short time, set the rotary switch to and hold for the desired processing time.
![Bosch - MUM5X Series - Processing ingredients with tools - Step 2 Processing ingredients with tools - Step 2]()
- If wished, further ingredients can be added during processing using the filling shaft.
![Bosch - MUM5X Series - Processing ingredients with tools - Step 3 Processing ingredients with tools - Step 3]()
- To add greater quantities of ingredients:
- Turn the rotary switch to and wait for the appliance to come to a standstill.
- Lift the swivel arm slightly and pull out the lid.
- Add the ingredients to the bowl.
- Fit the lid and push the swivel arm down until it engages.
- Process the ingredients until you achieve the required result.
- Set the rotary switch to
![]() .
.
Wait until the appliance stops.
![]() Processing stops and the drives move to the parked position.
Processing stops and the drives move to the parked position.
![Bosch - MUM5X Series - Processing ingredients with tools - Step 4 Processing ingredients with tools - Step 4]()
Finishing processing


Using accessory drives
Notes
- Remove the cover to use accessories on drive 2 or 3.
- Always close unused drives with the protective covers.
- Please follow the instructions for the accessory.
![Bosch - MUM5X Series - Using accessory drives Using accessory drives]()
Scales
Your appliance is equipped with a set of scales. You can weigh ingredients individually. The main unit has 4 weight sensors in its feet.
The following factors can falsify the measuring result:
- ¡ Work surface not stable, even, clean and smooth.
- Work surface vibrating
- The feet are not all touching the work surface or are soiled.
- Objects underneath the main unit
- Objects on the main unit
- Main unit slipped
- Main unit touched
- Ingredient quantities less than 5 g or 0.01 lb
Weighing ingredients
Requirements
- The bowl is inserted or an accessory is fitted.
- The rotary switch is set to
![]() .
.
- Press
![]() and do not touch the appliance again.
and do not touch the appliance again.
![]() The scales will be calibrated.
The scales will be calibrated.
![]() The display shows "- - - -".
The display shows "- - - -". - Wait for calibration to finish.
![]() The display shows "0 g" or "0.00 lb".
The display shows "0 g" or "0.00 lb". - Add the required ingredient.
![]() The display shows the weight.
The display shows the weight. - To weigh further ingredients, select one of the following options:
- Add further ingredients and read off the total weight.
- Press
![]() and wait until the display shows "0 g" or "0.00 lb".
and wait until the display shows "0 g" or "0.00 lb".
- To switch off the scales, press
![]() or start processing.
or start processing.
Tip: Also use the scales together with the accessory. Weigh the ingredients directly when adding them, e.g. to the blender attachment or the ice maker.
Note: The scales switch off automatically after approx. 3 minutes of inactivity.
Changing the display units of the scales
Requirements
- The rotary switch is set to
![]() .
. - The scales are switched on.
- To change the display unit between grams and pounds, press and and hold briefly.
- Release both buttons.
![]() The scales self-calibrate and restart with the changed setting.
The scales self-calibrate and restart with the changed setting.
![]() The setting is saved.
The setting is saved.
Timer
The timer shows the processing time.
Resetting the timer
- Set the rotary switch to the required speed.
![]() The display shows the processing time.
The display shows the processing time. - To reset the display to "00:00" press
![]() .
.
Notes
- If you interrupt processing for less than 30 seconds, the last values displayed are saved and will resume if processing starts again.
- If you interrupt processing for more than 30 seconds, the appliance will switch on the scales and perform calibration.
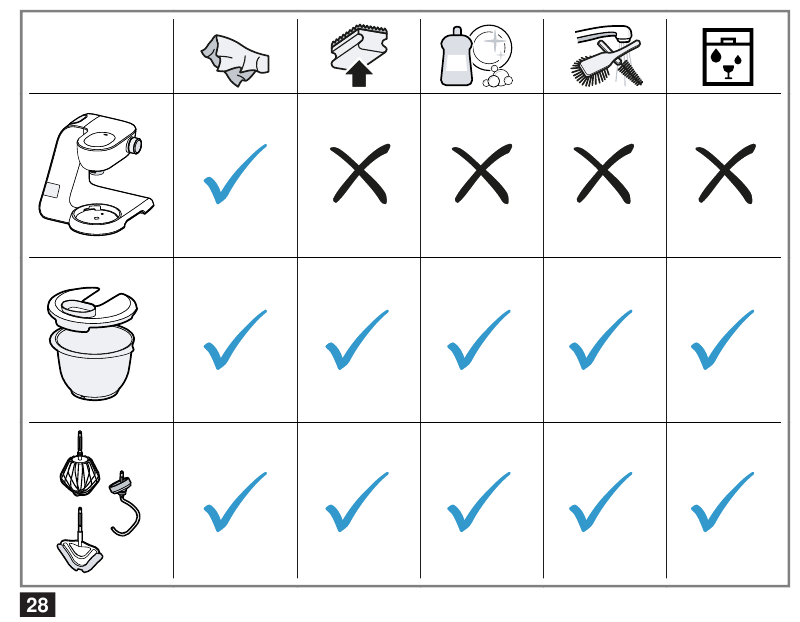
Overview of cleaning
Clean all parts immediately after use so that residues do not dry on.
- Do not use cleaning agents containing alcohol or spirits.
- Do not use sharp, pointed or metal objects.
- Do not use abrasive cloths or cleaning agents.
- Only clean the control panel and the display using a damp microfibre cloth.
Tip: When processing food such as carrots, plastic parts may become discoloured. Remove discolouration with a soft cloth and a few drops of cooking oil.
Clean the individual parts as indicated in the table.
Special accessories
You can buy accessories from the aftersales service, from specialist retailers or online. Only use genuine accessories as these have been specifically designed for your appliance. Accessories vary from one appliance to another. When purchasing accessories, always quote the exact product number (E no.) of your appliance. You can find out which accessories are available for your appliance in our catalogue, in the online shop or from our aftersales service.
www.bosch-home.com
Application examples
Note: To ensure that the ingredients of yeast dough or sourdough with a high water content mix best, pour the liquid into the bowl first.
Observe the information and values in the table.

Sample recipe
| Recipe | Ingredients | Processing |
| Heavy fruit cake |
|
|
Troubleshooting
| Fault | Cause and troubleshooting |
The appliance is not working | Appliance has no power supply.
|
Appliance does not start processing | Rotary switch is set incorrectly.
|
| Appliance does not start processing or switches off during processing. | Processing quantity is too big or processing time was too long.
|
Appliance or accessory is blocked.
| |
| |
A safety system has been activated.
| |
| The swivel arm cannot be opened or closed because the tool is jammed in the bowl. | Drive is not in the parked position.
|
| Scales show no change in weight despite ingredients being added. | Quantity of ingredients outside measuring range of scales.
|
The display shows "ERROR" | Scales cannot be calibrated or a measurement is not possible.
|
| The display flashes "5000 g", "11.00 lb", "-990 g" or "-2.20 lb". | The display range of the scales has been exceeded or undershot
|
"59:59 m: s" is flashing on the display | Display range of the timer has been exceeded.
|
| The professional beating whisk is touching the bowl or the ingredients are not mixed properly. | The distance to the bowl is not set correctly.
|
Customer Service
Detailed information on the warranty period and terms of warranty in your country is available from our after-sales service, your retailer or on our website. The contact details for Customer Service can be found in the enclosed Customer Service directory or on our website.
Safety
- Read this instruction manual carefully.
- Please note the additional instructions when using supplied or optionally available accessories.
- Keep the instruction manual and the product information safe for future reference or for the next owner.
- Do not connect the appliance if it has been damaged in transit.
Only use this appliance:
- with genuine parts and accessories.
- for mixing, kneading and beating food.
- for additional applications described in the instructions for accessories that are optional or come with the appliance.
- for normal processing quantities and for normal processing times for domestic use.
- under supervision.
- in private households and in enclosed spaces in a domestic environment at room temperature.
- up to an altitude of max. 2000 m above sea level.
Disconnect the appliance from the power supply when:
- not using the appliance.
- the appliance is unattended.
- assembling the appliance.
- taking the appliance apart.
- cleaning the appliance.
- approaching rotating parts.
- changing tools.
- confronted with a fault.
This appliance can be used by persons with reduced physical, sensory or mental capabilities or a lack of experience and/or knowledge if they have been given supervision or instruction concerning use of the appliance in a safe way and if they understand the hazards involved. Do not let children play with the appliance. Cleaning and user maintenance must not be performed by children. The appliance must not be used by children. Keep children away from the appliance and power cable.
- Never operate a damaged appliance.
- Never operate an appliance with a cracked or fractured surface.
- Never pull on the power cord to unplug the appliance. Always unplug the appliance at the mains.
- If the appliance or the power cord is damaged, immediately unplug the power cord or switch off the fuse in the fuse box.
- Call customer services.
- Connect and operate the appliance only in accordance with the specifications on the rating plate.
- Repairs to the appliance should only be carried out by trained specialist staff.
- Only use genuine spare parts when repairing the appliance.
- If the power cord of this appliance is damaged, it must be replaced by the manufacturer, the manufacturer's Customer Service or a similarly qualified person in order to prevent any risk.
- Never immerse the appliance or the power cord in water or clean in the dishwasher.
- Only use the appliance in enclosed spaces.
- Never expose the appliance to intense heat or humidity.
- Do not use steam- or high-pressure cleaners to clean the appliance.
- Never let the power cord come into contact with hot appliance parts or heat sources.
- Never let the power cord come into contact with sharp points or edges.
- Never kink, crush or modify the power cord.
- Never place the appliance on or near hot surfaces.
- Keep hands, hair, clothing and utensils away from rotating parts.
- Only attach and remove tools and accessories once the drive has stopped and you have unplugged the appliance.
- Before changing tools or cleaning the appliance, switch off and disconnect it from the mains.
- Only use the tools when the bowl is inserted, the lid is fitted and the drive covers are in place.
- Never open the swivel arm during processing.
- Parts which show cracks or other damage or do not fit correctly must be replaced with genuine spare parts.
- Do not reach into the bowl when lowering the swivel arm.
- Keep packaging material away from children.
- Do not let children play with packaging material.
- Keep small parts away from children.
- Do not let children play with small parts.
- Follow the cleaning instructions.
- Clean surfaces which come in contact with food before each use.
Documents / Resources
References
Download manual
Here you can download full pdf version of manual, it may contain additional safety instructions, warranty information, FCC rules, etc.
Advertisement





 and do not touch the appliance
  and wait until the display shows "0 g" or "0.00 lb".
 .
.


Need help?
Do you have a question about the MUM5X Series and is the answer not in the manual?
Questions and answers