Advertisement
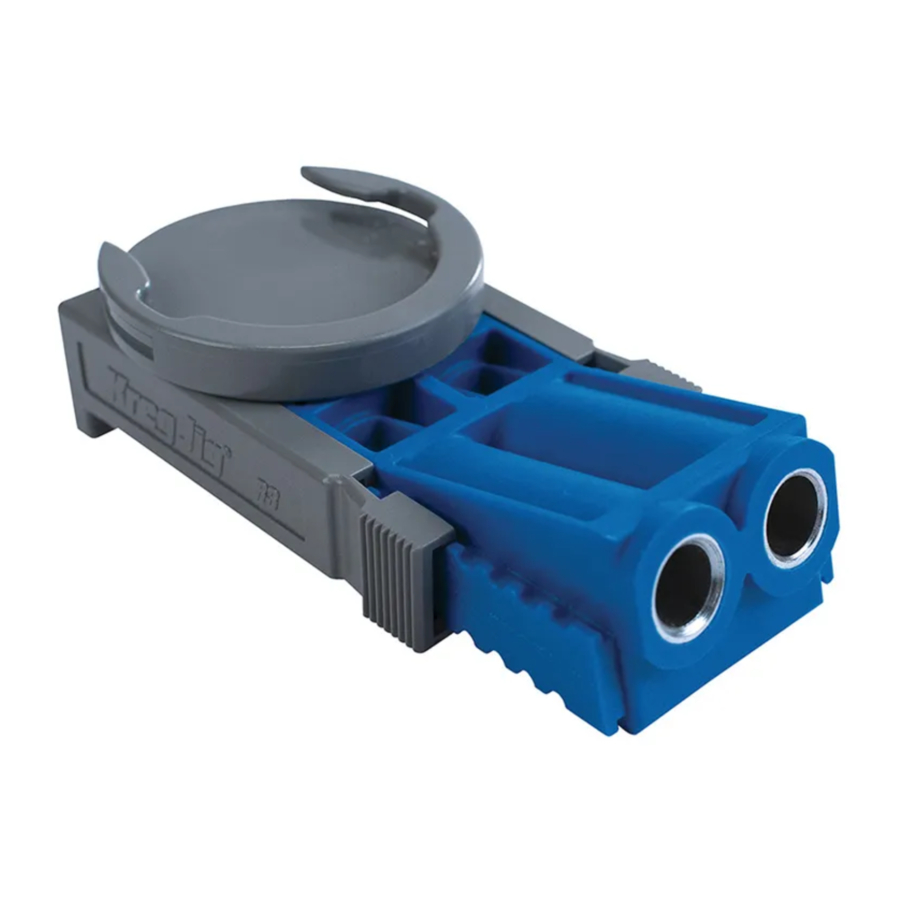
Parts

- Clamp Pad Adapter:
The adapter accepts the large pad of all Kreg face clamps and snaps into the back of the jig, turning clamp and jig into one assembly for fast jig positioning. - Drill Guide:
This two-hole drill guide keeps your drilling stroke straight and true. The hardened steel guides are guaranteed for the life of the tool. - Easy-Press ™ Positioning Sliders:
Adjust these two sliders with a press of your thumb to set the jig for different workpiece thicknesses. - Chip Release Holes:
Two holes at the base of each drill guide allow wood chips to escape for fast drilling, reduced heat build-up, and longer drill bit life. - Mounting Hole:
For tight locations where you can't use a clamp, secure the jig to the workpiece by driving a wood screw through this hole. - Clamp Adapter Holes:
Two key-hole slots provide tool-less attachment for the clamp pad adapter. - Stop Collar | Hex Wrench:
Set drilling depth by positioning the stop collar on the drill-bit shank. - ⅜" (9.5mm) Stepped Drill Bit | #2 Square Driver:
The special drill bit, made of hardened high-speed steel, drills the pocket hole and pilot hole in one operation. The 6" [152mm]-long driver bit provides clearance to keep your drill/driver aligned with the pocket screw.
Settings
To create strong joints, you'll set the drilling depth, adjust the jig position sliders, and select a screw length to match the thickness of the workpiece. The Kreg Jig ® R3 makes this easy, in just three simple steps:
Step 1: Set the Drilling Depth
The example shows the stop collar positioned for a ¾" (19mm)- thick workpiece.

Slide the stop collar onto the drill bit. Insert the pilot tip of the bit into the tip protector in the case tray, and snap the bit into the depth-setting gauge so the stop collar rests in the recess that has workpiece thickness marks along the edges. Push the bit step tight against the tip protector and align the stop collar with the mark that matches your workpiece thickness. Tighten the stop collar set screw with the hex wrench included with the jig.
Step 2: Adjust the Positioning Sliders
The example shows the sliders positioned for a ¾" (19mm)-thick workpiece.

To adjust the jig so the screw exits at the center of the workpiece, turn the jig over so the bottom faces up. Press the ridged tab on each slider with your thumb and slide it until the mark on the slider that matches the thickness of your workpiece aligns with the arrow on the jig body.
Choosing a Screw
Step 3: Select a Screw
Use this chart to select the correct screw length. Kreg offers a complete line of pocket screws for every workpiece thickness and type. All Kreg pocket screws are available at your Kreg dealer or online at www.kregtool.com.
Screw Length Selection / Jig Setting Guide
| Material Thickness | Screw Length | Slider Setting |
| ½" [13 mm]* | 1" [25 mm] | ½ " Mark |
| ⅝" [16 mm] | 1" [25 mm] | ⅝" Mark |
| ¾" [19 mm] | 1¼" [32 mm] | ¾ " Mark |
| ⅞" [22 mm] | 1½" [38 mm] | ⅞" Mark |
| 1" [25 mm] | 1½" [38 mm] | 1" Mark |
| 1⅛" [29 mm] | 1½" [38 mm] | 1⅛" Mark |
| 1¼" [32 mm] | 2" [51 mm] | 1¼" Mark |
| 1⅜" [35 mm] | 2" [51 mm] | 1⅜" Mark |
| 1½" [38 mm] | 2½" [64 mm] | 1½" Mark |

 Note: Screw length is measured from bottom of the head to the tip of the screw
*Panhead pocket screw recommended.

Coarse Thread
Due to the large diameter and thread pitch, our #8 coarse-thread screws offer a strong hold in softwoods and composite materials.

Use in woods and composites such as:
- Pine
- Cedar
- Basswood
- Poplar
- Plywood
- MDF
- Particle Board
Fine Thread
Because the smaller diameter and thread pitch of our #7 fine-thread screws reduce the chance of splitting the material, we recommend them for hardwoods.

Use in woods such as:
- Ash
- Oak
- Maple
- Walnut
- Hickory
- Cherry
- Mahogany
- Birch
Using Your Kreg Jig® R3
Clamping
Position the jig with the slider lugs hooked on the edge of the workpiece. A bar clamp or C-clamp works just fine to secure the jig to the workpiece.

With the included clamp pad adapter, the Kreg Jig ® R3 can be connected to any Kreg face clamp for faster positioning and clamping.

To drill pocket holes inside an existing or already assembled cabinet, remove the sliders, flip them over so the positioning lugs will be on the top of the jig, switch each slider from one side of the jig to the other, and reinstall them. Adjust the sliders so the mark on the slider that matches the thickness of the workpiece aligns with the index mark on the jig body. (The thinnest workpiece you can drill in this mode is ¾" [19mm].)

In situations where it is not possible to clamp the jig in place, secure the jig to the workpiece by driving a wood screw through the mounting hole. Remember to position the drill-bit stop collar to match the thickness of your workpiece.

Drilling
In addition to the proper Kreg Jig ® settings, spacing pocket holes evenly across the workpiece is an important part of making a strong joint. The two-hole drill guide allows you to drill holes in narrow workpieces (1½"-1⅞" [38mm-48mm]) without having to reposition the jig. For wider parts, drill pocket holes 9/16 " [14mm] from each edge add one or more pocket holes between the edge holes so the distance between holes does not exceed 6" [152mm]. For very large parts such as panels, we recommend placing the first pocket hole 2" [51mm] from the panel edge and every 6" [152mm] on center after that.
Before turning on the drill, slide the bit into the drill guide until the tip of the bit touches the workpiece. Withdraw the bit about ¼' [6mm]. Turn on the drill, make sure it is running at full speed, and feed the bit into the workpiece. Always run variable-speed or multi-speed drills at the fastest speed. While drilling the pocket hole, partially withdraw the bit several times to clear the chips. Stop drilling when the stop collar contacts the drill guide. Wait until the drill stops rotating to withdraw the bit from the drill guide.
Connect with Kreg®
Owning a Kreg Jig® opens up new project possibilities. This manual shows you how to adjust your jig and drill pocket holes. You may find the following resources helpful:
www.youtube.com/kregtoolcompany
www.facebook.com/kregjig
www.twitter.com/kregtoolcompany
plus.google.com/+kregtoolcompany
www.kregtool.com
Find project plans, product information and videos, the latest news, and more!
Kreg Owners' Community www.kregjig.ning.com
Join thousands of other Kreg product owners and share your projects, ask questions, offer advice, check out product reviews, and much more!
Kreg Plus Newsletter
Sign up at www.kregtool.com to receive our FREE monthly email newsletter. It's filled with tips, tricks, and project inspiration for do-it-yourselfers and woodworkers of all skill levels.
Safety Guidelines

- Read this manual and these safety guidelines. Learn the applications and limitations of the tool as well as the hazards specific to it. Operating the tool before understanding safe and proper use could result in personal injury.
- Always wear eye, hearing, and respiratory protection specifically designed and certified as safety equipment.
- The drill bit is sharp. Handle with care.
- Avoid awkward hand positions where a sudden slip could cause contact with the rotating bit.
- Properly secure your workpiece before drilling.
- Do not attempt to hold the pocket-hole jig in place with your hand while drilling. Secure it to the workpiece with a clamp.
- Follow your drill manufacturer's safety guidelines.
- Do not operate this tool or any machinery while under the influence of drugs, alcohol, or medications.
- Do not allow familiarity gained from frequent use of your tools to replace safe work practices. A moment of carelessness is sufficient to cause severe injury.
This product can expose you to chemicals including Acrylonitrile and other chemicals, which are known to the State of California to cause cancer and reproductive harm. For more information go to www.P65Warnings.ca.gov.
Drilling, sawing, sanding or machining wood products can expose you to wood dust, a substance known to the State of California to cause cancer. Avoid inhaling wood dust or use a dust mask or other safeguards for personal protection. For more information go to www.P65Warnings.ca.gov/wood.
Documents / Resources
References
![www.p65warnings.ca.gov]() http://www.p65warnings.ca.gov
http://www.p65warnings.ca.gov![www.p65warnings.ca.gov]() http://www.p65warnings.ca.gov/wood
http://www.p65warnings.ca.gov/wood![www.kregtool.com]() Welcome to Kreg Tool
Welcome to Kreg Tool![www.youtube.com]() Kreg Tool - YouTube
Kreg Tool - YouTube![www.pinterest.com]() Kreg Tool (kregtool) - Profile | Pinterest
Kreg Tool (kregtool) - Profile | Pinterest![www.twitter.com]() x.com
x.com![instagram.com]() Instagram
InstagramGoogle Workspace Updates: New community features for Google Chat and an update on Currents
Kreg Owners' Community

Download manual
Here you can download full pdf version of manual, it may contain additional safety instructions, warranty information, FCC rules, etc.
Advertisement


Need help?
Do you have a question about the Jig R3 and is the answer not in the manual?
Questions and answers