Advertisement
Quick Links
Advertisement

Related Manuals for Kreg Jig HD


Summary of Contents for Kreg Jig HD
- Page 1 Kreg Jig HD ® Owner's Manual...
-
Page 2: Safety Guidelines
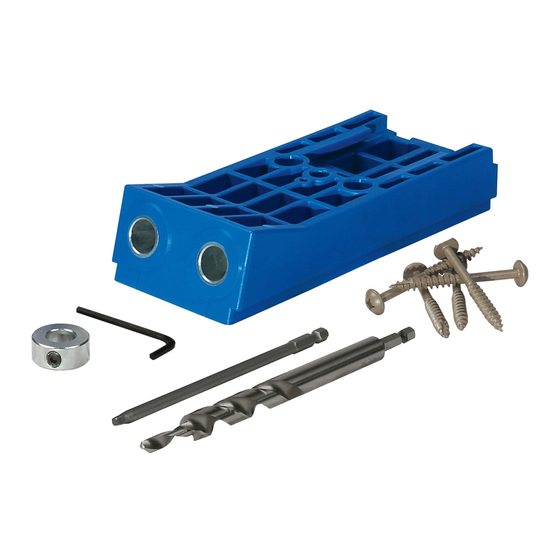
Safety Guidelines Read this manual and these safety guidelines. Learn the applications and limitations of the tool as well as the hazards specific to it. Operating the tool before understanding safe and proper use could result in personal injury. SAVE THIS MANUAL. •Always wear eye, hearing, and respiratory protection specifically designed and certified as safety equipment. - Page 3 Parts Drill Guide Stop Collar and Hex Wrench Kreg Jig HD Driver Bit Stop Block ® Kreg Jig HD Drill Bit HD Screw Sample Pack ®...
- Page 4 Introduction Owning a Kreg Jig HD opens up new outdoor project possibilities. This ® manual shows you how to adjust your jig and drill pocket holes. You may find the following resources helpful:...
- Page 5 Guardrail connections of the three styles shown here, constructed using the Kreg HD and Kreg Jig HD Screws, meet the live load requirements specified in ®...
- Page 6 2x4 rail on 2x4 rail flat edge attached to 4x4 post attached to 4x4 post Pocket-holes drilled on outside face. Style 3 ATTENTION Drill holes with the ® Kreg Jig HD centered on the workpiece. 4x4 post attached to 2x6 rail...
- Page 7 Setup To create strong joints in 1½" [38mm]-thick material, set up your jig in three simple steps: Adjust the Stop Collar Bit Shoulder ⁄ " (121mm)
- Page 8 Attach the Stop Block Kreg Wood Project Clamp (not included) ATTENTION When using a Kreg Wood Project Clamp (not included), slide the large clamp pad into the T-slot recess on the back of the drill guide and lock it in place with the end stop.
- Page 9 Pocket-Hole Placement For strong joints, space your pocket holes evenly across the workpiece. 1" 1" 3½" [89mm]-wide material 1" 1" 1" 2-5/8" 1" 5½" [140mm]-wide material 7¼" [184mm]-wide material...
- Page 10 Drilling Pocket-holes For best results, follow these steps: Place the stop block against the end of the board, position the drill guide, and clamp it in place. For 2x4s, simply center the drill guide on the width of the workpiece. You’ll use both bit guides when drilling the pocket holes.
- Page 11 Repair Applications The removable stop block allows you to use your Kreg Jig HD to repair or ® reinforce existing joints. For repair applications, remove the stop block from the drill guide, and clamp the guide directly to the workpiece. The position of the stop collar on the drill bit does not change.
- Page 12 Tips Mitered Corners To secure a miter joint with HD Screws, drill one pocket hole about ½" [13mm] from the miter “heel.” To get a screw close to the miter “toe” and still have the pocket hole entirely on the face of the part, remove the stop block from the drill guide.
- Page 13 Tips Mitered Corners: Securing the "toe" Heel...
-
Page 14: Additional Components
Kreg Jig Base ® The Kreg Jig HD is compatible with Kreg Jig ® ® Kreg Jig Master System bases. The dust collection ®... - Page 15 Additional Components Kreg Jig HD Driver Bit ® Replacement 6”-long #3 square drive bit. Kreg Jig HD Drill Bit ® Replacement drill bit, stop collar, and hex wrench. Kreg Jig HD Screws ® 30-count screws 125-count screws Check out the collection of drilling & milling bits we offer.
Need help?
Do you have a question about the Jig HD and is the answer not in the manual?
Questions and answers