Advertisement
- 1 Product overview
- 2 Description of the parts
- 3 Instrument cluster / display
- 4 Combination switch
- 5 Lock and radio remote control
-
6
Battery and charger
- 6.1 Instructions for using batteries
- 6.2 Description of the battery charge level indicator on the battery
- 6.3 Battery manual
- 6.4 Operating environment
- 6.5 Charging environment
- 6.6 Precautions for using the charger
- 6.7 Storage environment
- 6.8 Precautionary measures when putting the battery into operation
- 7 Driving instructions
- 8 Troubleshooting
- 9 Error codes / control unit
- 10 Cleaning the product
- 11 Secure storage of the product
- 12 Technical data and dimensions
- 13 Safety instructions
- 14 Documents / Resources
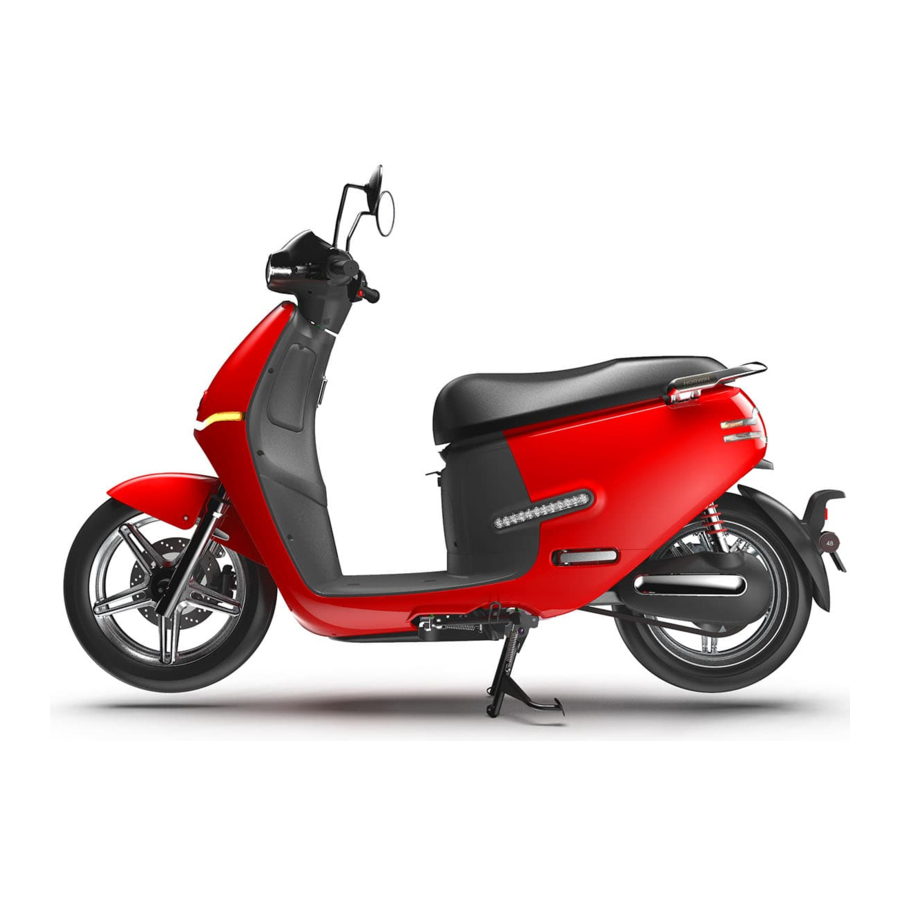
Product overview

Description of the parts

- Headlight
- Rear-view mirror
- Left combination switch
- Seat
- Tail light
- Rear fender
- Centre stand
- Side stand
- Front fender
- Front shock absorber
- Storage compartment (socket, max. consumption 1 A, voltage 5 V DC) built-in USB charging

- Throttle
- Right combination switch
- Ignition lock
- LED light element
- Footboard
- Rear shock absorber
- Rear armrest
- Reflector
- Cover of the rear swing arm
Instrument cluster / display

- Indicator, left
This indicator light flashes when you press the left indicator. - Indicator, right
This indicator light flashes when you press the right indicator. - Current power display
Displays the current consumption of the motor - Speed per hour
Displays the current speed (in km/h or mph). - Operating status
Indicates the current operating status of the vehicle. - Park or riding mode
Displays the currently selected parking or riding mode.- The maximum speed in the 1st riding mode is up to 45 km/h
- The maximum speed in the 2nd Riding mode is up to 75 km/h
- The maximum speed in the 3rd Riding mode is up to 95 km/h
- Low battery indicator
If the battery charge level is below 20%, the indicator lights up. - Motor warning light
If an error occurs in the motor control, this symbol lights up. - Trip odometer
Display of the current distance travelled (automatic reset after restart). - Total mileage
Display of the total mileage reading. - Charging indicator
This symbol lights up when the vehicle is in charging mode. - Battery charge level indicator
Displays the current battery charge level as a percentage. - High beam indicator lamp
This indicator lights up when the high beam is switched on. - Hazard warning lights
If you press the button on the right-hand combination switch of the hazard warning lights, the left and right indicators and this symbol flash. - Cruise control system
- Pressing the cruise control button causes the vehicle to continue travelling at the current speed.
- The cruise control can be deactivated by applying the left or right brake or by pressing the cruise control button again.
- Reverse mode indicator
- If you press and hold the reverse button on the right-hand combination switch, the vehicle is in reverse riding mode.
- Releasing the button returns the vehicle to forward mode.
- Touch panel
If the distance between the electronic radio remote control and the vehicle is less than approx. 2 metres, the vehicle can be switched on and off by swiping the touch panel (functional description below).
Combination switch

- High/low beam
- Press the switch upwards to switch on the high beam.
- Press the switch down to switch on the dipped beam.
- Indicator
- Press the switch to the left to switch on the left indicator.
- Press the switch to the right to switch on the right indicator.
- Move the switch to the centre position to switch off the indica-tor.
- Horn
- Press the horn button to sound the horn signal.
- The horn signal ends when the horn button is released.
- Cruise control
- Press the button to run the scooter at the current speed.
- To deactivate the cruise control, press this button again or apply the brake.

- Main lighting
- Press the switch down to switch off the main lighting.
- Press the switch upwards to switch on the main lighting.
- Riding mode selector switch
- Left position: 1. riding mode
- Centre position: 2. riding mode
- Right position: 3. riding mode
- Hazard warning lights
- Press the button to activate the hazard warning lights.
- Press the button again to deactivate the hazard warning lights.
- Start\Reverse switch
- Press the button to switch to standby/READY mode.
- Press and hold the button to activate reverse mode and re-lease it to return to forward mode.
Lock and radio remote control
Radio remote control

- Activation of the alarm system
Pressing the button activates the acoustic alarm system. If the radio remote control is more than approx. 2 metres away from the scooter, the alarm system activates itself automatically after a certain period of time. - Deactivation of the alarm system
Pressing the button deactivates the acoustic alarm system. - Power button
The vehicle can be switched on by pressing the button twice. (Pressing button '2' switches the vehicle off.)
Please note that the batteries in the radio remote controls must be replaced after a certain time, and when the radio remote controls do not work.
Mechanical key

Switching on and off

Insert the mechanical key and turn it to the "Start" position to switch on the vehicle. Turn the key back to the "Off" position to switch off the vehicle.
Opening the seat
- Insert the mechanical key and turn it to the "Open seat" position to unlock the seat.
![]()
- If the radio remote control is less than approx. 2 metres away, the seat can be opened by pressing it and turning it to the left (assuming the radio remote control and alarm system are working correctly).

Handlebar lock

Turn the handlebars to the furthest left position. The handlebars are locked by pressing and turning the key anti-clockwise to the "handlebar lock" position.
Battery and charger
Instructions for using batteries
The battery has multiple charging methods
External charging mode

First connect the charger to the battery interface, and then to the socket. If the charging process does not start automatically, press the charging indicator button.
In-vehicle charging mode

Place the battery in the battery compartment and connect the vehicle plug to the battery.
Then plug the charging plug of the charger into the charging inter-face above the footboard to charge the scooter.
If the charging process does not start automatically, press the charging indicator button directly on the battery.
Description of the battery charge level indicator on the battery
While charging, the charge level indicator shows the current battery charge level. Once the battery is fully charged, all LEDs light up continuously and no longer flash.
The current charge level is displayed by pressing the button next to the charge indicator - one LED corresponds to 20% charge level.

Battery manual
Before using the battery, make sure that it is the original battery; do not use batteries from other manufacturers or of other types.
Check the battery for obvious external damage, leakage of liquid, overheating, expansion or other damage.
Due to self-consumption factors such as transport routes and storage times, the battery does not initially have maximum capacity. Charge the battery according to the charging instructions.
Batteries must not be disassembled and must be disposed of properly.
Operating environment

Please use the battery between -10 ℃ and 45 ℃.

Please prevent the battery from coming into contact with liquids, such as water, cleaning agents, etc.

Please avoid storing the battery near heat sources, open flames, flammable and explosive gases or liquids.

Please prevent metallic foreign objects from entering the battery compartment.
- At low temperatures, the available battery capacity decreases to varying degrees. For example: The available capacity is approx. 70% at -10 ℃, 85% at 0 ℃ and up to 100% at 25 ℃.
- If you notice any abnormalities, such as a strange odour, over-heating or deformation, please stop using the battery immediately. Keep away from the battery and contact your specialist dealer immediately.
 If the battery is dismantled or taken apart without authorisation, the manufacturer's warranty is automatically invalidated. Incorrect handling could cause the battery to overheat, start to smoke, catch fire or explode.
Charging environment

Please use the original charger to charge the battery. Do not use chargers from other manufacturers, brands or types to charge the battery.

Please charge the battery at an ambient temperature of 0 ℃ - 35 ℃.

Please do not charge the battery for longer than 8 hours, since otherwise the battery life will be impaired.
- In the early phase (0-80%), the charging speed is faster; in the later phase (80-100%), the charging speed is slower, because this process is configured for charging safety and is normal.
- In winter, when the outside ambient temperature drops below 0 ℃, the charging process may stop, which is a normal condition. Please charge the battery at a suitable ambient temperature.
- At higher outside temperatures or shortly after the end of the ride, charging may not start immediately due to high temperatures inside the battery. It is recommended that the battery is left to rest for some time to lower the temperature.
![burn hazard]() During charging, chargers have a thermal effect and the temperature of the housing may increase. Please avoid touching the charger during the charging process (possible risk of burns).
During charging, chargers have a thermal effect and the temperature of the housing may increase. Please avoid touching the charger during the charging process (possible risk of burns).
Precautions for using the charger
- The charger should only be used indoors, under cover, or in environments protected from the weather.
- It is strictly forbidden to use the charger in an environment with high temperatures, and the charger must not be placed in the seat shell during the charging process.
- When the green indicator light on the charger lights up, end the charging process and disconnect the charger from the battery or the mains.
- If the indicator light on the charger is abnormal during the charging process, or if the charger smells strange or the housing of the charger is overheated, please stop charging immediately and contact your specialist dealer.
- Please do not dismantle the charger yourself, and do not replace the charger components yourself.
- If the charger is replaced, the new charger should match the battery model.
Storage environment
- As soon as the battery is inserted into the vehicle and connected, energy is drawn from the battery for the alarm system or other consumers.
- Please store the battery in an environment between 0 ℃ - 25 ℃ and not in an environment with a temperature higher than 40 ℃; otherwise, the battery capacity will be irreversibly weakened.
- If the vehicle is not used for a longer period of time, the battery must be disconnected, stored separately, maintained and charged regularly, as otherwise the battery may be completely discharged and irreversibly damaged, e.g., deep discharge of the battery. In such a case, it is excluded from the warranty.
- If the battery is stored for a longer period of time, the most suitable battery charge level is 50-70%. If the battery charge level is less than 10% or more than 90%, the battery capacity will be irreversibly weakened.
- The following technical standards apply with regard to the self-consumption protection mode when the lithium battery is stored safely:
![caution]() If the battery is not used for a longer period of time, it can be stored in the vehicle (the battery plug is not disconnected), and the maximum safe storage period is 15 days; otherwise, the battery may become deeply discharged and the battery cannot be restored.
If the battery is not used for a longer period of time, it can be stored in the vehicle (the battery plug is not disconnected), and the maximum safe storage period is 15 days; otherwise, the battery may become deeply discharged and the battery cannot be restored.- If the battery is not used for a longer period of time, the charge level is not less than 50%, and the battery is stored separately or kept in the vehicle (the battery plug is disconnected), the maximum safe storage period is 2discharged and the battery cannot be restored. months; otherwise, the battery may become deeply
- Please store the battery in a safe place; otherwise, the battery may be damaged in an uncontrolled manner: leakage, heating up, smoking, burning or explosion.
- Undervoltage and deep discharge of the battery caused by improper use are not covered by the warranty.
Precautionary measures when putting the battery into operation
- When using the battery for the first time, please discharge it as much as possible, and then fully charge it before the next use.
- Please keep the battery charge level at a minimum of 10%, and charge the battery in good time in order to maximise the service life of the battery.
 The battery must not be stored outdoors in rain or bad weather, and must not be rinsed with water or other liquids. If the vehicle is driven or pushed through high puddles of water, the water level must not exceed the height of the lower edge of the battery compartment; otherwise, water will penetrate the battery and the battery may be short-circuited, resulting in permanent battery failure.
In this case, it is forbidden to switch the vehicle on again or to recharge the battery, as otherwise the battery may catch fire and explode. Please return the battery to your specialist dealer immediately for servicing.
Driving instructions
Precautionary measures before beginning your ride
If you are impaired due to the consumption of alcohol or drugs, driving is absolutely not recommended. Read the user manual. Ensure that you have fully understood all safety instructions, as well as all functions of the operating elements.
Please make sure of the following before you begin your ride:
- You are in good physical and mental health.
- Your are wearing a helmet and other protective clothing.
- You should not operate the vehicle after consuming alcohol or taking medication.
Protective clothing
For safety reasons, we strongly recommend that you always wear a certified helmet and appropriate protective clothing when riding.
Checking before setting off
General precautions
If you discover any damage, other abnormalities or technical faults when checking your vehicle, please rectify them immediately or have them rectified by an authorised specialist dealer.
Before using the scooter, check the following points to ensure your safety on the road:
- Function test of all switches of the left and right combination units
- Handle for speed control
- Recommended tyre pressure: Front wheel 2.5 - 2.8 bar, rear wheel 2.5 - 3 bar
- Tyre surface for cracks, damage, wear or foreign objects adhering to the tyre
- Observe the legal tread depth (seasonal and country-specific deviations)
- Battery charge status
- Function test of headlight, tail light, brake light, indicators and horn
- Rear-view mirror (adjustment and cleanliness)
- Brake fluid level
- Brake system function test
Loading precautions
Overloading or improper loading can lead to irregular scooter operation. The exact dimensions and weight specifications can be found below in the technical data and dimensions.
Methods for starting
The EK3 can be started in multiple ways: with the mechanical key, the radio remote control and the touch panel on the display.
Starting using the mechanical key
- Insert the key to turn the ignition lock to the start position and use it to start the vehicle.
- Please put up the side/centre stand and press the "Start switch" in the right-hand combination unit; the "READY" symbol will appear on the display.
- Lightly turn the throttle and enjoy your ride!
Starting using the touch panel

- The distance between the radio remote control and the vehicle must be less than approx. 2 metres.
- Please fold up the side/centre stand, and swipe from left to right on the touch panel. The scooter switches on. Press the "start switch" on the right-hand combi unit. The "READY" symbol will appear on the display.
- Lightly turn the throttle and enjoy your ride!
Starting using the radio remote control
- The distance between the radio remote control and the vehicle must be less than approx. 2 metres.
- Fold up the side/centre stand, and press the power button on your radio remote control twice. The scooter switches on. Press the "start switch" on the right-hand combi unit. The "READY" symbol will appear on the display.
- Lightly turn the throttle and enjoy your ride!
Braking instructions
- Excessive, sudden braking can cause the wheels to lock and skid, limiting control of the vehicle. In this case, release the brake lever and drive forwards continuously until control is restored, and then brake more gently.
- Slow down as much as possible, or come to a complete stop before turning. Avoid braking when cornering, as this can cause one or two wheels to slip, thereby reducing control of the scooter.
- When riding in wet, rainy conditions or on soft surfaces, the manoeuvrability and braking ability of the scooter are impaired. In this case, all your riding manoeuvres must be adjusted; sudden acceleration, braking or turning can lead to loss of control of the scooter.
- On long, steep, downhill stretches of road, excessive use of the braking system can lead to overheating and reduce the effectiveness of the braking power. Consequential damage can therefore not be ruled out.
Methods for switching off
- Fold down the side stand; the "READY" symbol will go out on the display, the electrical system of the entire vehicle is still in "Park" mode, and the vehicle will not move off when the throttle is opened.
- Turn the key of the handlebar lock to position 2, and the electrical system of the entire vehicle will switch off.
![]()
- If the scooter was started using the radio remote control, press button 3 on the radio remote control once and the entire electrical system is switched off.
![]()
- If the vehicle was started by swiping the touch panel, swipe from right to left and the vehicle's electrical system is switched off.


Service and maintenance intervals
The exact maintenance and service instructions as well as the warranty guidelines can be found in the separate service and maintenance manual supplied with your vehicle.
General service tips
Please switch off the vehicle and remove the battery before cleaning the vehicle. Do not clean your vehicle directly with a strong jet of water (e.g., high-pressure cleaner, etc.), which can cause faults or damage to mechanical and electrical components due to moisture.
Troubleshooting
Troubleshooting on the vehicle
| Error description | Cause | Possible troubleshooting |
None Power when switching on |
|
|
| Motor failure when turning the twist grip after switching on |
|
|
Range or speed reduced |
|
|
The battery cannot be charged |
|
|
| The USB charging socket in the storage compartment has no function |
|
|
Error codes / control unit
| Error codes and description | Flashing frequency of the LEDs | |
| Overvoltage protection | The battery voltage is too high. | 1 |
| Undervoltage protection | The battery voltage is toolow. | 2 |
| Motor overvoltage protection | One or more phases of the motor are short-circuited. | 3 |
| Protection against blocking | The time of the stalling motor exceeds the value set in the control unit. | 4 |
| HALL sensor protection | Error on the HALL sensor of the motor or the wiring | 5 |
| Power supply error | After the self-test, the power supply to the control unit is faulty. | 6 |
| Phase line faults | One or more phases of the motor are disconnected. | 7 |
| Self-test error | Failed self-test of the control unit. | 10 |
| Overheating protection of the control unit | The temperature of the control unit is too high. | 11 |
| Twist throttle signal error | The input signal of the twist throttle is faulty. | 12 |
| Motor overheating protection | The motor temperature is too high. | 13 |
| Position error of the twist throttle after starting the vehicle | When the vehicle is switched on, the twist throttle is not in the starting position (zero position). | 14 |
| General error of the control unit. | The control unit is in an error state. | 15 |
Cleaning the product
Please mix tap water and neutral detergent to clean the vehicle. After cleaning the vehicle, wipe the surface with a soft cloth.
Do not clean your vehicle directly with a strong jet of water (e.g., high-pressure cleaner, etc.), which can cause faults or damage to mechanical and electrical components due to moisture.
Please refer to the more detailed information and instructions in the separate service and maintenance manual.
Secure storage of the product
Please park the vehicle in a flat, solid, well-ventilated and dry place. Please avoid exposing the vehicle to weather conditions such as sunlight, rain/snow, etc. for long periods of time. If you park the vehicle for a longer period of time, please note the additional information in the service/maintenance booklet.
Technical data and dimensions

| Parameters | |
| Motor type | DC mid-motor |
| Rated power | 3.5 kW |
| Max. power | 6.2 kW |
| Maximum speed | 95 km/h |
| Range (EEC test) | max. 76 km (1 x 72 V 36 Ah) |
| Battery capacity | 36 Ah |
| Battery type | Lithium battery |
| Display | LCD |
| Vehicle lighting system | LED |
| Brake system | CBS disc brake |
| Nominal battery voltage | 72 V |
| Standard charging current | 8 A |
| Battery charging time | approx. 4.5 h |
| Wheelbase | 1320 mm |
| Minimum ground clearance without load | 125 mm |
| Steering angle | 44° |
| Front wheel rim | MT 2.5×14 |
| Rear wheel rim | MT 3.0×13 |
| Front tyre size | 100/80-14 |
| Rear tyre size | 110/70-13 |
| Front brake system | Hydraulic disc brake system |
| Rear brake system | Hydraulic disc brake system |
| Vehicle length | 1900 mm |
| Width | 690 mm |
| Height | 1130 mm |
| Seat height | 780 mm |
| Empty weight without battery | 95 kg |
| Permissible total weight | 284 kg |
Safety instructions
Please read this product manual carefully, and only use this vehicle if you are mentally and physically fit to do so.
Please follow the traffic rules, do not deliberately drive in reverse for long distances, do not run red lights, and do not use mobile phones while driving.
Please do not use any third-party accessories, and do not disassemble or modify the e-scooter without authorisation; otherwise, any resulting damage will be at your expense, and you will lose the right to make use of our warranty service.
Due to the continuous improvement of the product, the vehicle you purchase may differ slightly from the vehicle described in this manual. If you are unsure about the use, repair and commissioning of this vehicle, please contact our authorised specialist dealers.
Please read the following instructions carefully for your own safety and that of others:
- Before riding the e-scooter, check that all safety-relevant functions (e.g., lighting system, horn, braking system, etc.) are in working order in order to ensure road safety. If you should notice any problems, please contact your specialist dealer immediately.
- To ensure your safety, wear a safety helmet, gloves and appropriate protective equipment when driving.
- Please make sure that you are in good health and not tired. Please do not ride your scooter if you have consumed drugs, medication, alcohol or impairing substances.
- Please observe the traffic regulations and adjust your speed according to the weather and road conditions.
- Do not park the vehicle in unauthorised locations (restricted areas, etc.)e.g., in escape routes, fire brigade access roads,
- We do not recommend charging or parking the electric scooter in the immediate vicinity of flammable materials. Charging should always be done under supervision.
Please contact the HORWIN Customer Service Centre at this e-mail address: service@horwinglobal.com
If you should have a problem with this scooter, we will be happy to help you.
Documents / ResourcesDownload manual
Here you can download full pdf version of manual, it may contain additional safety instructions, warranty information, FCC rules, etc.
Advertisement


Need help?
Do you have a question about the EK3 and is the answer not in the manual?
Questions and answers