Advertisement
Advertisement
Table of Contents

Subscribe to Our Youtube Channel
Related Manuals for Horwin EK3


Summary of Contents for Horwin EK3
- Page 2 EK3 User Manual Welcome to join HORWIN family! We will guide you to understand every function of EK3 electric motorcycle and use EK3 electric motorcycle correctly and safely. To ensure your safety, please read this manual carefully before riding and ensure that you always comply...
-
Page 3: Safety Instructions
Safety Instructions Please read this product manual carefully, and please do not use this product until you have known the characteristics of the electric two-wheeled motorcycle. Please abide by traffic rules, do not retrograde or run red lights and do not use mobile phone while riding the motorcycle. -
Page 4: Product Overview
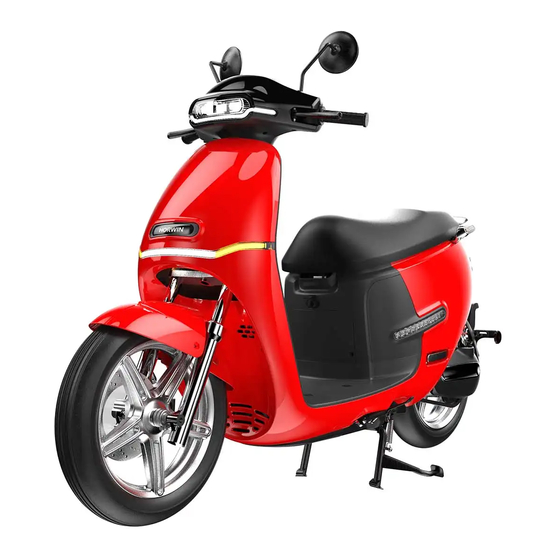
Product Overview Thank you for purchasing the EK3 electric two-wheeled motorcycle, which is hereinafter referred to as EK3. Schematic Diagram of Body and Components:... -
Page 5: Description Of Parts
Description of Parts Left Side ①Headlamp ②Rearview mirror ③Left combination switch ④Saddle ⑤Tail lamp ⑥Rear fender ⑦Middle stand ⑧Side stand ⑨Front fender ⑩Front shock absorber ⑪ Storage box (inbuilt USB) - Page 6 Right Side ①Throttle ②Right combination switch ③Ignition lock ④Steering lamp ⑤Footboard ⑥Rear shock absorber ⑦Rear armrest ⑧Reflector ⑨Rear fork decorative cover Instrument and Combination Switch...
- Page 7 1. Left turn signal Turn on the left turn signal lamp, the indicator flashes. 2. Right turn signal Turn on the right turn signal lamp, the indicator flashes. 3. Current display bar Display the current real-time current of the controller. 4.
- Page 8 8. OBD icon When a fault occurs, this icon will light up 9. Single mileage Display the single mileage 10. Total mileage Display the total mileage 11. Battery Indicator Display the current battery status in percentage,up to 100%. 12. High beam The indicator will light up when the high beam is turned on.
- Page 9 15. Reverse Display Press and hold the reverse button, the vehicle enters reverse mode. Th en turn the throttle, the vehicle goes backward. 16. Sliding Screen When the distance between the electronic key and the vehicle is less than 1.2 meters, swipe the screen to the right, start the motorcycle, swipe the screen to the left and stop the motorcycle.
- Page 10 ②Steering lamp ⑥Gear mode Turn the switch to the left to turn Press the left, middle and right on the left turn signal; buttons to adjust the gear Turn the switch to the left to turn on the left turn signal; Turn the switch to the middle position to reset the switch, and turn off the left/right turn signal.
- Page 11 Key and Remote Control Electronic Key 1. Anti-theft button: Press the button gently, then the vehicle will enter the anti-theft alarm state. When the electronic key is more than 1.2 meters away from the motorcycle, the motorcycle will automatically enter the anti-theft state. 2.
- Page 12 Mechanical Key Open the saddle Start Front lock Keyhole Start the Open the Ignition saddle motorcycle lock Front lock Turn the head to the leftmost position, then press and rotate the key counterclockwise to "lock" position...
-
Page 13: Battery And Charger
Open the saddle When the distance between the remote control key and motorcycle is less than 1.2m, Press inward with a "click" sound and loose the button, then turn the key left to "open" position to open the saddle. Insert the mechanical key, turn it to "open" position, and open the saddle. - Page 14 Take out the battery, plug the charger into the charging interface, then plug into the socket and press the battery start button. Then the power indicator will light up and display the real-time power. Vehicle Charging Mode Put the battery into the battery compartment, connect the vehicle power plug to the battery, and then insert the charger charging plug into the charging interface above the footboard to charge the motorcycle.
- Page 15 In the Non-Charging state, press the power display button: Indicator In the normal state, the indicator shows the battery power. Each grid displays 20% of power. Battery Manual Before using the battery, please make sure that the battery is the original battery, and do not use other brand or type of battery.
- Page 16 of the battery leaving the factory is about 30%). Due to self-consumption factors such as transportation cycle and storage cycle, when using the battery for the first time, the battery will have low or no power, which is a normal phenomenon. Please don't worry, just charge it according to the charging instructions.
- Page 17 The battery is not the component that can be repaired by the user. In case of abnormal phenomenon, please contact the dealer. If the battery is disassembled without permission, the user will not enjoy the three-guarantee service, and the battery may be heated, smoked, on fire or exploded.
- Page 18 Precautions for Charger Use The charger can only be used indoor. It is strictly forbidden to charge the battery in a confined space or in the high temperature environment, and the battery shall not be placed in the seat bucket or tail box during charging. ...
- Page 19 than 40℃, otherwise the capacity of the battery will be irreversibly attenuated. In winter, summer or other special circumstances, if the vehicle is not used for a long time, the battery must be taken out of the vehicle, stored separately, maintained and charged regularly, otherwise the battery may be completely drained and irreversibly damaged.
- Page 20 Precautions for Battery Use: When using the battery for the first time, please drain the battery as much as possible, then fully charge it before formally using it, so as to ensure that the actual capacity of the battery is as accurate as the electric quantity displayed on the instrument.
-
Page 21: Protective Clothing
the battery may be on fire, burned and exploded. Please transfer the battery to the dealer for maintenance immediately. Riding Guide Precautions for Preparation Drinking is a direct cause of death in motorcycle driving. Every year, 50% of drivers die from driving after drinking. Do not drive after drinking Before your first drive, we strongly request you to: Read the user manual;... -
Page 22: Driver Training
EK3. Please practice driving the motorcycle in a safe place until your skills are mature and you have got used to the size and weight of EK3. We request all drivers to take driving courses certified by local government. - Page 23 Are rearview mirrors clean. Adjust them to proper angle. Is the brake oil sufficient. Can handles and brake system work normally. Should there be any abnormality or operation issue, please contact HORWIN customer service center. Email: service@horwinglobal.com Restrictions and Guidelines on Roads...
-
Page 24: Loading Instructions
Distribute the weight of goods evenly on two sides of the vehicle body; How to start the vehicle EK3 can be started in two ways: by mechanical key and remote controller; First method: start the vehicle by using mechanical key:... - Page 25 Step 2 Please retract the side stand/middle stand, and press the "Start Switch",then the instrument displays "READY". Step 3 Turn the throttle handle gentle and enjoy your first riding. Second method: start the vehicle by using the electronic key: Step 1 Please wear your safety helmet, sit on the vehicle, and the distance between the electronic key and the vehicle shall be less than 1.2m Step 2 Please retract the side stand/middle stand, swipe the screen to...
- Page 26 Third method: start the vehicle by using the electronic key: Step 1 Please wear your safety helmet, sit on the vehicle, and the distance between the electronic key shall be less than 1.2m Step 2 Please retract the side stand/middle stand, double click the Start Button on the electronic key at the interval of 0.5s, the vehicle is energized, press the "Start Switch", then the instrument displays "READY".
- Page 27 Instructions for Braking Before riding the vehicle, it is necessary to check whether the front and rear brake handles can work normally Excessive sudden braking may cause dead lock and slide of wheel, reducing control over the motorcycle. In this case, release the brake lever and continuously drive forward until the control restores, then brake more gently.
- Page 28 Closing the Riding System The methods of turning off the riding system are as follows: 1. Lay down the side stand, the "READY" on the instrument will not light up, the electrical system of the whole vehicle is in standby state, and the vehicle will not move forward after the throttle is turned.
-
Page 29: Product Manual
4. If the vehicle is started by sliding the screen, then swipe the screen to the left, the electrical system of the whole vehicle will be turned off. Product Manual Due to the continuous improvement of our products, design changes and other reasons, the product described in this manual may be inconsistent with the product you purchased. - Page 30 "click" sound to recover 0% starting position Transmission chain Check the tightness of Clean EK3 after riding it for 300 miles in wet or dirty the chain (*) places, and replace the chain if necessary. Adjust and lubricate the chain...
- Page 31 Front and rear brake √ √ √ √ √ √ √ √ light switches Inspection operation Signal lights and √ √ √ √ √ √ √ √ headlights Inspection operation(*) Side stand √ √ √ √ √ √ √ √ Inspection operation Front shock absorber, front fork...
-
Page 32: Troubleshooting
(*) Unless you have the appropriate tools, service data and mechanical qualifications, otherwise, the vehicle shall be inspected by your HORWIN authorized dealer. (* *) For safety reasons, we recommend that these items can only be provided by your authorized HORWIN dealer. - Page 33 Phenomenon Cause Treatment Method 1. The battery is not fully charged 2. The tire pressure is 1.Check the charger for damage insufficient 2. Check the tire pressure before 3. The vehicle is braked and each use started frequently and the The endurance mileage is vehicle is overloaded...
- Page 34 OBD code Fault code Fault Treatment Method Speed control throttle fault 1, the Contact the after sales service P0120 voltage of the throttle is out of range or dealer Overcurrent fault of the controller, the Contact the after sales service P0C01 average current of the controller or dealer...
- Page 35 Controller Flashing Frequen Protection Characteristics of Controller System cy of The battery voltage is higher than the set Overvoltage protection value The battery voltage is lower than the set Undervoltage protection value Motor Overcurrent The phase line of the motor is Protection short-circuited.
- Page 36 Cleaning of the Vehicle Please mix tap water and neutral detergent to scrub the vehicle. After scrubbing the vehicle, wipe the surface with a soft cloth. Please do not directly flush both sides and inside of the instrument with a high-pressure water gun.
- Page 37 Basic Parameter...
- Page 38 Item Parameters Motor type DC motor Rated power 3.5KW Maximum power 6.2KW Maximum Speed 95km/h Range (AT 45 KM/H WITH 100KM Battery capacity 40AH Battery type Lithium battery Instrument Lamp system of the vehicle Brake system CBS oil brake Battery voltage Standard charging current Charging time Wheelbase...
- Page 39 Note: This form shall be completed by the customer and shall be filed by the dealer. Policy of Warranty Thank you very much for purchasing EK3 electric motorcycle produced by HORWIN. In order to provide users with comprehensive service guarantee, according to relevant laws and regulations and...
- Page 40 Within the warranty period, HORWIN service provider will freely provide repair service and replacement service. If the maintenance is beyond the service period or scope of "Three Guarantees", HORWIN service provider will provide paid services according to local market conditions and maintenance prices.
- Page 41 Item Spare Parts Warranty Scope Warranty Period Painted plastic parts, electroplated parts, 6 months handrails The painted surface is seriously Vehicle chipped, faded,blistered and Body cracked Front brake assembly, rear brake 9 months assembly and disc brake Non-fast charger (accessory delivered 24 months with the vehicle) Fast charger...
- Page 42 Item Spare Parts Warranty Scope Warranty Period In the specified use environment, the lithium battery is used after being charged and is not impacted by external force.(The range of the environment temperature at which the lithium battery can be charged is 0℃~35℃, and the range of the environment temperature at which the lithium battery can be used is...
- Page 43 Instructions to other items not covered by warranty standard Based on the above table, if the items are beyond the time limit and scope of three guarantees, they are beyond the scope of three-guarantee service. Other parts not included in the above table, such as brake shoe, brake oil, power socket, cable, USB, PP and appearance parts, are vulnerable and consumable parts and cannot enjoy the "Three-Guarantee"...
- Page 44 There is no invoice, warranty card or bill or the bill is inconsistent with the card. If the parts such as controller and charger are provided with trademarks or seals, and the trademarks or seals are torn artificially, these parts will not be guaranteed. ...
- Page 45 Repair& Maintenance Records In order to enhance your warranty experience, please be sure to repair and maintain your vehicle at our authorized dealers. And please record in the form below and stamp the dealer's seal. Model: Frame No.: Motor No.: The 1st service Date: Range:...
- Page 46 The 7th service Date: Range: Dealer's stamp The 8th service Date: Range: Dealer's stamp The 9th service Date: Range: Dealer's stamp The 10th service Date: Range: Dealer's stamp The 11th service Date: Range: Dealer's stamp The 12th service Date: Range: Dealer's stamp The 13th service Date:...
- Page 47 The 14th service Date: Range: Dealer's stamp The 15th service Date: Range: Dealer's stamp The 16th service Date: Range: Dealer's stamp The 17th service Date: Range: Dealer's stamp The 18th service Date: Range: Dealer's stamp The 19th service Date: Range: Dealer's stamp The 20th service Date:...
Need help?
Do you have a question about the EK3 and is the answer not in the manual?
Questions and answers