go-e Charger Gemini, Charger Gemini 2.0 Manual
- Installation and operating manual (35 pages) ,
- Quick reference manual (21 pages) ,
- Quick reference manual (24 pages)
Advertisement
- 1 Product overview
- 2 Scope of delivery
- 3 Technical data Gemini & Gemini 2.0
- 4 Installation
- 5 Commissioning/charging
- 6 LED status display/troubleshooting
- 7 Reset card/RFID chip
- 8 App - connection setup
- 9 App - Charger
- 10 App - settings
- 11 Contact and support
- 12 Important symbols
- 13 Sustainable charging
- 14 Before installation and commissioning
- 15 Safety regulations/notes
- 16 Documents / Resources
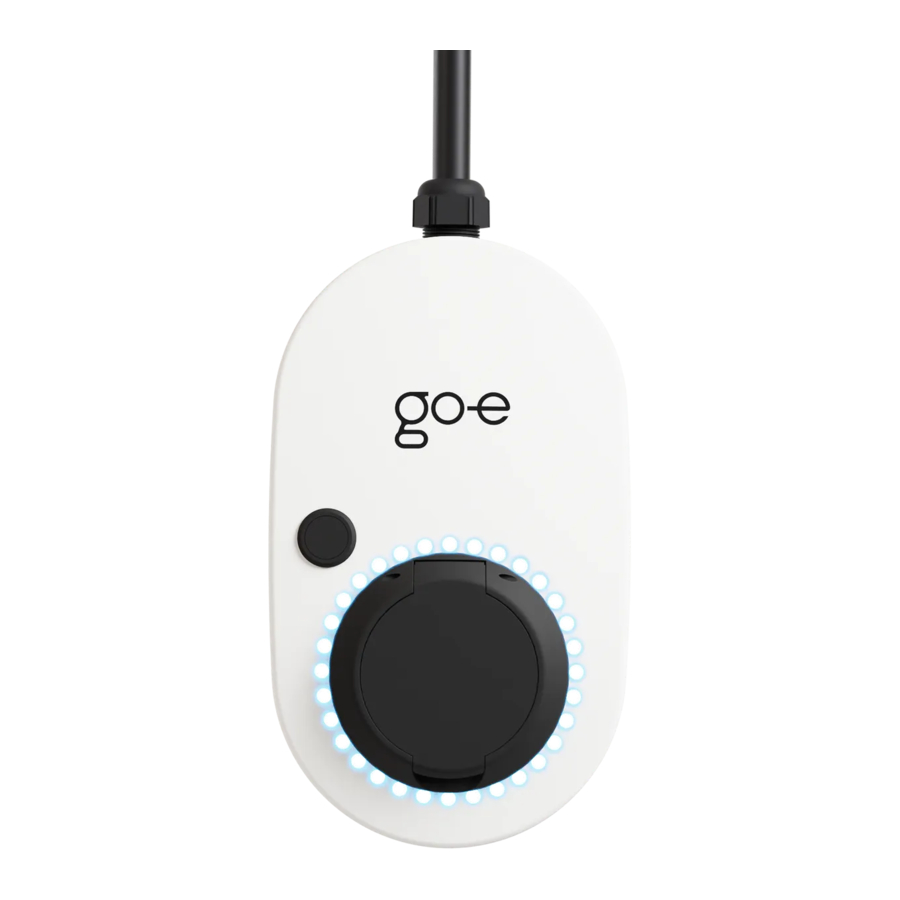
Product overview

- RFID chip
Release of charging processes (can be activated via app) - Reset card
Required for using the app and for resetting the charger to factory settings - Connection cable
direct connection to a junction box possible
![]()
- Housing
Impact-resistant and UV-resistant high-performance plastic - RFID reader
Release of charging processes with RFID chips or cards
(can be activated via app) - Button
Change of charging strength (5 levels - adjustable via app) - LED ring
Display of charging strength (1 LED = 1 ampere) and charging status - Type 2 socket
Connection for type 2 plug of the charging cable (with weather protection) - Rating plate
With serial number of the charger - Sealed screws
![warning]() Opening leads to loss of guaranty/warranty
Opening leads to loss of guaranty/warranty

Scope of delivery

Optional accessories
- go-e Controller
- go-e Case
- go-e Tower or go-e Pedestral
- Type 2 cable (up to 22 kW) 2.5 m | 5 m | 7.5 m
- Type 2 cable holder
- RFID chips, pack of 10
- Additional go-e Charger wall bracket
Technical data Gemini & Gemini 2.0
Product specifications
| 11 kW | 22 kW | |
| Stationary wallbox/charging station | According to EN IEC 61851-1:2019 | |
| Dimensions | Approx. 15.5 x 26 x 11 cm | |
| Weight | 1.85 kg | 2.34 kg |
| Connection cable | 1.8 m, 5 x 2.5 mm² for permanent connection (type H07BQ-F) | 1.8 m, 5 x 6 mm² for permanent connection (type H07BQ-F) |
| Connection | Single-phase or three-phase | |
| Rated voltage | 230 V - 240 V (single-phase) / 400 V - 415 V (three-phase) | |
| Nominal frequency | 50 Hz | |
| Power grid types | TT / TN / IT | |
| Standby power | 3.1 W (LEDs dark) to 5.2 W (LEDs bright) | |
| RFID | 13.56 MHz | |
| WiFi | 802.11b/g/n 2.4 GHz / frequency band 2412-2472 Mhz | |
| Cellular connectivity* | 4G | LTE / 2G | EDGE / Supported bands: GSM900, GSM1800, LTE FDD: B1 B3 B5 B7 B8 B20 / Frequency Range: 800MHz - 2600MHz | |
Permissible ambient conditions
| 11 kW | 22 kW | |
| Installation site | Indoors and outdoors | |
| Operating temperature | -25°C to + 40°C | |
| Storage temperature | -40°C to + 85°C | |
| Average temperature in hours | Maximum 35°C | |
| Altitude | Maximum 2,000 m above sea level | |
| Relative humidity | Not more than 95% (non-condensing) | |
| Impact resistance | IK08 | |
Charging capacity
| 11 kW | 22 kW | |
| Maximum charging power | 11 kW (16 A, 3-phase) | 22 kW (32 A, 3-phase) |
| Ampere and status display | Readable via LED ring and app | |
| Adjusting charging power | By button and app | |
| Via charging current in steps of 1 ampere between 6 A and 16 A | Via charging current in steps of 1 ampere between 6 A and 32 A | |
* = go-e Charger Gemini 2.0
Charging capacity
| 11 kW | 22 kW | Remark | |
| Single-phase charging car¹ | 1.4 kW to 3.7 kW | 1.4 kW to 7.4 kW | Country-specific limitations need to be observed |
| Two-phase charging car¹ | 2.8 kW to 7.4 kW | 2.8 kW to 14.8 kW | Two-phase connection of the charger is not possible |
| Three-phase charging car¹ | 4.2 kW to 11 kW | 4.2 kW to 22 kW | go-e Charger switches through the power that is available at the connection |
¹Charging power depending on the number of phases of the car's onboard charger
Safety functions
| 11 kW | 22 kW | |
| DC protection module with DC current detection and additional AC detection | 6 mA DC, 20 mA AC (An RCD type A must be installed on the building side and a miniature circuit breaker must be connected upstream. The local installation regulations must be observed). | |
| Protection class | I | |
| Pollution degree | II | |
| Anti-theft device | Charging cable locking device | |
| Access control | Can be activated if required. Authentication via RFID or APP possible. One learned RFID chip is already included. | |
| Input voltage | Phase and voltage testing | |
| Switching functions | Testing of the switching functions | |
| Ground check | For TT, TN grids (deactivatable ground check for IT grid - Norway mode) | |
| Current sensor | 3-phase | |
| Temperature sensors | Regulation of the charging current in case of overtemperature | |
| Grid-serving control | Two data cables for connection to ripple control receiver | |
| IP65 | Protected against dirt and water, suitable for permanent outdoor operation | |
| go-e network operator API | For authorised access by the electricity grid operator to the go-e Charger for grid-serving power control | |
| Modbus TCP | e.g. for grid-serving power control by the electricity v grid operator | |
Connection to vehicle
| 11 kW | 22 kW |
| Type 2 socket (acc. to EN 62196-2) with mechanical locking device (own type 2 cable required, available as accessory) | |
| Vehicles with type 1 can be charged with adapter cable type 2 to type 1 (available as accessories) | |
Additional cellular specifications Gemini 2.0
| 11 kW | 22 kW | |
| Mobile phone contract | At least 5 years of free cellular connection. Extension possible for 12 euros (incl. VAT) per year. | |
| SIM card type | Factory-integrated eSIM from go-e (not exchangeable). Factory-installed customer-owned nano-SIM for larger B2B projects. | |
| Activate/Deactivate | At any time via go-e app or API | |
| Connection types | Standard: 4G LTE Cat-1 Fallback in case of limited reception: 2G / EDGE | |
| Country availability go-e tariff | Unlimited cellular connection in all EU countries, Great Britain, Switzerland, Norway and Liechtenstein. Free roaming between these countries. | |
| Mobile networks | An overview of the mobile networks used in the above-mentioned countries is available on the go-e website in the Support/FAQ section. | |
Overview of network interfaces go-e Charger series (V3 to V5)
| HOME series (V3) | Gemini series (V4) | Gemini 2.0 series (V5) | |
| WiFi hotspot | yes (can be disabled) | yes (can be disabled) | yes (can be disabled) |
| WiFi connection | yes | yes | yes |
| 4G / LTE | no | no | yes |
| 2G / Edge (Fallback) | no | no | yes |
Functions & interfaces go-e Charger
| Using WiFi | Using cellular | |
| App connection | yes | yes |
| OCPP1 | yes | yes |
| Dynamic energy tariffs | yes | yes |
| Static load balancing | yes | yes |
| Dynamic load balancing with go-e Controller | yes (Internet connection required for Controller) | yes (Internet connection required for Controller) |
| PV surplus charging with go-e Controller | yes (Internet connection required for Controller) | yes (Internet connection required for Controller) |
| Charging log recording and export | yes | yes |
| HTTP Cloud API | yes | yes |
| MQTT API[1] | yes | no |
| Modbus TCP[2] | yes | no |
¹OCPP connection is established directly from the Charger. No tunnelling through the go-e Cloud. OCPP can also be used when the go-e Cloud connection deactivated.
2 MQTT connection is established directly from the Charger. When using WiFi, the connection to MQTT brokers is possible both in the local network and on the Internet. It is not possible to use MQTT via cellular connection due to the high data volume.
3 As Modbus TCP connection to the go-e Charger has to be established by directly using an IP address, a connection via cellular network is technically not possible.
go-e app and connectivity
| 11 kW | 22 kW |
| Local (WiFi hotspot) or worlwide* (WiFI or cellular connectivity) controlling and monitoring | |
| Adjustment/check of the charge (voltage, current, power, energy) | |
| Adjusting the current level in 1 ampere steps | |
| Start/stop function and Scheduler | |
| Management of RFID chips/cards (up to 10 users per charger) / Access control (RFID/App) | |
| OCPP 1.6* | |
| Electricity meter (total kWh and total amount per RFID chip) | |
| kWh limit mode / ECO mode* / Daily Trip Mode* | |
| Push notifications* | |
| Cable unlock functions | |
| Flexible energy tarifs with intelligent charging management*/** | |
| Static load balancing* | |
| Photovoltaic connection via go-e Controller (separate product) or open API interface (programming required) or alternative energy management system* | |
| LED adjustment | |
| Management of the charging levels via button on the charging station | |
| Updateable for later functions (Smart home, etc.)* | |
| Automatic unlocking of the charging cable in the event of a power failure | |
| 1-/3-phase switching via app or automatically with go-e Controllereven during the charging process | |
| Synchronisation of charging processes with the cloud and display of the past charging processes* | |
| Documented public API interfaces: HTTP, MQTT, Modbus TCP | |
*Internet connection of the Charger required
**Contract with an electricity provider whose flexible electricity tariff is integrated in the go-e app is required. Several 100 tariffs are stored. The number of tariffs is constantly being expanded.
Installation
Required tools

- Pencil
- Spirit level
- Measuring tape
- Drilling machine
- Screwdriver
- Hammer
- Cutter knife
- Side cutter
Enclosed mounting material

- Dowel 8 x 40 mm
- Screws for wall bracket 4.5 x 50 mm
- Screw for U-piece 4 x 50 mm
- U-piece (optional anti-theft device)
- Wall bracket
 It is not necessary to open the go-e Charger as part of the installation process. The device must also never be opened in other respects.
- Mount the go-e Charger approx. 1.00 to 1.45 meters above the ground, depending on your personal feeling of well-being.
![]()
![information]() Place the wall bracket in the desired mounting position. Use a spirit level to align it straight. Mark the four drill holes with a pencil by using the wall bracket as a template.
Place the wall bracket in the desired mounting position. Use a spirit level to align it straight. Mark the four drill holes with a pencil by using the wall bracket as a template.
![]()


- Drill holes at the four marked positions.
![]()
![]()
- Attach the wall bracket with four screws and dowels each. Drive the dowels into the wall with a hammer. Make sure that the surface is not warped. The device may not be attached if the wall bracket is distorted. Compensate possible unevenness of the wall with spacers (not included in the scope of delivery).
![]()
![]()
- Hook the go-e Charger into the wall bracket.
![]()
Optional: If required, attach the supplied U-piece directly above the charger, making it impossible to remove the device from the wall bracket. In addition, a padlock (not included in the scope of delivery) can be attached.
![]()
![]()


- The go-e Charger is equipped with an integrated DC protection module with DC detection and additional AC detection (6 mA DC, 20 mA AC).
![warning]()
![]()
On the building side, an RCD type A must be installed and a miniature circuit breaker must be installed upstream. The local installation regulations must be observed. Miniature circuit breakers with characteristic B or C for 16 or 32 amperes are permissible:
![]()

- 3- or 4-pole for three-phase connection
- 2-pole for single-phase connection
- The go-e Charger Gemini (2.0) may be connected single-phase and three-phase. If necessary, lay an additional supply line. When selecting the cable crosssection, observe the simultaneity factor and the type of installation. We recommend the following cable cross-sections, but the electrician has to decide according to local conditions:
![warning]()
![]()
![]()
The connection cable of the go-e Charger Gemini (2.0) may also be shortened. Connection via a junction box is possible.11 kW 22 kW as surfacemounted at least 2.5 mm² at least 6 mm² in wall at least 4 mm² at least 6-10 mm² in insulation at least 10 mm² at least 10 mm²
![]()


- If your energy provider prescribes a ripple control receiver, the two data cables (white and red) are also needed to be installed. Polarity order does not matter.
![]()
![]()
- When installing several devices, connect the phases of the first, second and third charger to the domestic circuit in rotation according to the adjacent illustration to ensure even load distribution when charging single-phase vehicles.
![]()
![warning]() Activate static load balancing via the go-e app (Internet required).
Activate static load balancing via the go-e app (Internet required).
![information]() When using the go-e Controller, you can activate dynamic load balancing, which takes into account the electricity consumption in the entire house.
When using the go-e Controller, you can activate dynamic load balancing, which takes into account the electricity consumption in the entire house.
![]()


Commissioning/charging
- Start of the charger
The go-e Charger performs a self-test during initial start-up or after a restart, during which the LEDs light up in rainbow colours.
![]()
- Ready to charge
The go-e Charger is ready for operation. The number of blue LEDs corresponds to the set charging current.
![information]() Five predefined charging levels can be selected via the but ton.
Five predefined charging levels can be selected via the but ton.
![information]() You can adjust the charging levels individually in the go-e Charger app („Current levels"). It does not matter whether the go-e Charger is connected singlephase or three-phase.
You can adjust the charging levels individually in the go-e Charger app („Current levels"). It does not matter whether the go-e Charger is connected singlephase or three-phase.
![]()
- Starting the charging process
Connect the go-e Charger and the vehicle by using a type 2 charging cable (or if the car has a type one socket by using a type 2 to type 1 adapter cable). Make sure that the type 2 plug is inserted as far as possible into the type 2 socket of the charger.
![]()
The Charger is ready for charging and is waiting for the car to release it. The LEDs light up yellow in the number of the preset charging current.
![]()
- Charging
After the car has enabled charging, the LEDs rotate clockwise around the type 2 socket during the charging process.
![information]() The number of „tails" corresponds to the number of connected phases or the number of phases set in the app:
The number of „tails" corresponds to the number of connected phases or the number of phases set in the app: - 1 rotating tail = 1-phase charging (230 V)
- 3 rotating tails = 3-phase charging (400 V)
The speed of rotation and length of the tails indicate the amount of charging current.
![]()
- Stop charging
The charging process is completed when the LEDs light up green.
![information]() If you want to stop charging prematurely, use the „cable release" function of your vehicle or the large round button of the go-e Charger app (tab „Charging").
If you want to stop charging prematurely, use the „cable release" function of your vehicle or the large round button of the go-e Charger app (tab „Charging").
![information]() The cable remains locked in the type 2 socket in the standard setting after the charging process has ended (adjustable via the app) until it is removed from the vehicle (theft protection).
The cable remains locked in the type 2 socket in the standard setting after the charging process has ended (adjustable via the app) until it is removed from the vehicle (theft protection).
![information]() If the power supply is interrupted, the charging cable remains locked in the charging box for reasons of theft protection. To unlock it, it is necessary to reenergise the charging station. The cable can also be unlocked automatically after a power failure, provided the function has been activated in advance via the „Cable unlock" setting in the app. However, it is then no longer theft-protected in the event of a power failure.
If the power supply is interrupted, the charging cable remains locked in the charging box for reasons of theft protection. To unlock it, it is necessary to reenergise the charging station. The cable can also be unlocked automatically after a power failure, provided the function has been activated in advance via the „Cable unlock" setting in the app. However, it is then no longer theft-protected in the event of a power failure.
![]()


LED status display/troubleshooting
The go-e Charger displays the charging status via different colours and positions of the LEDs. In addition, it executes a whole series of safety queries to check the used power source for possible errors. For this reason, the go-e Charger may display an error and refuse to charge, especially with unknown power sources.
The device visualises the cause of the error by certain colours and positions of the LEDs. You can also find the error message within the „Status" information of the app. (The following colour codes correspond to the factory setting).
Ground check deactivated

4 LEDs light up red (3, 6, 9 and 12 o'clock).
The go-e Charger has the safety function „ground check", which prevents the charging process in TT/ TN power grids (common in most European countries) in case of insufficient grounding of the power connection. This function is enabled by default and can be disabled via the go-e Charger app.
However, the „Ground check" should only be disabled if you are sure that the electricity grid has no grounding (IT grid, e.g. in many regions of Norway), so that charging can also be carried out here. If you are not sure, you must leave the setting in the app at „Enabled"!
Waiting

The LEDs flash blue in the number of preset charging power.
The go-e Charger waits to charge based on a preset sheduler or to obtain cheap electricity when charging with a flexible electricity tariff.
Activation required

The LEDs light up blue and two white LEDs move from the top and bottom to the centre.
The „Access control"/"Charging mode" is not set to „Open". Use a learned RFID chip or the app to activate the charging process.
RFID chip detected

5 LEDs light up green.
The go-e Charger has recognised an RFID chip authorised for charging and releases the charge.
Unknown RFID chip

5 LEDs light up red.
An unknown RFID chip was used. Use a learned RFID chip to activate charging.
Internal error

The LEDs flash red.
The go-e Charger has detected a general communication error. Check the error code in the go-e Charger app.
Vehicle is not recognised

The LEDs light up blue in the standby mode.
However, the charging process does not start.
Check the charging cable and the tight fit of the plugs.
Grounding fault

The LEDs flash red at the top and glow green/yellow statically at the bottom.
Check whether the supply line to the go-e Charger is properly grounded.
Phase error

The LEDs light up blue at the bottom and flash red at the top.
Check whether the phase/s of the go-e Charger are connected properly. It is possible that only 2 phases are connected. If no function occurs, contact the go-e Support.
Fault current detected

The LEDs flash red at the top and light up pink at the bottom.
The Charger has detected a DC fault current >= 6 mA or AC fault current >= 20 mA. To acknowledge the fault, press „Reboot" in the app or disconnect the Charger from the power supply for a short time. If necessary, the charging current can be reduced, but also check the connection used. (The charging system in your vehicle may also be defective).
Increased temperature

The LEDs light up yellow at the bottom and flash red at the top.
The temperature in the go-e Charger is increased. Therefore, the charging current is automatically reduced.
Error unlocking or locking

The LEDs briefly light up red at the top and yellow at the bottom.
The charging cable could not be unlocked or locked properly. The unit tries to repeat the process every five seconds. The type 2 plug may not be inserted completely. Try to insert it into the type 2 socket as far as possible.
Firmware update

The LEDs flash pink and turn yellow with increasing progress of the update.
A firmware update was started via the go-e Charger app. This may take a few minutes. Do not disconnect the charger from the power supply during this time.
Firmware update successful

The LEDs light up alternately green and pink. The firmware update has been successfully completed.
Firmware update failed

The LEDs light up alternately red and pink. The firmware update could not be completed successfully. Please try again.
Start of the charger does not end

The LEDs light up permanently in rainbow colours. If the charger does not leave this mode, the WiFi signal may be disturbed. Please remove possible sources of interference (e.g. devices with a WiFi mesh network).
Connection cable/fuse

The LEDs do not light up despite a power connection.
Check the overload protection of the connection.
Reset card/RFID chip
go-e Charger reset card

On the back of the reset card you will find important access data which you need to set up the app control of the charger:
- "Serial number": Serial number of the go-e Charger
- "Hotspot SSID": WiFi hotspot name of the charger
- "Hotspot key": WiFi hotspot password of the device
- "QR-Code": Automatically connection to the hotspot
Ideally, leave the reset card at a secure location where you can quickly access it in case you need it.
 Reset to factory settings

You can also use the reset card to reset the go-e Charger to factory settings:
- Hold the reset card in front of the chargers RFID reader
- All LEDs light up red briefly to confirm
The stored RFID chips and assigned consumption data are not deleted during this process.
RFID chip
Protection against unauthorised charging

If you install the go-e Charger outdoors, you can protect the device against use by unauthorised persons by means of an RFID chip. In the settings of the go-e Charger app, „Authentication required" or „RFID/App required" needs to be selected for this.
The delivered RFID chip is already learned.
To authenticate a person authorised for charging, the chip needs to be held in front of the RFID reader (below logo of the charger) before each charging process. Alternatively, authentication can be done by tapping the round button of the tab „Charging" of the go-e Charger app.
Consumption overview for several users

Furthermore, additional user accounts can be created with additional RFID chips (available as accessories). This is useful if several people share the unit and the charged current should be displayed separately for each user in the app.
Additional RFID chips can be learned via the app („Settings"/"RFID chips"). Simply select one of the free slots and follow the instructions in the app. The chips can be renamed individually in the app.
Any RFID chip/card that transmits on a frequency of 13.56 MHz (e.g. also many credit cards) can be learned.
App - connection setup
The go-e Charger can also be used without an app.
Download the go-e app if you want to change basic settings, use comfort functions, read the internal electricity meter or control the charger remotely.
The go-e app is available for download on the platforms listed opposite, depending on the operating system of your mobile device.


Set up connection via hotspot

- Some smartphones require deactivating mobile data and terminating active WiFi connections.
- Either scan the QR code of the reset card (an external app may be required for this) or manually search for the charger's network (displayed as go-e-xxxxxx) in the settings of your mobile device to connect to the charger's hotspot. If you connect manually, you need to enter the password that you will find on the reset card under „Hotspot key".
- Now launch the go-e app.
- If the „Charger" page is already displayed, you can already operate the charger locally via the app. Otherwise, you need to select your go-e Charger in the app beforehand.
Set up connection via WiFi
For remote control of the Charger and for some comfort functions, an Internet connection of the Charger is essential.

- To connect to the WiFi network, you have to establish an active hotspot connection to the Charger (as described above).
- Open the app, go to device list, and tap „Setup device."
- On the next screen, choose „Set-up go-e device." Once the hotspot connection is recognized, a new screen will appear. Here, select your country and tap „Continue." You have the option to enter a technician password to safeguard the grid configuration.
- Enter the name of your WiFi („SSID") or select your WiFi (if displayed). You also need to enter the „password" of this WiFi network. As soon as the connection has been established, a „Continue" button appears, which you have to tap. You may also disable the cellular connection at this point.
- The following screen prompts you to set a password, enabling remote Charger access. Complete the setup by entering this password.
- Finally, disconnect the hotspot connection with the Charger and switch your smartphone to an internet connection via mobile data or WiFi to remotely control the Charger.
App - Charger
The „Charger" screen of the app shows you the status of your Charger. Here you can monitor and control the charging process of your vehicle.

- If you own more than one go-e product, you can add, display and manage new devices in this list.
- In the charging status area, you can see the current charge status of your Charger, e.g. whether your car is currently being charged or whether it is waiting for PV surplus.
- Here you can see the total energy supplied during the current charging process (in kWh) and the current power output (in kW).
- The charging process usually starts immediately after connecting the vehicle, unless you changed settings in the app for PV surplus charging, for example, or activated access protection (authentication). In this case, you can start or cancel the charging process immediately using the start/stop button.
- You can choose your desired charging mode that suits your preference or schedule. ‚Eco' is for environmentally friendly and cost-effective charging, ‚Basic' is for regular charging without special settings, and ‚Daily Trip' is for setting a specific time and energy amount for your daily needs.
- Here you can see the charging speed in amperes and the number of phases used. You can change the charging speed by tapping this button.
- The tabs in the bottom navigation bar provide detailed information about the charging process and additional settings for a wide range of use cases.
App - settings
You can adjust the basic and comfort settings of the charger via the „Settings" tab of the app. You are provided with help notes in the app for the setting options, which is why you will only find basic information below.
WiFi and cellular connection
The cellular connection is useful if you cannot connect the go-e Charger Gemini 2.0 to a WiFi but want to use all the smart features. It is activated by default and can be deactivated in the app in the „Settings" under „Connection"/" Cellular". If WiFi and cellular are activated at the same time, WiFi is favoured for data traffic. The combination is recommended as WiFi generally offers a higher speed when providing updates and enables more accurate technical support due to a higher number of data measurements.
Current levels
When delivered, the black button of the go-e Charger is predefined with 5 amperage levels for selecting the charging current. You can switch between the levels step by step by pressing the button. You are able to adjust the current intensity of the five levels to your personal needs via the „Current levels" setting option of the go-e Charger app.
 With lower amperages, you charge more sustainably, which can have a positive effect on the stability of the power grid. With high amperages, you charge the battery faster.
Save energy with kWh limit
The „kWh limit" function is practical if you do not want to fully charge the battery because, for example, you live on a mountain and want to recuperate when driving downhill. Set in the „kWh limit" menu how much energy should be charged until the next trip.
Flexible energy tariffs - charge cheaper
If you have a contract with your electricity provider about a flexible electricity tariff with changing tariffs every hour or at certain times of a day, you can configure the Charger so that it charges your car at the cheapest hours. To do this, we have integrated flexible energy tariffs in the app to provide you with a sustainable and money-saving way of charging. The list of energy providers you can see in the go-e Charger app is constantly expanding, as dynamic electricity pricing is a relatively new concept. Check in the go-e app under „Mode" whether your energy tariff is already integrated. Select the country you live in, your energy provider and the tariff you have signed up for with your energy provider. Then activate „ECO Mode" or „Daily Trip Mode" under Mode and set a price, time or kWh limit at which the go-e Charger should start or finish charging for the selected charging mode in the „Settings" tab.
In „ECO mode", you can set a price limit per kWh. As soon as the electricity price falls below the threshold you set, the wallbox charges your electric car.
In „Daily Trip Mode", you can set a time and a kWh amount to charge your vehicle without a price limit. The go-e Charger automatically selects the cheapest hours for charging according to your electricity tariff until the specified kWh amount is reached within the set time limit. If you wish, you can continue charging in ECO mode by manually setting the charging price limit.
A cloud connection (Internet) is required for this functionality. The current prices are automatically transferred to the charger and displayed in the „Information" tab.
Photovoltaic surplus charging
Basically, the go-e Charger allows you to charge your car easily and automatically with surplus electricity from your photovoltaic system (PV). However, this requires an energy management system (EMS). The go-e Controller (separate product) is an example of such an EMS. The open interfaces of the go-e Charger also allow you to use other EMS. For these, however, you usually need to have programming knowledge or check in advance whether the EMS you want to use already has the go-e Charger integrated.
For charging with PV surplus power with go-e Charger and go-e Controller, customisations have to be made in the app under „Settings" in „ECO Mode" or „Daily Trip Mode". There you will find a slider „Charge with PV surplus", which you need to activate. You can then adjust the exact settings via the link „PV surplus" below the slider. Here you can also opt for automatic phase switching in order to be able to charge even when the PV system's output is low. How charging works in conjunction with the go-e Controller is explained in detail in its instructions.
Combine cheap electricity tariffs and photovoltaic surplus charging
In combination with the Controller, you can even combine charging with PV surplus and favourable electricity tariffs in „Eco Mode" and „Daily Trip Mode". The Charger first tries to use as much solar power as possible and then continues charging with cheap electricity rates.
Scheduler
The „Scheduler" option allows you to postpone the charging process to a time when electricity is available in abundance (often at night). In this way, you act in a particularly sustainable way, as you do not increase the load peaks that are common at the end of the working day and take electricity that could otherwise not be used sensibly. In this way, you ensure grid stability.
After activating the scheduler, you can define when the go-e Charger may charge or not charge. For weekdays, Saturday and Sunday, 2 time periods can be defined separately.
Load balancing
If you operate several go-e Chargers at one power connection, you should use the „load balancing" (static) function so that the building power connection is not overloaded. A cloud connection (Internet) is required for this function. If the cloud connection is temporarily interrupted, the go-e Charger will continue charging with reduced charging current in fallback mode, provided a charging current value greater than 0 A has been entered for this purpose. When using the go-e Controller, you can activate dynamic load balancing, which takes into account the electricity consumption in the entire house.
Cable unlock functions
The default setting under „Cable unlock" is that the charging cable should remain locked in the charger after the charging process until it is released at the vehicle (theft protection). Alternatively, you can lock the cable permanently. This is useful if you rarely take it with you in the car and the go-e Charger has been installed outdoors. The function serves as a permanent protection against theft of the cable. Furthermore, you can have the cable automatically unlocked after the charging process. This is convenient if you share the charging station with several people and want to allow them to use the charger at the end of your charging session.
Contact and support
Do you still have questions about the go-e Charger?
You can find helpful answers concerning the most frequently asked questions, help for technical problems and troubleshooting on: www.go-e.com
If you cannot find an answer to your question in this guide, on our website or in the app, please feel free to contact us:
Support
go-e GmbH
Satellitenstraße 1 9560 Feldkirchen AUSTRIA
 support@go-e.com
 +43 4276 62400
www.go-e.com
Important symbols
| Warning of a hazardous situation that may result in damage to health, fatal injuries or damage to property if the safety regulations are not followed. | | Note regarding the adaptation of the product or product functions to individual needs. |
 | The activity may only be carried out by a qualified electrician. | | Hint for a more ecological or economical use of the product. |
Sustainable charging
With the go-e Charger Gemini (2.0) you have chosen an extremely compact and versatile charging station for electric vehicles. Smart and intelligent solutions that make charging electric cars even more convenient are already integrated in the go-e Charger Gemini (2.0).
Compared to the classic wall charging station, the go-e Charger Gemini (2.0) can be installed more quickly by an electrician and easily connected to an existing junction box where applicable.
The go-e Charger was developed and tested by electric car drivers for electric car drivers. To ensure that it remains upto-date in the future, we are constantly developing the firmware and adapting the app to the state of the art. So let us surprise you with future functions.
Electric vehicles also need energy, which has to be generated. If we use the available energy carefully, we will not need to expand fossil fuel power plants or nuclear power plants for electric mobility.
An important contribution we can all make is to use surplus energy. So if possible, do not charge your car when you come home after work, as this is the time when the electricity grid is at its peak anyway. In order to save energy and thus also to charge in an environmentally conscious way, you should, if possible, postpone your charging with the go-e Charger „Scheduler" function to lunchtime or the early hours of the morning if possible, as there is a surplus of electricity in the grids at this time.
Even more interesting could be an electricity contract with a provider offering flexible energy tariffs, where you can benefit from the highly fluctuating electricity prices quoted at the electricity price exchange. With the go-e Charger, you only charge when the electricity is cheapest. The technology for this is already integrated in each of our charging stations. All you need to do is sign a contract with an electricity provider whose flexible electricity tariff is integrated in the go-e app. Several 100 tariffs are available. The number of tariffs is constantly being expanded.
By the way, in combination with the go-e Controller (separate product) you can easily charge with photovoltaic surplus power. Due to the open interfaces of our chargers, this also works with other energy management systems.
We wish you lots of fun with your go-e Charger and enough electricity at all times.
Your go-e Charger Gemini 2.0: All smart features, software updates and remote diagnostics in the event of support are now also available without WiFi thanks to the integrated SIM card and cellular connection.

Before installation and commissioning
Note before installation and commissioning
Observe all safety regulations and instructions in this manual!
Read the manual and the data sheet carefully and keep them for future reference. The documents are intended to help you:
- To use the product safely and properly
- Increase the durability and reliability
- To avoid damage to the device or property
- To prevent a threat to life and limb
Registration information
Depending on the country, the requirements of the authorities and electricity grid operators have to be observed, such as a registration or approval requirement for charging stations, or the limitation of single-phase charging.
Please contact your electricity grid operator to find out whether the go-e Charger is subject to registration or approval and whether other restrictions must be observed.
Safety regulations/notes
General safety regulations
The go-e Charger may only be Persons wearing electronic implants used for charging battery electric should keep at least 60 cm away from vehicles (BEV) and plug-in hybrids (PHEV) with the adapters and cables intended for this purpose.
Disregarding the safety regulations can have serious consequences. go-e GmbH declines any liability for damage caused by disregarding the operating instructions, safety regulations or warnings on the unit.
High voltage - danger to life! Never use the go-e Charger if the housing is damaged or open.
In case of unusual heat development, do not touch the go-e Charger or the charging cable and stop the charging process as soon as possible. If the plastic is discoloured or deformed, contact customer support.
Never cover the go-e Charger during charging. Heat build-up can lead to fire.
Persons wearing electronic implants should keep at least 60 cm away from the go-e Charger due to electromagnetic fields. Due to legal regulations the go-e Charger Gemini and Gemini 2.0 must not be used in the following countries: Netherlands, France, Italy. The go-e Charger Gemini flex has the communication interfaces WiFi 802.11b/g/n 2.4GHz, LTE-FDD*, GPRS*, EDGE* and RFID. WiFi is operated on a frequency of 2.4Ghz, channels 1-13 with the frequency band 2412-2472Mhz. The maximum transmission power of the WiFi is 20dBm. LTE is operated on FDD bands 1, 3, 7, 8 and 20 with a maximum transmission power of 23dBM. GPRS and EDGE are operated on 900 and 1800MHz at a maximum transmission power of 35dBm. RFID is operated on a frequency of 13.56MHz with a maximum radiated power of 60dBμA/m at 10m.
Electrical protective measures, installation, operation
Any information regarding electrical installation is intended exclusively for a qualified electrician whose training allows all electrical work to be carried out in accordance with the applicable national regulations. Before carrying out electrical connection work, you need to de-energise the circuit. Installation must be carried out in accordance with local, regional and national regulations.
Observe the permissible ambient conditions from the data sheet. A location without direct sunlight is recommended. The Charger is only suitable for charging gassing vehicle traction batteries in wellventilated rooms. The unit must not be operated indoors if there is an increased danger from ammonia gases.
The Charger should not be operated in the immediate vicinity of flammable or explosive substances, running water or heat-emitting equipment. The go-e Charger must be mounted vertically in the wall bracket on a flat wall. Make sure that the power connection leading to the go-e Charger is properly installed and undamaged. The go-e Charger is equipped with a DC protection module that protects the building installation from possible DC faults that could be caused by an electric car. On the building side, an RCD type A and a miniature circuit breaker must be installed. The go-e Charger also provides additional protection against AC faults (6 mA DC, 20 mA AC). The local installation regulations must be observed. The go-e Charger may only be operated at fully functional protective devices. Connection cables must be sufficiently dimensioned. An electric shock can be fatal. Do not reach into sockets and plug systems by hand or with technical aids. The go-e Charger has a safety function called „ground check", which prevents charging in TT/TN power grids (common in most European countries) if the power connection is not grounded. This function is activated by default. It may only be deactivated via the go-e Charger app if you are sure that the power grid does not have an earth connection (IT grid, e.g. in many regions of Norway) so that charging can also take place here. The go-e Charger visualises a deactivated „ ground check" by 4 red LEDs (3, 6, 9, 12 o'clock).
Connection, plug
Do not use go-e Charger if any cable attached to or plugged into the unit is damaged.
Never use wet or dirty plugs in connection with the go-e Charger.
Never pull plugs out of the connector by the cable!
Opening, conversions, repair, maintenance
Any modification or repair of the hardware or software of a go-e
Charger may only be carried out by specialist personnel of go-e GmbH. The attachment of a CEE plug to the connection cable is completely prohibited.
For safety reasons, the disassembly of an allegedly defective, permanently installed go-e product may only be carried out by a qualified electrician. Before dismantling an allegedly defective product, always contact go-e's technical customer support and wait for its decision on the further procedure for handling the service case.
Removing and damaging warning notices attached to the go-e Charger or opening the device will result in the loss of any liability by go-e GmbH. The warranty also expires in the event of any modification or opening of a go-e product.
The go-e Charger is maintenance-free.
The device may be cleaned with a damp cloth. Do not use cleaning agents or solvents. Do not clean the device with a high-pressure cleaner or under running water.
Documents / Resources
References
Download manual
Here you can download full pdf version of manual, it may contain additional safety instructions, warranty information, FCC rules, etc.
Advertisement


Need help?
Do you have a question about the Charger Gemini and is the answer not in the manual?
Questions and answers