Focusrite RedNet Manual
- User manual (28 pages) ,
- Installation manual (58 pages) ,
- Instruction manual (25 pages)
Advertisement
INTRODUCTION
RedNet is a powerful, low latency, digital audio networking system designed specifically for music, recording studio, live and broadcast applications. It is based on Audinate's Dante™, a well-established audio networking technology known for its extreme robustness. Dante - and the RedNet system - is capable of transporting up to 512 channels of bidirectional audio (at 48 kHz sample rate) over a single Ethernet link. The number of channels available in your DAW will depend on the host method being used.
RedNet brings Dante technology into the studio and live industries as the basis of a complete system. RedNet is a range of extremely high quality analogue and digital audio interfaces and components that do a great deal more than simply allow you to connect your digital studio through an Ethernet network: they will revolutionise the way you work in other ways too. Importantly, Dante is nonproprietary; this means it will work with any ASIO- or Core Audio-compliant DAW software, including Pro Tools, Logic, Cubase and Nuendo.
If you are a musician or an engineer currently using USB or FireWire-based interfaces, RedNet will give you a more reliable, powerful and professional system infrastructure. RedNet is a great solution in facilities where long cable runs are involved and/or there is a requirement to routinely reconfigure the various rooms making up a facility. It also has the advantage of only needing a standard network cable to interconnect all the I/O throughout the system, minimising installation time and impact on a building.
ABOUT THIS USER GUIDE
The Guide provides a detailed explanation of the RedNet system to help you achieve a thorough understanding of its capabilities; this includes the installation and use of the RedNet PCIe/ PCIeR card, which will be a central component in many RedNet systems. We recommend that all users, including those already experienced in digital audio networking, take the time to read through this Guide so that you are fully aware of all the possibilities that RedNet and its software has to offer. If the Guide does not provide the information you need, be sure to consult www.focusrite.com/rednet, which contains a comprehensive collection of common technical support queries.
Note that this System User Guide does not include a detailed description of the various interfaces; a separate User Guide specific to each interface is supplied with every unit, in addition to the System User Guide. Much of the installation and operation of a RedNet system revolves around setting up and configuring the system itself – these are factors which are common to all RedNet components. The examples used in this System User Guide necessarily use particular RedNet units, but you should not be concerned if your system does not include the same units – the principles of operation as far as the overall system concept is concerned is applicable to all RedNet hardware.
OVERVIEW
Focusrite RedNet Audio Networking - key features
- Digital audio networking developed specifically for studios, live and broadcast.
- Scalable, up to 512 bidirectional audio channels per link (at 48 kHz)
- Choice of various analogue and digital I/O interfaces
- Supports as many interfaces as required
- Pristine audio quality with low latency
- Round trip latency less than 3 ms with RedNet PCIe/ PCIeR card
- Based on DanteTM - proven reliability and robustness
- 24-bit, up to 192 kHz sample rate
- Very simple to configure
- Remote control of all interfaces via included RedNet Control software
- Supports any open DAW package, including ProTools, Logic and Nuendo
- Mac and Windows compatible
REDNET SYSTEM COMPONENTS
A RedNet system requires both hardware and software components. The RedNet hardware range currently consists of various models of I/O interface and a PCIe/ PCIeR digital audio interface card which is installed in the system's host computer. All the I/O units can be considered as "Break-Out" (and/or "Break-In") boxes to/from the network, and all are built in mains-powered, 1U or 2U 19" rackmounting housings, unless otherwise stated.
There are three software items for installation on the host computer: RedNet Control, Dante
Controller and Dante Virtual Soundcard. Both RedNet Control and Dante Controller are essential for system operation. Dante Virtual Soundcard is an optional software alternative to the RedNet PCIe/ PCIeR card, and allows the creation of RedNet systems without a dedicated computer interface card.
Systems based on Dante Virtual Soundcard have a lower channel capacity and a slightly inferior latency performance compared to systems using the PCIe/ PCIeR card.
RedNet I/O interfaces
A variety of audio interfaces are available for the RedNet system, including mic preamps, analogue line level I/O and various interfaces catering for digital protocols. For more information please visit: www.focusrite.com/rednet
Full details of each RedNet interface can also be found in the User Guides found on the RedNet webste.
RedNet PCIe/ PCIeR card

The RedNet PCIe/ PCIeR (PCI Express) card is an optional hardware interface between the Ethernet network interconnecting the various I/O units in a RedNet system, and the host computer. When installed in a 4-lane (minimum) PCIe card slot in either a PC, Mac or Thunderbolt chassis, it allows up to 128 channels to be sent to/from the DAW through its on-board Ethernet port/ ports. A system latency of less than 3 ms is possible with the PCIe/ PCIeR card, but to achieve this, we recommend the use of a 16-lane PCIe card slot. Note also that system latency in all cases will be dependent on buffer size, sample rate and processor power.
The computer into which the card is attached will require RedNet Control to be installed. The Ethernet port/ ports on the PCIe/ PCIeR card should be connected to the network via a Gigabit Ethernet switch, and the host computer's native Ethernet port should be connected to another port on this same switch. In this arrangement, the PCIe/ PCIeR card's Ethernet port handles all the audio and the native port handles the control data between RedNet Control and the remote RedNet I/O units.
RedNet Control
RedNet Control is the software application which lets the user configure the RedNet system and control each individual RedNet I/O device, whatever its physical location. RedNet Control versions for both PC and Mac are available as downloads from the Focusrite website – see "Installing RedNet Control".
All RedNet devices on the network are auto-detected by the RedNet Control software, and visualised on-screen along with their various controls and settings.
Dante Controller
Dante Controller software is Audinate's proprietary generic audio routing application for use with
Dante digital audio networked devices. Installation of Dante Controller is automatic; it will be installed as part of the RedNet Control software installation.
Dante Virtual Soundcard
Dante Virtual Soundcard is a software alternative to the RedNet PCIe/ PCIeR card. It allows users who do not require the extremely low latency and high channel count possible with the RedNet PCIe/ PCIeR card to implement a RedNet system. A maximum of 64 channels (in each direction) is possible, at a typical latency of 7 ms (buffer size and sample rate dependent).
Dante Virtual Soundcard can be downloaded directly from www.audinate.com. (On-line registration is required.)
Using RedNet with other Dante-compatible products
As RedNet is based on Audinate's Dante system, it is compatible with Dante-enabled devices from other manufacturers. However, note that when using RedNet devices with other Dante-enabled products, you may be limited to sample rates of 48 or 96 kHz, as many other devices do not support the full range of sample rate options offered by RedNet.
MINIMUM SYSTEM REQUIREMENTS
In general terms, computers running the following operating systems will allow a RedNet system to deliver satisfactory performance (but see important note below):
Mac
Apple Mac with OS X 10.8 (Mountain Lion) or later. Please note that RedNet is not supported by Mac PPC.
Min. 2 GB RAM
Dual core Intel Processor (Quad core recommended)
PC
PC running Windows 7, Windows 8 or Windows 10 (32- or 64-bit). Please note that RedNet is not supported by Windows Vista.
Min. 2 GB RAM
Dual Core processor (Quad core recommended)

Focusrite have evaluated a number of specific models of computer for use with RedNet systems, and recommend the use of one of these if highest system performance is essential (i.e., lowest latency at maximum channel count). Users should check www.focusrite.com/rednet for the latest information regarding specifications of suitable computers.
NETWORK REQUIREMENTS
The Audinate DanteTM protocol on which RedNet is based uses standard Ethernet technology for the network. Although RedNet traffic can be mixed with other network data, we recommend that for maximum performance the Ethernet network used for RedNet audio should be self-contained and not used for other IT purposes.
The network topology employed will be dictated by user requirements and building layout.
RedNet is compatible with both Cat 6 and Cat 5e cabling, though Cat 6 STP is preferred. EtherCON or standard RJ45 connectors with metal screens should be used, with the cable screen bonded to the connector screen.
Gbit Switch requirements
The switches used in a RedNet network should be of the 'managed' type, and designed for use in 1000 Mbps (Gigabit) systems. Un-managed switches may prevent correct RedNet network configuration. A switch with an internal PSU (i.e., requiring direct connection to AC mains) is also recommended; the external "plug-top" PSUs supplied with cheaper units may be prone to interference which could generate audible artefacts in the audio.
Numerous makes/models of Gigabit switches have been found to operate satisfactorily with Dante systems. Recommended manufacturers include Linksys, Dell, HP and Cisco. We also recommend Power-over-Ethernet (PoE) enabled switches, which will power certain RedNet devices such as the RedNet AM2 (For more information - please see the RedNet User Manuals).
Note the following features are required when selecting a switch for use with a RedNet network:
- Gigabit (1000 Mbps) ports
- Quality of Service (QoS) with 4 queues
- Diffserv (DSCP) QoS, with strict priority
- A managed switch is also recommended, to provide detailed information about the operation of each network link: port speed, error counters, bandwidth used, etc.
Additional information on switch requirements can be found at www.focusrite.com/rednet.
A note about Latency
No digital audio system is "instantaneous"; the term "latency" is used to express the time by which the audio is delayed in travelling through the system. In practice, latency only becomes a problem when mixing signals from systems having significantly different delays. The Dante protocol used by RedNet exhibits very low latency, and you should not experience any problems in normal recording practice when using it for multichannel audio transport between a DAW and sources or monitoring.
With the RedNet PCIe/ PCIeR card in use, round-trip latency can be less than 3 ms (depending on buffer size and sample rate). If you are using Dante Virtual Soundcard instead of the RedNet PCIe/ PCIeR card, additional processing time is required by the computer. However, you should achieve the same order of latency as with a FireWire interface.
The precise latency of any given system will be determined by a number of factors, including the processing speed of the computer, the number of switches in the network, the make/model of switch used and the network topology.
INSTALLATION GUIDE
UNIT CONNECTIONS AND FEATURES
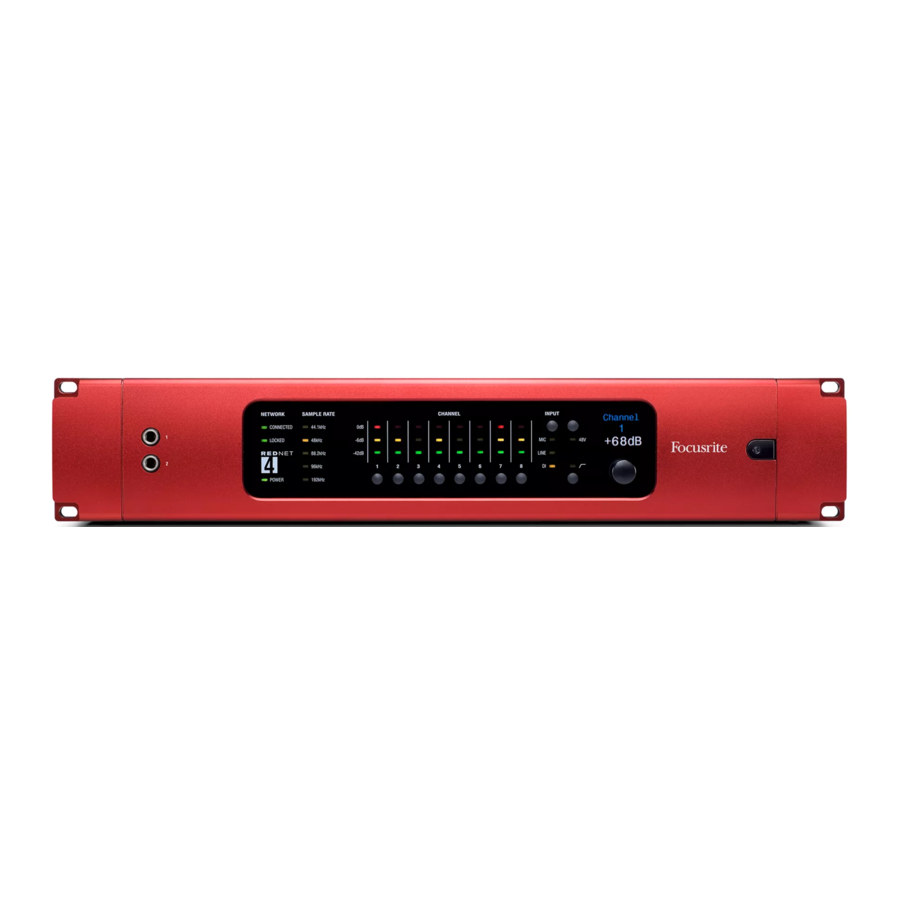
RedNet I/O interfaces
Full details of the front panel controls, indicators and rear panel connections of the various RedNet hardware interfaces will be found in the device specific User Guides on the RedNet website.
RedNet PCIe/ PCIeR card

- Primary Network Port - Connect this to the Gigabit network switch local to the computer. The port is the primary interface for all the channels of audio on the RedNet network. The socket has integral LEDs which illuminate to indicate connection to an active network port, and network activity.
- Secondary Network Port - Secondary Dante network connection where two independent Ethernet links are being used (Redundant) or an additional port on an integral network network switch on the Primary Network (Switched)
- SYS – multi-colour LED indicating the card's Dante system status:
- Green – normal operation
- Orange – system failure
- CLK – multi-colour LED indicating the card's sync status:
- Green (steady) – confirms card is a Dante PTP slave; the card will sync to the clock embedded in the incoming Dante bitstream
- Green (blinking) – confirms card is a Dante PTP master; the card is set (in Dante Controller) to generate the Dante clock which will be used by other units.
- Orange – sync failure
- ERR – reserved for future use.
NOTE: additional LED displays are thus:- All LEDs red – card has entered failsafe mode. If this situation occurs, users are recommended to contact Focusrite Customer Support.
- All LEDs blinking green – identify function has been activated from Dante Controller.
The RedNet PCIe/ PCIeR card is a standard single-width PCIe card which will fit an empty card slot in a PC, Mac or Thunderbolt chassis. The slot used must be "4-lane" minimum, though 16lane is necessary to achieve maximum performance. Please check your computer's motherboard documentation if you are unsure of the slot specification.
The RedNet PCIe/ PCIeR card is powered by the computer or chassis in which it is installed. It conforms to the PCIe card supply voltage standard, and provided your computer's PSU is working normally, you should experience no power-related issues with any computer.
GETTING STARTED
The Getting Started Guide, which is included with all RedNet devices, provides a brief overview of the steps you need to take to establish a working RedNet system, and if you haven't already done so, we suggest you read through this document now.
Refer to the documentation supplied with your Gigabit switch. You will be able to access the switch configuration once you have connected the switch to your computer's Ethernet port by opening your usual Internet browser and entering the IP address (this will be given in the switch documentation) into the browser's URL field. Most switches will be pre-configured in a suitable state for use with RedNet, but it is important to check that QoS (Quality of Service) is enabled. This step should be straightforward, but if you have difficulties, please refer to the Answerbase on the Focusrite website: www.focusrite.com/answerbase.
HOSTING REDNET
RedNet can be 'hosted' (i.e., supported by your system computer) either with or without the RedNet
PCIe/ PCIeR card. Focusrite recommends using the RedNet PCIe/ PCIeR Card to get the best performance from your RedNet system. With the card, your system will have the lowest audio latency possible and support the maximum number of channels. See note below regarding use of RedNet with Pro Tools|HDTM systems.
If you are not using the RedNet PCIe/ PCIeR Card, a RedNet system can be hosted on any compatible computer with one Ethernet port using the Dante Virtual Soundcard. This is a software application which may be www.audinate.com. Please consult the User Guide section "Using Dante Virtual Soundcard".
With the Dante Virtual Soundcard, system performance and capacity will be reduced compared to a system using the RedNet PCIe/ PCIeR card. With Dante Virtual Soundcard, the system channel count at the sampling frequency in use (the maximum number of audio channels available) is half that achievable with the RedNet PCIe/ PCIeR card. Overall system latency will vary with the specification of the host computer in use, but in most cases will be similar to the latency experienced when using Focusrite FireWire interfaces. This is likely to be more than adequate in the majority of situations.
For more information: www.focusrite.com/rednet
NOTE: Pro Tools|HDTM users can interface to a RedNet system with one or more RedNet 5/ RedNet HD32R HD Bridge. In this case, RedNet 5/ RedNet HD32R itself acts as the system host, and neither a RedNet PCIe/ PCIeR card nor Dante Virtual Soundcard are required to operate the RedNet system.
CONSTRUCTING A REDNET SYSTEM
Necessary equipment
- Compatible Mac or Windows PC
- RedNet I/O Interfaces as required
- Either:
- A RedNet PCIe/ PCIeR Card
- Dante Virtual Soundcard software
- Up to five (Pro Tools|HDTM) or six (Pro Tools|HDXTM) RedNet 5/ RedNet HD32R HD Bridges
- Gigabit Ethernet Switch
- Ethernet cables:
- One cable between each RedNet interface and the switch,
- One cable between the host computer and the switch, and
- If a RedNet PCIe/ PCIeR card is in use, one further cable between the card and the switch.
- RedNet Control software
RedNet Control software can be www.focusrite.com/downloads, having registered the product using the codes on the Product Registration Card supplied with each RedNet hardware item. Users are recommended to check periodically thereafter to ensure that they have the latest version, and update if necessary.
Technical Requirements
To download software (either Dante Virtual Soundcard or the latest version of RedNet Control), an Internet connection will be required.
Installing the RedNet PCIe/ PCIeR Card

 The computer should be disconnected from the AC mains supply before attempting to install the PCIe card. Allow the computer to cool before starting the installation.
 Anti-static precautions should be taken when handling the card once it is removed from its anti-static bag; only handle the card by gripping the card by its edges and avoid touching any of the component parts.
Place the computer on a clean, flat surface. Open the computer as necessary, to access the PCIe card slots. Install the RedNet PCIe/ PCIeR card carefully, ensuring that it is firmly and securely in place. Close the computer and re-connect its power supply.
Installing RedNet Control
All software required for a RedNet system is available for download from the Focusrite website, having registered your purchase at www.focusrite.com/register. The Product Registration Card provided with your RedNet unit contains a validation code which you will need to enter in the Registration area. This procedure ensures that you will have the most up-to-date software versions.

Go to www.focusrite.com/register, and follow the instructions on the card to register your product and download RedNet Control and associated software.
When all downloads are complete, install the RedNet Control application in the usual manner. Follow all on-screen instructions from this point.
Audinate Dante Controller
This software application is automatically installed when RedNet Control is installed. RedNet functions can be controlled from RedNet Control and routings can be be defined in Dante Controller.
Dante Controller can also bewww.audinate.com. Register first, then download and install.
Connecting your RedNet audio network
Remove any Ethernet cables connected to your computer (these can be reconnected after setting up RedNet - either to the Gbit switch, or to any additional vacant Ethernet ports you have on your computer).
Connect a vacant Ethernet port on your computer to a port on your Gbit Switch with a Cat6 Ethernet cable. If you have installed a RedNet PCIe/ PCIeR card, connect its Ethernet port to a port on the Gbit switch with a second Cat 6 Ethernet cable.
Connect the Ethernet ports on the rear of each RedNet I/O interface in the system to further ports on the Gbit switch with Cat 6 Ethernet cables.
The recommended order of powering the components in a RedNet system is as follows:
- Power up the Gbit switch;
- Power up all RedNet units on the networks one by one (power-on sequence takes approx. 40 s per unit)
- Boot the host computer.
When your computer has booted up, launch RedNet Control.
Audio setup in your DAW with RedNet Control
Whatever DAW you are using, it will provide a method of selecting which RedNet audio channel feeds each track. Please refer to your DAW's documentation or Help files if you are unsure about this.
The RedNet PCIe/ PCIeR card will be detected automatically by your DAW and added to the list of available audio sources. Depending on your particular DAW, it may be necessary to select it as the active I/O device manually; other systems may set it as the default device on detection. From the Audio I/O Setup (name will differ between DAWs), you can select which of RedNet's 128 input channels constitutes the audio source for each track in use. Similarly you can route each track to any of the 128 output channels available. Please note to operate RedNet PCIe/ PCIeR with Pro ToolsTM you will need to activate "Pro Tools Mode" in RedNet Control on all Windows systems.
EXAMPLE REDNET STUDIO SETUPS – REDNET WITH A DAW
System 1 - Simple setup RedNet 1 and RedNet 4 (record mic and playback)

Using a simple system of two RedNet units, up to 16 sources could be simultaneously recorded, and up to 8 of them could be via the Focusrite microphone preamplifiers in the RedNet 4. Up to 8 outputs could be created for monitoring or downmix purposes.
System 2 - Single Control Room and Live Room setup (analogue)
2 x RedNet 2 (Control Room) + 2 x RedNet 4 (live room)

This small studio system would allow up to 48 sources to be recorded simultaneously; 16 of these could be from mic or line sources in the live room, with another 32 from line sources in the control room via the RedNet 2 units. Up to 32 outputs could also be made available via the RedNet 2's outputs.
System 3 - Single Control Room and Live Room setup (digital)
As above but RedNet 3 replaces RedNet 2 in CR for interface to digital mixer

This would be a suitable system when the mixing desk in use was digital rather than analogue. RedNet 3 replaces RedNet 2 in System 2. This would provide up to 64 digital inputs into the system via RedNet 3's ADAT-format inputs. If analogue sources were required in the control room as well, a RedNet 1, 2 or 4 as appropriate could simply be added to the network.
Dante Virtual Soundcard setup RedNet 4 only, no switch, straight to host Ethernet port

This shows the very simple network required if your system does not include a RedNet PCIe/ PCIeR card. The host computer would instead have the Dante Virtual Soundcard installed, and a single Cat 6 connection between RedNet 4 and the host's resident Ethernet port would suffice. This system would be ideal for basic high-quality recording but would require monitoring to be through an amplifier/ speaker system connected directly to the host computer's resident audio output.
RedNet audio distribution system – no DAW
RedNets 1 – 4 in different rooms, audio networking only

In this more complex, centralised system, users in any room would be able to access audio sources from any other room. Each room has its own local Ethernet switch, and each is connected in turn back to a central switch in the machine room. The host computer – which may or may not be a DAW platform – is connected to this central switch.
OPERATION WITH REDNET CONTROL
When RedNet Control is launched, it interrogates the network to discover which RedNet units are connected. This may take a few moments, after which a set of virtual front panels is displayed. When RedNet Control is launched for the first time, the screen display should be similar to that shown below.

Each RedNet unit on the network will have a corresponding virtual front panel on-screen, so the display on your system will probably differ from that above, where the example system has one each of RedNets 1, 2 and 4.
Virtual panel layout

As well as duplicating the controls and indicators of a device's physical front panels, the virtual front panels have a number of features common to all RedNet types.
- Minimise Icon - Click this to reduce the virtual front panel to a nominal size. The controls and indicators are no longer available when the panel is minimised.
- Unit Name - Displays default unit name. Clicking on the name allows the unit to be renamed.
- ID Icon - Click this to flash the meter LEDs on the physical device. The LEDs flash for 5-10s approx. This is a useful feature when you have multiple units of the same type. Use it to identify a unit and then name the unit accordingly (see item 2).
- Tools Icon - Clicking this will open a menu with contents depending on the RedNet device type. Various device settings may be controlled. More details are given in the RedNet Hardware Manuals.
- PSUs A & B - Each illuminates if PSU has power input and all DC outputs are present.
- Networks - Each illuminates if a valid connection is available.
- Locked - Device is successfully locked to the network (changes to a red cross if not locked).
- Network Master - Illuminates indicating that the unit is the network master.
- External Clock - Illuminates indicating external clock status (See relevant Hardware Manuals for more information)
Utility menu
Right-clicking on most areas of a RedNet device in RedNet Control will open a pop-up menu with the following options:

- Get Info – opens a window providing system information, including firmware and software versions.
- Launch Dante Controller... - clicking this option launches Audinate Dante Controller, or, if Dante Controller is already running, opens its window on top of RedNet Control. See "Using Dante Controller".
- Upgrade Firmware... – select this option when you have downloaded a firmware update from the Focusrite website. A standard Open window opens, allowing you to navigate to the saved firmware update file. Select the filename to initiate the upgrade procedure. Once a firmware upgrade has commenced, a progress bar will appear. It is very important that you do not interrupt the upgrade process, either by shutting down the computer or powering down a unit, or you risk permanent damage to the unit.
Per-unit virtual front panels
Please see the individual RedNet interface User Guides for information regarding the on-screen features and facilities which are specific to each unit.
USING DANTE VIRTUAL SOUNDCARD
If your RedNet system is to be based on Dante Virtual Soundcard instead of a RedNet PCIe/ PCIeR card, you will need to download the application from the Audinate website, www.audinate.com, and install it. Each RedNet I/O interface is supplied with Dante Virtual Soundcard download instructions and a software license. Having registered your purchase with Focusrite, you will be able to access the activation code for Dante Virtual Soundcard in the "My Products" area of the Focusrite website.
A comprehensive User Guide for Dante Virtual Soundcard is also available from the Audinate website. Dante Virtual Soundcard users are recommended to download this document as well and read it thoroughly.
Once Dante Virtual Soundcard is installed, your RedNet system will operate in a very similar manner to that already described for systems using the RedNet PCIe/ PCIeR card. Note that RedNet Control will still need to be installed for a Dante Virtual Soundcard-based system. There will be no differences in RedNet Control's operation.
The fundamental difference between a Dante Virtual Soundcard-based system and a RedNet PCIe/ PCIeR card-based system is that Dante Virtual Soundcard imposes certain restrictions on the system's maximum capabilities. The most important of these are:
- Dante Virtual Soundcard supports up to 64 x 64 audio channels at 44.1/48kHz, 32 x 32 audio channels at 88.2/96kHz and 8 x 8 audio channels at 176.4/192kHz,
- Dante Virtual Soundcard will impose higher latency on system operation, but is a good alternative for mobile recording
IMPORTANT NOTE: Dante Virtual Soundcard is a product of Audinate Pty Ltd., and is NOT a Focusrite product. As such, variation to the specification and development of the product is subject to change which is out of the control of Focusrite.
Intending Dante Virtual Soundcard users are recommended to obtain any additional information required from www.audinate.com.
USING DANTE CONTROLLER
Audinate Dante Controller is installed on your computer as part of the RedNet Control installation.
You can launch Dante Controller either by navigating to its shortcut (in Finder > Applications on Macs or in All Programs in Windows), or by selecting 'Launch Dante Controller...' from the right-click Utility menu in RedNet Control.

The Dante Controller window has five tabs; Routing, Device Info, Clock Status, Network Status and Events. The Routing tab is where custom audio routings can be set up.
The routing page is arranged as a matrix, with audio inputs listed horizontally ('Dante Transmitters') and audio outputs listed vertically ('Dante Receivers'). The '+' symbol against each RedNet device may be clicked to expand the full set of inputs or outputs; Note that in the case of an input-only interface (e.g., RedNet 4), no outputs are listed. Clicking the '+' symbol against the horizontal/vertical titles Dante Transmitters and Dante Receivers simultaneously expands all audio inputs and outputs respectively; clicking the '-' symbol collapses them. In addition to the RedNet devices on the network, all 128 inputs and 128 outputs available through the RedNet PCIe/ PCIeR card are listed.
The matrix displays graphically how the physical inputs and outputs on the RedNet units are currently mapped to the audio channels of the RedNet PCIe/ PCIeR card. Consider a simple situation where a single RedNet 1 unit is on the network.

Expanding the RedNet PCIe/ PCIeR card inputs (vertical axis – Dante Receivers) and the RedNet 1 audio inputs (horizontal axis – Dante Transmitters) will give a display like this:

You can see that the Dante Controller confirms that each of the RedNet 1's analogue inputs 1 to 8 is mapped to the RedNet PCIe/ PCIeR card's network receive channels 1 to 8, by a green tick. Similarly, expanding the RedNet PCIe/ PCIeR card outputs (horizontal axis – Dante Transmitters) and the RedNet 1 audio outputs (vertical axis – Dante Receivers) gives a display like this:

Again, Dante Controller confirms that each of the network transmit channels 1 to 8 of the RedNet PCIe/ PCIeR card is mapped to RedNet 1's analogue outputs 1 to 8.
This basic graphic principle extends to all RedNet units on the network.
Other Dante Controller options
Various other facilities are available in Dante Controller, which are not specific to its use as the transmission platform for RedNet. A full set of Help files is installed with the application; Click Help > Contents for further information.
REGISTERING YOUR PRODUCT
For technical support, please register your product at: www.focusrite.com/register
CUSTOMER SUPPORT
You can contact Focusrite Customer Support at:
Email: supportteam@focusrite.com
Phone: +44 (0)1494 462246
TROUBLESHOOTING
If you are experiencing problems with your RedNet System, we recommend that in the first instance, you visit our Support Answerbase at: www.focusrite.com/answerbase
IMPORTANT SAFETY INSTRUCTIONS
- Read these instructions.
- Keep these instructions.
- Heed all warnings.
- Follow all instructions.
- Do not use this apparatus near water.
- Clean only with dry cloth.
- Do not block any ventilation openings. Install in accordance with the manufacturer's instructions.
- Do not install near any heat sources such as radiators, heat registers, stoves, or other apparatus (including amplifiers) that produce heat.
- Do not defeat the safety purpose of the polarized or grounding-type plug. A polarized plug has two blades with one wider than the other. A grounding type plug has two blades and a third grounding prong. The wide blade or the third prong are provided for your safety. If the provided plug does not fit into your outlet, consult an electrician for replacement of the obsolete outlet.
- Protect the power cord from being walked on or pinched particularly at plugs, convenience receptacles, and the point where they exit from the apparatus.
- Only use attachments/accessories specified by the manufacturer.
- Use only with the cart, stand, tripod, bracket, or table specified by the manufacturer, or sold with the apparatus. When a cart is used, use caution when moving the cart/ apparatus combination to avoid injury from tip-over.
![]()
- Unplug this apparatus during lightning storms or when unused for long periods of time.
- Refer all servicing to qualified service personnel. Servicing is required when the apparatus has been damaged in any way, such as power-supply cord or plug is damaged, liquid has been spilled or objects have fallen into the apparatus, the apparatus has been exposed to rain or moisture, does not operate normally, or has been dropped.
- No naked flames, such as lighted candles, should be placed on the apparatus.
The appliance coupler is used as the disconnect device, the disconnect device shall remain readily operable.

Do not use a damaged or frayed power cord.
If the mains plug supplying the apparatus incorporates a fuse then it should only be replaced with a fuse of identical or lower rupture value.
The apparatus shall be connected to a mains socket outlet with a protective earthing connection.
 |  TO REDUCE THE RISK OF ELECTRIC SHOCK, DO NOT REMOVE COVER (OR BACK). NO USER-SERVICEABLE PARTS INSIDE. REFER SERVICING TO QUALIFIED SERVICE PERSONNEL. |
| The lightning flash with arrowhead symbol, within equilateral triangle, is intended to alert the user to the presence of uninsulated "dangerous voltage" within the product's enclosure that may be of sufficient magnitude to constitute a risk of electric shock to persons. |
| The exclamation point within an equilateral triangle is intended to alert the user to the presence of important operating and maintenance (servicing) instructions in the literature accompanying the appliance. |

TO REDUCE THE RISK OF FIRE OR ELECTRIC SHOCK, DO NOT EXPOSE THIS APPARATUS TO RAIN OR MOISTURE AND OBJECTS FILLED WITH LIQUIDS, SUCH AS VASES, SHOULD NOT BE PLACED ON THIS APPARATUS.
Documents / Resources
References
![www.focusrite.com]() RedNet Interface Range | Focusrite
RedNet Interface Range | Focusrite![www.focusrite.com]() Focusrite | Audio Interfaces and Pro Audio Equipment
Focusrite | Audio Interfaces and Pro Audio EquipmentFocusrite | Focusrite Downloads
![www.focusrite.com]() Please log in | Customer Portal
Please log in | Customer Portal
Download manual
Here you can download full pdf version of manual, it may contain additional safety instructions, warranty information, FCC rules, etc.
Advertisement


Need help?
Do you have a question about the RedNet and is the answer not in the manual?
Questions and answers