WMF Lono (3200000437) Manual
- Instructions for use manual (132 pages) ,
- Operating manual (84 pages) ,
- Instruction manual (64 pages)
Advertisement
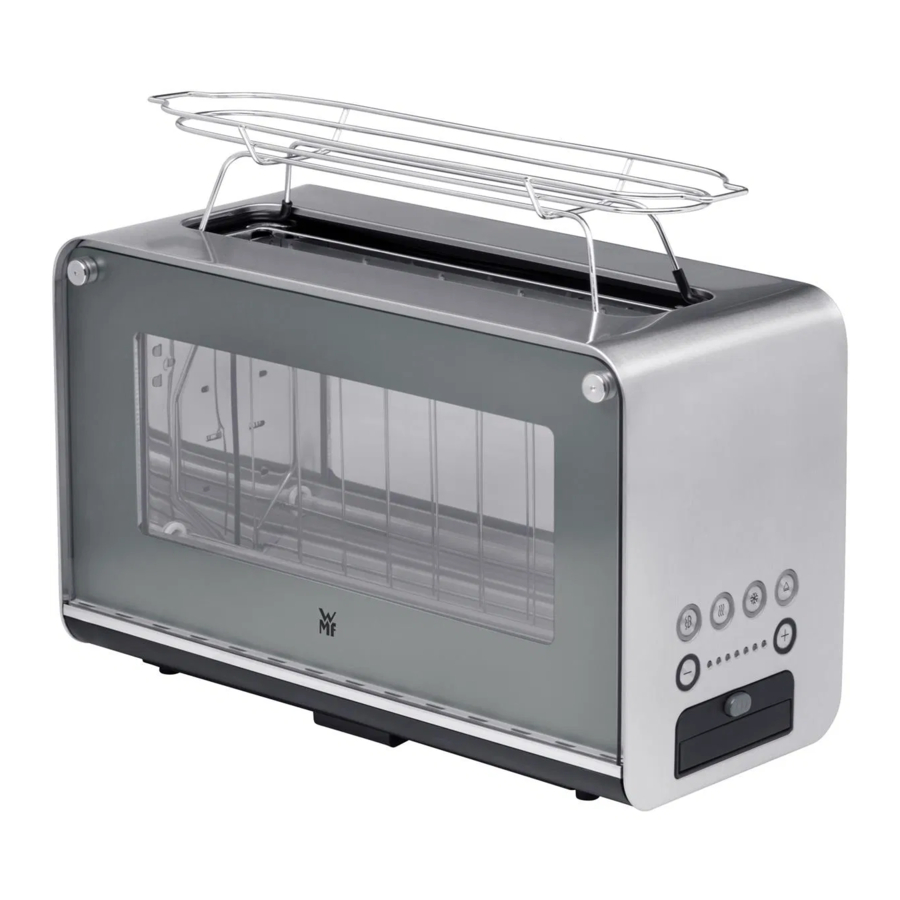
Set- up


- Bread slot
- External glass plates (tinted)
- Internal glass plates (transparent)
- Bagel button
![]()
- Warming button
![]()
- Defrost button
![]()
- Start/stop button
![]()
- "- " / "+" buttons
![]()
- LED display
- On/off button
- Crumb tray
- Roll attachment


Using the appliance for the first time
Any unnecessary length of the power cable can be wound in at the base of the device. Plug in the power cable and press the On/Off button to switch on the device.
Prior to the first use, run the toaster through at least one toasting cycle without bread at the maximum browning setting in order to remove the surface protection from the heating elements. The resulting odour is harmless, but this should nevertheless be performed in a well- ventilated area. Allow the device to cool off somewhat before each toasting process.
Insert the bread slices into the bread slot. To make sure that they do not jam, they should be no thicker than 2.6 cm. Place small slices next to one another in an upright position in the bread slot so that it is easier to take them out after toasting.
Use the "+"/"- " buttons initially to set the medium browning level and then press the Start/Stop button ![]() . The motor switches on and moves the toast downwards until the toasting time expires. The device then switches off automatically and the finished toast is raised from the bread slot for removal.
. The motor switches on and moves the toast downwards until the toasting time expires. The device then switches off automatically and the finished toast is raised from the bread slot for removal.

The device is still ready to use (LED display illuminated) until the On/Off button is pressed to switch off the toaster (LED display disappears).
When not in use, the appliance automatically switches to energy- saving standby mode after five minutes. This is indicated by a single LED lighting up on the LED display. By pressing the Start/Stop button the inserted slices of bread are toasted – and standby mode is cancelled. When the appliance is not in use, we recommend switching it off by pressing the On/Off button.
Information about the degree of browning
If the toast is too light, select a higher browning level. If the toast is too dark, move the browning level to a lower setting. The LED display is only useful as a guide. The greater the number of illuminated LEDs, the darker the browning. The toasting result can vary for the same setting depending on the bread type, size, moisture content and thickness of the slices. Therefore, choose a lower setting for less moist bread, smaller slices and also when toasting just one slice of bread. When toasted too darkly, concentrated acrylamide forms. You should therefore avoid toasting too darkly.
![]() Single- sided toasting
Single- sided toasting
Ideal for baguettes, rolls and bagels. For single- sided toasting of a baguette, for example, cut the baguette lengthwise. Place it in the bread slot so that the cut side is facing the front. If the bagel button is pressed immediately after starting, the slice of bread will only be toasted on its front side.
![]() Warming up / secondary toasting
Warming up / secondary toasting
If the warm- up button is pressed immediately after starting the device, already cooled off toast is warmed up again to become crispy (regardless of the set degree of browning) and light bread is somewhat toasted.
![]() Thawing
Thawing
If the button is pressed immediately after starting, the toasting cycle is automatically extended to toast frozen bread.
![]() Stopping the toasting cycle
Stopping the toasting cycle
To stop the cycle early, press the illuminated Start/Stop button.
Roll attachment
The toaster has a roll attachment that can be fitted if needed. Two rolls can be baked from both sides, each with the lowest setting. Slightly wet bread that is too dry beforehand so that it toasts better. Note: only use the roll attachment on the lowest setting, otherwise there is a risk of the device overheating.
Crumb tray
Falling crumbs are collected in the crumb tray during toasting. To empty, briefly press against the crumb tray. You will then be able to pull it out of the device.
Cleaning and care
Before cleaning, switch off the toaster, remove the plug from the socket and let the device cool down completely. Especially the glass plates must be cooled down completely. The inner glass plates can be removed for intensive cleaning.
They can be removed vertically downwards after unlocking the base.

Only clean the glass plates with a damp cloth and some glass cleaner. Do not use any sharp or abrasive cleaning agents. Do not clean with oven/grill spray. Do not use a steam cleaner.
After cleaning, the internal glass plates must be completely dried before they can be reinserted in the toaster.
Note: An audible sound is emitted at the start of the next toasting cycle if the internal glass plates have not been reinserted correctly. For safety reasons, it is not possible to continue toasting until this error has been rectified.
Using a stiff brush, remove the crumbs baked onto the grilles and heating elements in the bread slot. Do not tip the device when doing so, otherwise the crumb tray will empty into the inside of the device. Afterwards, pull out the tray, clean and insert it back into the device. Never immerse the toaster in water. Clean the roll attachment with a damp cloth. It is not dishwasher safe.
Important safety information
- The appliance must not be operated via an external timer or remote control.
- This appliance can be used by children older than eight years of age as well as by people with limited physical, sensory or mental capabilities and persons lacking experience and/or lacking knowledge, if they are supervised or have received instructions on how to use the appliance safely and have understood the resulting risks.
- Children should be supervised in order to ensure that they do not play with the device.
- Cleaning and user maintenance shall not be made by children, unless they are older than 8 years old and supervised.
- Keep the appliance and its power cable out of reach of children under 8 years of age.
![shock hazard]() Risk of electric shock!
Risk of electric shock!
The appliance may only be connected to a 230 V mains socket with an earth wire that has been installed pursuant to regulations. It must be ensured that the earthing system of the household electrical installation has been installed pursuant to regulations and that the safety equipment (RCCB) functions correctly.- Note: check the RCCB regularly by pressing the test button.
![]()
bread slices can burn in toasters. Therefore, do not use the device near or under flammable objects (e.g. curtains, wall cupboards) and always supervise.![]()
![burn hazard]()
risk of burning: During toasting, the touchable surfaces of the toaster can get very hot. Please ensure you only touch the controls!- If the appliance's power cable is damaged, it must be replaced by the manufacturer's central customer service department or by a similarly qualified person. Unauthorised repairs could put the user at considerable risk.
- Do not immerse the toaster in water.
- When cleaning, do not insert your fingers or any objects (e.g. fork, knife, or similar) into the bread slot.
- Falling crumbs are collected in the crumb tray during toasting. This can be removed and then emptied.
- This appliance is designed for use in households and similar environments, such as:
- Staff kitchen areas in shops, offices and other commercial environments;
- Farmhouses;
- By guests at hotels, motels and other residential facilities;
- At bed- and- breakfast establishments.
- The appliance is not intended for purely commercial use.
 Risk of electric shock!
Before use
Read the instruction manual carefully. The manual contains important information about operating and caring for the appliance, plus safety instructions. Keep the manual in a safe place and pass it on to any subsequent users. The appliance may be used only for the intended purpose and in accordance with this instruction manual. Always follow the safety instructions when using the appliance.
Technical specifications
Rated voltage: 220–240 V ~ 50–60 Hz
Power consumption: 1100- 1300 W
Protection class: I
Additional safety information
- Pull out the mains plug:
- If malfunctions occur during use
- Before cleaning and care
- After use.
- To prevent the toaster being mechanically switched on by mistake, the plug must always be removed from the socket prior to storage.
- The device should be connected only to earthed wall sockets that have been installed in accordance with the regulations. The mains cable and plug must be dry.
- Never operate the toaster unattended.
- Do not pull or clamp the power cable over sharp edges. Do not leave it dangling. Protect it from heat and oil.
- Do not place the appliance on hot surfaces, such as on hotplates or similar areas, and do not operate near naked flames.
- Do not operate the toaster without the crumb tray and glass plates inserted.
- Never pull the mains plug out of the socket by the power cord or with wet hands.
- Stop using the device and/or pull the mains plug out of the socket immediately if:
- The device or power cord is damaged;
- You suspect that the appliance may be defective after being dropped or a similar incident. In such cases, return the appliance to be repaired.
- When inserting the toast, ensure that the bread slices do not get jammed. However, should this happen, first pull the power plug out of the socket and then remove the interference.
- When cleaning, do not insert your fingers or any objects (e.g. fork, knife, or similar) into the bread slot.
- Caution, glass breakage: remove and insert the glass plates carefully and only for cleaning.
- Do not use any sharp or sharp- edged objects on the glass plates as they could otherwise damage the glass plates.
![]()
![burn hazard]()
risk of burns: never use the toaster without the glass plates inserted.- The toaster may only be used when all four glass plates are correctly fitted and do not have any signs of damage (e.g. cracks, spalls or splits).
- Only operate the toaster when upright and away from other objects.
- Do not cover the bread slots during toasting. Do not lay any bread slices or rolls on the casing, as this causes the device to overheat.
- No liability shall be accepted for any damage resulting from misuse, incorrect operation or improper repairs. Warranty claims will be deemed invalid in such cases.
- Grip of roll attachment is not a handle. Only touch the roll attachment when it is cooled down.
- If toast of small bread slices is less than 85mm length, the user must pay attention to the potential risk of burning when taking out the slices.


Danger of suffocation!
Do not allow children to play with packaging materials.
Using the appliance
This toaster is suitable for slices of bread (up to a size of 13 x 13 cm), braided rolls and similar baked goods with a maximum thickness of 2.6 cm. Do not use it for baked goods with fillings or spreads, e.g. butter or jam.
Documents / ResourcesDownload manual
Here you can download full pdf version of manual, it may contain additional safety instructions, warranty information, FCC rules, etc.
Advertisement


Need help?
Do you have a question about the Lono and is the answer not in the manual?
Questions and answers