Advertisement
INTRODUCTION
AM´s family recreational kayaks emphasize tracking and speed while maintaining comfort and stability. They are designed to move easily on lakes and rivers for several hours of boating pleasure. This manual has been compiled to help you achieve long term safe using and pleasure from Aqua Marina® product.
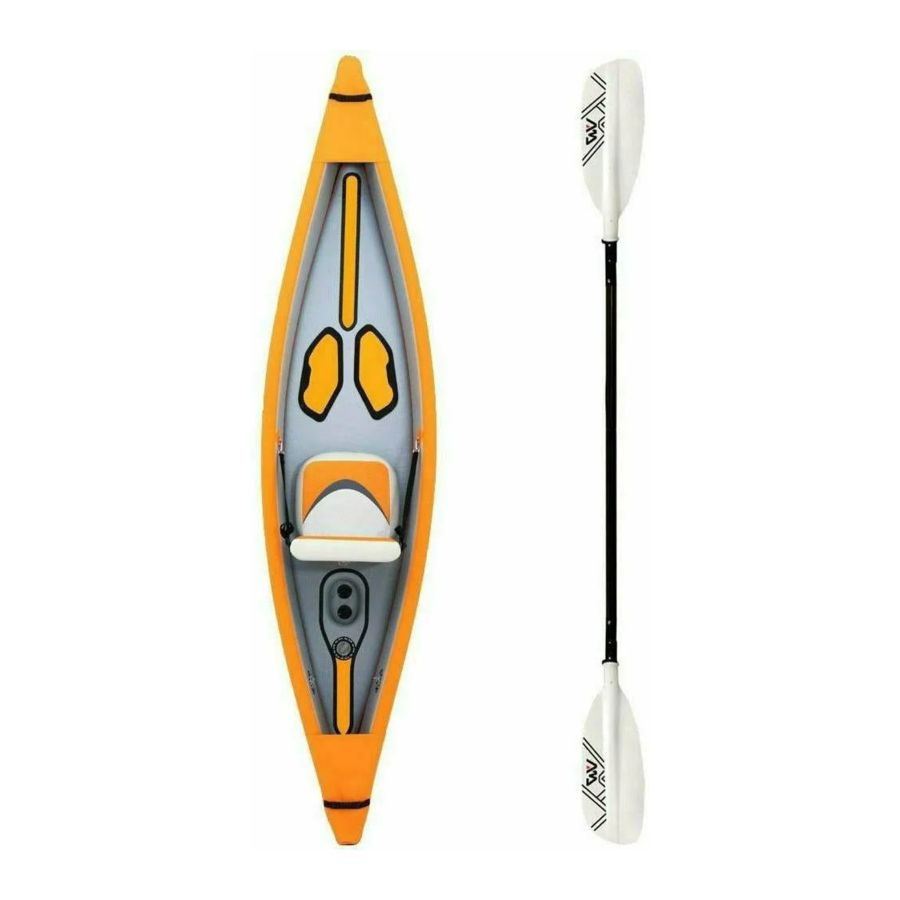
PRODUCT DESCRIPTION

VALVE AND PUMP OPERATION
- High pressure valve
Follow these instructions for valve operation to inflate or deflate the kayak properly. The board inflation valve is located at the side chambers and kayak floor.
![]()
- To close off the valve for inflation, make sure that the centre valve pin is in the UP position. If it is in the DOWN position, press down on the valve pin and turn it counter-clockwise until it pops up.
![]()
- To open the valve for deflation, press down on the valve pin and turn it clockwise so it locks down.
- Be careful of any sand or debris around the valve area when deflating because small parts could be thrown with the air and hurt someone.
- Always lock the valve cover over the vale stem when using it. This will prevent the air from coming out and dirt from coming in.

- To close off the valve for inflation, make sure that the centre valve pin is in the UP position. If it is in the DOWN position, press down on the valve pin and turn it counter-clockwise until it pops up.
- Keel air valve


- Open external cap and pull firmly to extend it out (Fig. 1).
![]()
- Attach suitable adapter nozzle to the end of inflation pump. Insert pump and start pumping (Fig. 2). Usually pump air into the inflatable keel by JOMBO hand pump. To pull the piston twice up and down is enough.
![]()
- When fully inflated, gently twist the adapter sleeve to right while backing pump out of valve (Fig. 3).
![]()
- Fully remove adapter and close external stopper. Valve should appear depressed into itself (Fig. 4).
![]()


- Jombo high-pressure T-bar pump
- Unscrew the valve cap, push the button in and turn it clockwise to make sure that the valve is in the "Pin Up" position.
- Make sure the pump hose is connected to the "Inflate" outlet.
- Connect the pump nozzle into the valve receptacle.
- Start pumping air into the kayak by sliding the pump piston up and down. Do it, until the required pressure will be reached.
- After inflation tighten the valve cap. Only the valve cap can ensure final air tightness.
NOTE: - If the pump piston starts to squeak, apply some silicone spray onto the piston shaft.
- The maximum air pressure for this product is 10 psi.
![]()
Don't over inflate beyond 10 psi. Overinflating voids the warranty.![]()
![]()
JOMBO 23.5" extra high-pressure hand pump with gauge (B0302210)


The JOMBO high-pressure pump can easily reach the working pressure for the Tomahawk kayak. The pump comes with a pressure gauge and hose. Working pressure is 10 psi. If the kayak is sufficiently firm before reaching 10 psi, don't inflate further. The air pressure of the drop-stitch PVC seat is up to 4.35 psi – 0.3 bar. To avoid damage, it is recommended to remove the gauge from the pump for storing.

ASSEMBLY AND INFLATION
- Locate a clean and smooth surface to unfold the kayak and lay it out flat.

- Inflate the drop-stitch PVC air floor, sides and inflatable keel at the bow by sequences. The working pressure for all chambers is 10 psi (except the keel).


- Seat installation: The Tomahawk seat is made of a high-pressure drop-stitch PVC material. The air pressure of the drop-stitch PVC seat is up to 4.35 psi – 0.3 bar. Featuring a high-back and stiff feel that support your back. Inflate the seating bladder and back bladder by sequences. Attach the Velcro base to the kayak floor. Using the seat straps clip each strap to the D-rings. The upper straps attach to the forward D-rings.

- Tracking fin installation: Turn the kayak over and slide the tracking fin into the base. It only sides in facing one way. Slide in the push-in pin into the grove until it clicks into the position.


DEFLATION

The air from the high-pressure valves comes with high strength!
- To deflate it, push the valve stem down and turn it a quarter turn to the right. The stem will stay in the down position allowing the air to release.
![]()

NOTE:
Check the pressure before each using. Air pressure and weather conditions can influence internal pressure of inflatable products. The pressure will be decreased in cold water because of air contraction. If it occurs, you should add some air to the product. On the other hand, the air will expand in warm days. You have to deflate some air to protect it from damage due overpressure.
- Use only Aqua Marina® approved inflation pumps.
- Never use motor driven high-pressure air pumps as these may cause over inflation. Fill it only with cold air.
- Over and under inflating could result in serious safety hazard.
- Always check the inflation pressure before using this product.
- Never stand on this product or on its marginal parts during inflation.
- Never open the cap of the air valve while this product is being used.
- Make sure that the valve is tightly closed before each using.
PADDLE ASSEMBLY
KAYAK PADDLE AC-80321

- Press and align the push-button on the paddle blade with the short shaft hole and ensure the push-button is securely snapped into the short-shaft hole.
- Join the 2 shafts together by pressing and aligning the push-buttons. The button must securely snap into the hole.
- Reverse these steps to disassemble it. It is not necessary to detach the paddle blades from the shafts.
MAINTENANCE AND STORAGE
The kayak is made of the highest quality materials and complies with the ISO 6185 standard. Doing not approved modifications could endanger the user, other people and voids the warranty.
There is very little that you have to do to keep your boat in good condition for many years.
| 1 |  |
| 2 |  |
| 3 |  |
| 4 |  |
- Clean your kayak after a trip to prevent damage from sand, salt water or sun exposure. Most dirt can be removed with a garden hose, sponge and mild soap. Make sure the boat is completely dry before storing. Use a few cleaning agents as possible and do not discharge waste agents into water. Clean your boat preferably on land.
- The product may be stored inflated, but do not place any heavy or sharp objects on it. Hanging is not recommended.
- Open all air valves and deflate boat completely. Remove all the accessories from the boat, seats and oars.
- Fold the bow end twice to the middle of the kayak tightly while forcing out any remaining air. Repeat this procedure for the stern. The boat storage bag or carry bag is designed to allow you to get your kayak into the bag as easily as possible with minimal folds. Follow the diagram below for the best folding procedures.
- Store it best in a dry room. Ensure protection against rodents and other vermin, as they feed on the fabric of the product.
- Store the product and accessories in a dry, temperature controlled, between 0°C-40°C (32°F104°F) storage location.
LEAK DETECTION AND REPAIR
ABOUT PVC
If your boat appears a bit soft, it might not be because of leak. If the boat was inflated late in the day with 32°C (90°F) air, that air might cool down to 25°C (77°F) overnight. The cooler air exerts less pressure on the hull, so it could appear soft the next morning. If there has been no temperature variation, you need to start looking for a leak:
- Take a good look at your boat from just a few feet away. Flip it over and closely check over the outside. Any large leaks should be clearly visible.
- If you have an idea, where your leak is, use a mix of dishwashing liquid and water in a spray bottle and spray over the suspicious areas. Any leak will produce bubbles that will pinpoint the leak location.
- Check valves for leak. Spray soapy water around the valve and the valve base if necessary.
AIR LEAK DETECTION
If your kayak appears a bit soft, it might not be cause of leak, since any change in temperature can cause modifications 0.003 bar (0.045 psi), per Celsius degree (34°C). If the boat was inflated late in the day that air might get cool overnight. The cooler air exerts less pressure on the hull, so it could appear soft the next morning.
If there has been no temperature variation, you need to first determine exactly where the air is leaking. Follow these instructions:
- Check that there is no sand or debris within the air valve.
- Make sure that the valve gasket is in place.
- Inflate all chambers of the tube.
- Close the cap on all the valves.
- Rinse the kayak with soapy water, including perimeter of the inflation valves.
- Wherever bubbles appear, that is the location of the leak to be repaired.
SMALL REPAIRS
Inadvertent punctures can be repaired using included vinyl repair patch.
- Thoroughly clean and dry the damaged area. Completely deflate the product.
- Cut a portion of the patch to cover the puncture an allow an additional ¼" on all sides. Always cut a round patch, never leave square corners.
- Be sure the repair area is completely dry.
- Apply generous coat glue to the vinyl repair patch and to the product.
- Allow the glue to dry for 2 - 3 minutes, or until the glue becomes tacky.
- Apply the patch to the product, using your thumb or finger, apply even pressure across the entire surface of the patch. Make sure that the edges of the patch are pressed down along the entire diameter.
- Allow the product to dry for at least 12 hours before inflating and using.
If there are large tears/cracks, bring the water craft or any essential equipment into a professional repair shop for appropriate repair or replacement.
GENERAL INFORMATION
SAFETY
- Read this manual carefully for your own safety and follow all precautions. Not to do it may cause a damage, serious injury or death.
- Paddle sport can be very dangerous and physically demanding. The users of this product should know that during paddling may occur serious injury, even lethal. Observe all watercraft laws and common sense.
- Keep this manual in a secure place and hand it over to the new owner if you sell the craft. Record the Hull Identification Number (HIN) that is printed on the hull of the kayak in following box:
SAFETY PRECAUTIONS
- Read this manual carefully before first using and instruct all users in proper and safe using.
- Keep this manual for future reference.
- Follow specific instructions for this product and don't do any modification.
- Follow all warnings and precautions of this manual and data given on the capacity plate.
- Uneven distribution of people and load in a kayak can be dangerous.
- Pay attention while stepping or climbing aboard the kayak. Step into the centre of the kayak for maximum stability.
- Always wear an approved personal flotation device (life preserver).
- Wear a helmet, if necessary.
- Don't use it in a strong wind and in strong currents, in open water or in dangerous tides.
- Don't paddle in flood conditions.
- Don't use this product under influence of alcohol or drugs.
- Don't overload or over inflate it.
- Don't exceed your paddling ability and don't overstretch yourself.
- Never let you tow from another boat or vehicle.
- Don't violate local safety rules and boating regulations.
- It is not a life saving device.
- Children may use it only under adult supervision.
- Don't drag your Aqua Marina over rocks or gravel to avoid damage.
- Don't use a compressor, CO2 or compressed air for inflation. Use only Aqua Marina recommended pumps.
- Don't sleep inside your kayak while being on water.
- Bring a cell phone or other emergency contact device in a waterproof bag.
- Don't exceed the data given on the capacity plates.
- Beware of offshore winds and currents.
SPECIFICATIONS AND PRODUCT FEATURES
SPECIFICATIONS
| Model | Size | Max. passenger | Air chambers | Net weight | Max. payload | Air pressure |
| TH-325 | 325 x 72 cm (10´8" x 28") | 1 | 3+2 | 17 kg (37.5 lbs) | 120 kg (265 lbs) | 0.69 bar (10 psi) |
| TH-425 | 425 x 78 cm (13´11" x 31") | 2 | 3+2 | 23.5 kg (51.8 lbs) | 200 kg (440 lbs) |
STANDARD EQUIPMENT
| Model | Magic backpack | Paddle | Seat | Slide-in tracking fin | Air pump | Pressure gauge | Repair kit |
| TH-325 | 1 | AC-80321 x 1 | High-back drop-stitch PVC seat x 1 | 1 | JOMBO 23.5" Highpressure hand pump | 1 | 1 (glue included) |
| TH-425 | 1 | AC-80321 x 2 | High-back drop-stitch PVC seat x 2 | 1 |
Documents / ResourcesDownload manual
Here you can download full pdf version of manual, it may contain additional safety instructions, warranty information, FCC rules, etc.
Advertisement


Need help?
Do you have a question about the Tomahawk and is the answer not in the manual?
Questions and answers