
Related Manuals for Click 0605594


Summary of Contents for Click 0605594
- Page 1 BLADELESS FAN WITH HEATER WITH REMOTE CONTROL INSTRUCTION MANUAL Item No : 0605594...
-
Page 2: Important Safeguards
IMPORTANT SAFEGUARDS When using electrical appliances, basic precautions should always be followed to reduce the risk of fire, electric shock and injury to persons, including the following: SAFETY PRECAUTIONS Read all instructions carefully, even if you are quite familiar with the appliance. •... - Page 3 WARNING: Do not use this heater in small rooms when they are occupied by persons not capable of leaving the room on their own, unless constant supervision is provided. In order to avoid overheating, DO NOT COVER the appliance. Do not place the heater on LONG PILE CARPET OR FLOKATI RUGS. Use a heat board if necessary. To reduce the risk of fire, keep textiles, curtains, or any other flammable material at least 1 metre away from the air outlet.
- Page 4 POSITION INSTRUCTIONS This heater must be placed on a hard, level, heat resistant surface. When positioning, please keep the following points in mind: • The heater requires no installation. It should be used solely as a portable appliance. The heater must always be used and stored in an upright position.
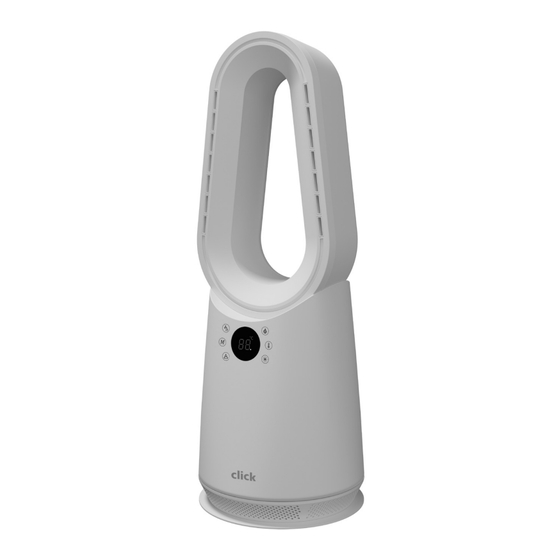
- Page 5 FEATURES OF YOUR BLADELESS FAN AND HEATER Air outlet Remote Control Panel 5 COLOR & 1 GRADIENT AMBIENT LIGHT Air inlet Stand Base...
-
Page 6: Operation
YOUR BLADELESS FAN AND HEATER Congratulations on the purchase of your new Bladeless Fan and Heater. Before first using your the appliance, it is most important that you read and follow the instructions in this use and care booklet, even if you feel you are quite familiar with this type of appliance. Your attention is drawn particularly to the section dealing with IMPORTANT SAFEGUARDS. -
Page 7: How To Use
Control panel: On/off button Timer button HOW TO USE When operated for the heater first time, the unit may emit an unpleasant burning type smell. This is normal, and will disappear after a short period of use. 1. Carefully remove the heater from the plastic bag and carton.Place the heater on a level surface in a stable upright position. - Page 8 Display Operating mode Strong air speed moder The appliance switches to the highest level of ventilation mode. Sleep Mode Reduce the current gear by 1 gear every 15 minutes, and the minimum is reduced to the first gear. Natural air speed mode Air volume 3-5-7 gear air-speed in turn.
-
Page 9: Remote Control Introduction
Press Power button to turn the fan and heater off and unplug it from the mains outlet after use. Note: After the appliance has been switched off from heating mode, it automatically switches to blower mode and blows out a stream of air for approx 30 seconds to allow the heating element to cool down.The 30 second countdown timer is displayed on the LED screen. - Page 10 Display Operating mode Strong air speed moder The appliance switches to the highest level of ventilation mode. Sleep Mode Reduce the current gear by 1 gear every 15 minutes, and the minimum is reduced to the first gear. Natural air speed mode Air volume 3-5-7 gear air-speed in turn.
-
Page 11: Insert Batteries Into The Remote Control
2. Insert two new AAA 1.5V alkaline batteries align with polarity indicator markings (+/-) inside the battery compartment. 3. Reattach the battery cover, making sure the locking tabs click into place. WARNINGS: •... -
Page 12: Technical Specification
TECHNICAL SPECIFICATION Power Supply: ........AC 220-240V~ 50Hz Cool Power Consumption: ........28W Heating Power Consumption: ......2000W NOTE: As a result of continual improvements, the design and specifications of the product within may differ slightly to the unit illustrated on the packaging CARE AND CLEANING •... - Page 13 NOTES...
- Page 14 NOTES...
-
Page 15: Warranty Exclusions
AUSTRALIA & NEW ZEALAND Thank you for purchasing one of our quality Click products. Please keep your receipt as proof of purchase, as this will authenticate your warranty. Any claim under this warranty must be made within 1 year of the date of purchase of the product. - Page 16 Cat. No. : SKJ-CR063H July 2024...
Need help?
Do you have a question about the 0605594 and is the answer not in the manual?
Questions and answers